Admin Onboarding - Item Workspace Tabs
The default tab order is Description, Discussion, Subtasks, Child Items, Time Tracking, Forms, Assets, Github, Agent Sessions, Activity. Administrators can reorder or hide tabs per item type under Data Model → Workspace Tab Order (see Customizing the Item Drawer). Some tabs appear only when relevant: Forms when the type has custom fields outside the Sidebar group, Github when the integration is installed, and workstreams have no Subtasks, Time Tracking, Forms, Github, or Agent Sessions.
An item opens on Description, except that a link to a comment or a Service Desk ticket with an unread customer reply opens Discussion.
Description
A rich-text editor for what the item is and what done looks like. Formatting, mentions (@), item links (#), and emoji (:) are covered in Workspace Editor & Collaboration. Your edits are kept as a draft and saved when you close the item; if a save fails, the drawer stays open with your text. Descriptions and comments are limited to 100 KB including formatting.
Generate a description with AI
The round AI button in the lower-right corner of the description editor (Use AI templates to generate a description) opens Generate Description. It wears the same icon as the AI Assistant's button, but it is a separate feature: anyone who can edit the description sees it, whether or not your organization has switched the AI Assistant on.
- Pick a template under Select a description template, or write your own structure in Template (Supports markdown). The built-in Custom template scaffolds Objective, Description, and Acceptance Criteria.
- Optionally add instructions in AI Prompt (tone, audience, up to 400 characters).
- Click Generate Description. The AI uses the item's title and current description plus your template.
Saving templates for the team. Templates are organization-wide. Anyone with edit access can use them; saving, updating, or deleting them needs the Admin or Owner role. With your markdown in the Template field, click Save next to the template selector, give it a Label (up to 100 characters) and optional Description (200), and Save template. Select an existing one to Update, Save as new, or delete it.
Discussion
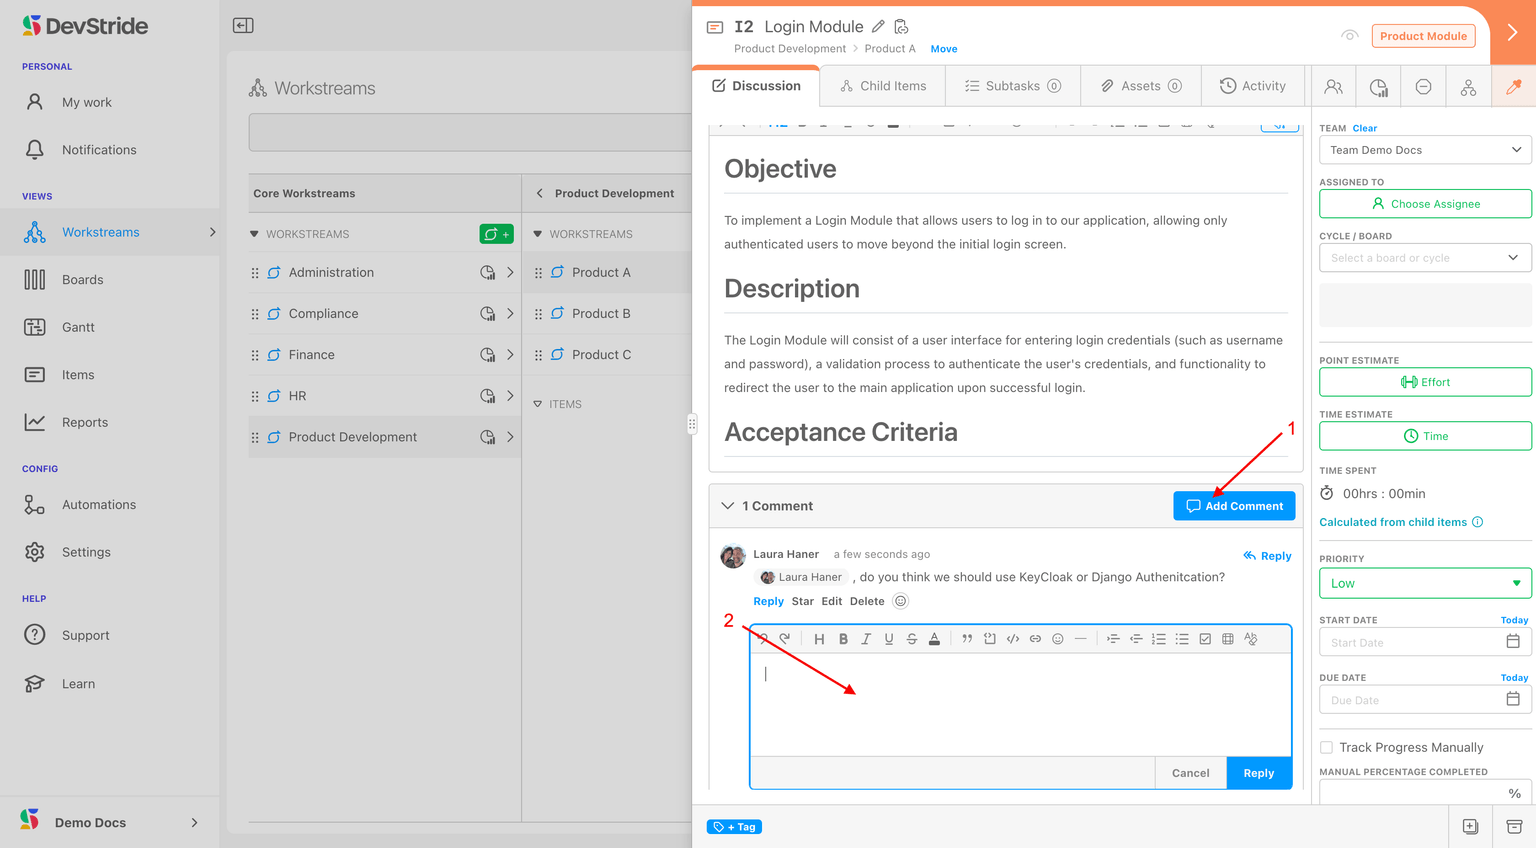
Comments on the item, oldest or newest first, with Add Comment. Comments notify watchers and support mentions. On Service Desk tickets this tab splits into Internal note and Reply to customer.
Subtasks
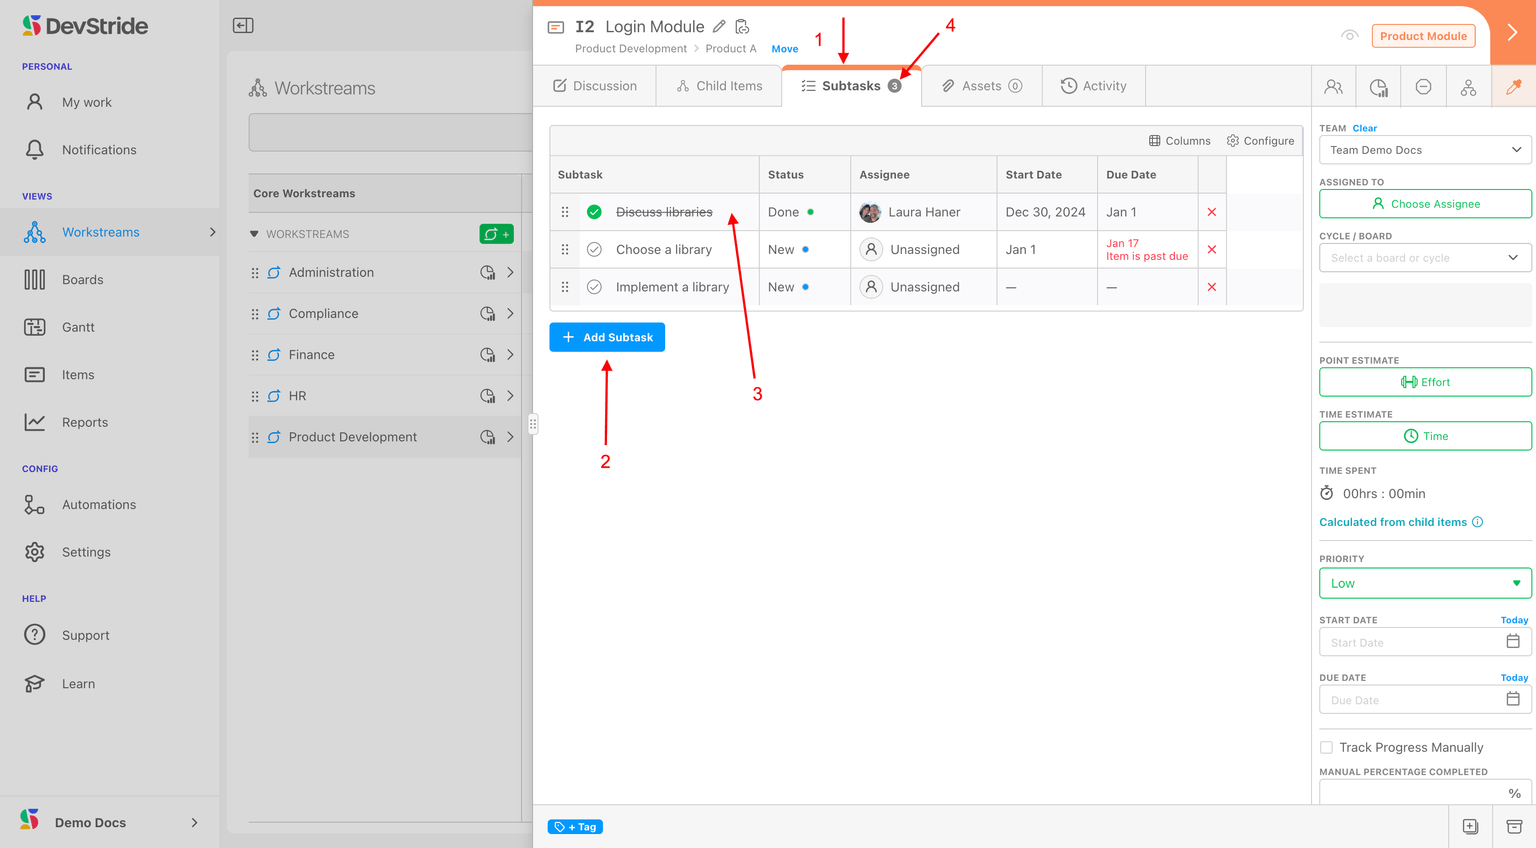
A lightweight checklist inside the item: Add Subtask (or press s), tick the check to complete one, assign and date each if you like. Subtasks are not items: they do not appear in the hierarchy or in most reports. An item with open subtasks is not considered done. Admins can add their own subtask statuses, such as Cancelled, and choose which count as finished; see Subtask Statuses.
The gear (Configure) on the subtasks table, available on bottom-level types only, offers Enable estimation on subtasks and Enable time spent on subtasks; when on, the item's estimate and time spent are calculated from its subtasks.
Child Items
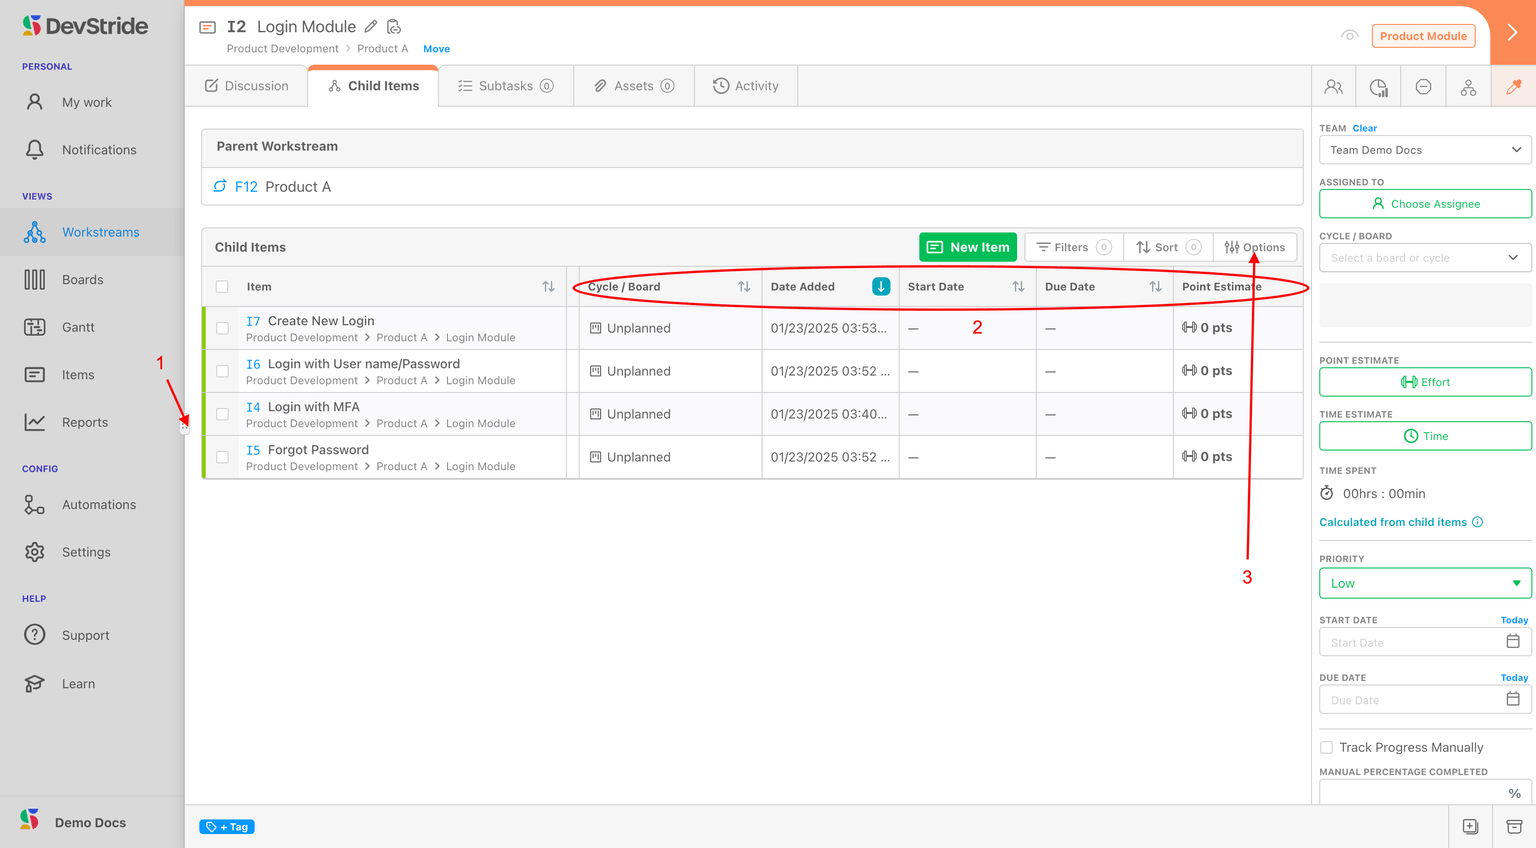
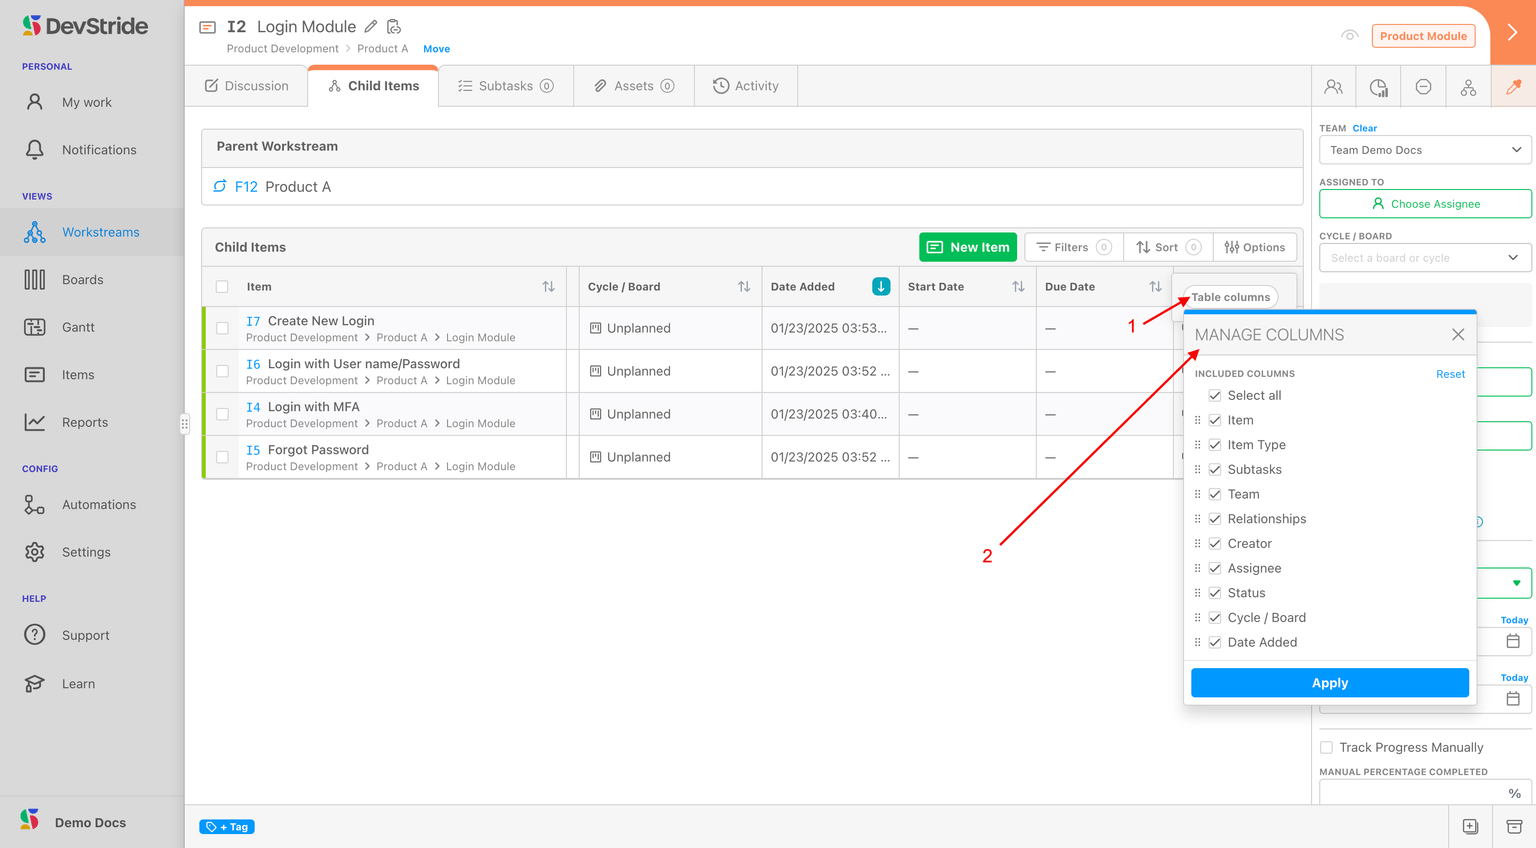
The item's place in the hierarchy: its parent above, its children in an editable table below. Use Filters, Sort, and Options → Table columns to shape the table; cells are editable in place, and dragging the grabber widens the drawer.
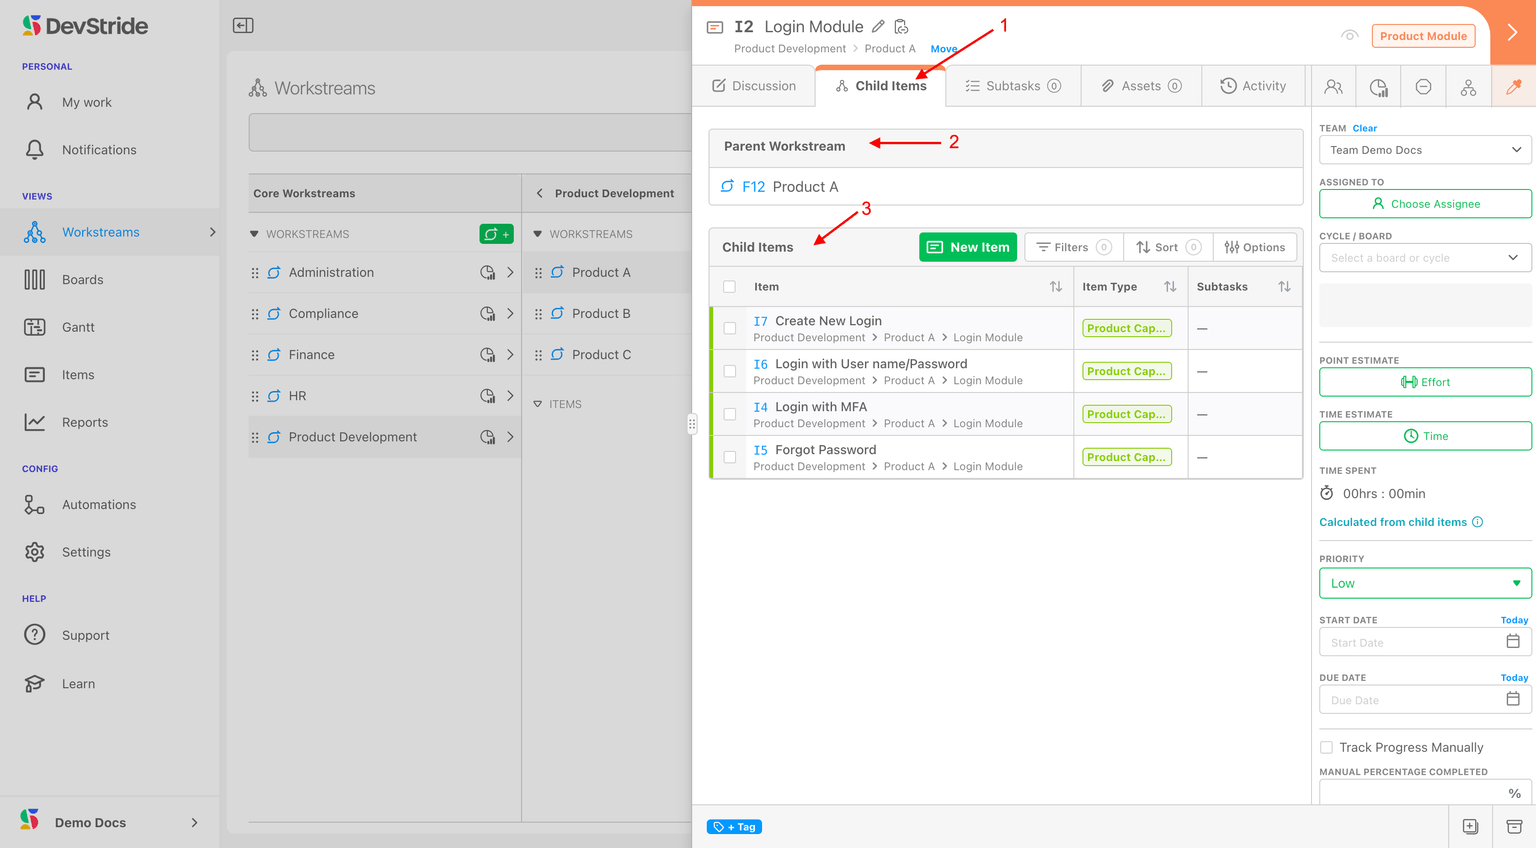
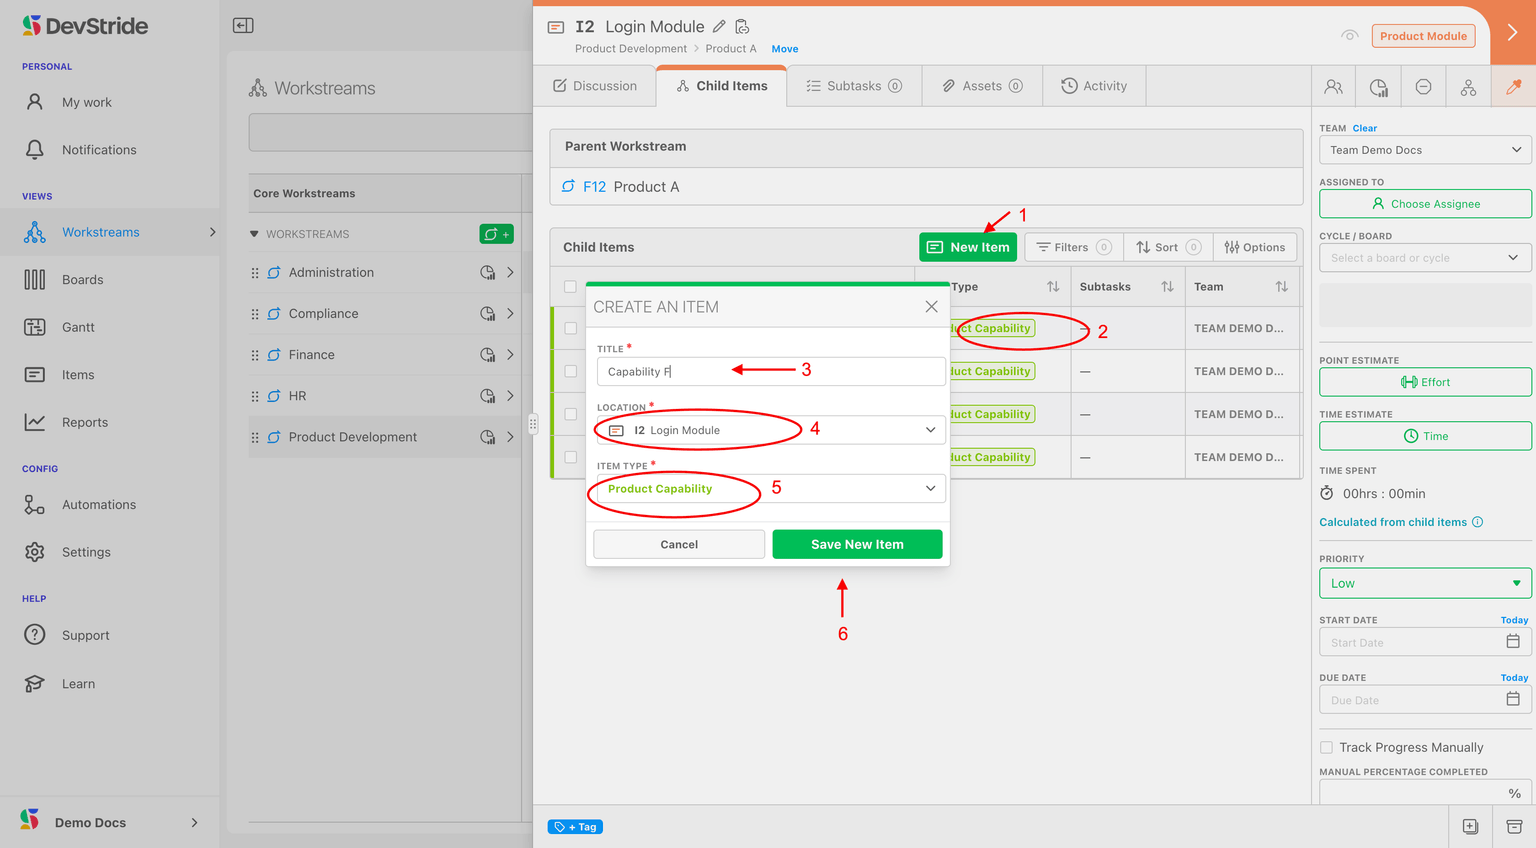
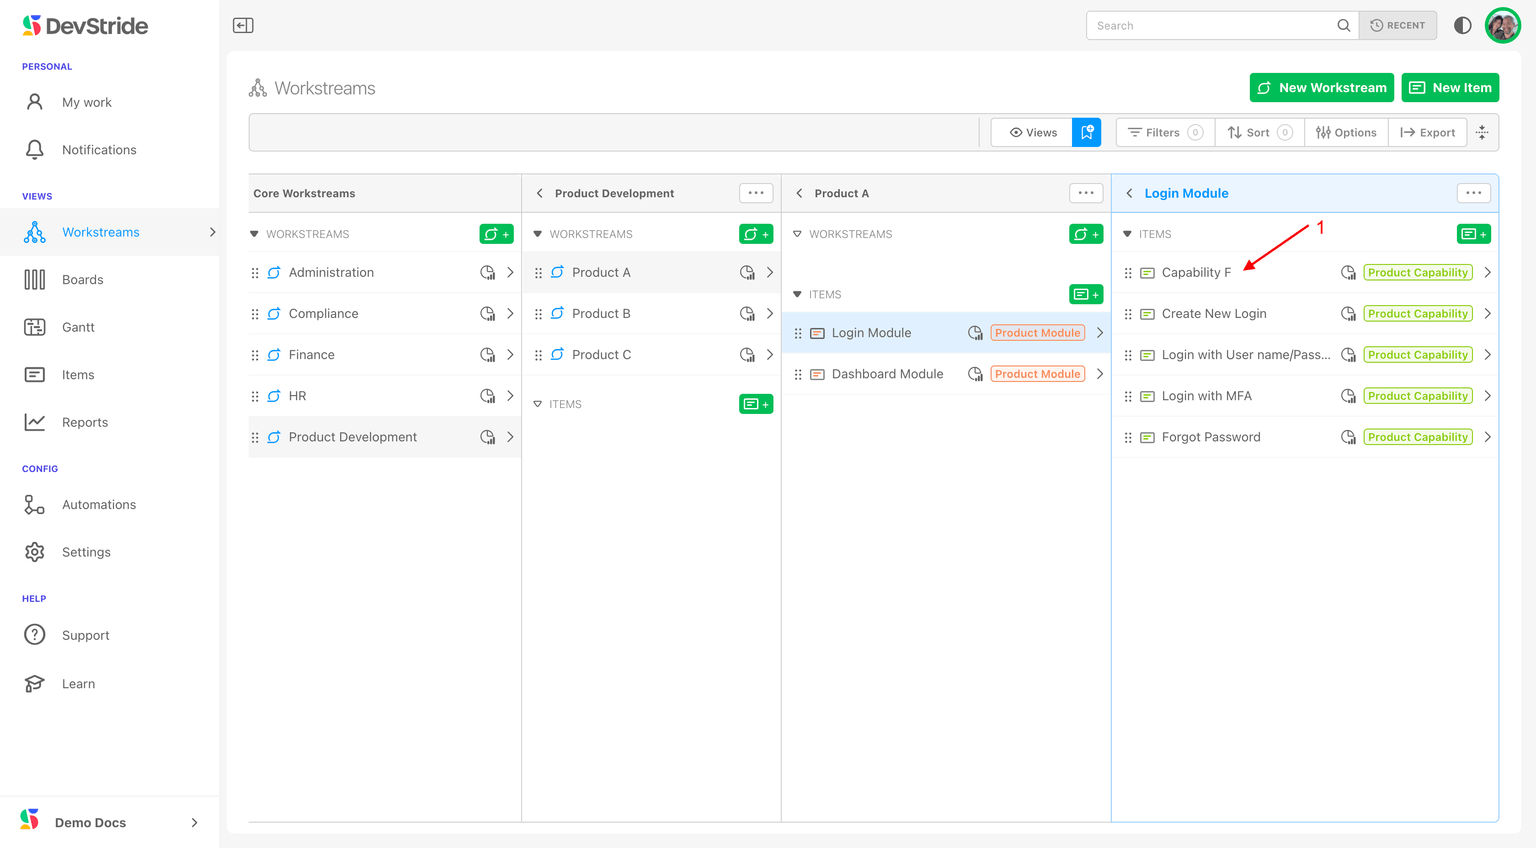
The green Item button adds a child; its dropdown offers Create Items with AI for several at once. In Create an Item, the location and type default to this item and the next type down, and View detail after creating opens the new child immediately. With Child items inherit their parent's sprint and team on in Global Automations, the child also starts on this item's board and team.
Export sends children to CSV: Selected items, Child items (direct children), or All items underneath. Filters still apply; the file lands under Measure Performance → Exports. Shown to members with reporting access.
Time Tracking
The item's time entries: Total Time Spent, New Entry, and the entries table. Covered in Time Spent. Disabled when time is calculated from subtasks.
Forms
Sections for the custom fields you placed in non-Sidebar form groups (a RICE scoring block, for example). Appears only when such fields exist for the item type. See Setting up Custom Fields.
Assets
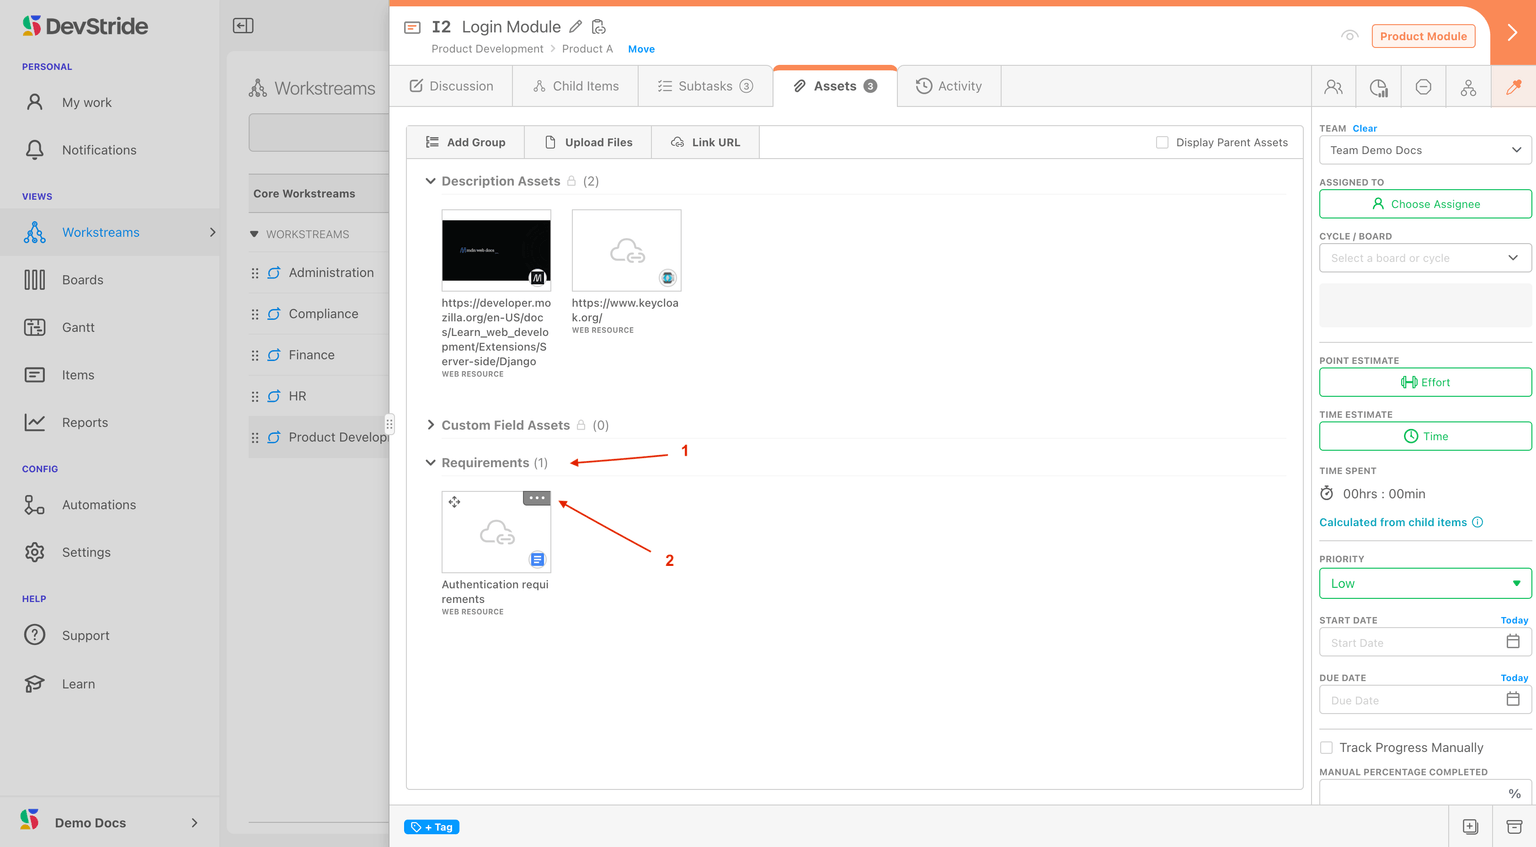
Links and files that belong with the item: Google Docs, Figma boards, spreadsheets, uploaded files. Prefer links to living documents over pasting content into the description; access rights on the linked document still apply.
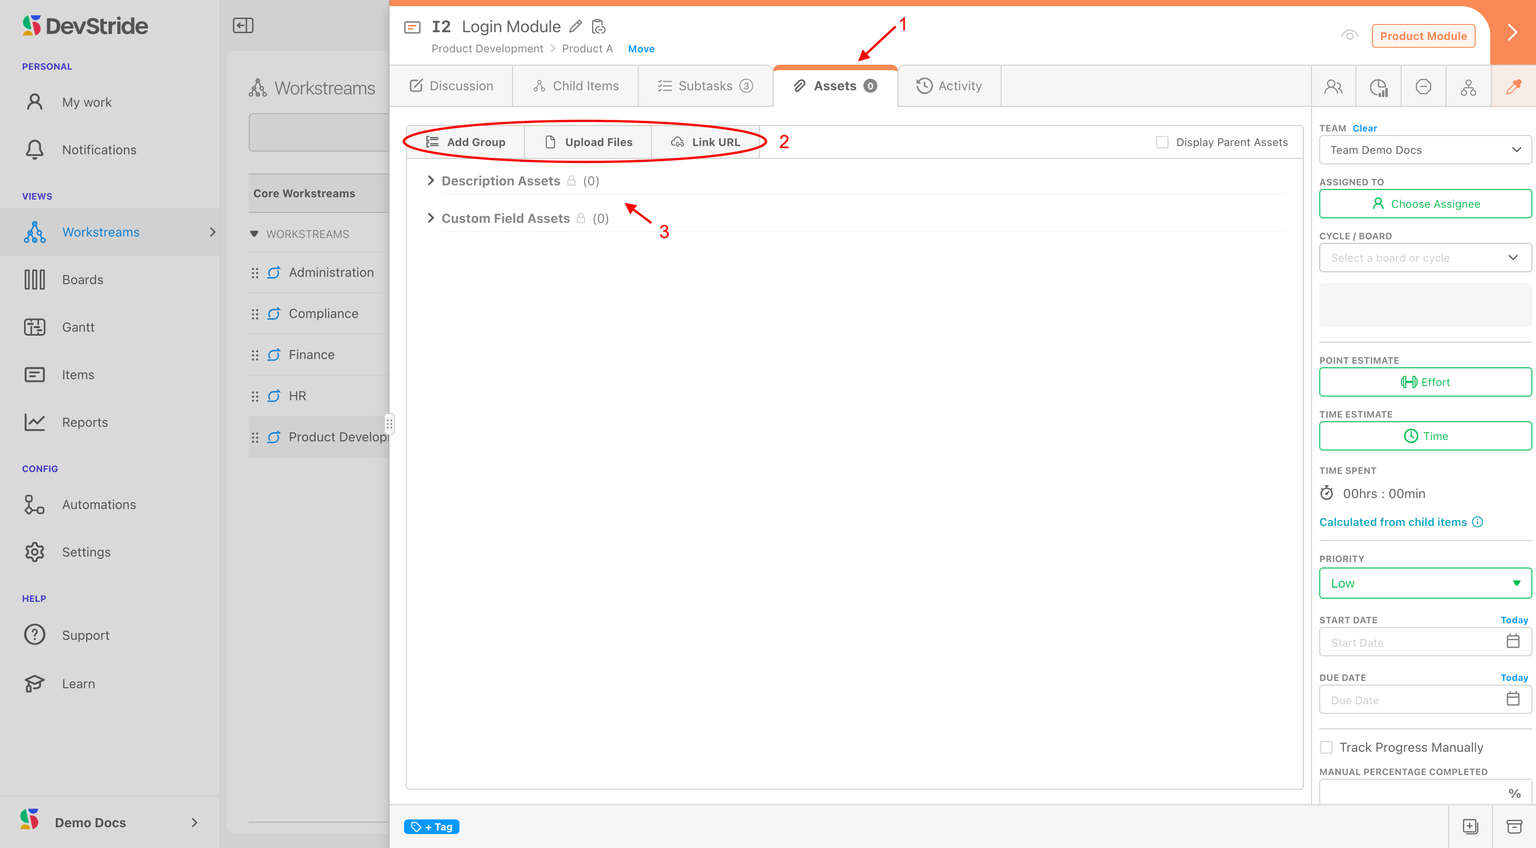
Buttons: Add Group (name a section), Upload Files (or drop files on the tab, or paste a screenshot), Link URL. In Add Link URL, choose New Group or Choose Existing Group, paste the Link (DevStride adds https:// and fetches the page title into Name, which you can override), and click Add Link. Files mentioned in the description and in custom fields appear automatically in their own groups. Display Parent Assets shows the parent's assets read-only.
Files keep their name. Click an image or a PDF and it opens in a new tab; save it from there and it keeps the name shown on its tile. Click any other file (a spreadsheet, a Word document) and it downloads under that name straight away, as Download in the tile's menu does. If someone renamed a file and left off its extension, the download adds it back.
Pasting a screenshot. Copy a screenshot, open the item's Assets tab and press ⌘V (Ctrl+V on Windows). The image is added to the General group, named for when you pasted it, for example Screenshot 2026-10-28 at 10.41.11 AM.png, so each paste is its own file. A paste into a text box or the description goes there instead.
Each file shows who added it and when, under its name on the tile; Get Info lists the same as Added By and the date added. Files that arrived by email read Email attachment, and images taken from the description read DevStride.
Versions. Uploading a file with the same name as one already in the group adds a new version of that file instead of a second tile. The tile stays in place, shows the newest upload, and carries a badge such as v2. Click the badge, or Versions in the tile's menu, to see every upload of the file, newest first, with who added it and when; open, download or Restore any earlier one. Restoring makes that upload current again and keeps the others. Deleting the file deletes all its versions. Only uploaded files stack: links, email attachments, images from the description and files copied with an item never do.
Github
Pull requests and branches linked to the item, when the GitHub integration is connected.
Agent Sessions
The AI agent sessions that worked on the item, newest first. Each entry shows the agent and model, who directed it and who it authenticated as, its intent, the branch and pull request, the files and tools it touched, the review engines and outcome, its timing, and how it ended. It is a summary, never a transcript. Only people who can read the item see the tab, and secrets and email addresses are scrubbed before anything is stored. Agents record sessions through the API and the MCP server.
Activity
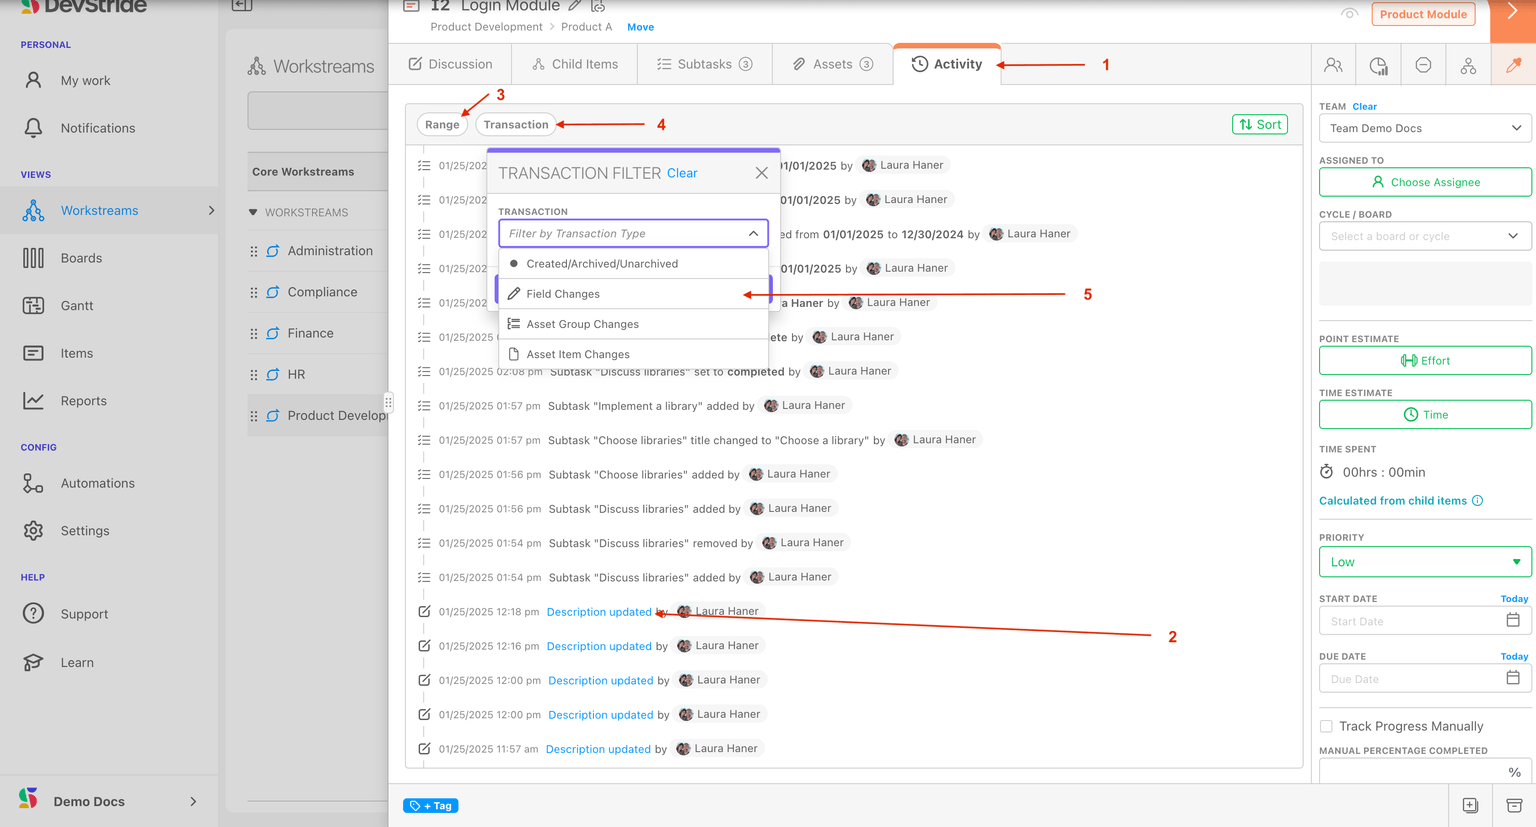
An immutable audit trail of every change, filterable by Range, Transaction type, and Sort. Use it to answer who changed what and when.
Correcting history. With the Backdate Item History permission and edit access, the date of a status or board change is clickable: pick the date and time it really happened, and the feed re-orders. Corrections of the created date, the creator or a change's date each add a line such as Status change re-dated, Created date changed or Creator changed, naming who made it. Entries recorded as history, by an import or a correction, carry a small Backdated tag; hover it to see when and by whom they were really recorded. See Correcting an item's real history.
A Description updated entry opens Description Changes: a Diff, the Before Edit text, and the After Edit text, each with Restore. Restoring writes a new current description (and a new activity entry); the log itself never changes. Requires edit access.
Next: Quick Links.
Admin Onboarding - Item Workspace Header
Step 7a of admin onboarding — open an item and read its header: completion icon, number, name, copy link, breadcrumb and Move, watchers, item type, and the footer actions (tags, duplicate, archive).
Item Workspace Quick Links
Step 7c of admin onboarding — the icon strip beside the item tabs: permissions and participants, the blocked flag, relationships and the dependency graph, Create Linked Item, and item colour.