Admin Onboarding - Item Workspace - Right Bar: Time Spent
Item Workspace Tour: Right Bar Features - Time Spent
DevStride uses the concept of "time spent" primarily for the purpose of creating ongoing predictability.
It is not intended to be a payroll or billing time-tracking system. However, you can choose to derive time spent information from DevStride in service of those needs. For more information on time spent for payroll or billing tracking, please reach out to your DevStride implementation team.
We will be focusing here on using DevStride's time spent capabilities as they relate to project performance and predictability.
Time spent in DevStride represents the sum of time spent on an individual task. This can be rolled up to modules, etc.
The goal of identifying time spent on a task or a group of tasks is not micromanagement. The main purpose of tracking time spent is to help size the work appropriately in future estimations. This increases overall predictability.
To that end, DevStride ties your time spent information (1) on each item to your estimate, and indicates whether the time was over or under the original guess (2).
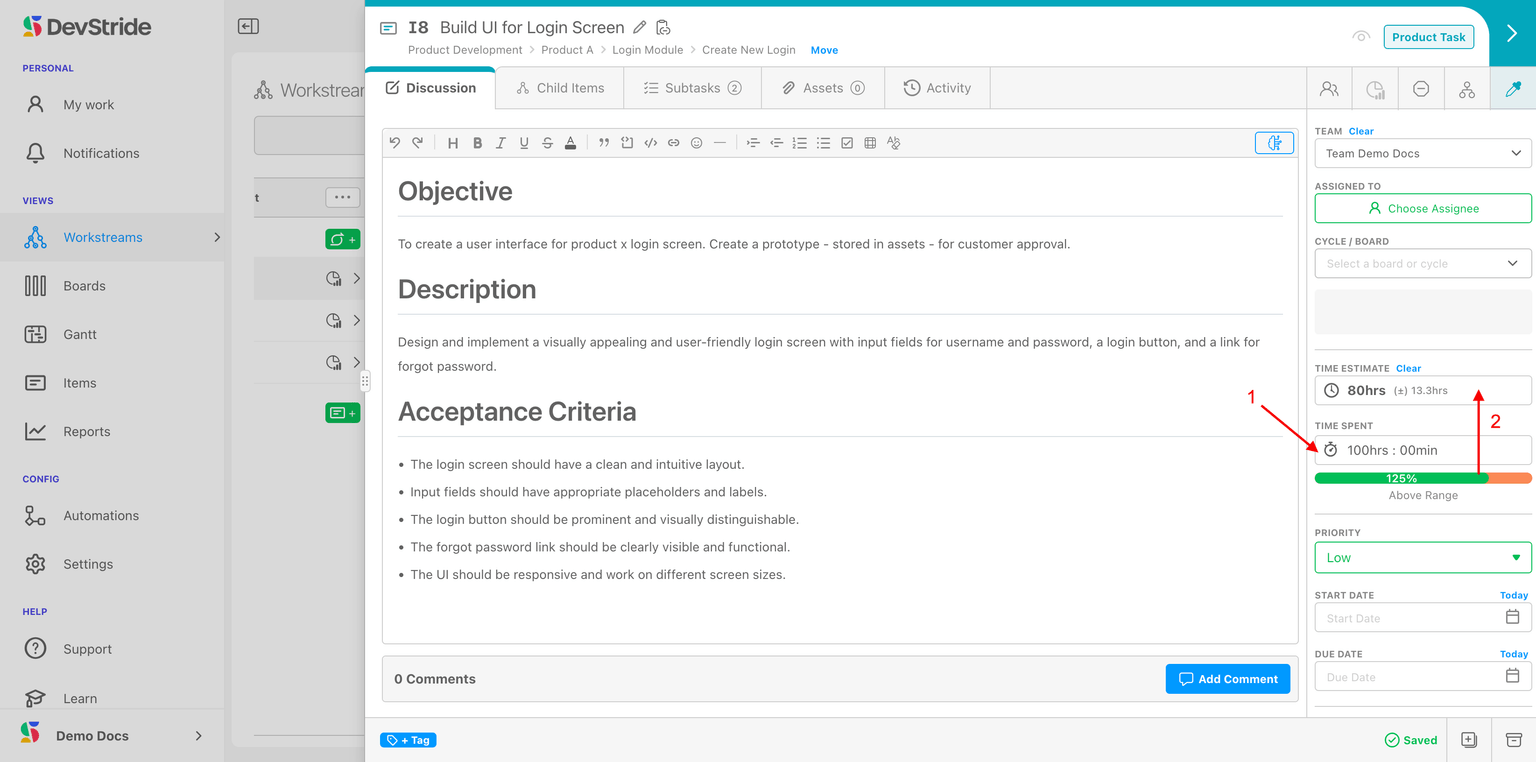
In DevStride, time can be logged on an item at any level of your hierarchy — a task, a story, an epic, or an objective. Every item keeps two separate, non-overlapping figures: its own logged time and the rolled-up total from its descendants. Wherever a total appears — the right bar, the Items Table, cards, analytics — it is the combined figure: the item's own time plus its descendants' time, with each logged hour counted exactly once.
At the parent level, DevStride indicates any actual time overage (1) compared to the estimate (2) as a percentage.
In the case of time spent overage, warning icons display on the item and throughout the system on workstreams, boards, and gantt charts. These icons link to an interactive completion stats pop-up (3).
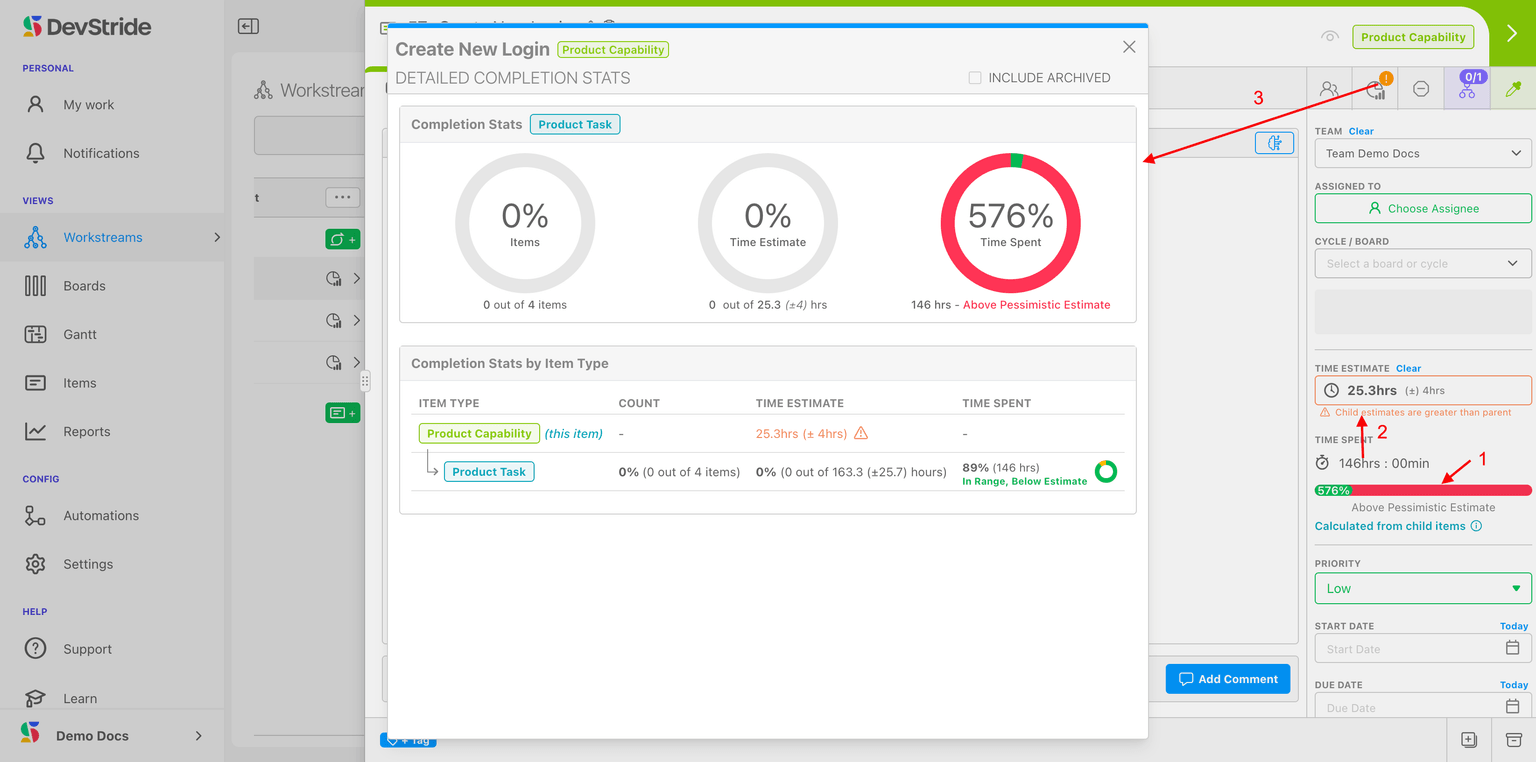
The time spent range indicator can provide real signal for the purposes of strengthening your team's project management capabilities.
Because every item's total combines its own logged time with everything rolled up from the items beneath it, it's possible to see the overall effort that is required to complete the work under a given parent item.
An indicator that shows a team's estimate of time is well-under or well-over actual time spent signals that the work required for an individual task—or for a group of tasks—is not well-understood.
For these occurrences, it's important for the team and/or its project leader to intervene on that type of item, in order to discover any potential underlying issue. This also helps future estimates be more accurate for project planning.
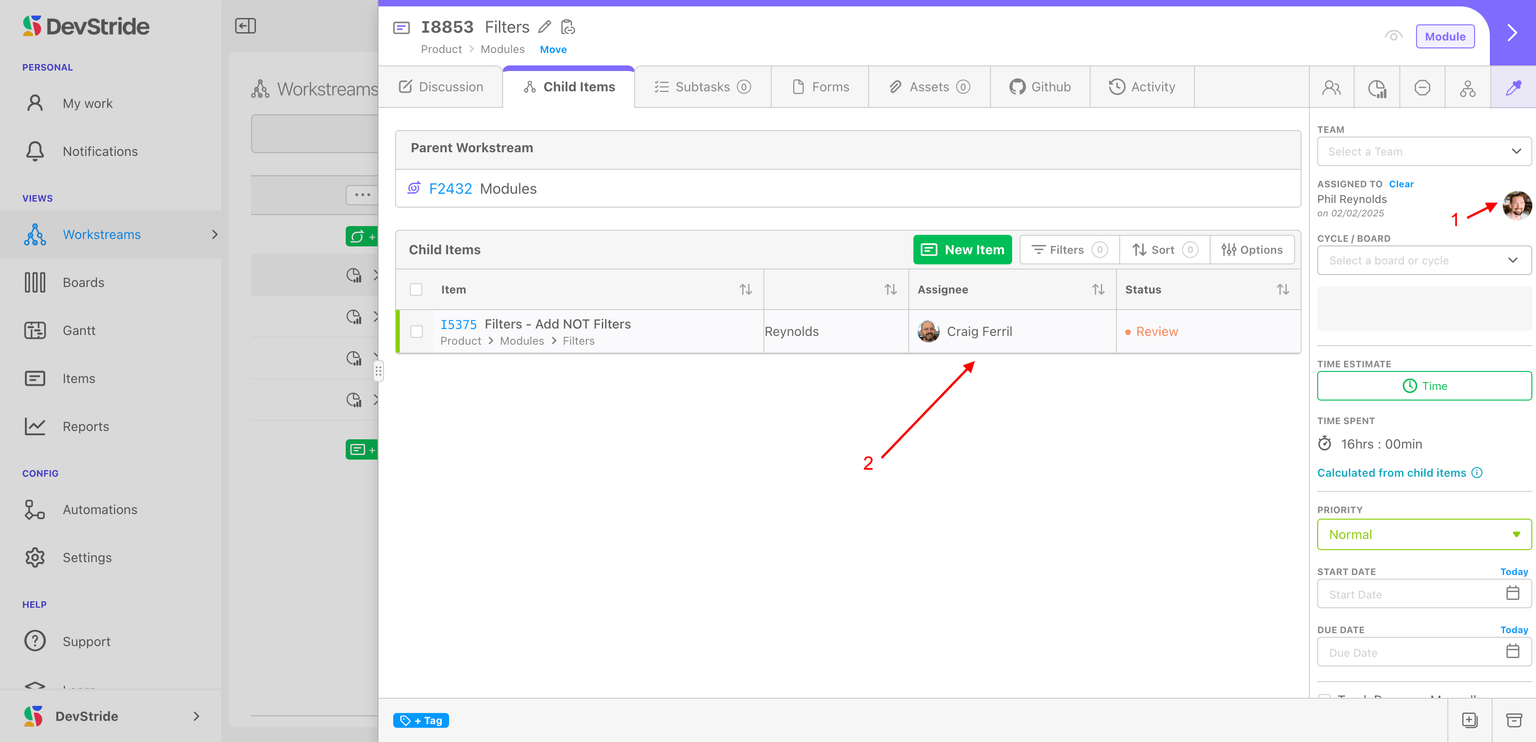
Note: While you can assign an owner at a parent-level item, only the time for the individual child tasks they are assigned to follow the parent-level owner. The assignee here is primarily used for understanding accountability for the parent level, as is often done with organizations using RACI (responsibility) charts. If the owner of the parent does hands-on work at the parent level — coordination, review, integration — that time can now be logged directly on the parent item itself, where it shows as the parent's own time alongside the rolled-up child totals.
In this example below, this parent item is assigned to someone responsible for the overall work. The owners of the tasks of the child items are listed below (2). The time for the child items belongs to assignees of those items.
Recording Time on an Item
The Time Spent field in the item's right bar shows the total time recorded against that item — its own logged time plus its descendants' — and it is editable on every item, at every level of the hierarchy (unless your organization has turned off parent-item time entries — see the note above):
- On any work item, click the Time Spent field to log time directly against that item.
- On a parent item, the field's caption breaks the total down — how much is the item's own logged time and how much rolled up from child items — so the two are never conflated.
- On an item that tracks time on its subtasks, the field is read-only and shows Calculated from subtasks.
Descendants' time still rolls up to parents automatically; logging time on the parent itself simply adds the parent's own share on top. When there is no time recorded yet, the field shows No time tracked.
Open the time-tracking view
For any item where you can record time, you have two ways to get to its time entries:
- Open the item drawer's Time Tracking tab.
- Click the Time Spent field (or the Time Spent cell in the Items Table) to open the Time Entries modal.
Both routes show the same information: a Total Time Spent: summary at the top, a New Entry button, and a table of individual entries. The table has columns for Time, Description, Start, End, Contributor, and Actions. Click a row, or use the edit and delete icons in the Actions column, to edit or remove an entry.
Every column except Actions — Time, Description, Start, End, and Contributor — is sortable by clicking its header. Long descriptions truncate with an ellipsis and show their full text on hover.
Add or edit a time entry
Click New Entry to open the entry form (titled Track Time), or open an existing entry to edit it (titled Edit Tracked Time). The form has these fields:
- Time Spent (HH:MM) — required. The duration you worked. See Entering durations below for the two ways you can type this.
- Date Ended — the date the work finished. Leave it on Any Date if you do not need a specific date. DevStride computes the entry's start date by subtracting the duration from the end date, so the start and end dates cannot be the same. The date picker places no restriction on future dates, so you can date an entry in the future — useful for logging planned work.
- Contributor — who the time belongs to. See Logging time for a teammate below.
- Description — an optional note about the work (placeholder Work Description).
Click Save to add a new entry or Update to apply your edits. Cancel discards the form.
Entering durations
The Time Spent (HH:MM) field accepts two input styles, and your choice is remembered for you between sessions:
- Natural (the default) — type the duration flexibly. You can enter
1h 30m,90 minutes, or2:45. A bare number is treated as hours, so1.5becomes 1 hour 30 minutes. The field shows the hint e.g. 1h 30m. - Ledger — fast numeric entry where digits fill in from the right. Typing
130fills to01:30. Minutes are capped at 59.
Use whichever style fits how you think about time; both produce the same HH:MM result.
Logging time for a teammate
The Contributor field controls who a time entry belongs to. It defaults to you, but you can pick any other member of your organization instead — that records the time on their behalf. You can also choose No User if the time should not be attributed to a specific person.
There is no separate "log on behalf" mode: choosing a different Contributor in the standard entry form is all it takes.
Time and Subtasks
DevStride can track estimates and time on sub-tasks as well.
How to do it:
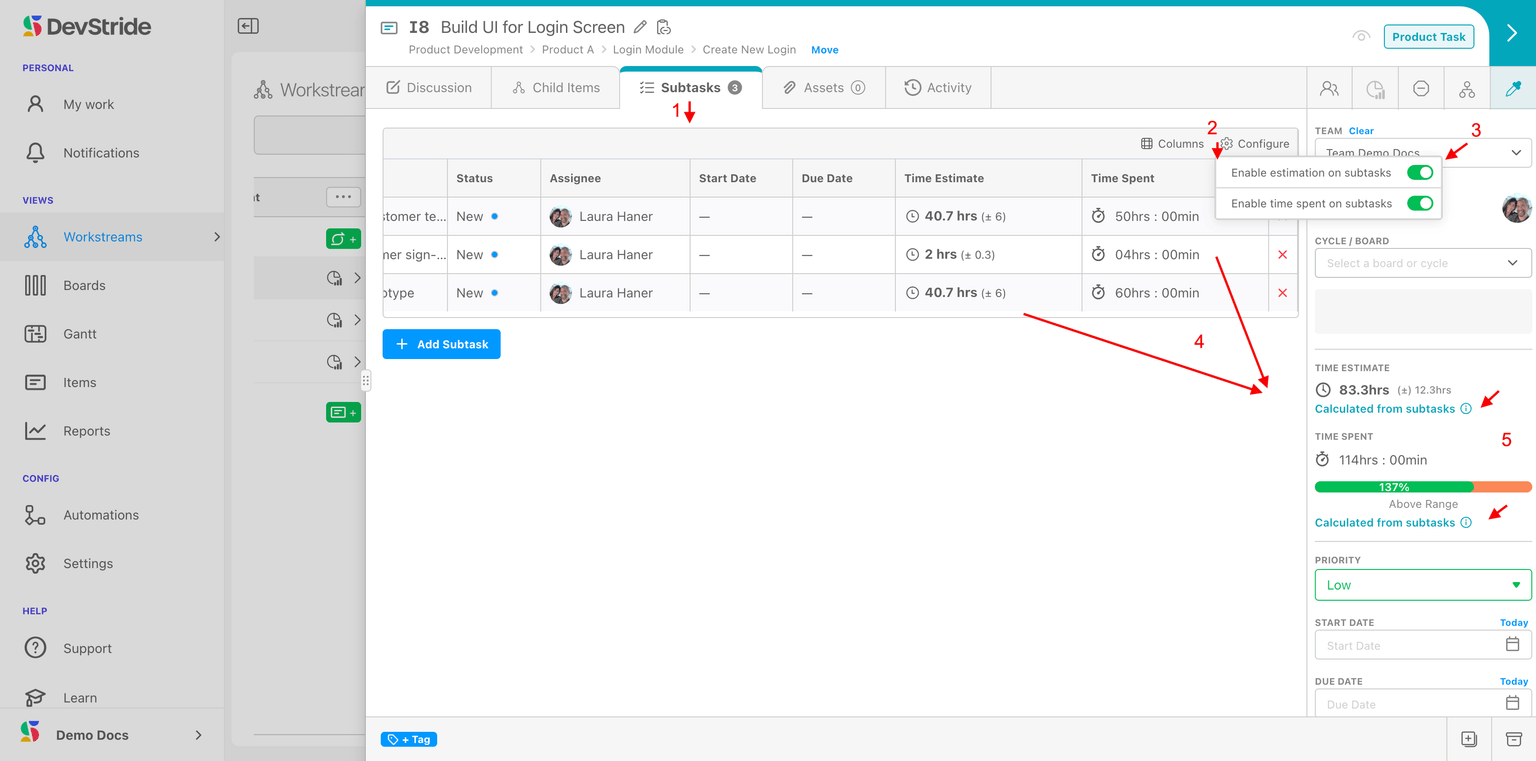
On the subtasks tab (1), use the configure icon (2) to enable the time estimation and/or tracking (3).
Subtasks' time and estimation updates (4) for this item will now roll up to the item totals(5).
What this gives you
Tracking time for subtasks is useful when the individual steps are substantial enough to want to track time on them. An example might be that a user story item might take several steps to complete. Tracking those subtasks and the time each take helps for both estimating the task and tracking its overall time.
As we mentioned above, you can choose to derive time spent information from DevStride for the purpose of certain basic billing needs.
Organizations that bill by time entries, such as attorney, can use DevStride subtasks to accomplish this goal.
You can build subtasks for each time entry and track billable time. In this way, some DevStride users take advantage of this method for rudimentary time tracking for engagements and client work.
Reviewing Time Across Users
To see recorded time across people and items, use the User Time Tracking report in Analytics. A Group By selector lets you organize the entries in one of three ways:
- Date (the default) — one section per date.
- Item — one section per item, with matching subtasks nested underneath.
- None — a flat list of items.
Subtask time is always shown separately, in its own Subtasks sections with their own subtotals, because it comes from a distinct data source. Your Group By choice is remembered between sessions.
Tracking Overdue Dates
If you use a custom field of type Date or DateTime, an organization admin can turn on a Track overdue toggle for that field in Settings > Data Model > Custom Fields (it appears below the field's Description, and only for Date/DateTime fields). This toggle is off by default.
When it is on, a past-due date value shows in red with an (Overdue) label in the Items Table. Overdue styling only applies to top-level work items that are not yet completed; it does not apply to subtasks or workstreams. This is useful for surfacing missed dates without affecting purely informational date fields.
Now, continue to tour the features on the right bar of the item workspace:
Best Practices for Time Estimates
For spreadsheet-style weekly time entry in the Weekly Logs plugin (under Plugins in the app menu), see Weekly Logs.