Setting up and Using Perpetual Boards
What a perpetual board is
A perpetual board has no start or end date. Work arrives, moves across the board's statuses and leaves; the board itself never "ends". Use one for anything that flows rather than being committed to a period:
- a team backlog that feeds sprint cycles
- a support or trouble-ticket queue
- an operations or maintenance to-do list
- a marketing content pipeline
Items on it can still carry due dates — the board just doesn't impose any. For period-based work, use cycle boards instead; the two kinds sit side by side in the same folder under the headers Perpetual Boards and Cycle Boards.
Create a perpetual board
Step 1: Open the folder
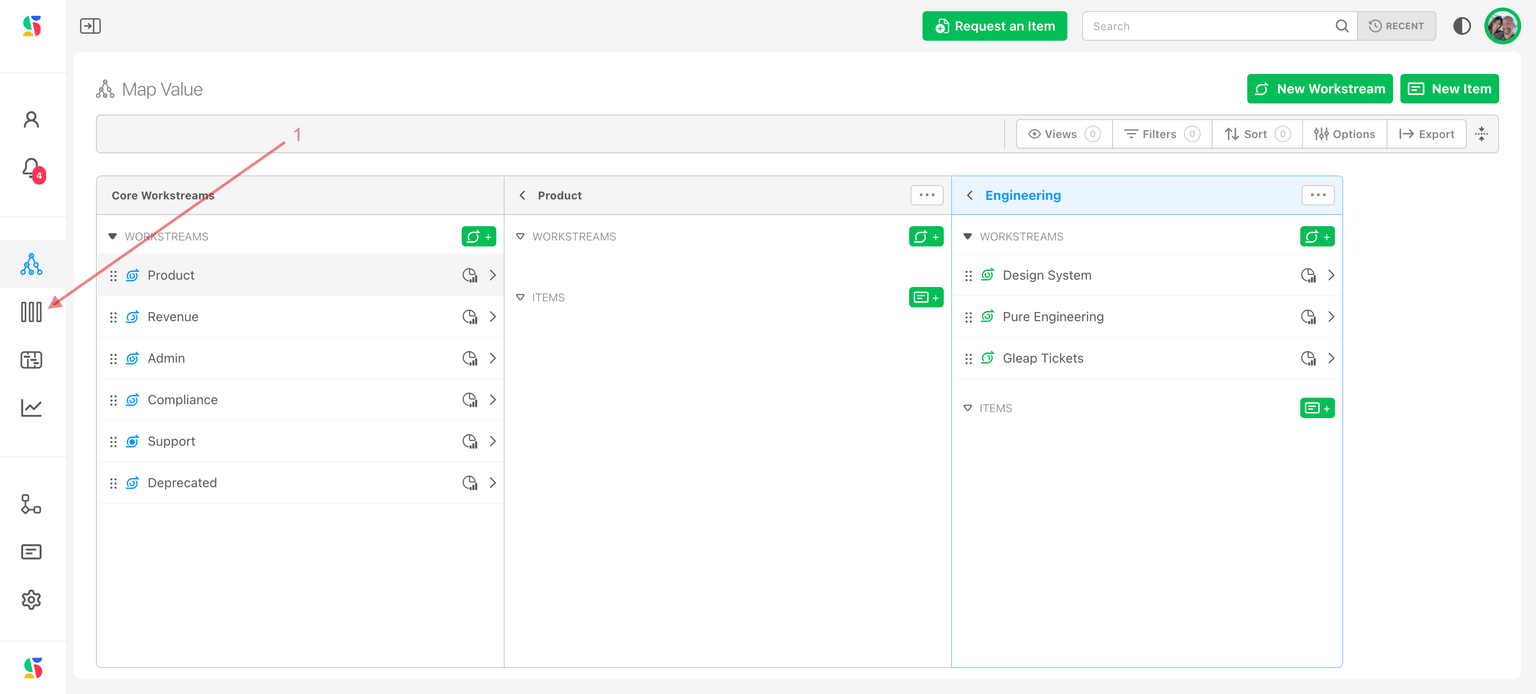
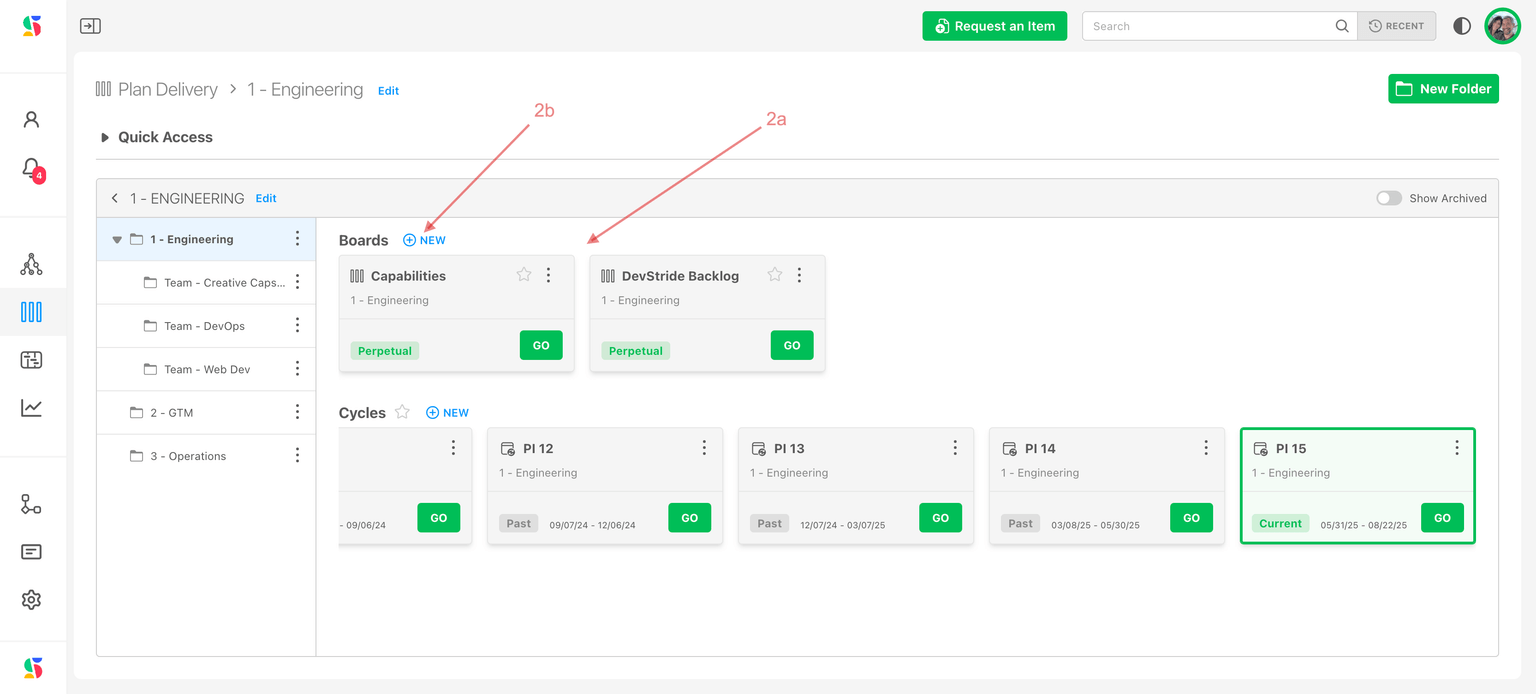
Click Plan Delivery in the left navigation (1), then select the working group folder that should own the board (2a). If the folder does not exist yet, create it first with Can contain boards turned on.
Step 2: Click New under Perpetual Boards
Under the Perpetual Boards header, click New (2b).
Step 3: Fill in the New Board dialog
| Field | What to enter |
|---|---|
| Name | Required, at least 3 characters — Customer Support Queue, Platform Backlog. |
| Parent Folder | Pre-filled with the folder you were in. Pick another to create the board elsewhere. |
| Description | Optional. |
| Status Collection | Required. The set of statuses that become the board's columns. Collections are defined in Configure Settings → Data Model → Item Statuses; see Item Statuses. |
| Default Team | Optional. Pre-fills the Team field when you create an item while viewing this board. |
The dialog reminds you that Boards inherit permissions from the parent folder. Click Create board. The empty board opens.
You can change any of these later from the board's Edit link (next to the breadcrumb) or the card's kebab menu. Changing the Status Collection moves any item whose status is not in the new collection to the new collection's first status; matching statuses are kept. Changing Parent Folder moves the board.
Step 4: Add items
A board shows items that are assigned to it. An item can be on only one board at a time, so adding it here moves it off any other board. Three ways:
- Import existing work. Click Import at the top right, browse or search your workstreams, select items and click Import Items. Full walkthrough: Import stories and epics into boards.
- Create new work on the board. Click Item (shortcut
i), give it a Title, a Location in your workstreams and an Item Type, and click Save New. The item is created in Map Value and placed on this board, in its first status, with the board's Default Team. - Assign from the item. In any item's drawer, set the Cycle / Board field. From Manage Items, My Work or a table, select several items and use Edit → Cycle/Board.
Use the board
Open the board from its card's GO button, or from the Cycle / Board field of any item on it.
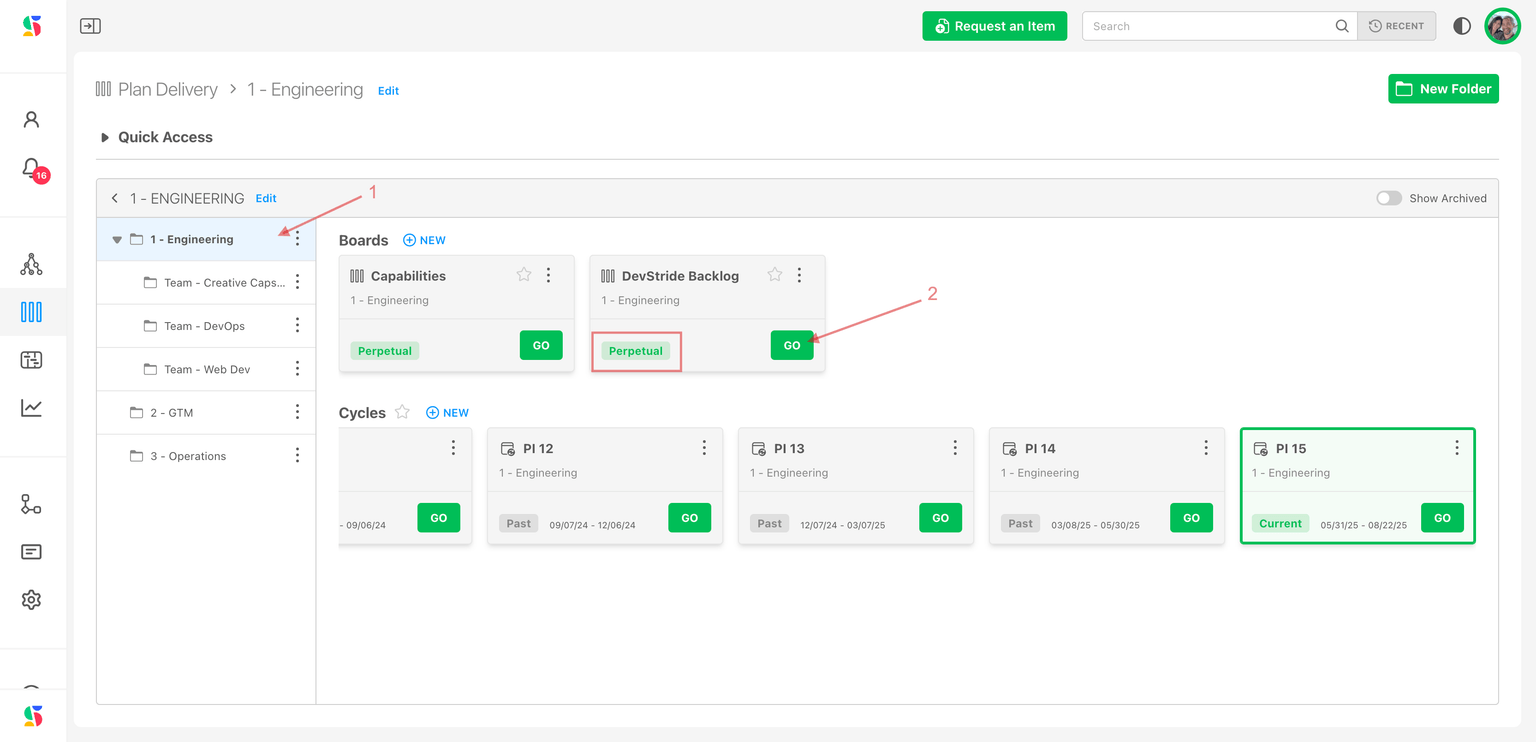
Cards show a green Perpetual badge; cycle cards show Past, Current or Future with their dates, so the two are easy to tell apart.
Card view — run the work
Click the Card view icon (1).
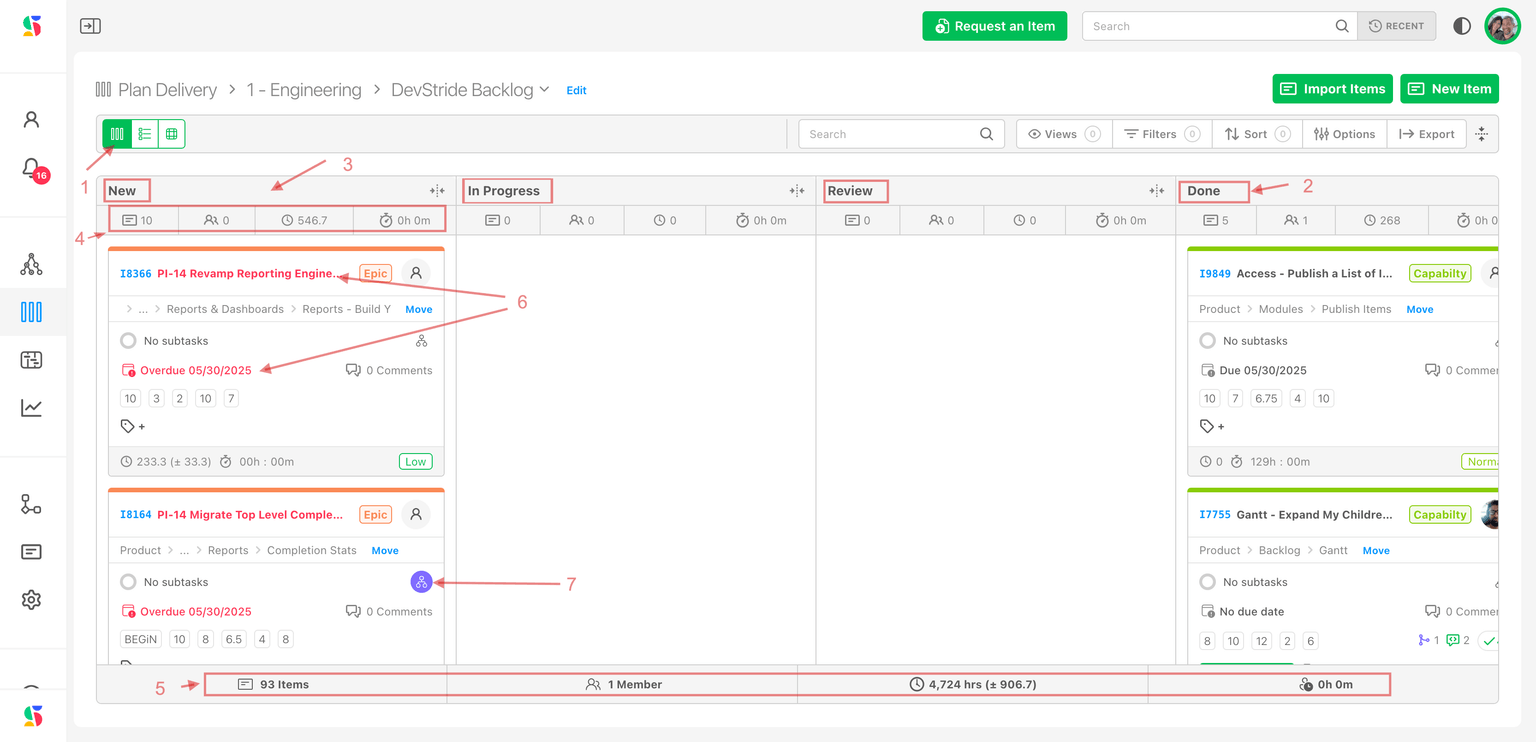
- Items sit in the column of their status (2). Columns come from the board's status collection.
- Drag a card to another column to change its status (3). Status changes made anywhere else — the item drawer, Manage Items, the Gantt, an automation — move the card too.
- Each column header shows item, assignee, time estimate, points and time spent subtotals (4).
- Overdue items show their title and due date in red (5).
- Cards with dependencies, dependents or related items show a purple relationship icon (6); click it to manage them.
- The Board Totals footer sums the board (7). Click any total for an itemized breakdown.
- Over a WIP limit, a column turns red and shows a WIP LIMIT (n) pill. See Boards and WIP limiters.
Table view — plan and rank
Click the Table view icon (1).
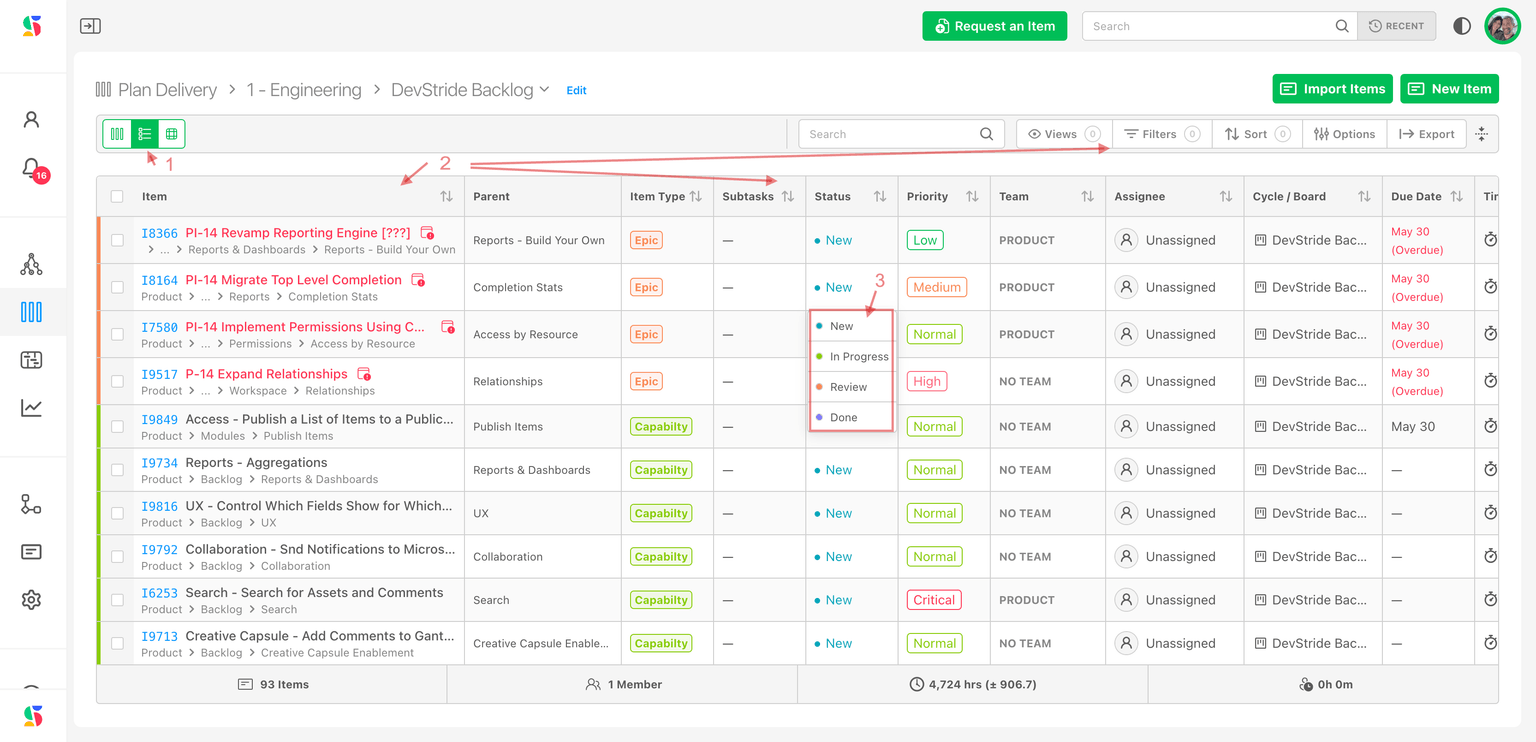
Columns are sortable and resizable (2); most cells edit in place, and you can move through rows with the keyboard like a spreadsheet (3). Under the default sort, drag rows up and down to set the board's rank — the order everyone sees. Select several rows for the bulk Edit menu.
2D view — balance and risk
Click the 2D view icon (1).
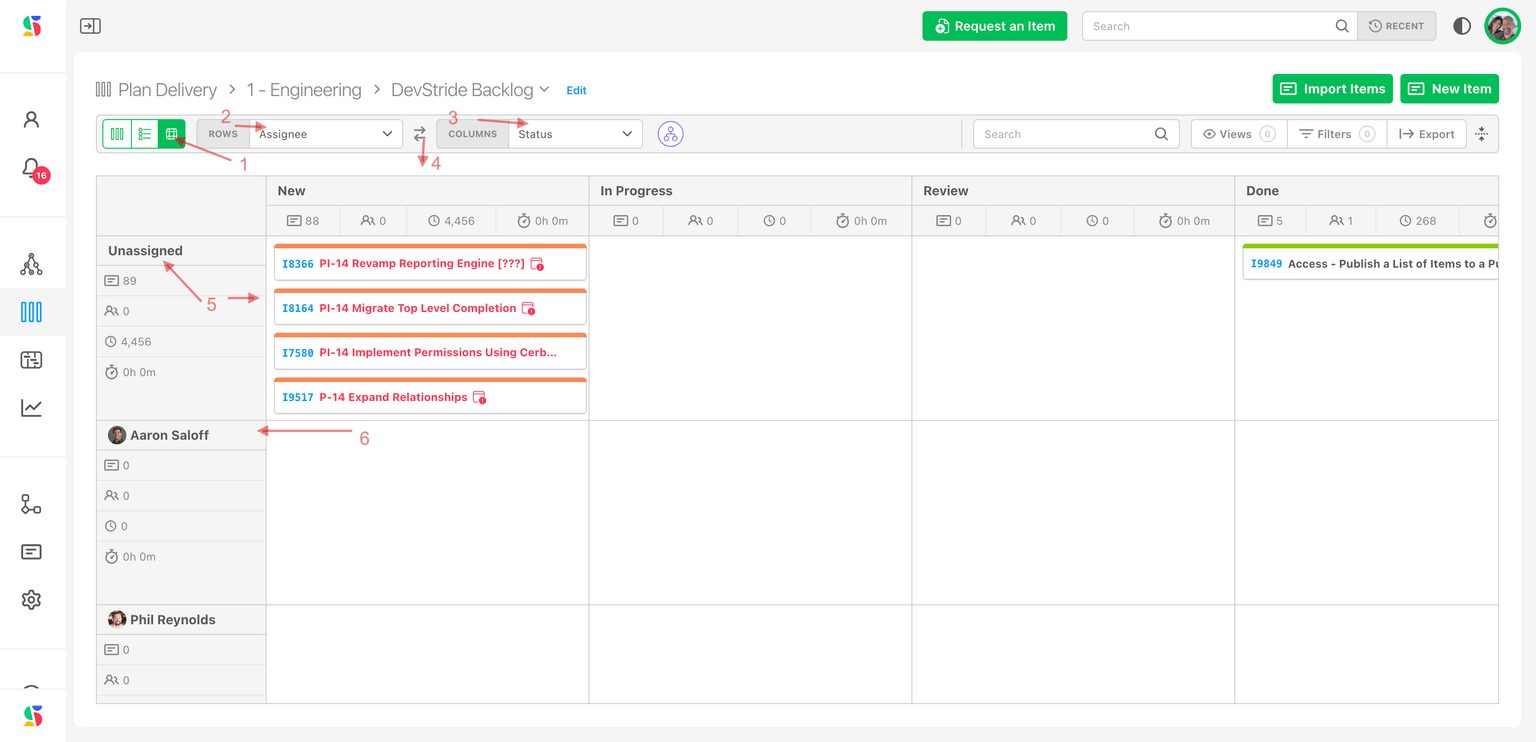
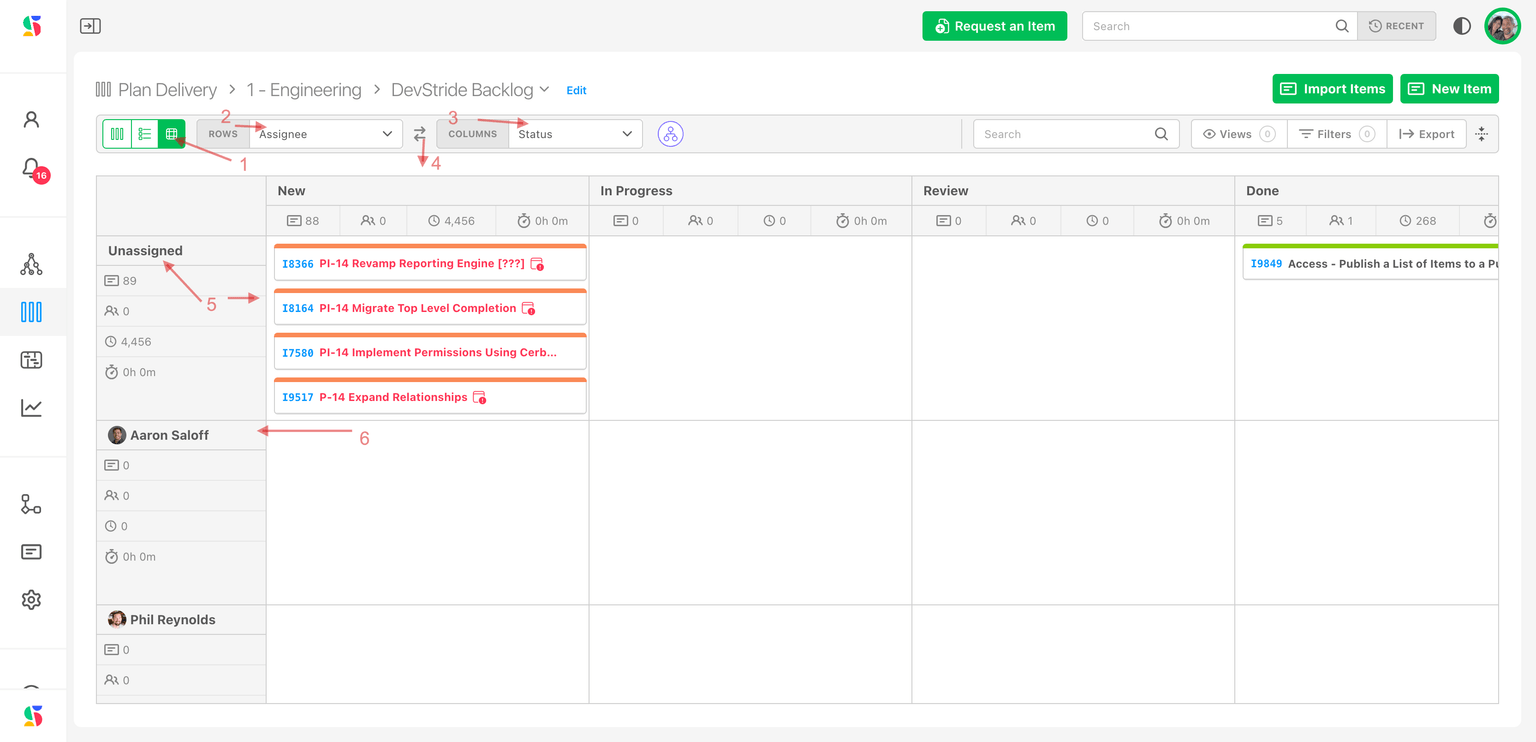
Choose a field for the Rows (2) and Columns (3) — Status, Assignee, Priority, Color, Persona, Item Type, Parent or a single-select custom field. The default is Assignee rows by Status columns; the swap icon (4) exchanges the axes. Items with no assignee appear in the No person row (5); drag a card into another row to assign it, or into another column to change its status. Overdue items stay red here too.
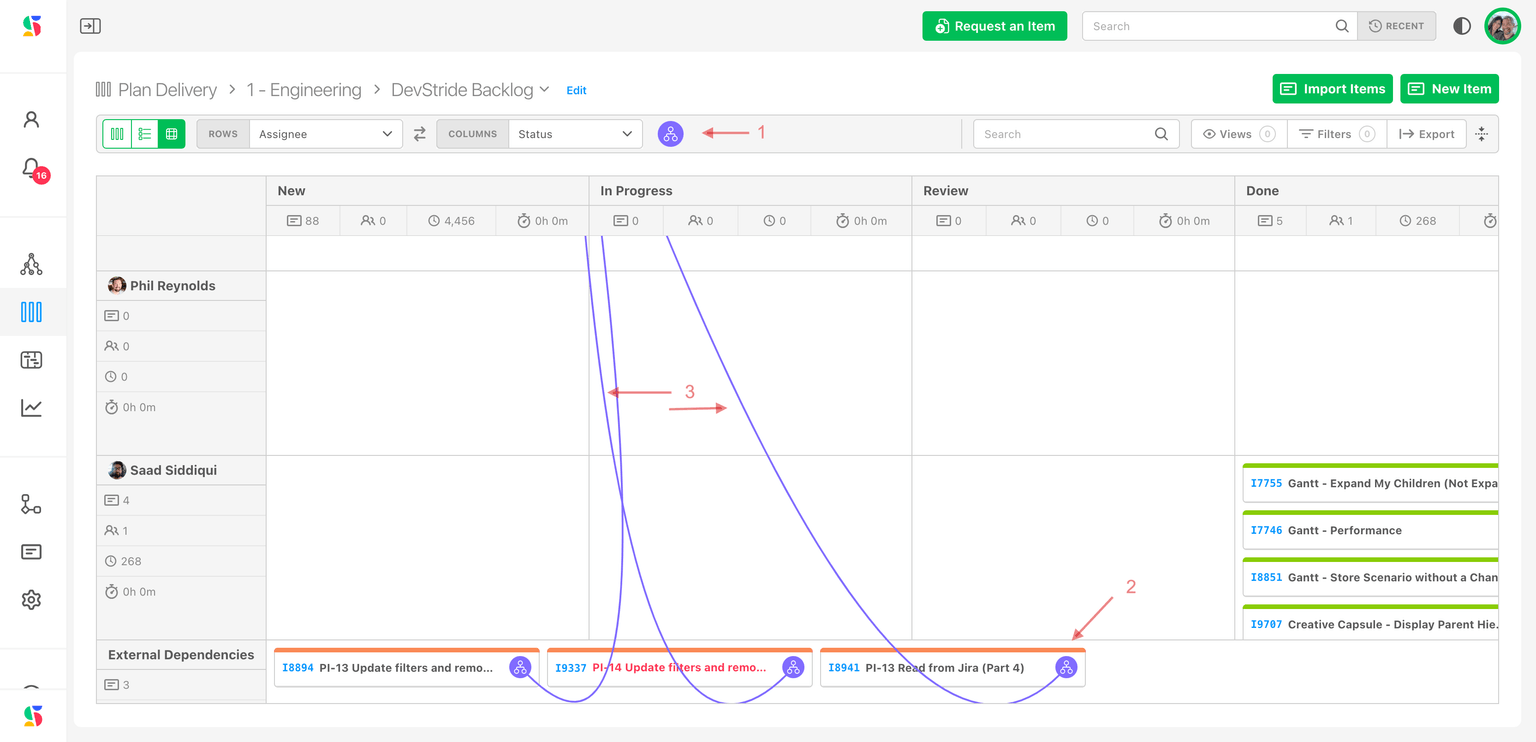
Dependency lines are drawn between related cards (1). An External Dependencies row collects items that are not on this board but block or relate to ones that are (2), so an upstream problem in another team's work is visible on yours (3).
Filter, save views, export
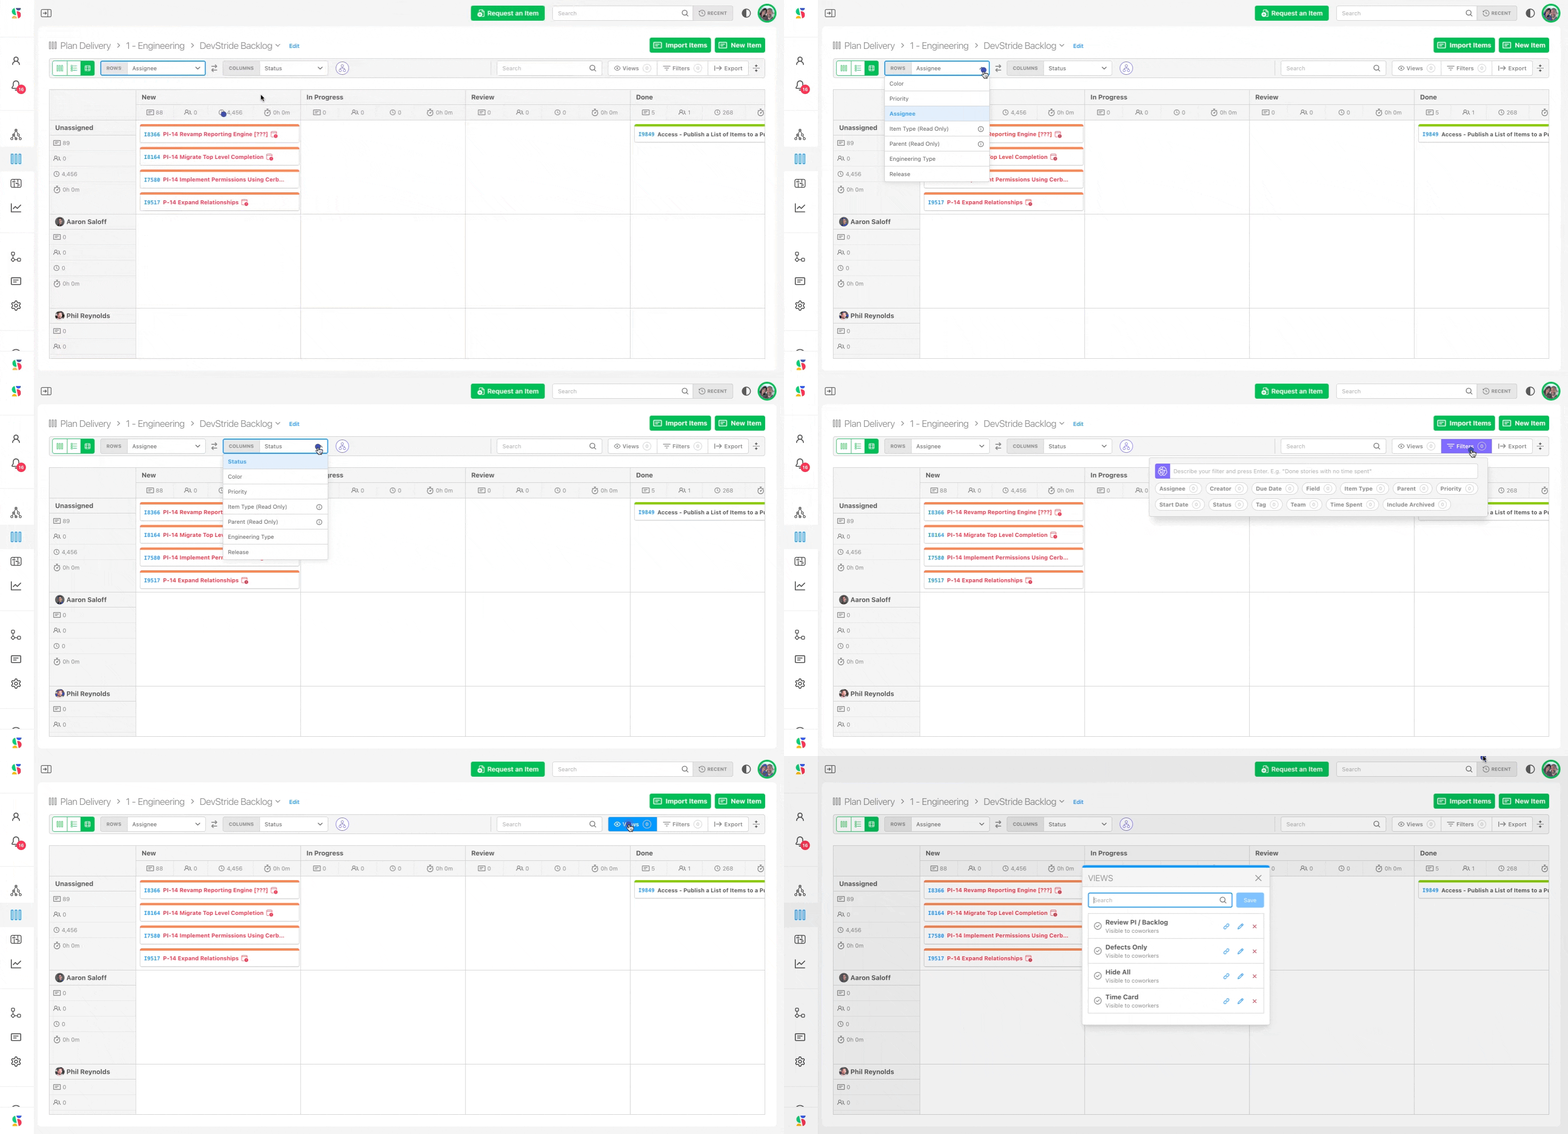
The control ribbon works the same in all three views: Find, Views (save and share a set of filters and layout), Filters, Options (hidden card fields, table toggles, Include Archived) and Export to CSV. Details in Track and move work with board views.
Keep the board clean
Done items stay in the Done column until something moves them. Options:
- Move them by hand to another board, or clear their board from the Cycle / Board field.
- Automate it. The Item Stays Done on Board trigger fires after an item has sat in Done on a chosen board for a set time, and can move it to another board or take it off this one. Step by step: remove completed work after a delay.
Archiving a board
When a queue is retired, open the card's kebab menu and choose Archive (you need Owner access to the board, or an admin role). The Archive Board dialog asks what to do with the items:
- Remove their board — items stay in their workstreams with no board.
- Move to another board — pick a board to send them to.
The board disappears from the folder (turn on Show Archived to see it). Items never remain on an archived board; to remove the archived board for good, see permanently deleting an archived board or folder.
Unarchiving a board
Changed your mind? Turn on Show Archived, open the archived board's kebab menu and choose Unarchive. It needs the same access as archiving. The board comes back empty: the items it had when it was archived keep the board they were given then, so move back the ones you want. A board inside an archived folder cannot be unarchived on its own; the menu says This board is in an archived folder. Unarchive the folder first.
Boards and folders synced from Azure DevOps or Jira
A board, sprint or folder that an Azure DevOps or Jira import created belongs to that system, so its menu offers only Archive, or Unarchive once it is archived; editing, moving, permissions and permanent deletion stay in the other tool. Archiving a synced board asks no question about its items: they leave the board, the other system still decides which sprint each belongs to, and while the board is archived it takes no new items from the sync. Archiving a synced folder puts away every sprint inside it the same way. Unarchive the board or folder and the next sync places items on it again.
Tips
| Practice | Why |
|---|---|
| Set WIP limits on the in-progress statuses | A red column is the earliest warning that the team is overloaded. |
| Rank the backlog in Table view before planning | Rank is shared by everyone; sort is only yours. |
| Save a View per audience | A "stakeholder" view with hidden fields and a priority filter is one click for the next meeting. |
| Let an automation clear Done | Keeps the board honest without a weekly tidy-up. |
Creating Subfolders in DevStride
Nest a working group under another in Plan Delivery, so a program can see every team's boards while each team sees its own.
Using Cycle Boards
Set up a folder on a cadence so DevStride generates a cycle board per sprint, PI or month; plan work into a cycle, run it, and move unfinished work forward.