Admin Onboarding - Item Workspace Tabs
- 20 Feb 2025
- 5 Minutes to read
- Contributors

- Print
- DarkLight
Admin Onboarding - Item Workspace Tabs
- Updated on 20 Feb 2025
- 5 Minutes to read
- Contributors
- Print
- DarkLight
Article summary
Did you find this summary helpful?
Thank you for your feedback!
Item Workspace Tour: Tab Features
Discussion Tab
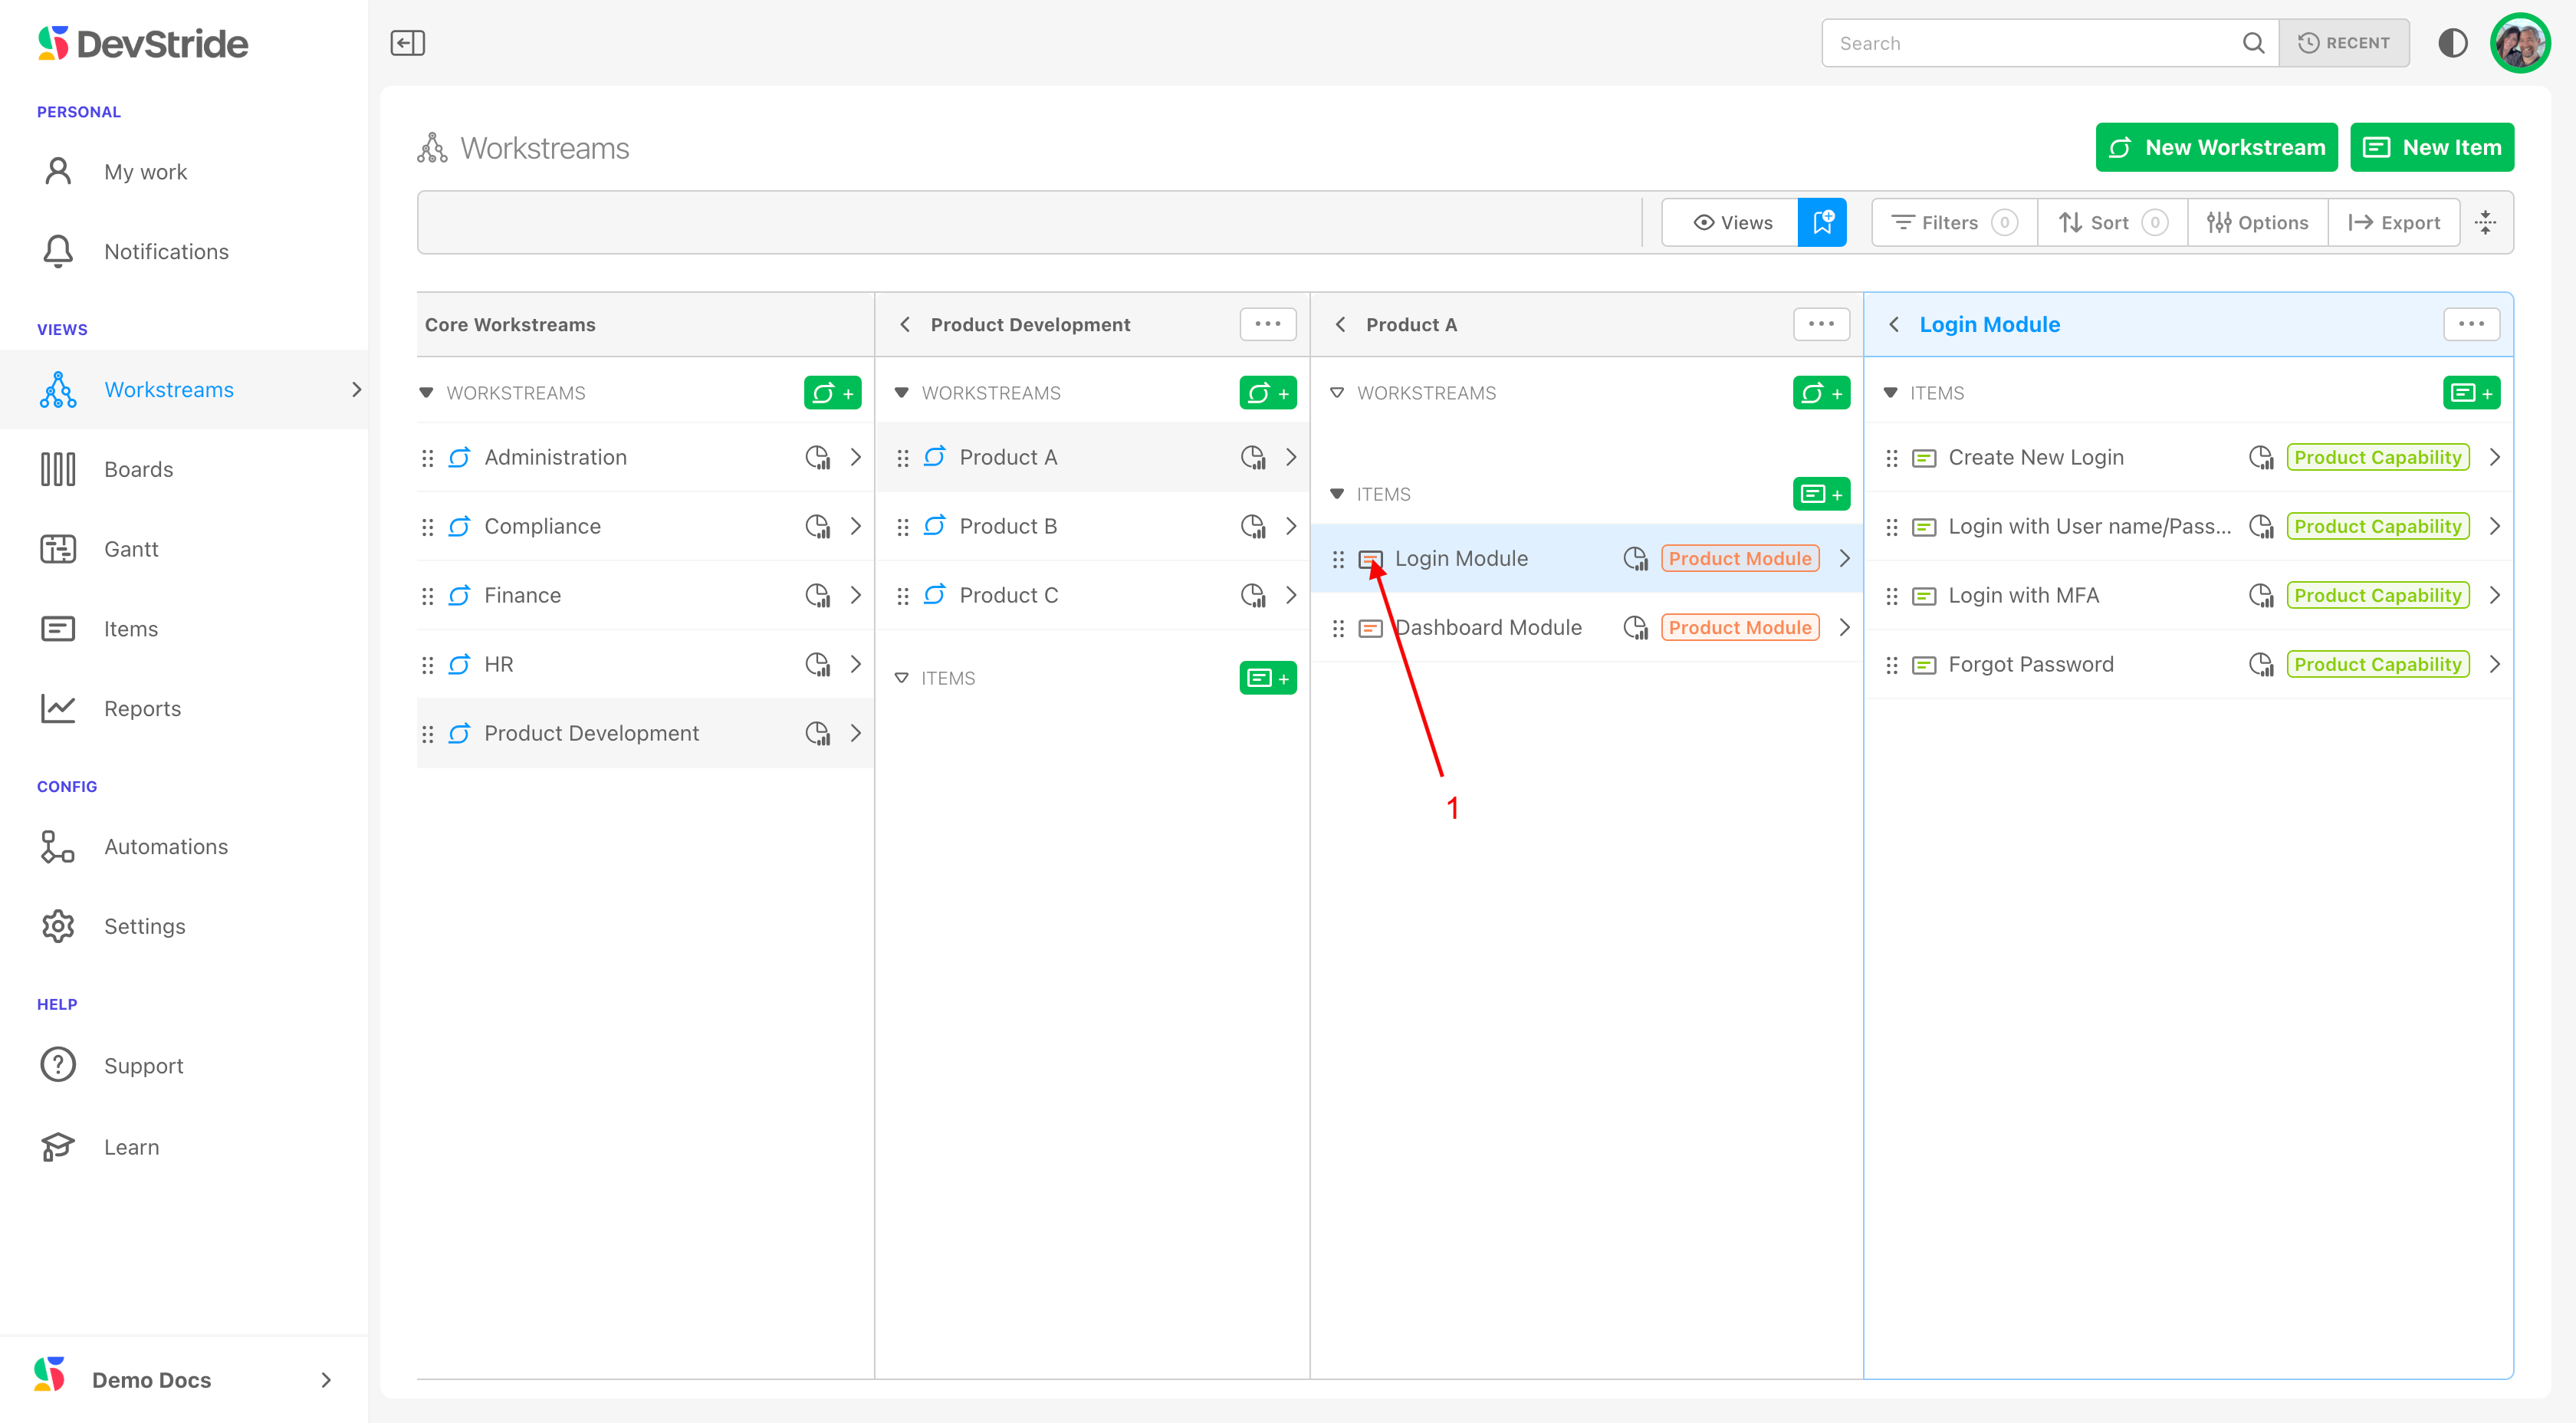
To review the tabs on the item workspace, we will take a look at a Module Item (1) from our earlier example. There are a few more tabs that come with custom fields that we will cover later.
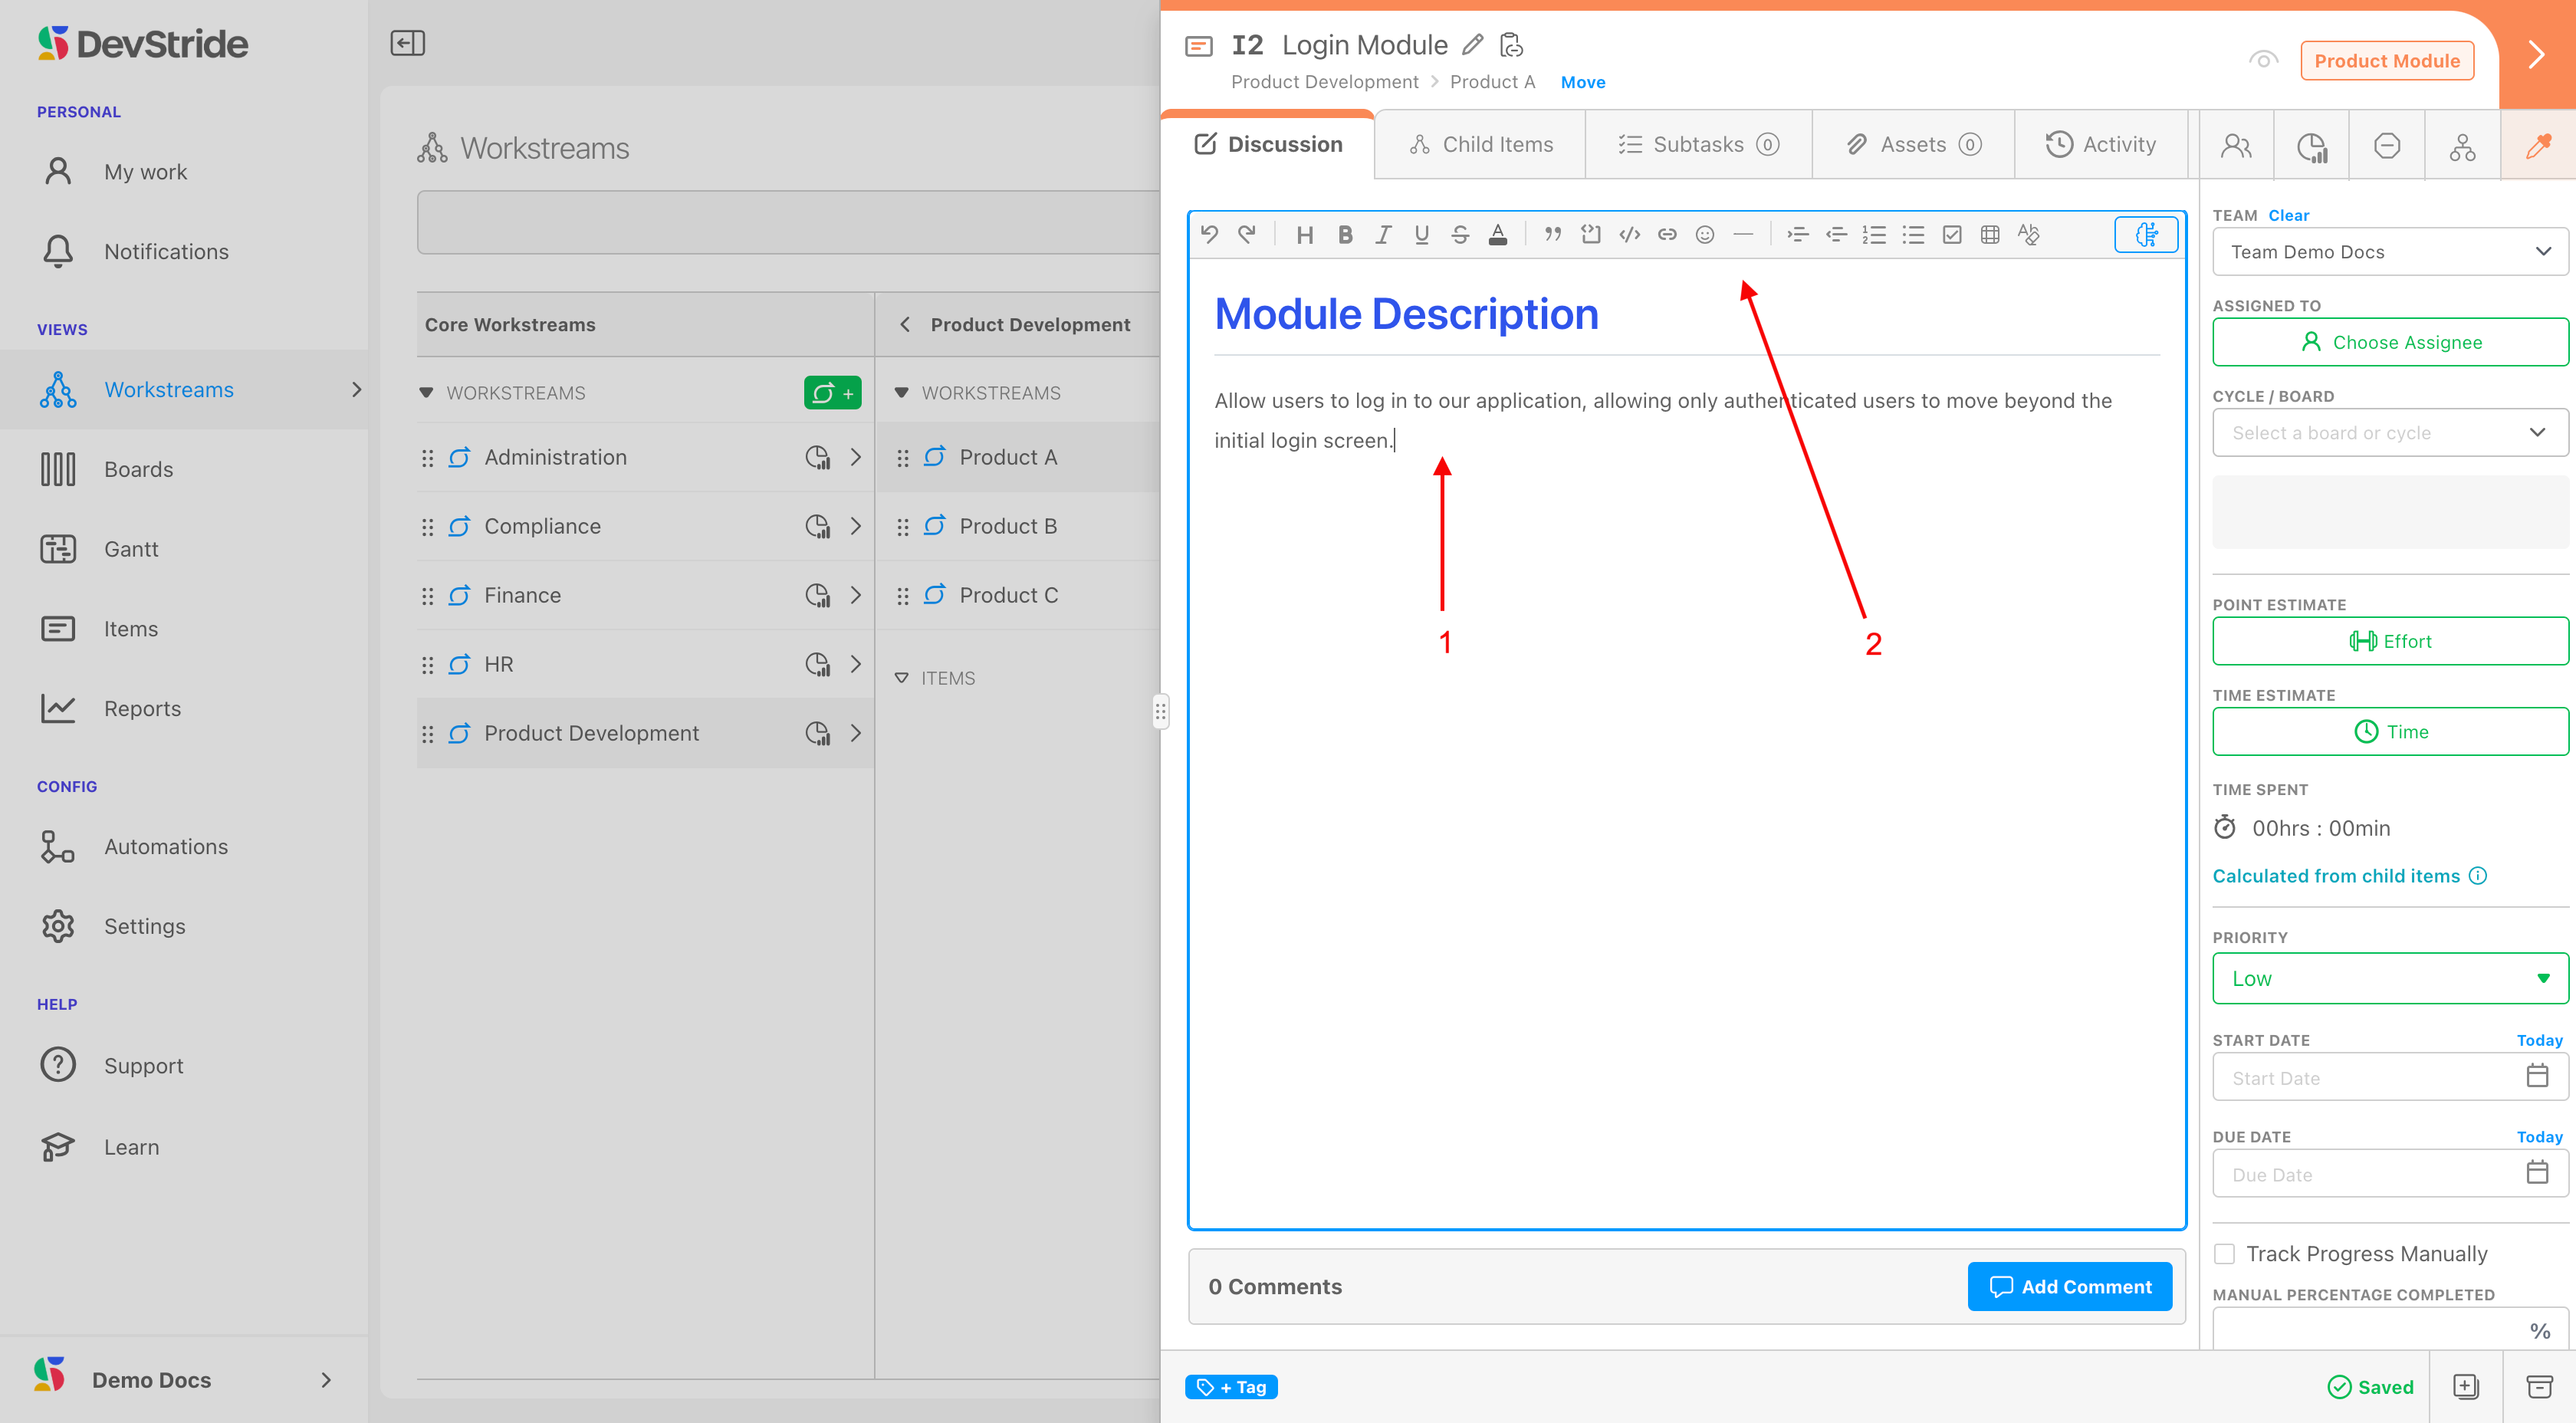
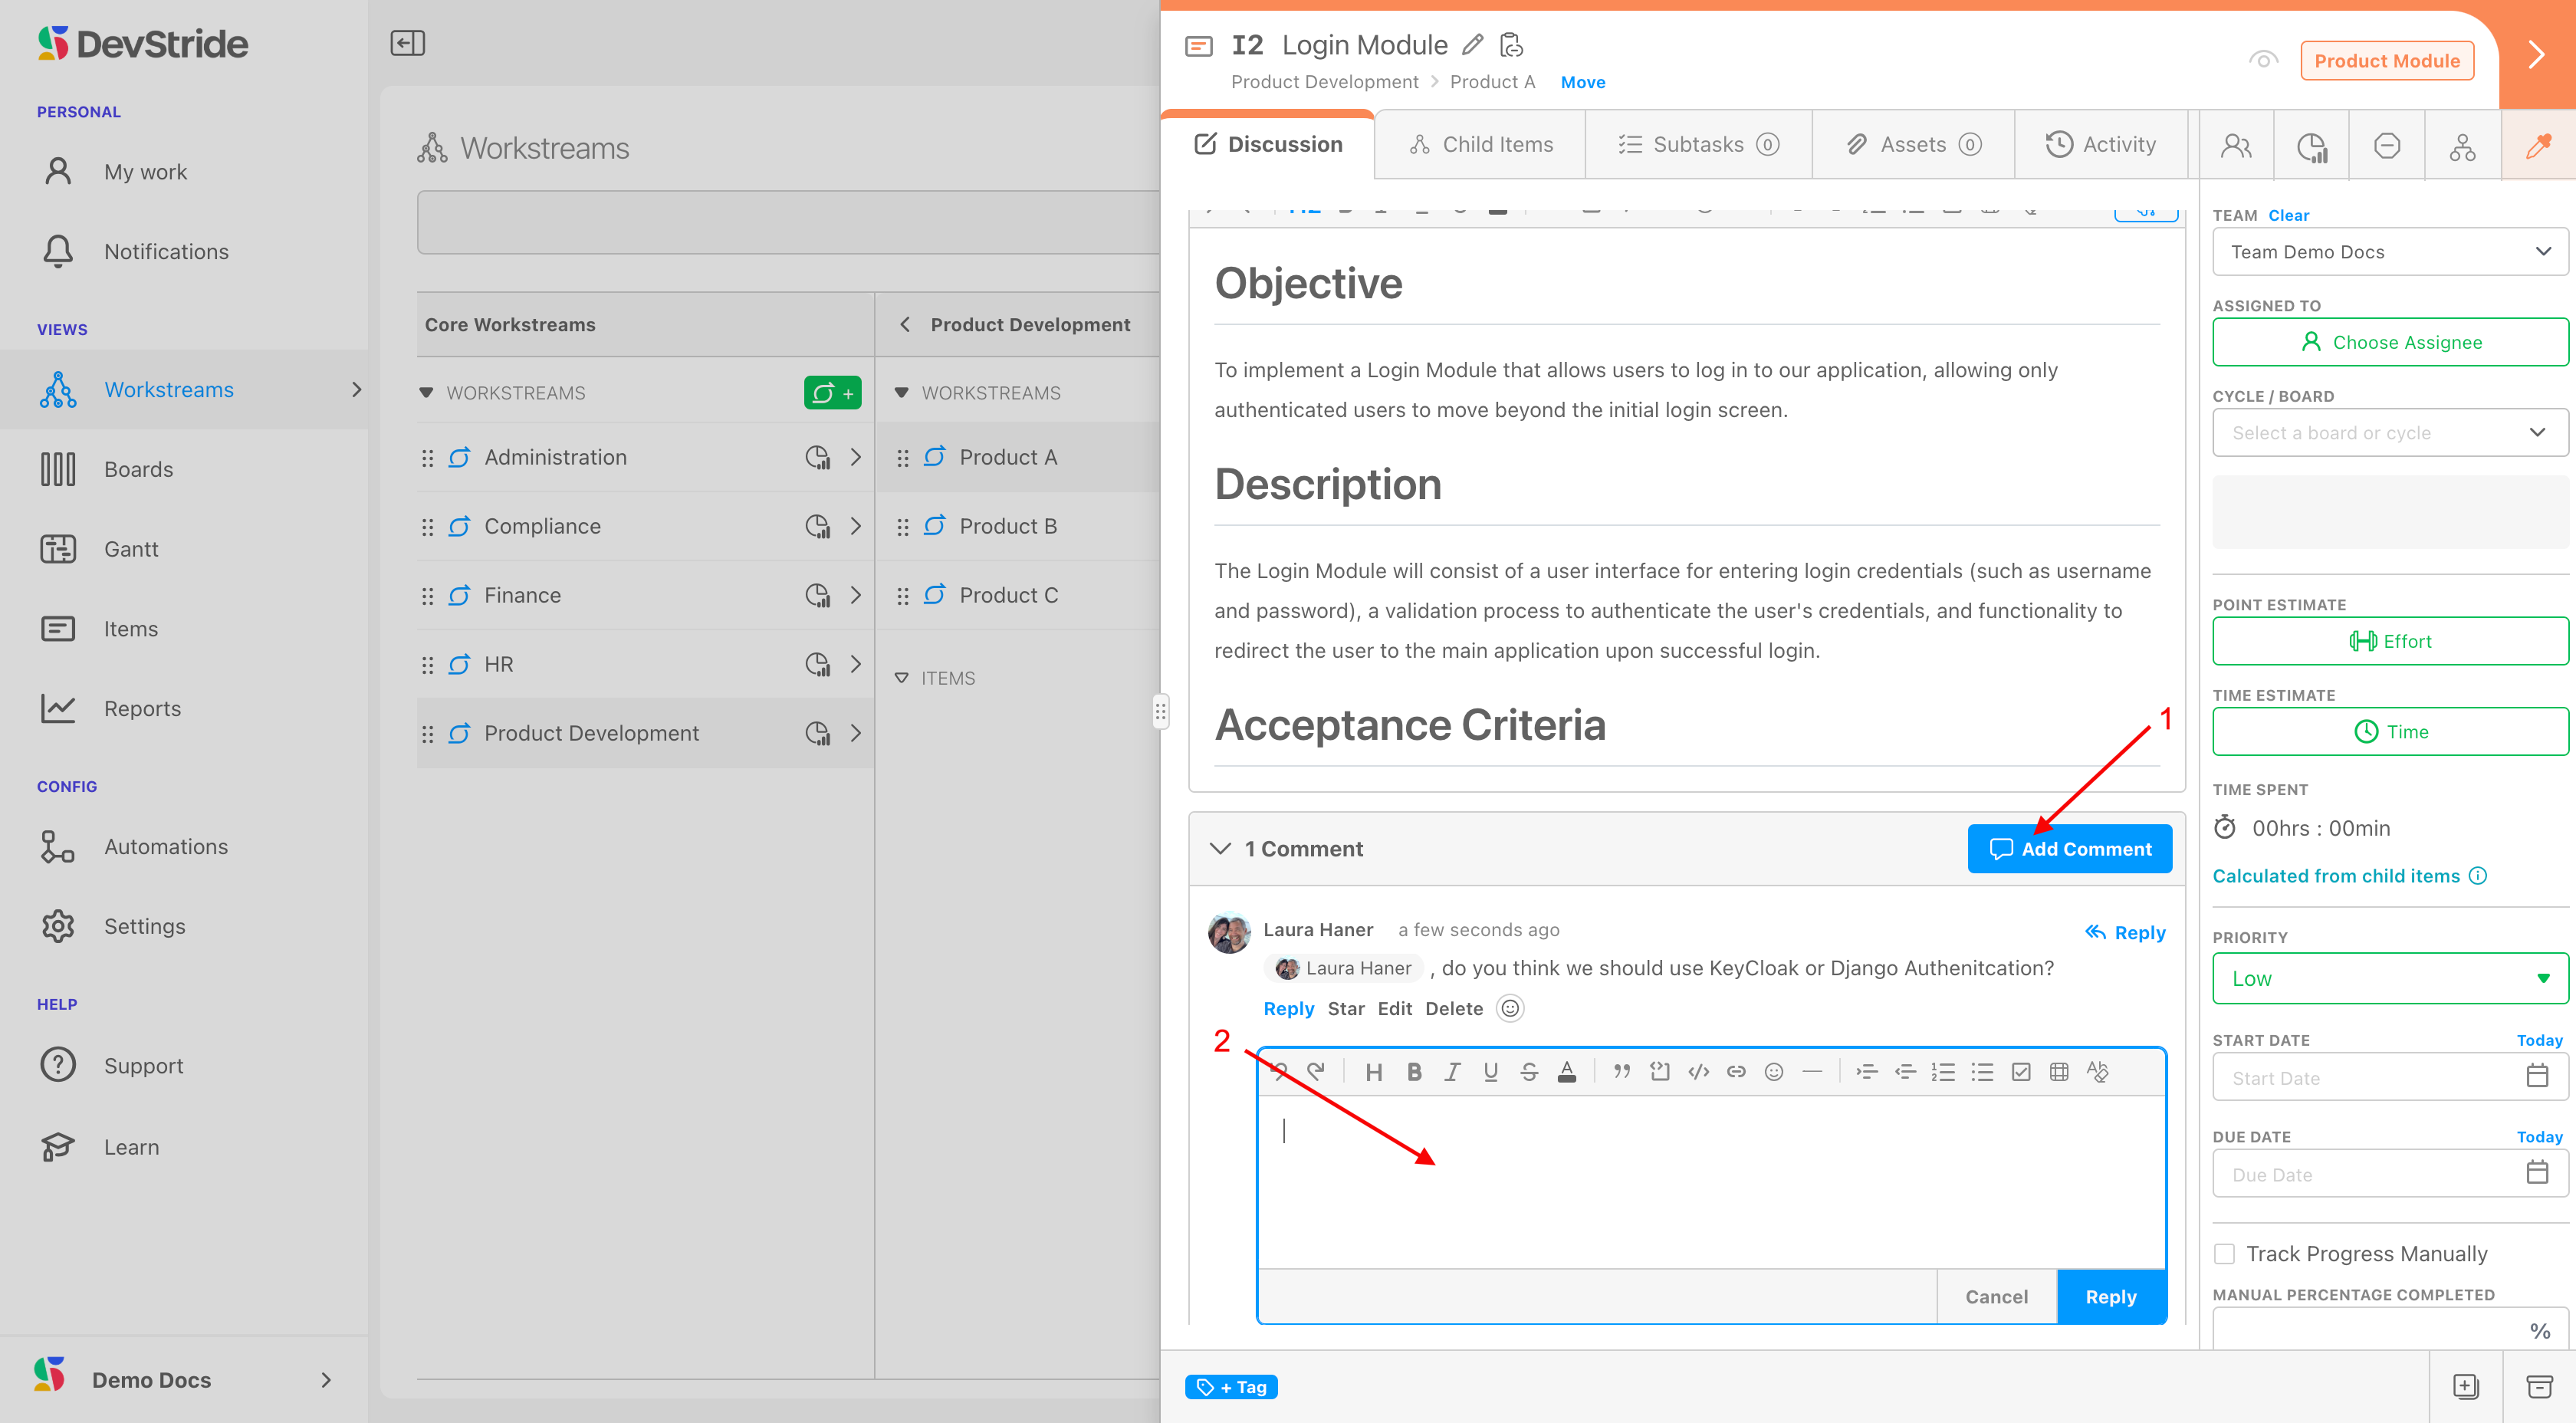
We might want to describe what the expected module will deliver. We can do this in the Discussion tab (1). This tab allows you to describe the item using a feature-rich text editor (2).
→ AI Time Saver
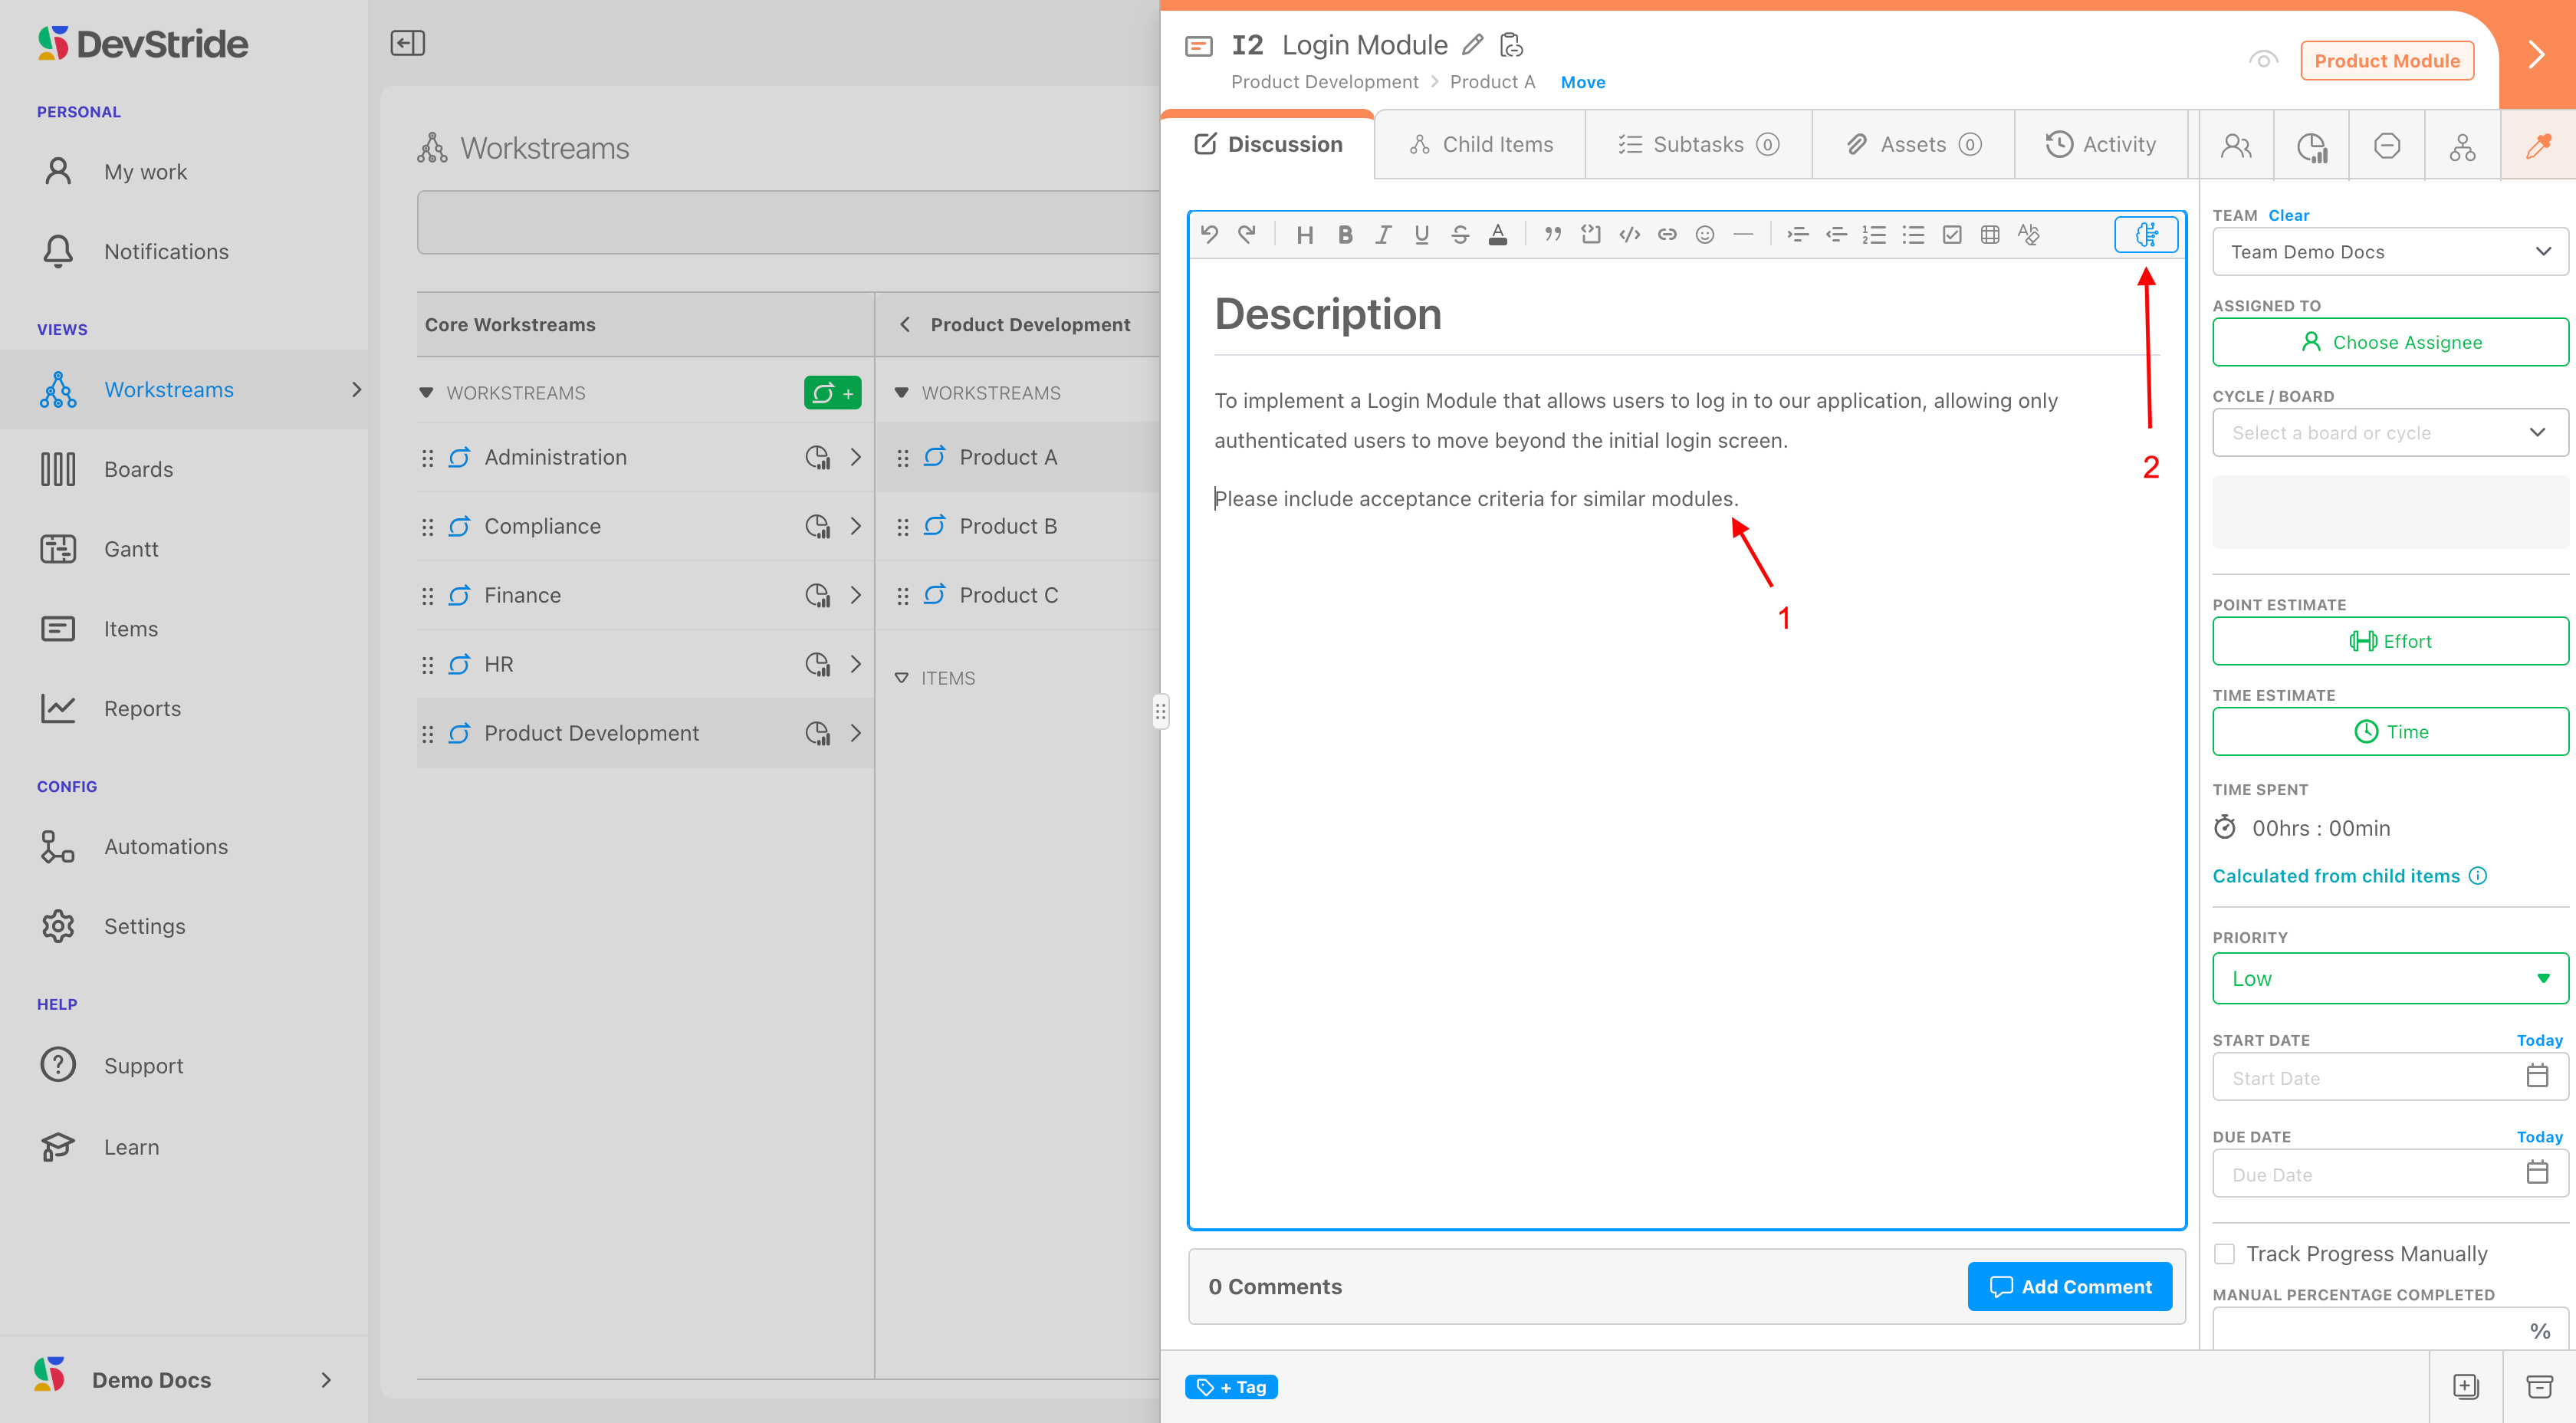
You can take advantage of AI in DevStride's to help generate your description. You can simply click the AI icon (2), and DevStride will generate results based on your item name.
If you include prompts or relevant links in the discussion box (1), you can get even better results once you click generate (2).
What This Gives You
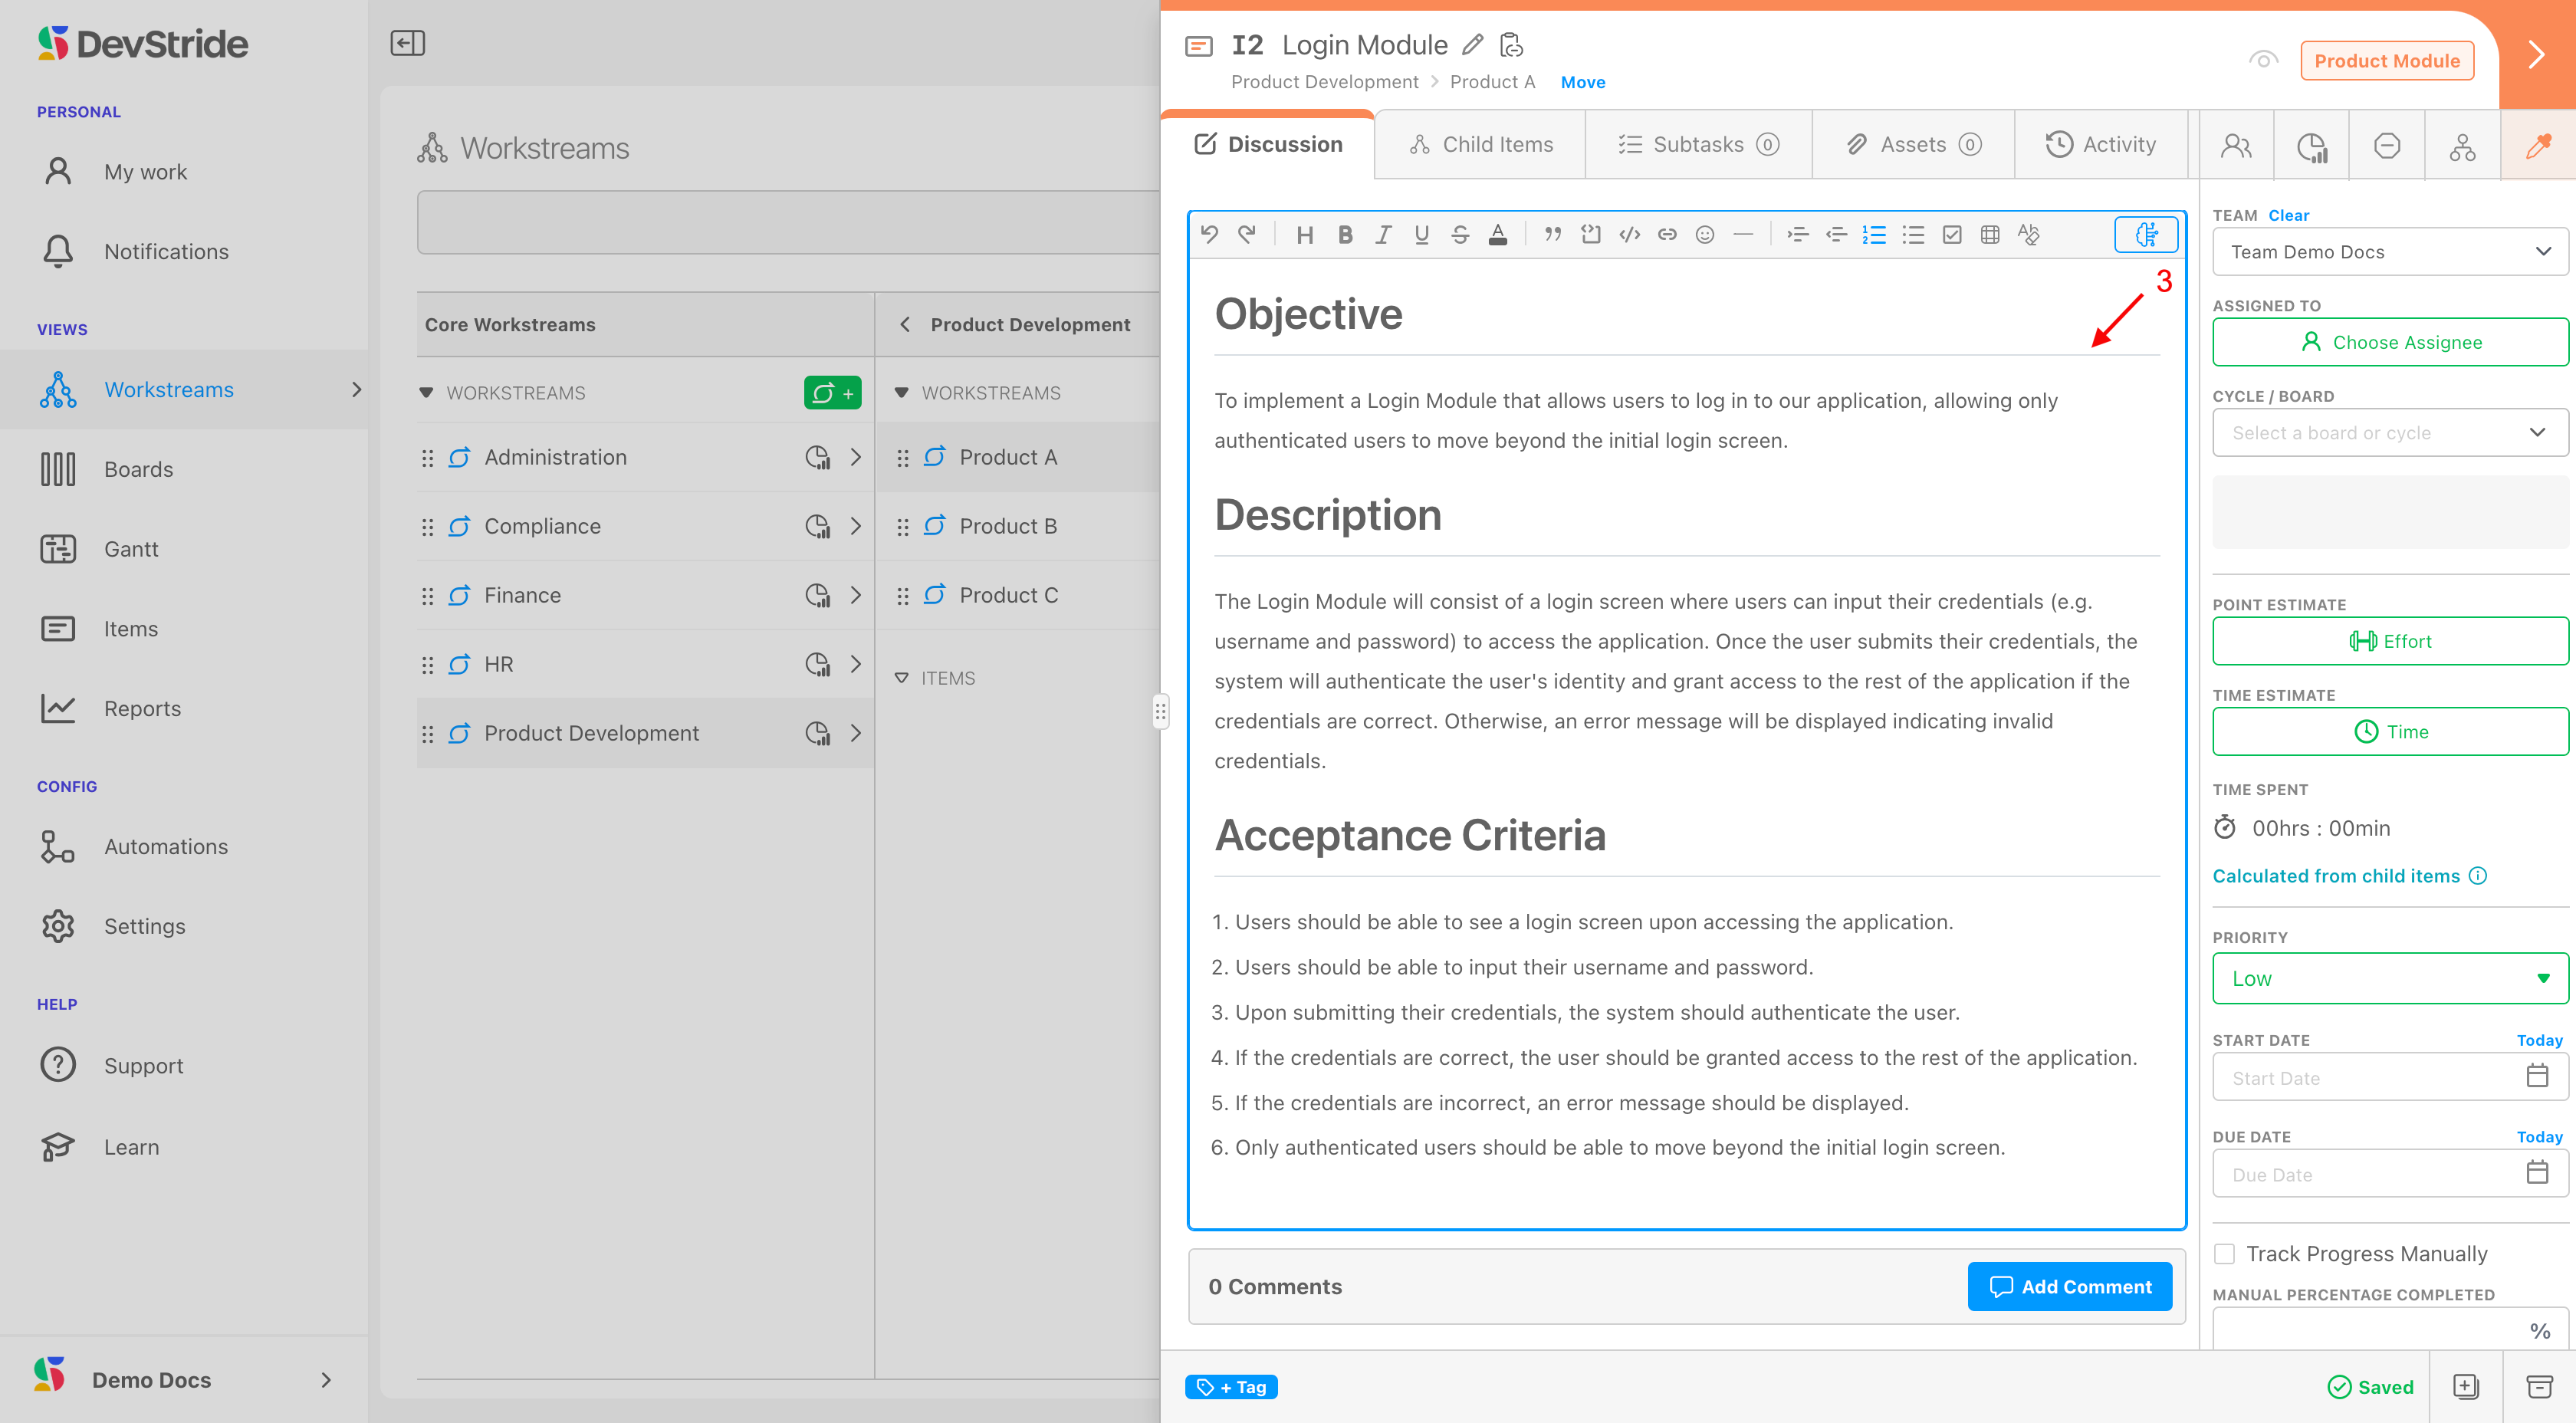
The AI feature can save countless hours by providing relevant content, a consistent way to describe an item, suggested steps or considerations, or any additional information you would like to include based on a specific AI prompt.
You can see an example of an AI-generated description below (3).
The Discussion tab also has a Comments feature (1). This feature helps you capture valuable discussions pertaining to the item (2). This comments section is also integrated with DevStride Notifications and email.
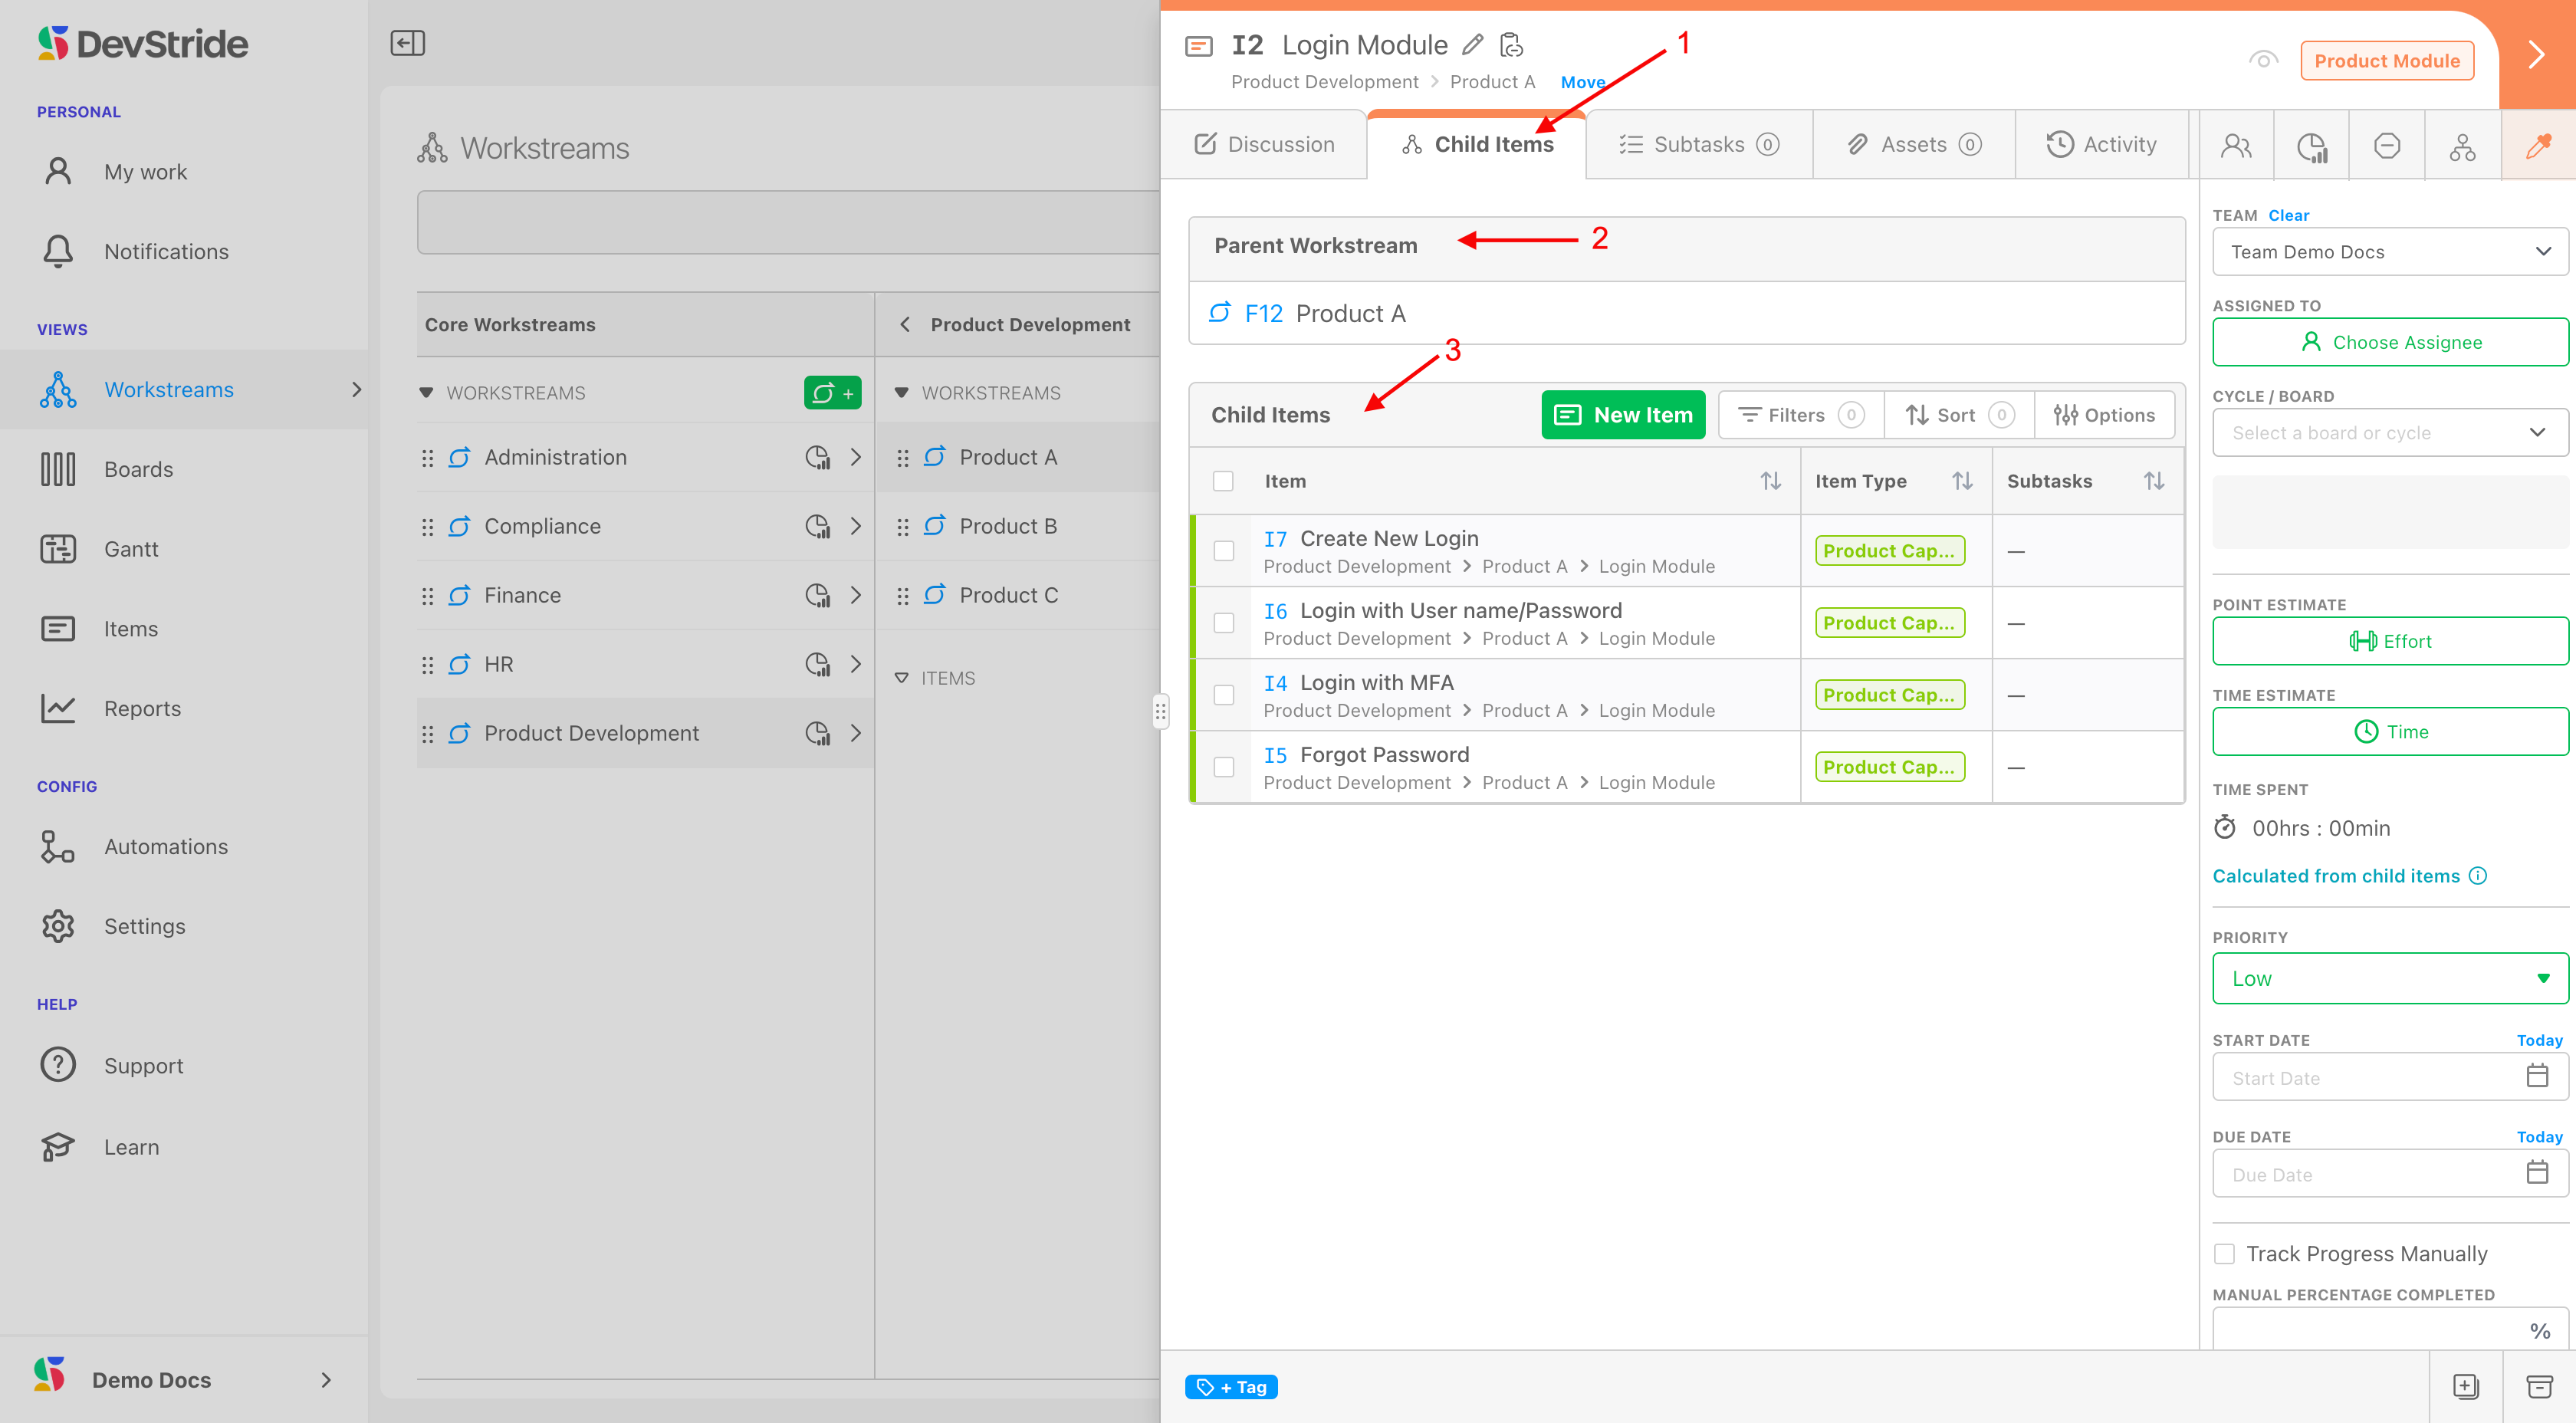
Child Items Tab
This tab (1) provides another quick link to reference where this item lives in the workstream map.
You can see both its parent workstreams (2) and its child items (3). This section provides the child information in a table format. This tab is a convenient place to make changes to child items - as the data in table are actionable as well.
New child items can be added here.
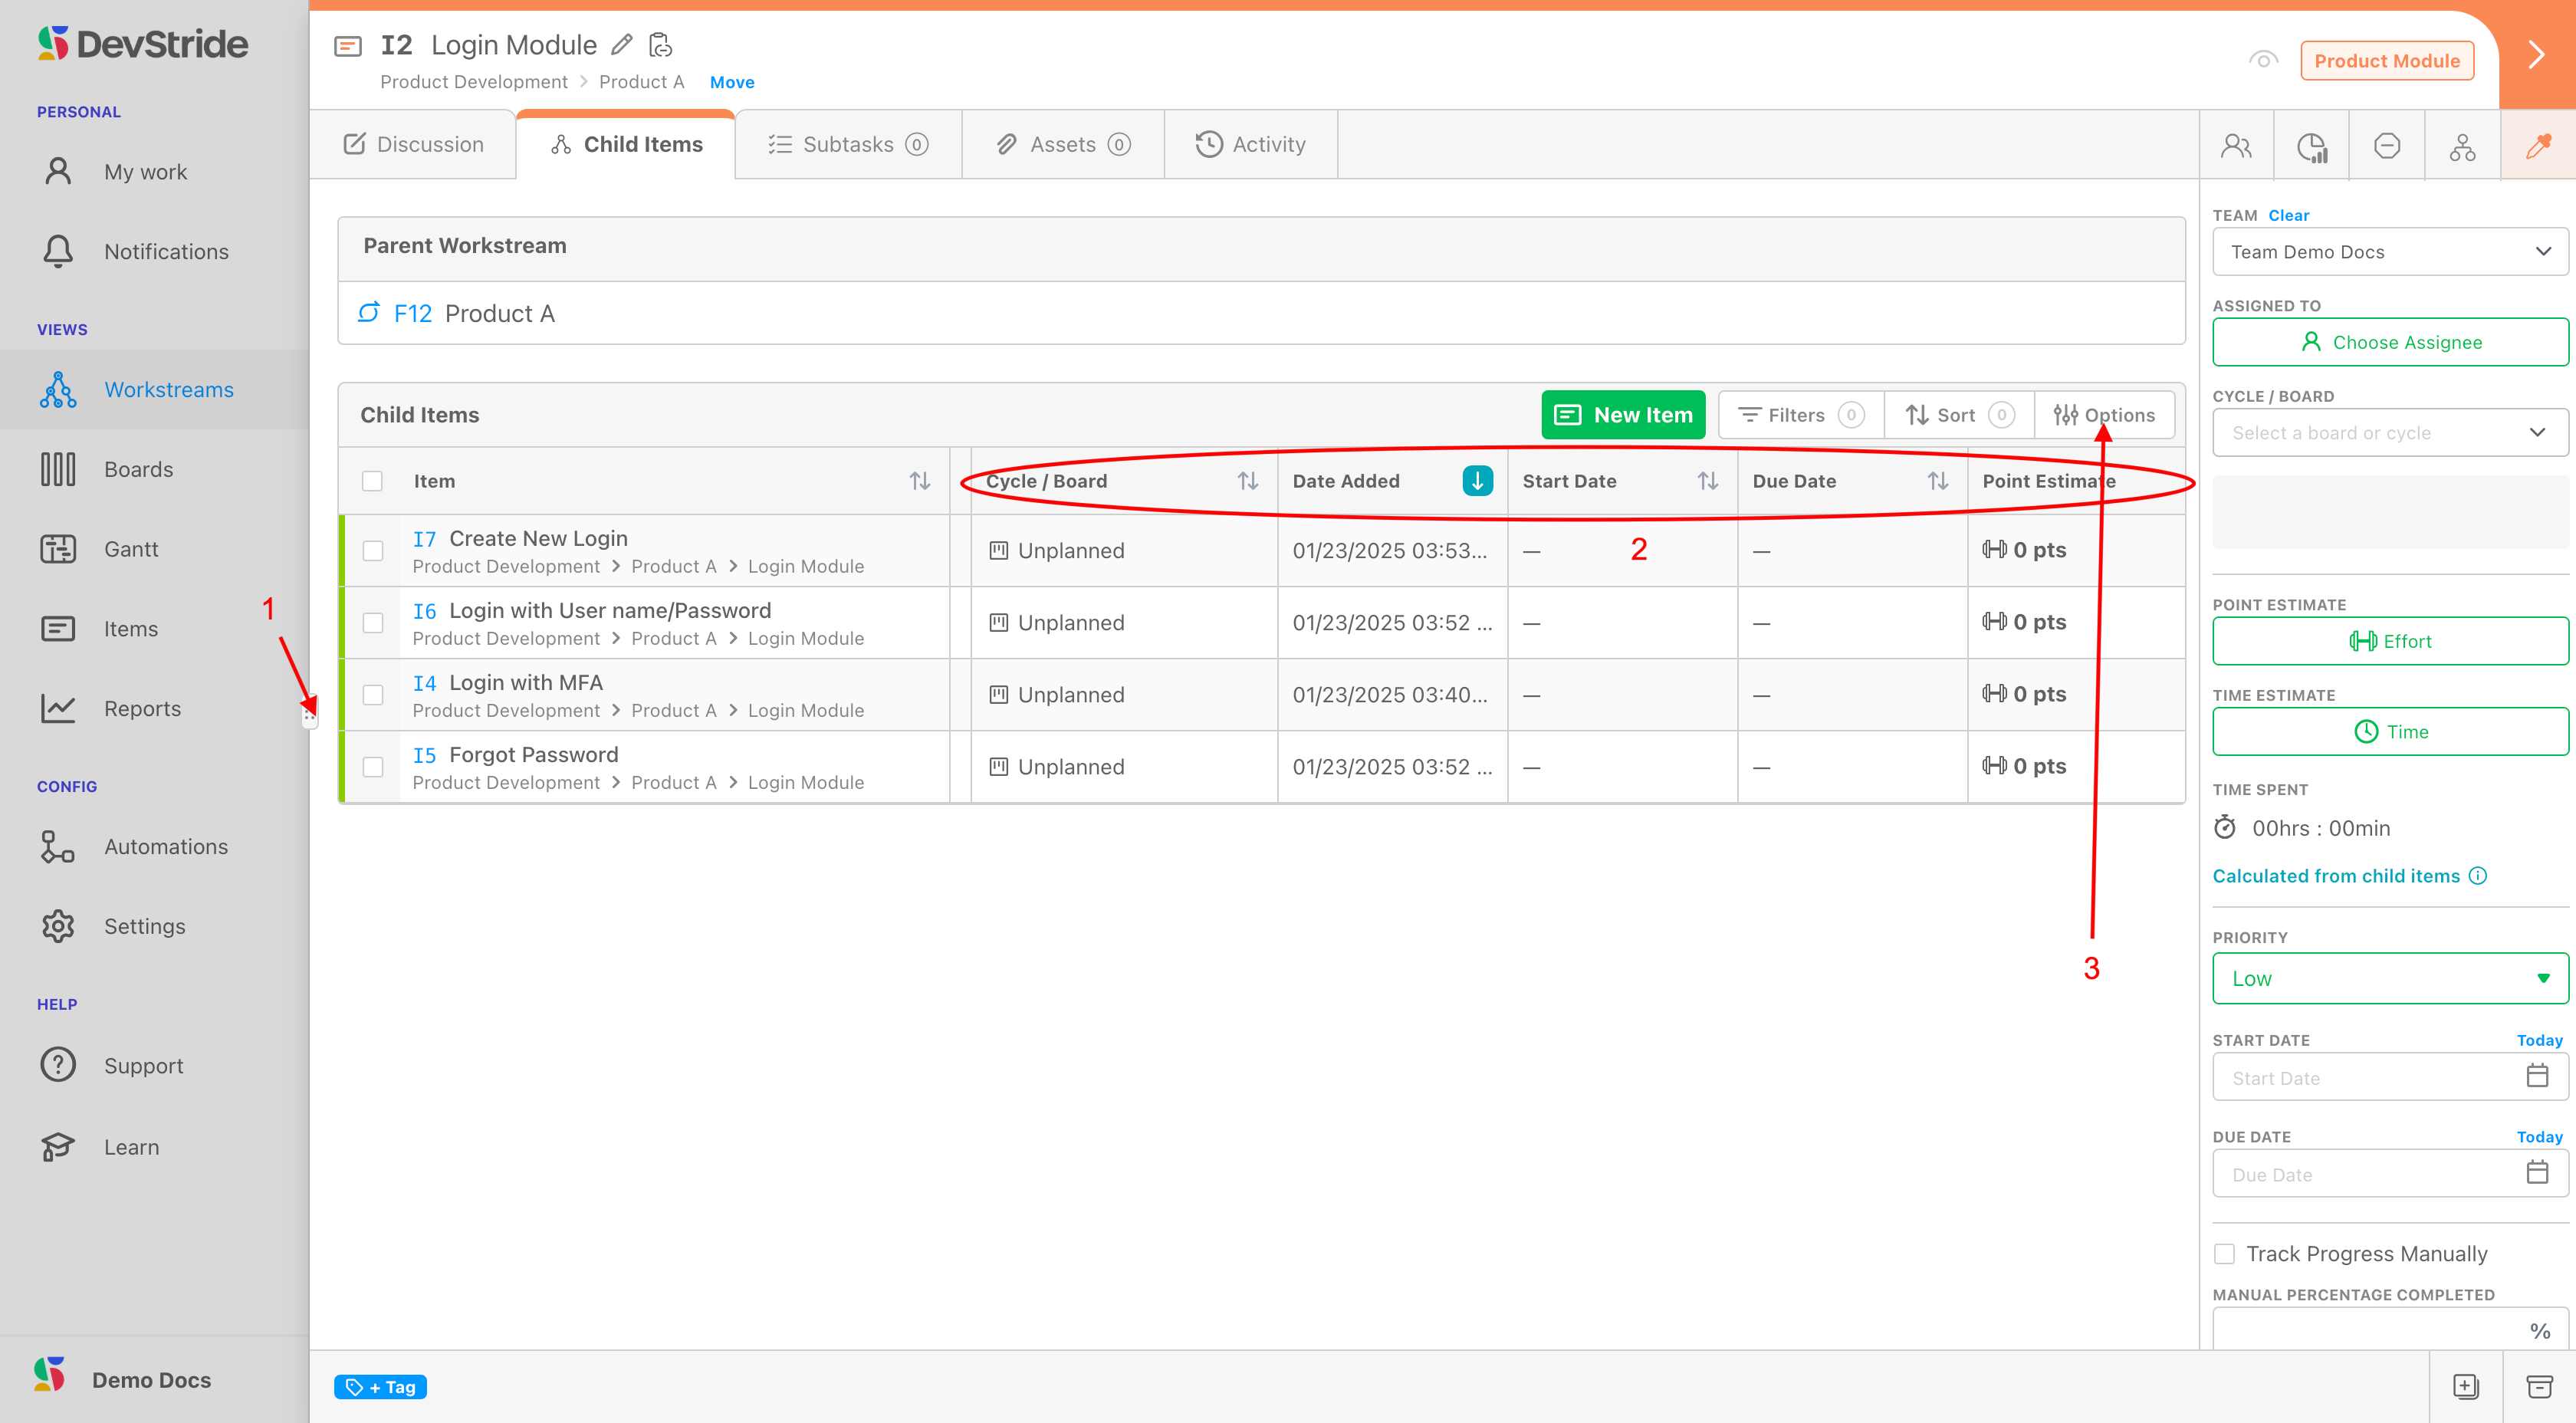
In addition, if you click on the grabber bar (1) and drag it to the left, you can expand any item window to provide a larger view.
Inside this table, you can filter, sort by fields, determine which columns you would like to see. You can also and set columns using the options available.
You can also manage large lists of items here through Filter, Sort and Options views (2). If you'd like to manage which columns you view from here, click on Options (3):
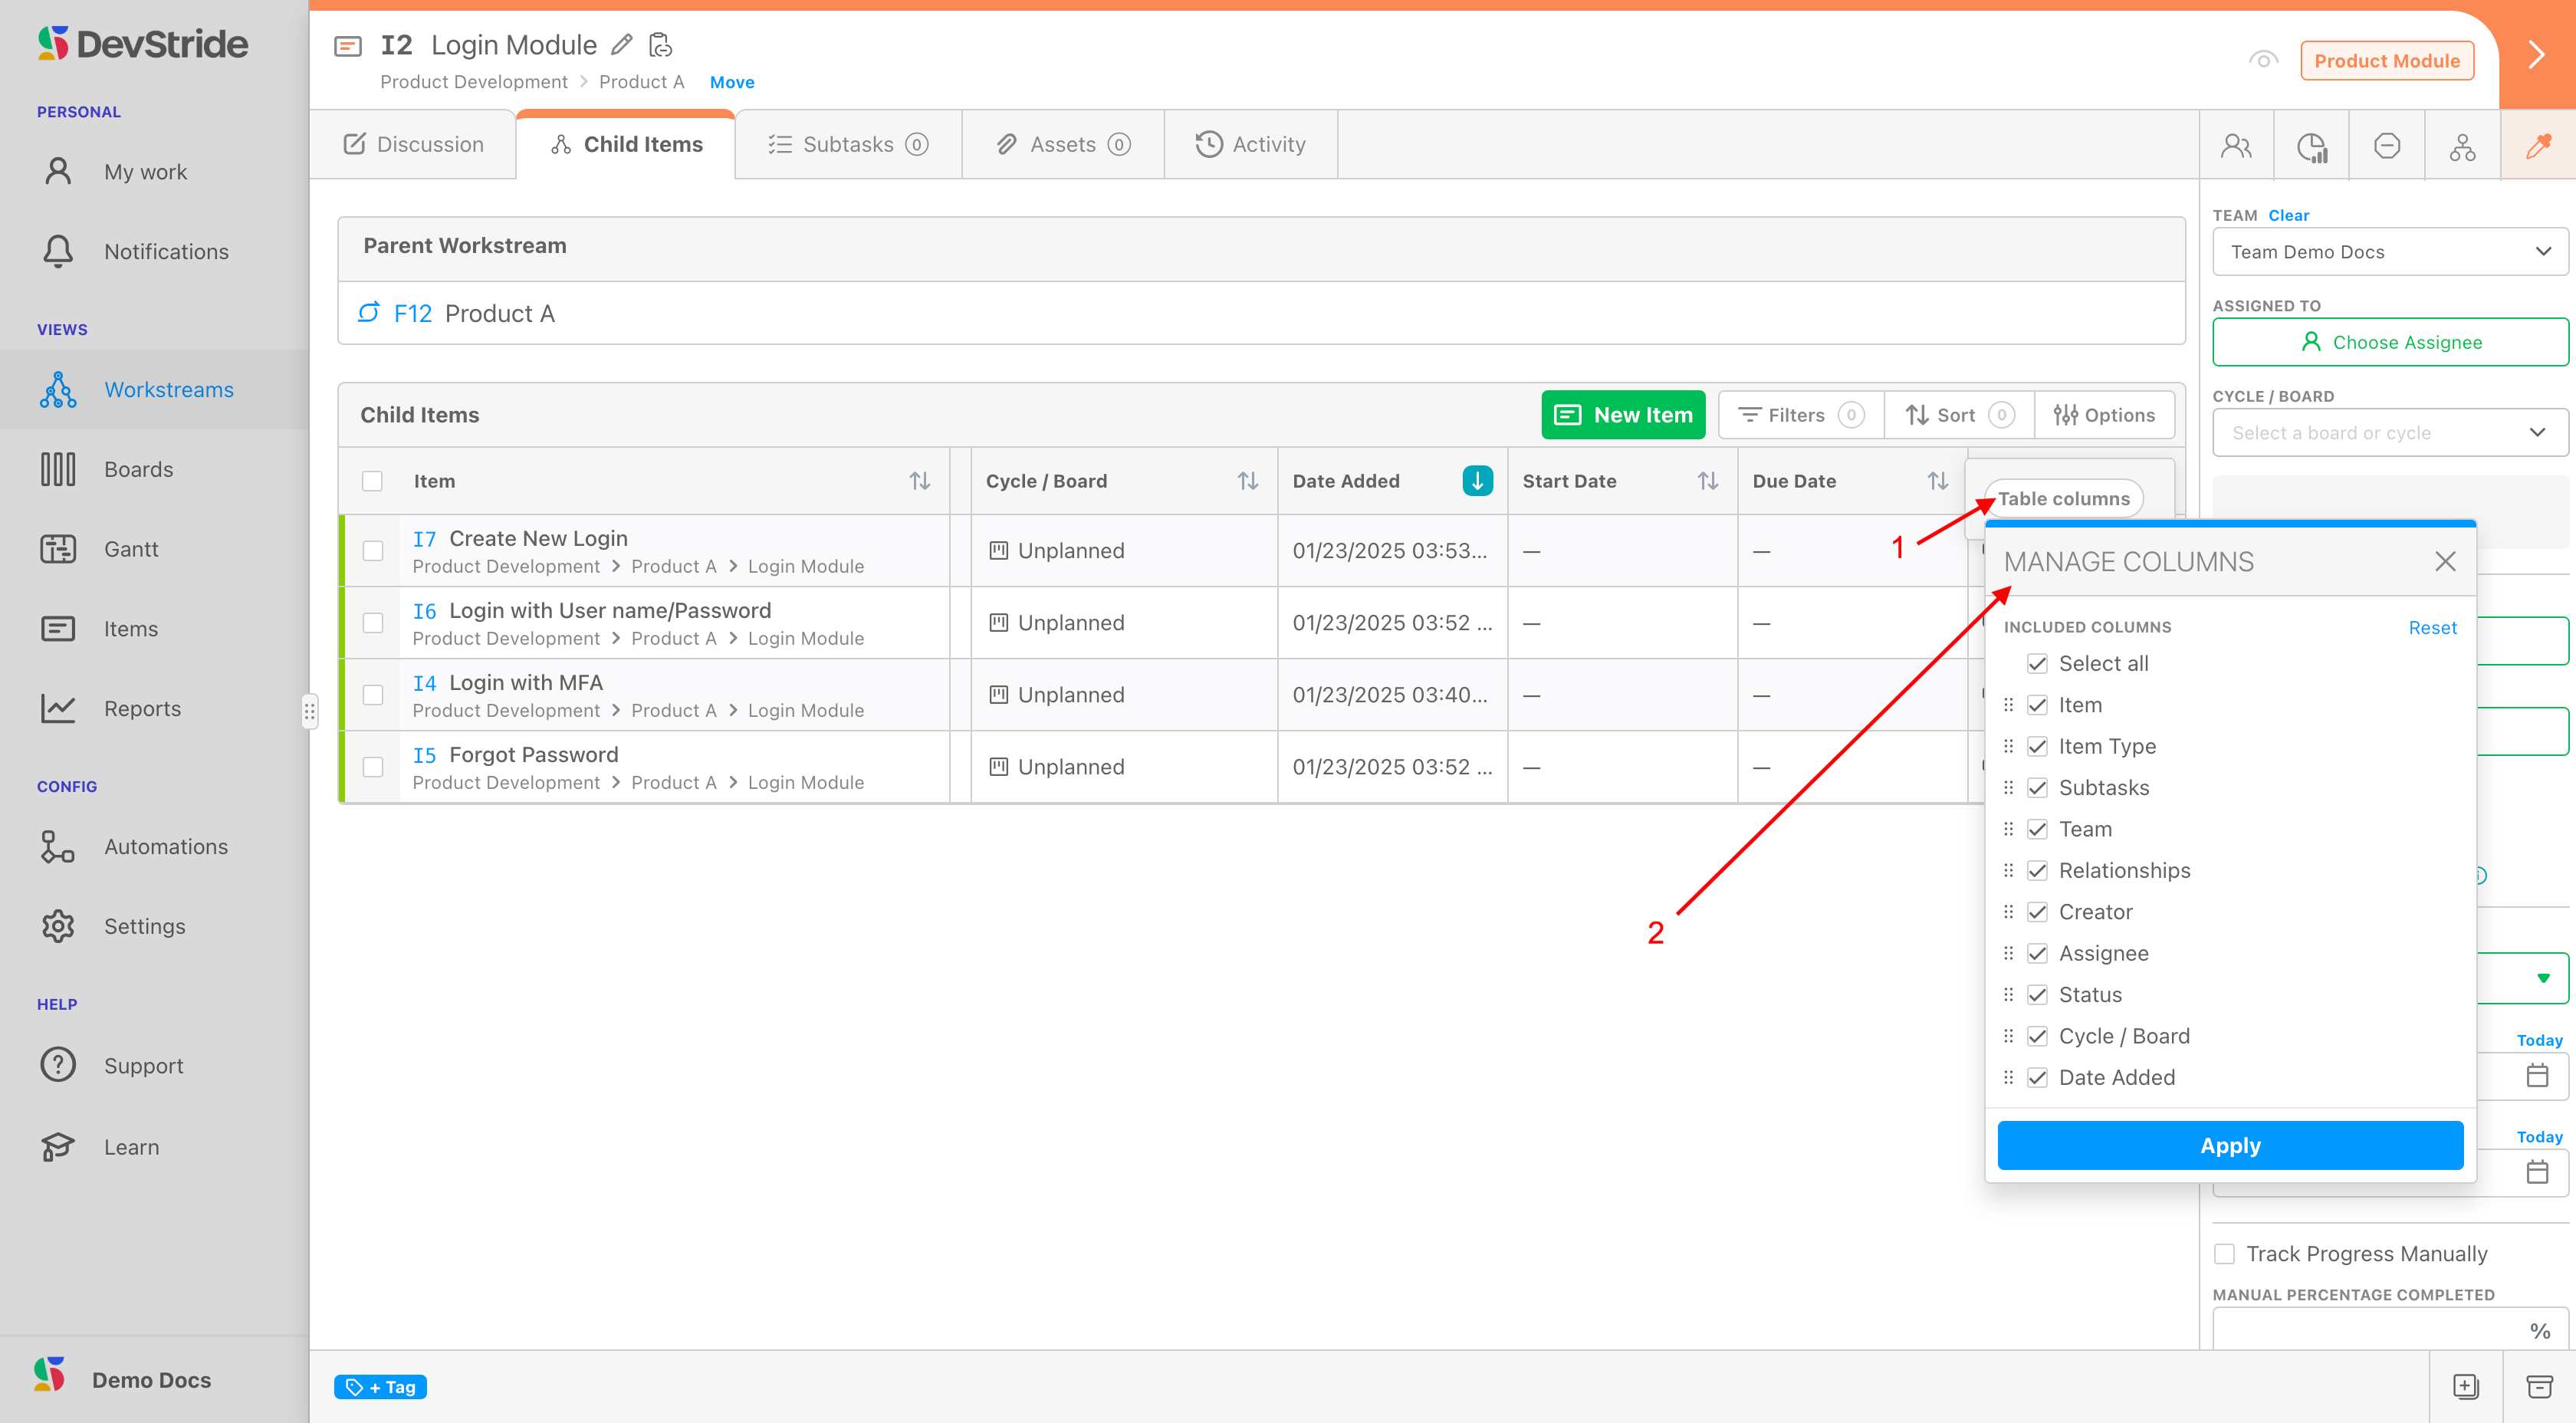
Then click Table Options (1) and select the columns you'd like to see (2):
If you'd like to add a new work item right from this screen, click on New Item (1). Note that the default new item type assumes the hierarchy of the child items in current list (2).
A pop-up window displays. Name the item you are adding (2). You can accept the location and item type or, you can change the location and item type as well throught these dropdowns (4 - 5). Click Save New Item (6) when finished.
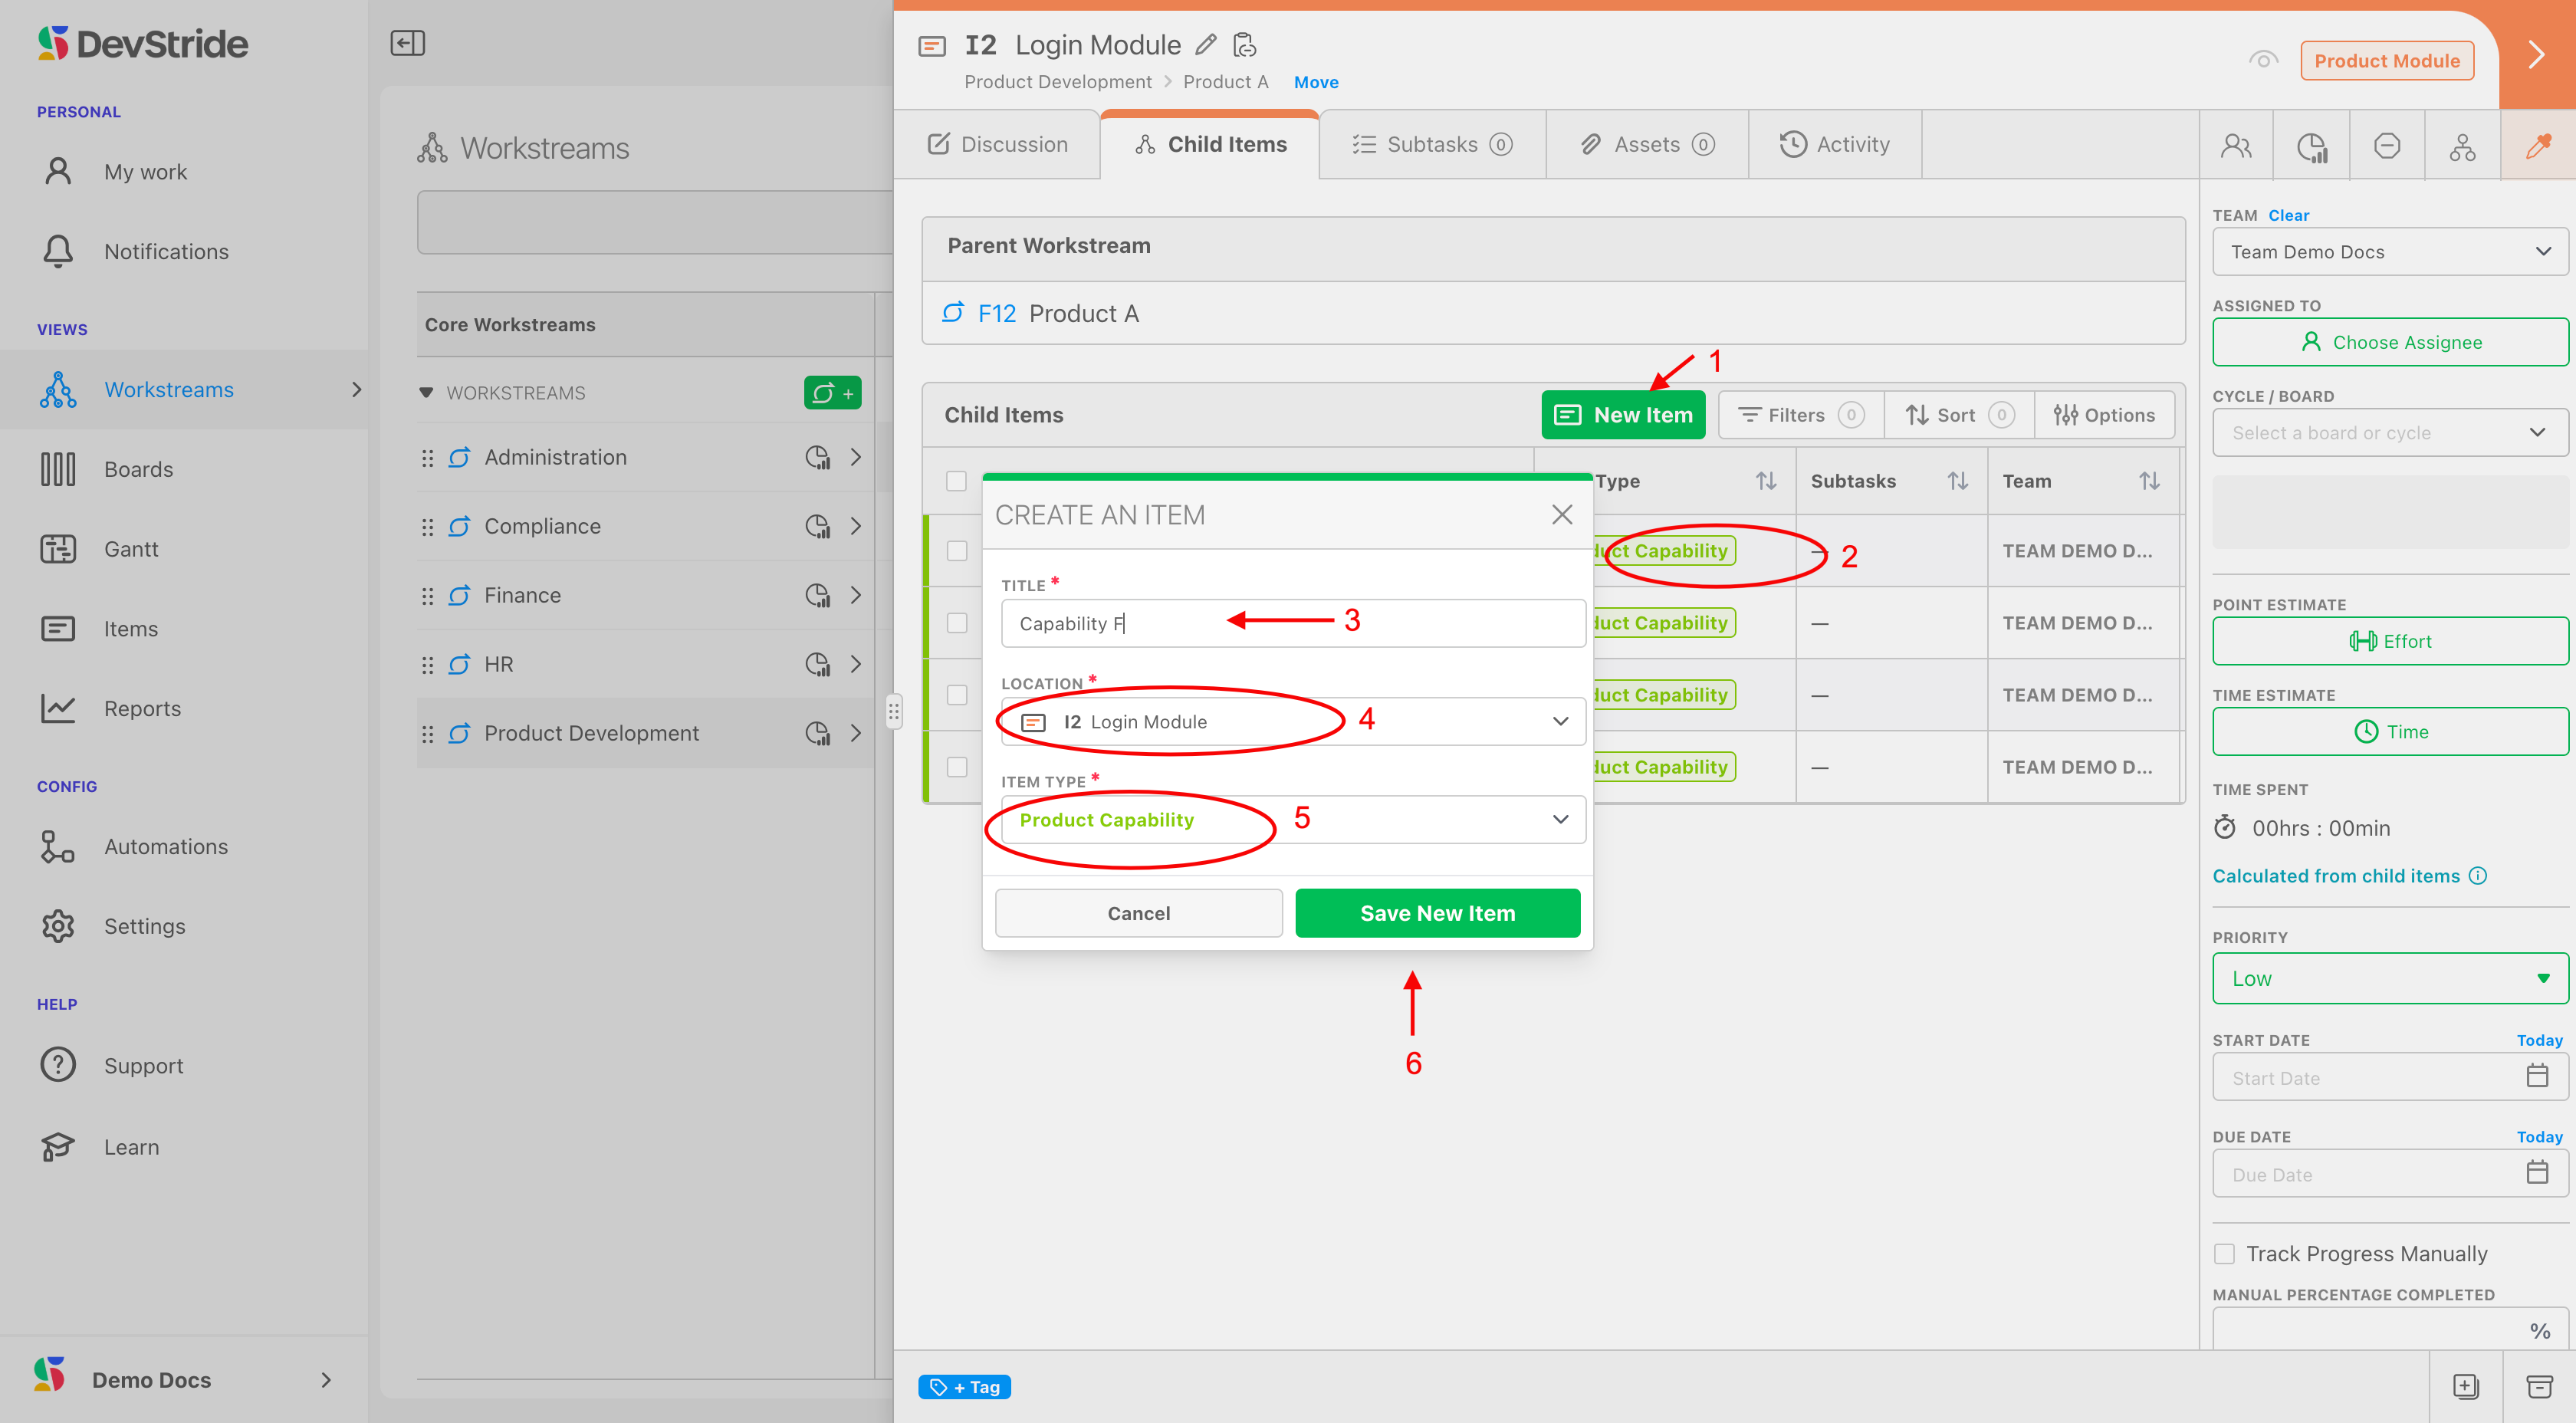
Adding items here is synchronized with the main Workstream Map and will automatically populate in the map as well. Here, our example, Capability F, is now on the Workstream Map in the correct location (1).

Subtasks Tab
Subtasks exist for the purpose of creating a light-weight task list. This is not designed to be work with a data model and reporting, etc. It's meant to be a checklist of small activities you want to remember to do related to this particular item.
To sub-task or not to sub-task
If you need to report on the activity, do not manage it as a sub-task item.
Subtasks are not represented in DevStride reports in any meaningful way. While they have some helpful capabilities (can be copied as part of a template, can have due dates, an —if they are on the lowest level of the item hierarchy—can track time against them, etc.), they are meant to be used as simple checklist items.
You can assign subtasks to people and give each of the sub-tasks their own due dates (as long as they do not exceed the item's due date).
If you use a subtasks list, your item will not be considered "done" until the sub-tasks are also completed.
To create subtasks:
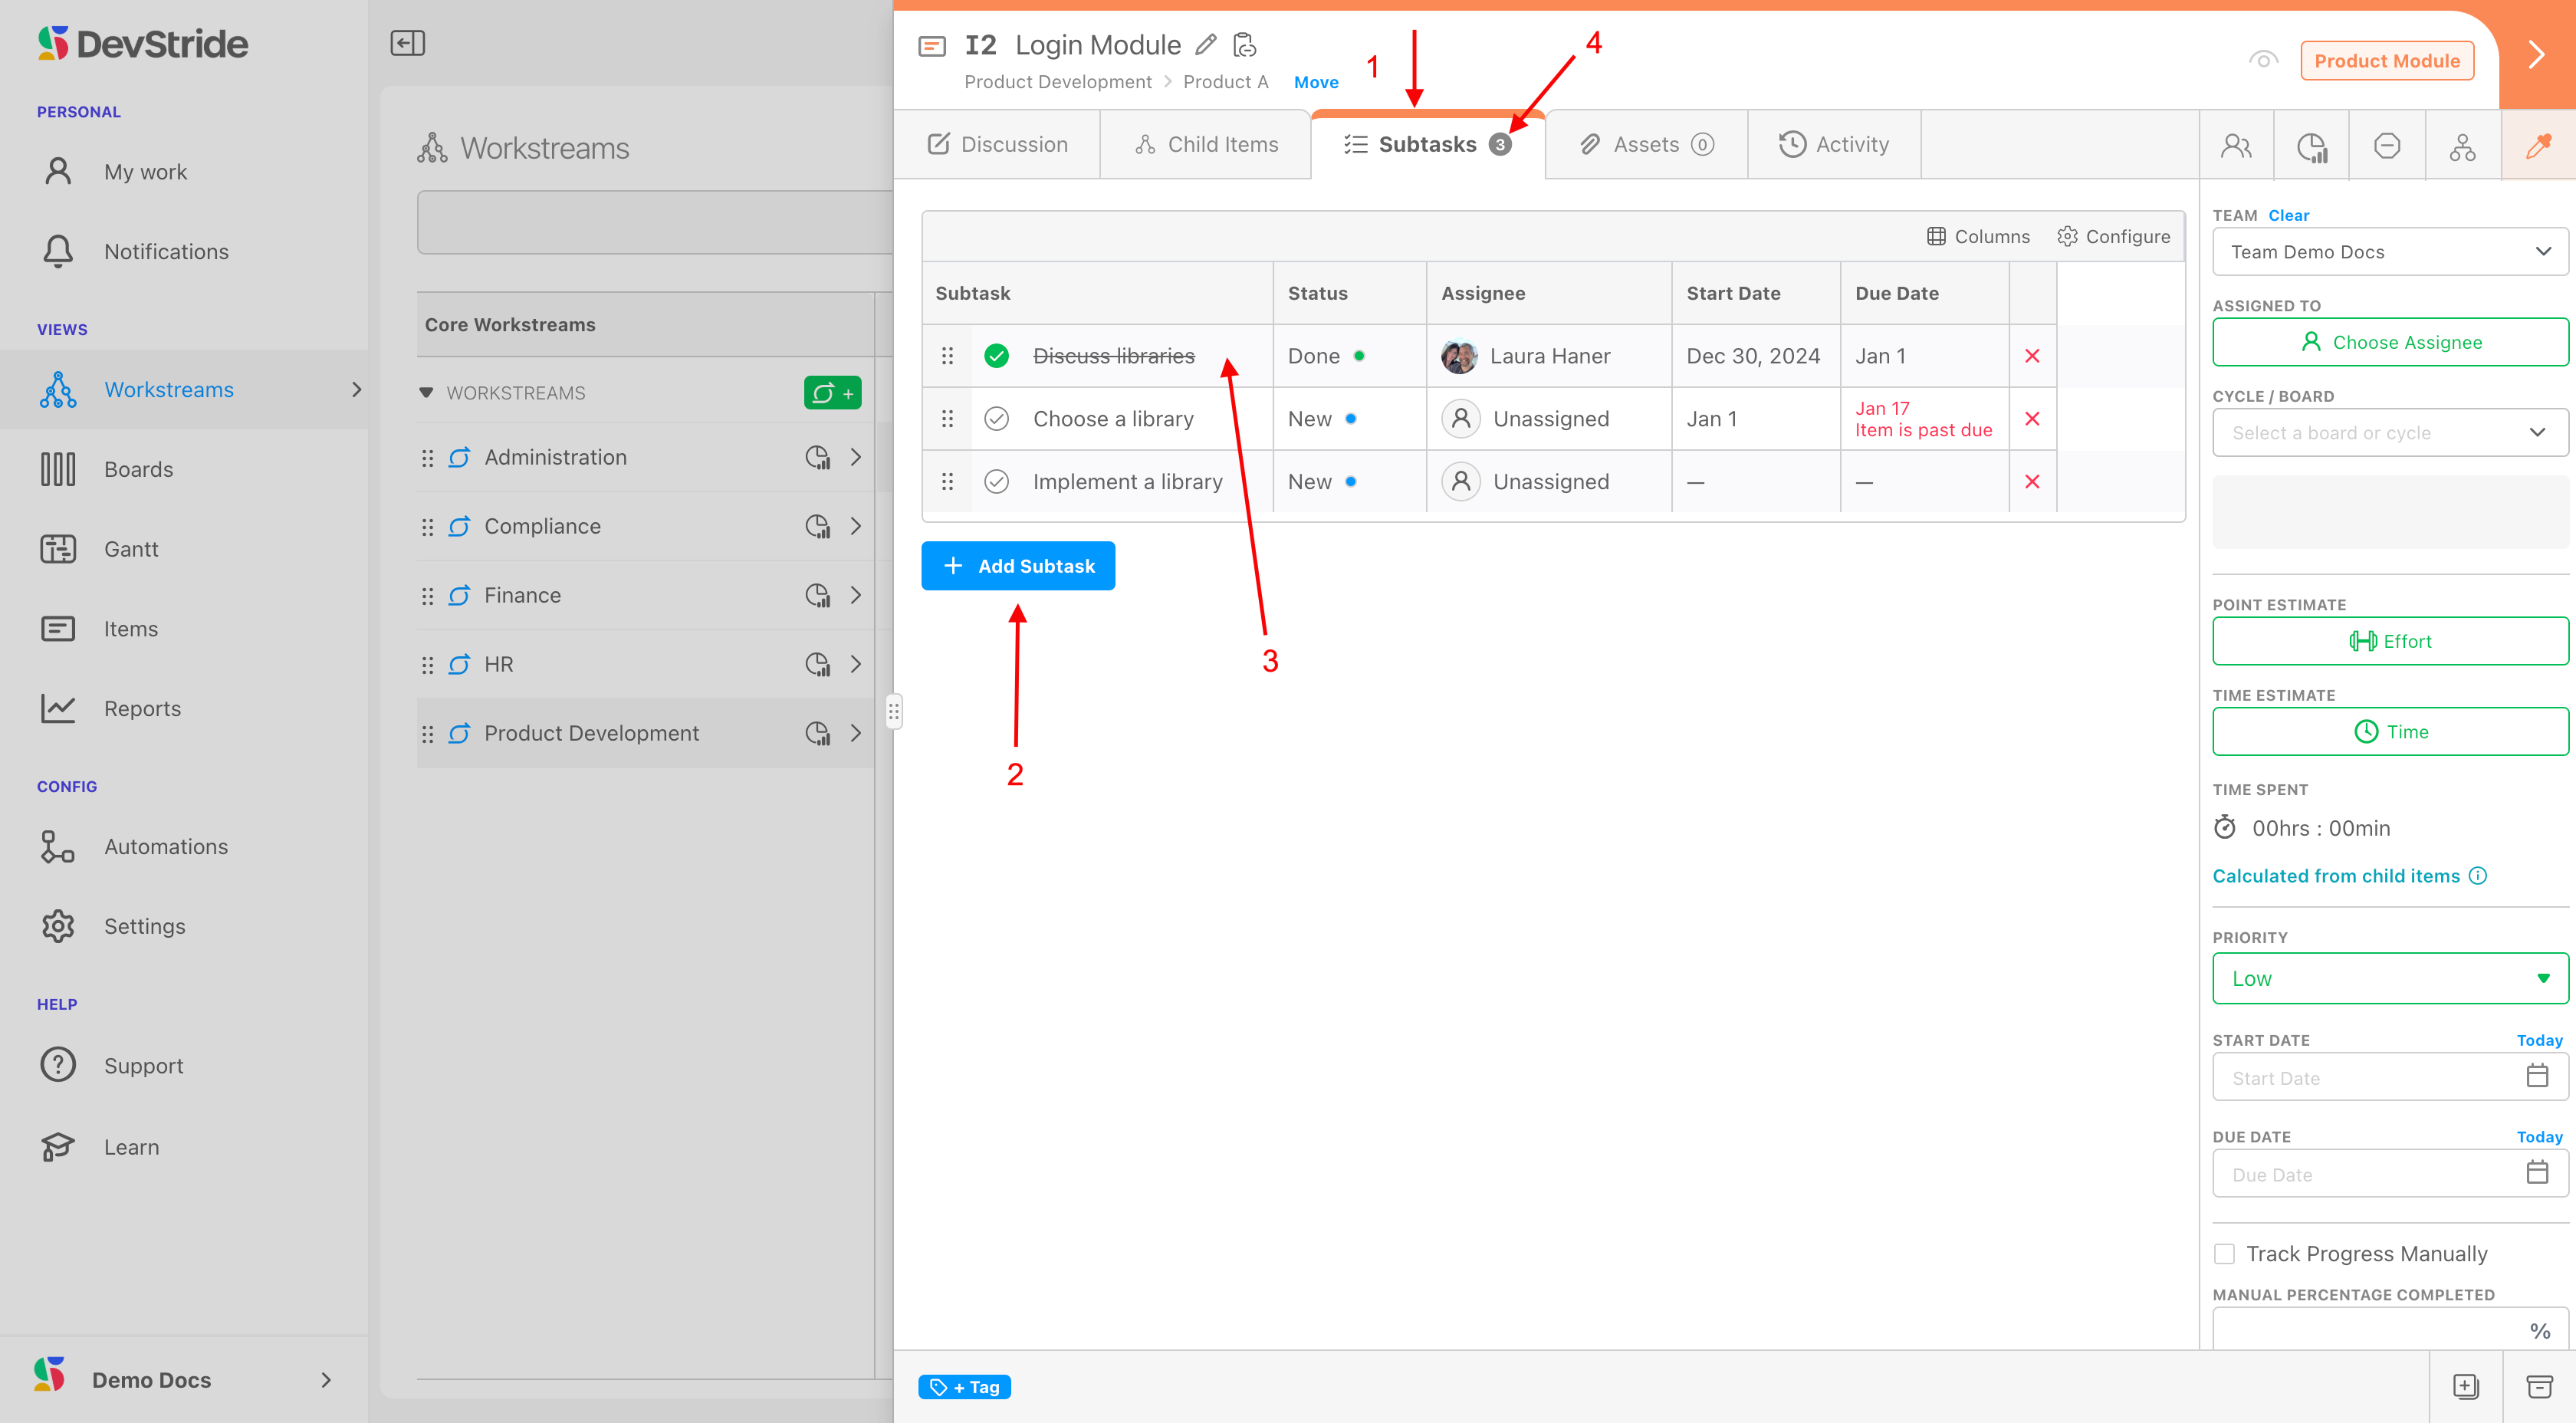
From the Subtasks tab (1) click on Add subtask (2).
To indicate a subtask is complete, simply click on the checkmark next to it (3). Note that you can see that there are subtasks on this tab by glancing at the badge counter (4).
Assets Tab
The Assets Tab is a way of organizing and linking to the item's relevant external resources. Great examples of useful assets are:
- Google Docs of living or static documents
- Figma boards or other design files
- Spreadsheets
- Websites
- Local files (these can be uploaded instead of linked)
What this gives you
This functionality creates durable assets for ongoing reference and use.
Assets help keep everything up-to-date and all in one place for visibility, without having to reproduce it manually.
Rather than trying to recreate large amounts of information in the description tab or pass around and update documents, use links in Assets wherever possible.
Links allow you and your team to refer to and work on the most current version of any given file.
Asset links preserve access rights protection so that only team members with the appropriate rights can actually open the document.
How to Do it
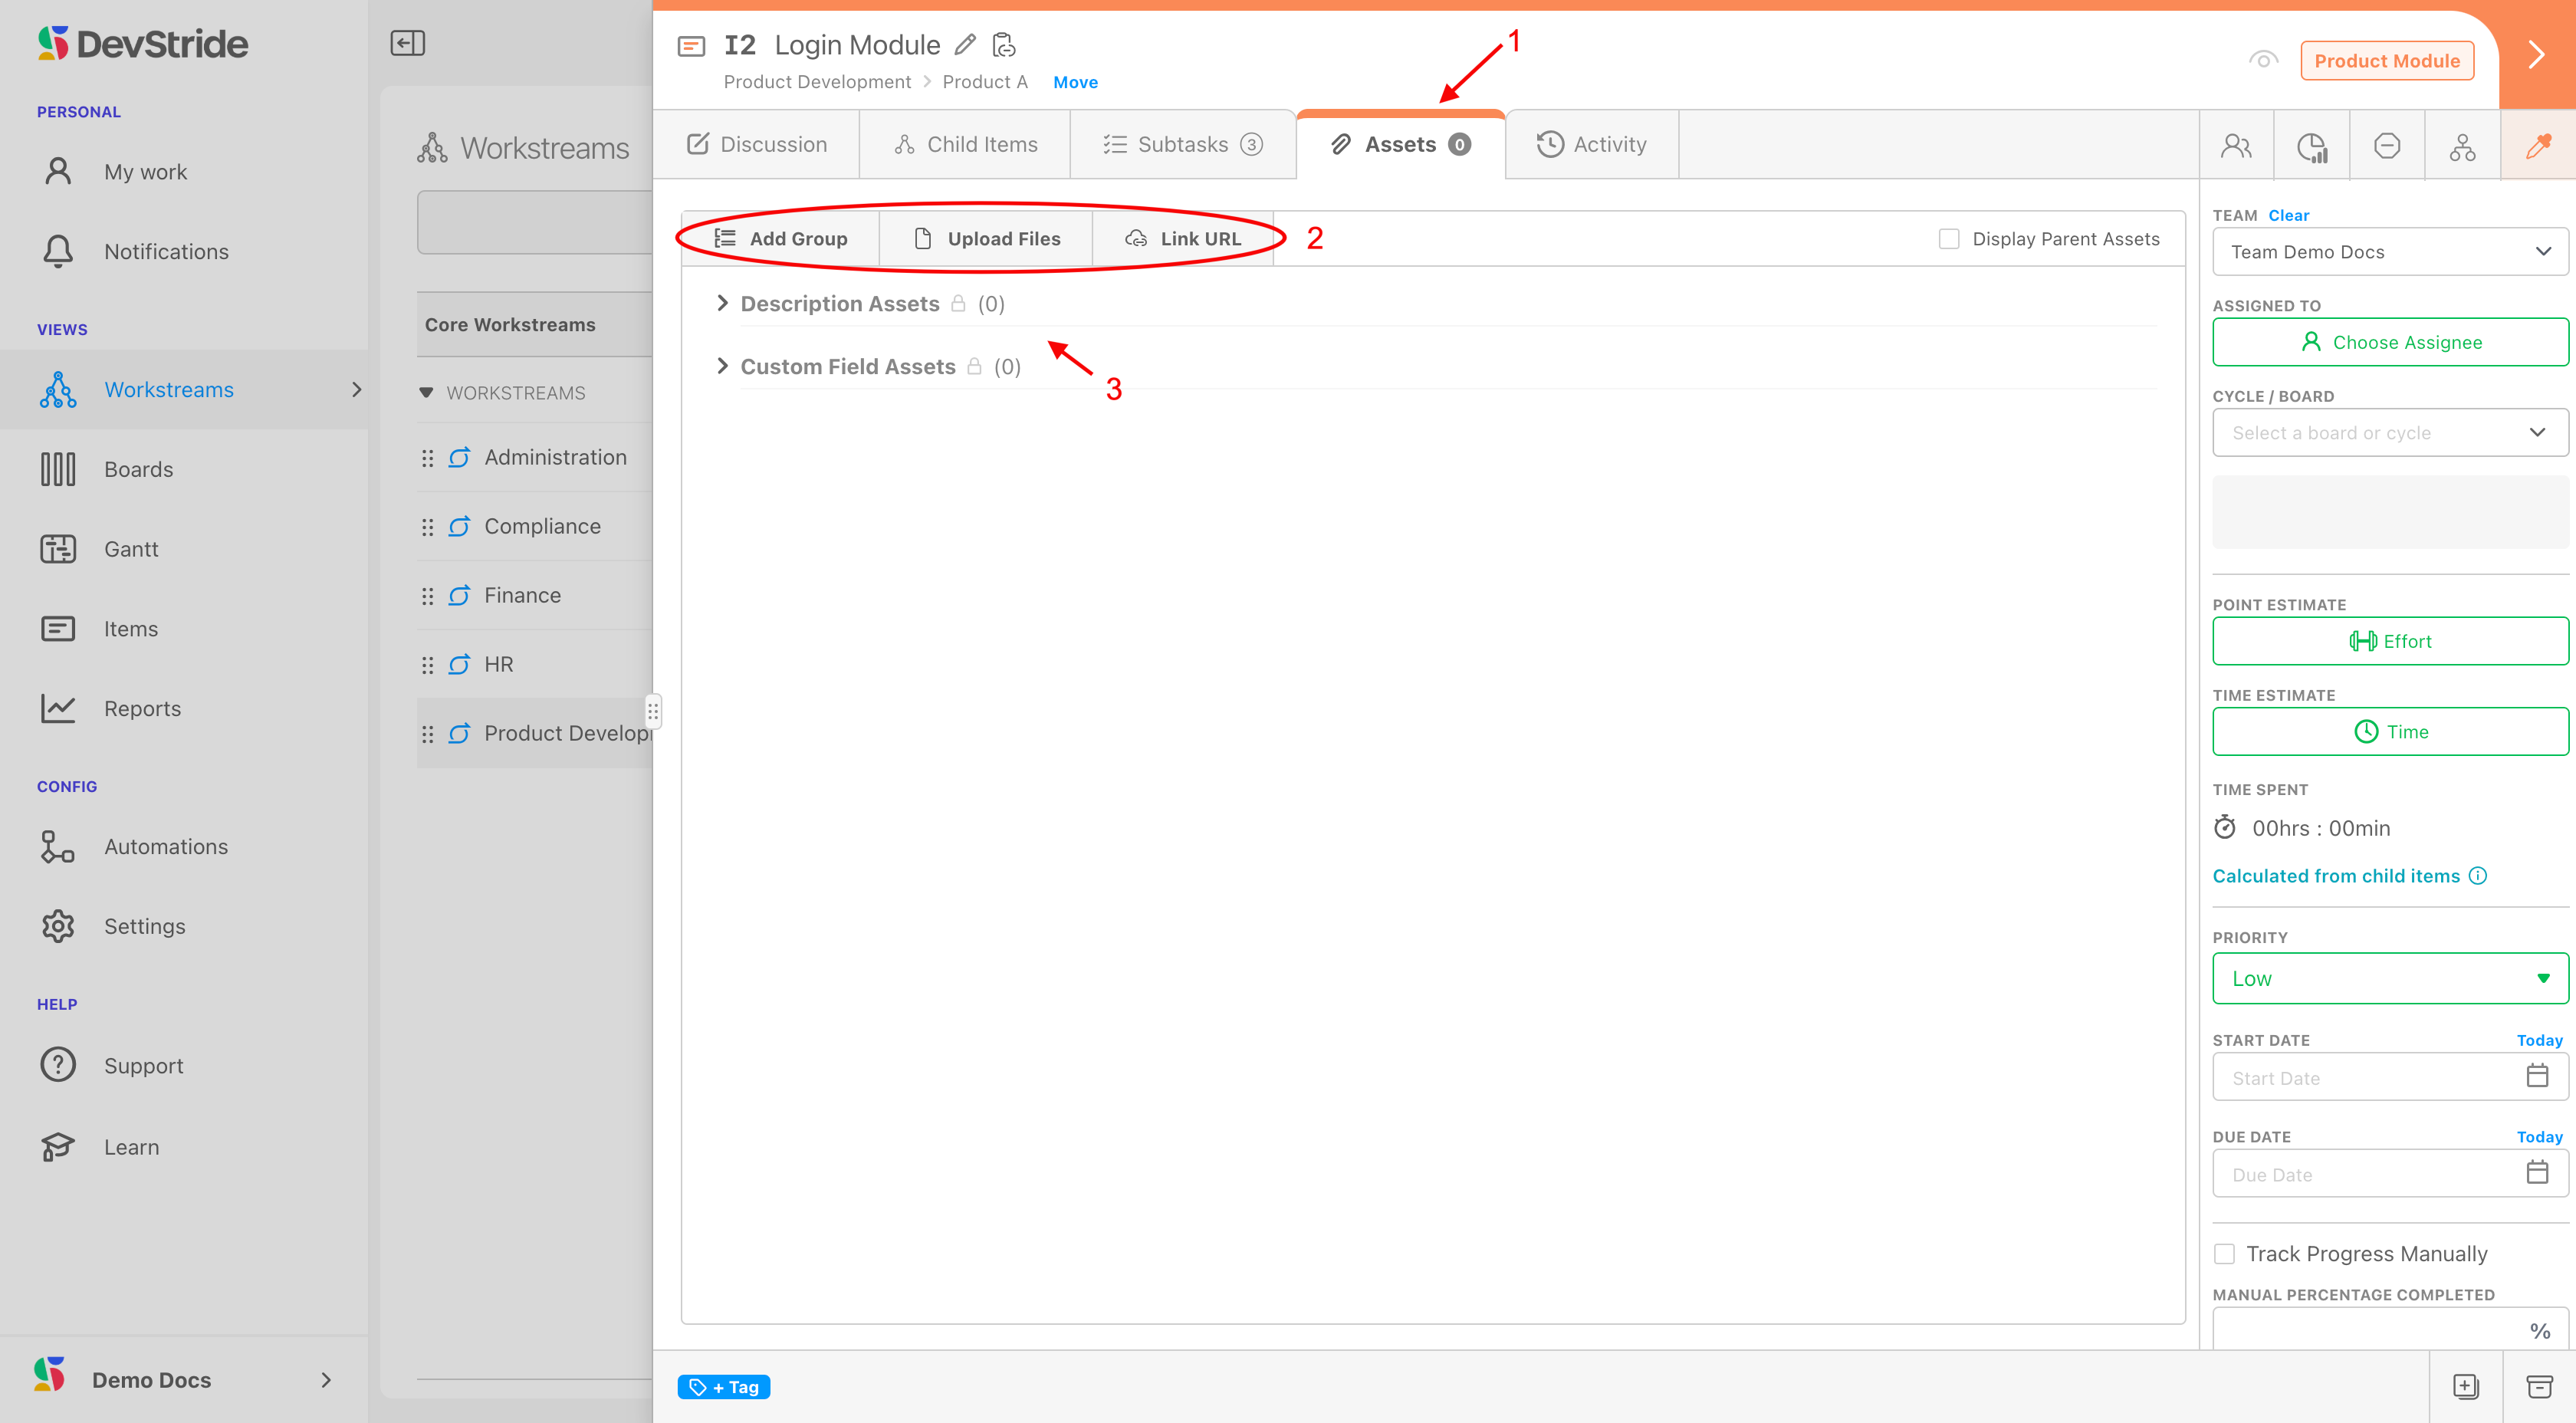
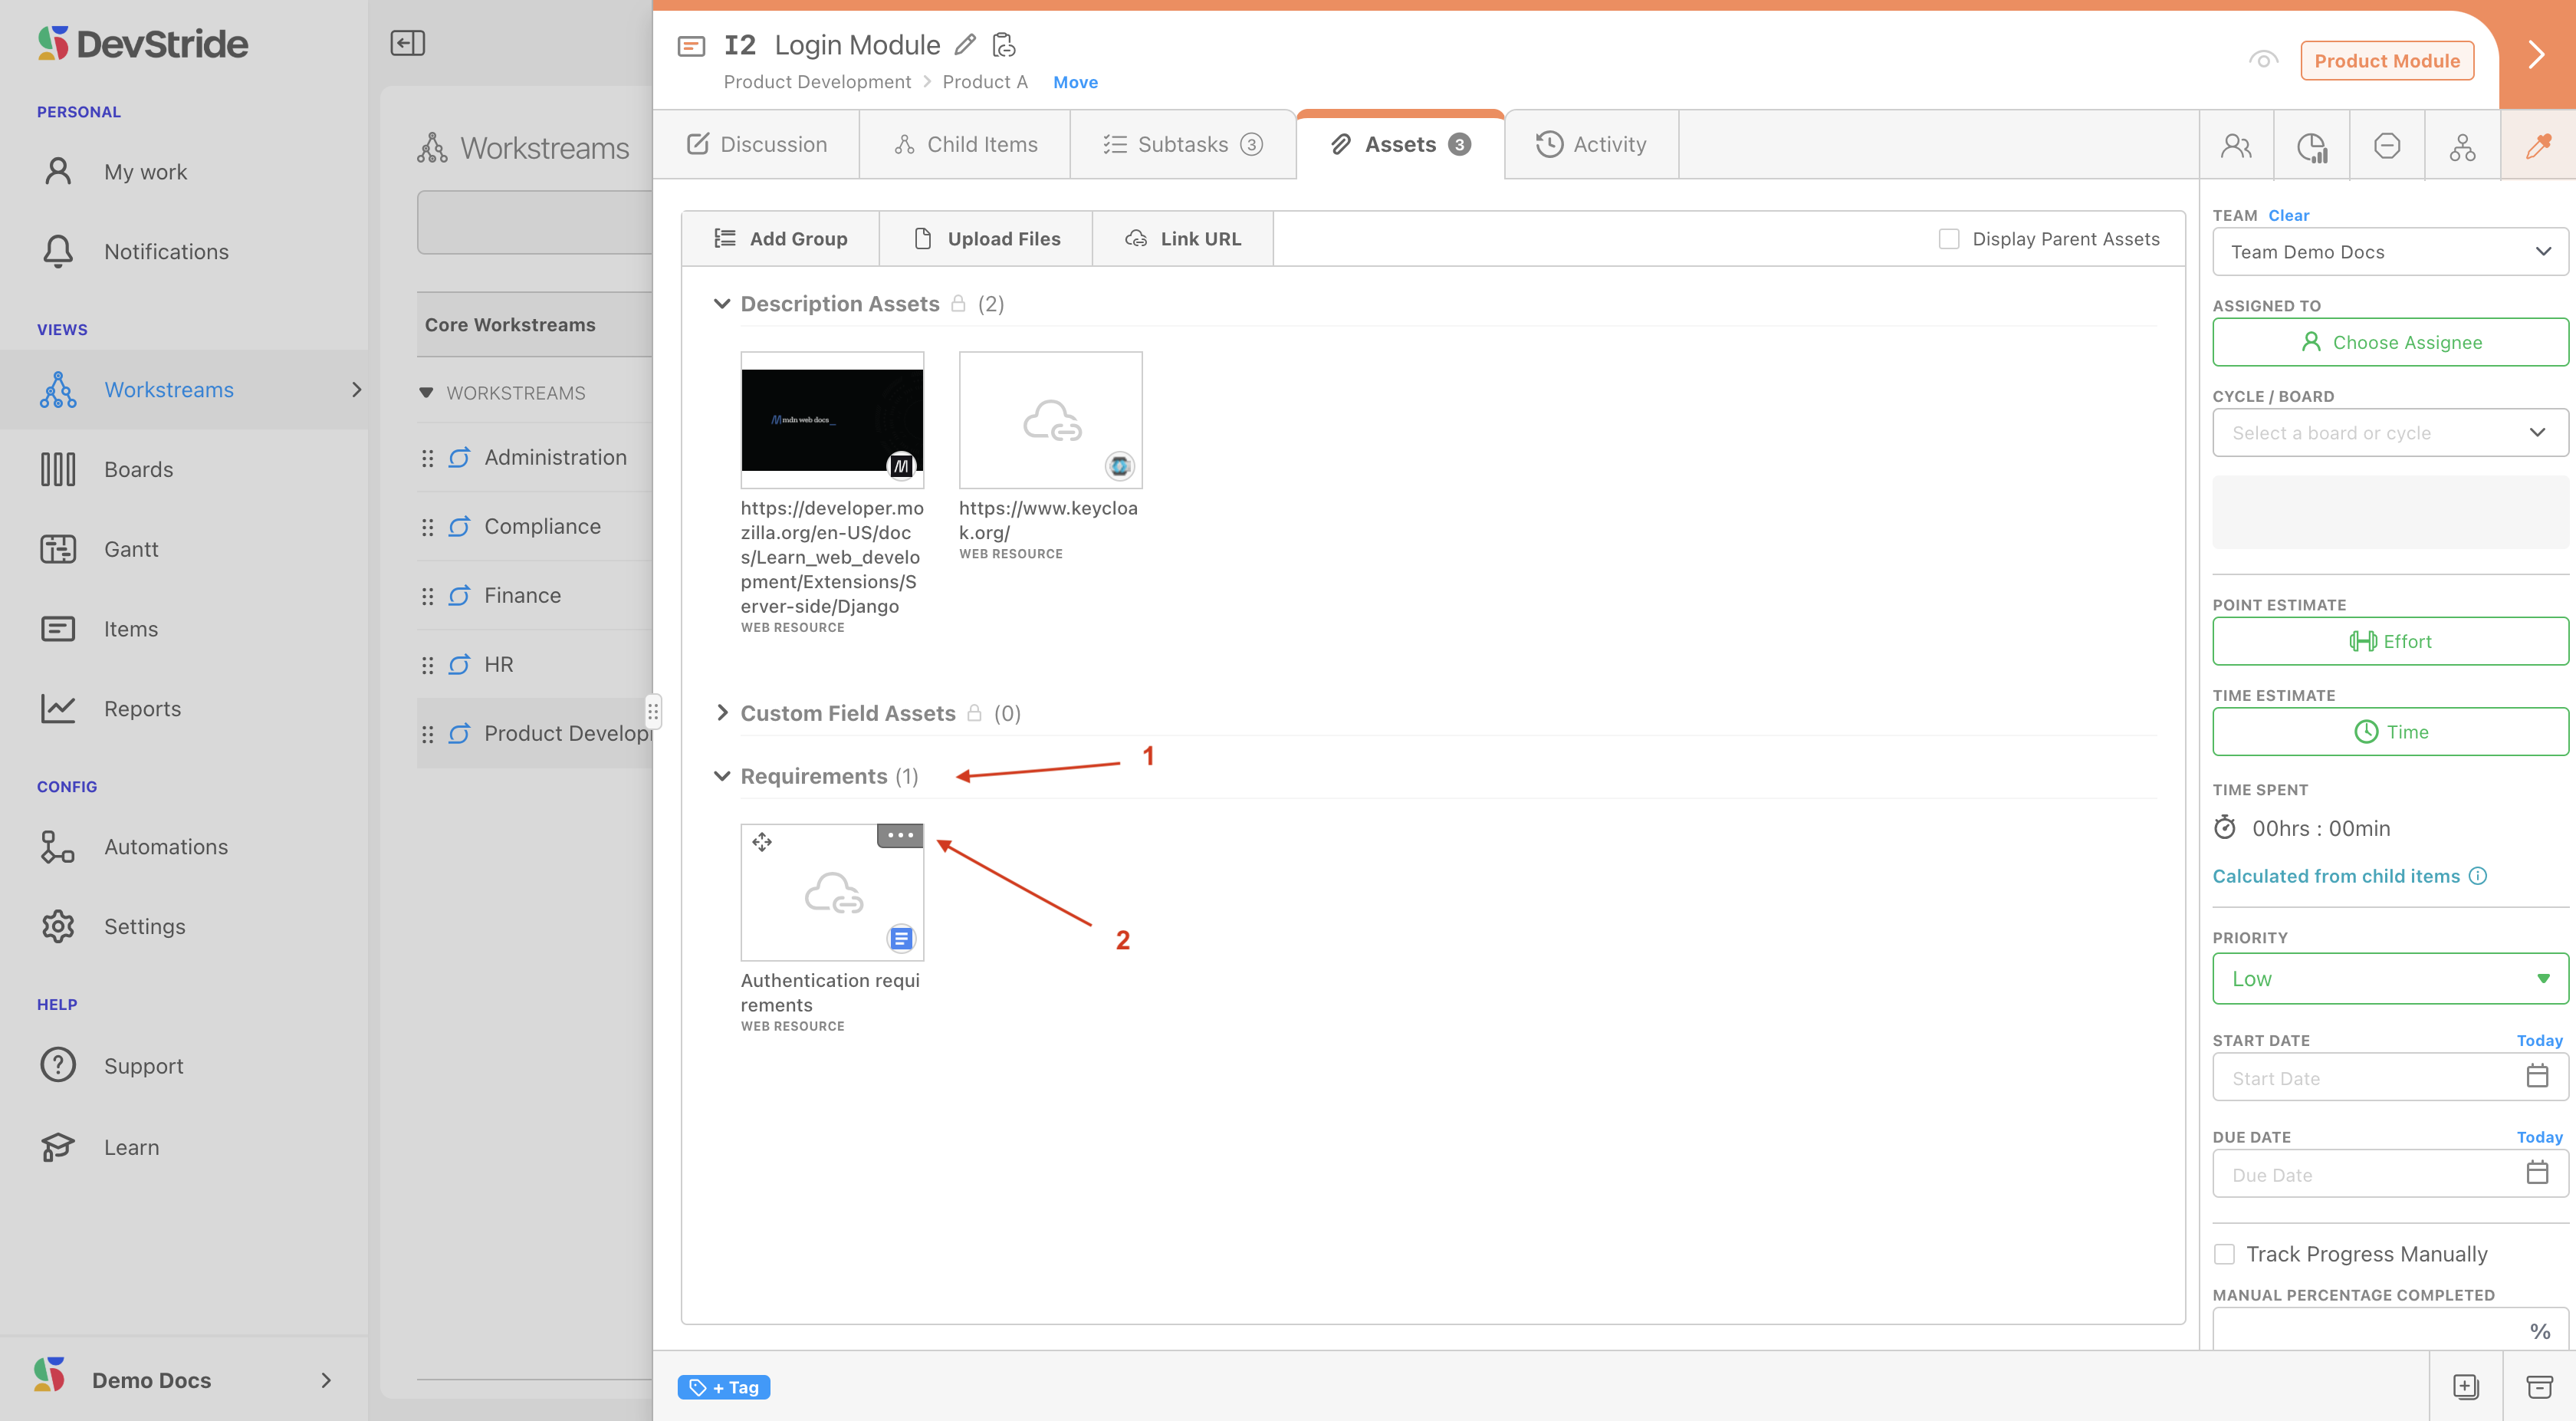
From the Assets tab (1) you can upload a file or link a URL (2). Note: Use link a URL if you want to link to a living shared file that is stored online (like Googe Docs).
You can further organize how Assets display, by clicking on Add Group and Naming it.
Assets that are mentioned in the Description Tab are auto-populate in the Description Assets Section. Assets that might be added to Custom Fields that are part of this item are auto-populated in teh the Custom Fields Assets section. See (3).
As an example, here's how to create a group and link a URL.
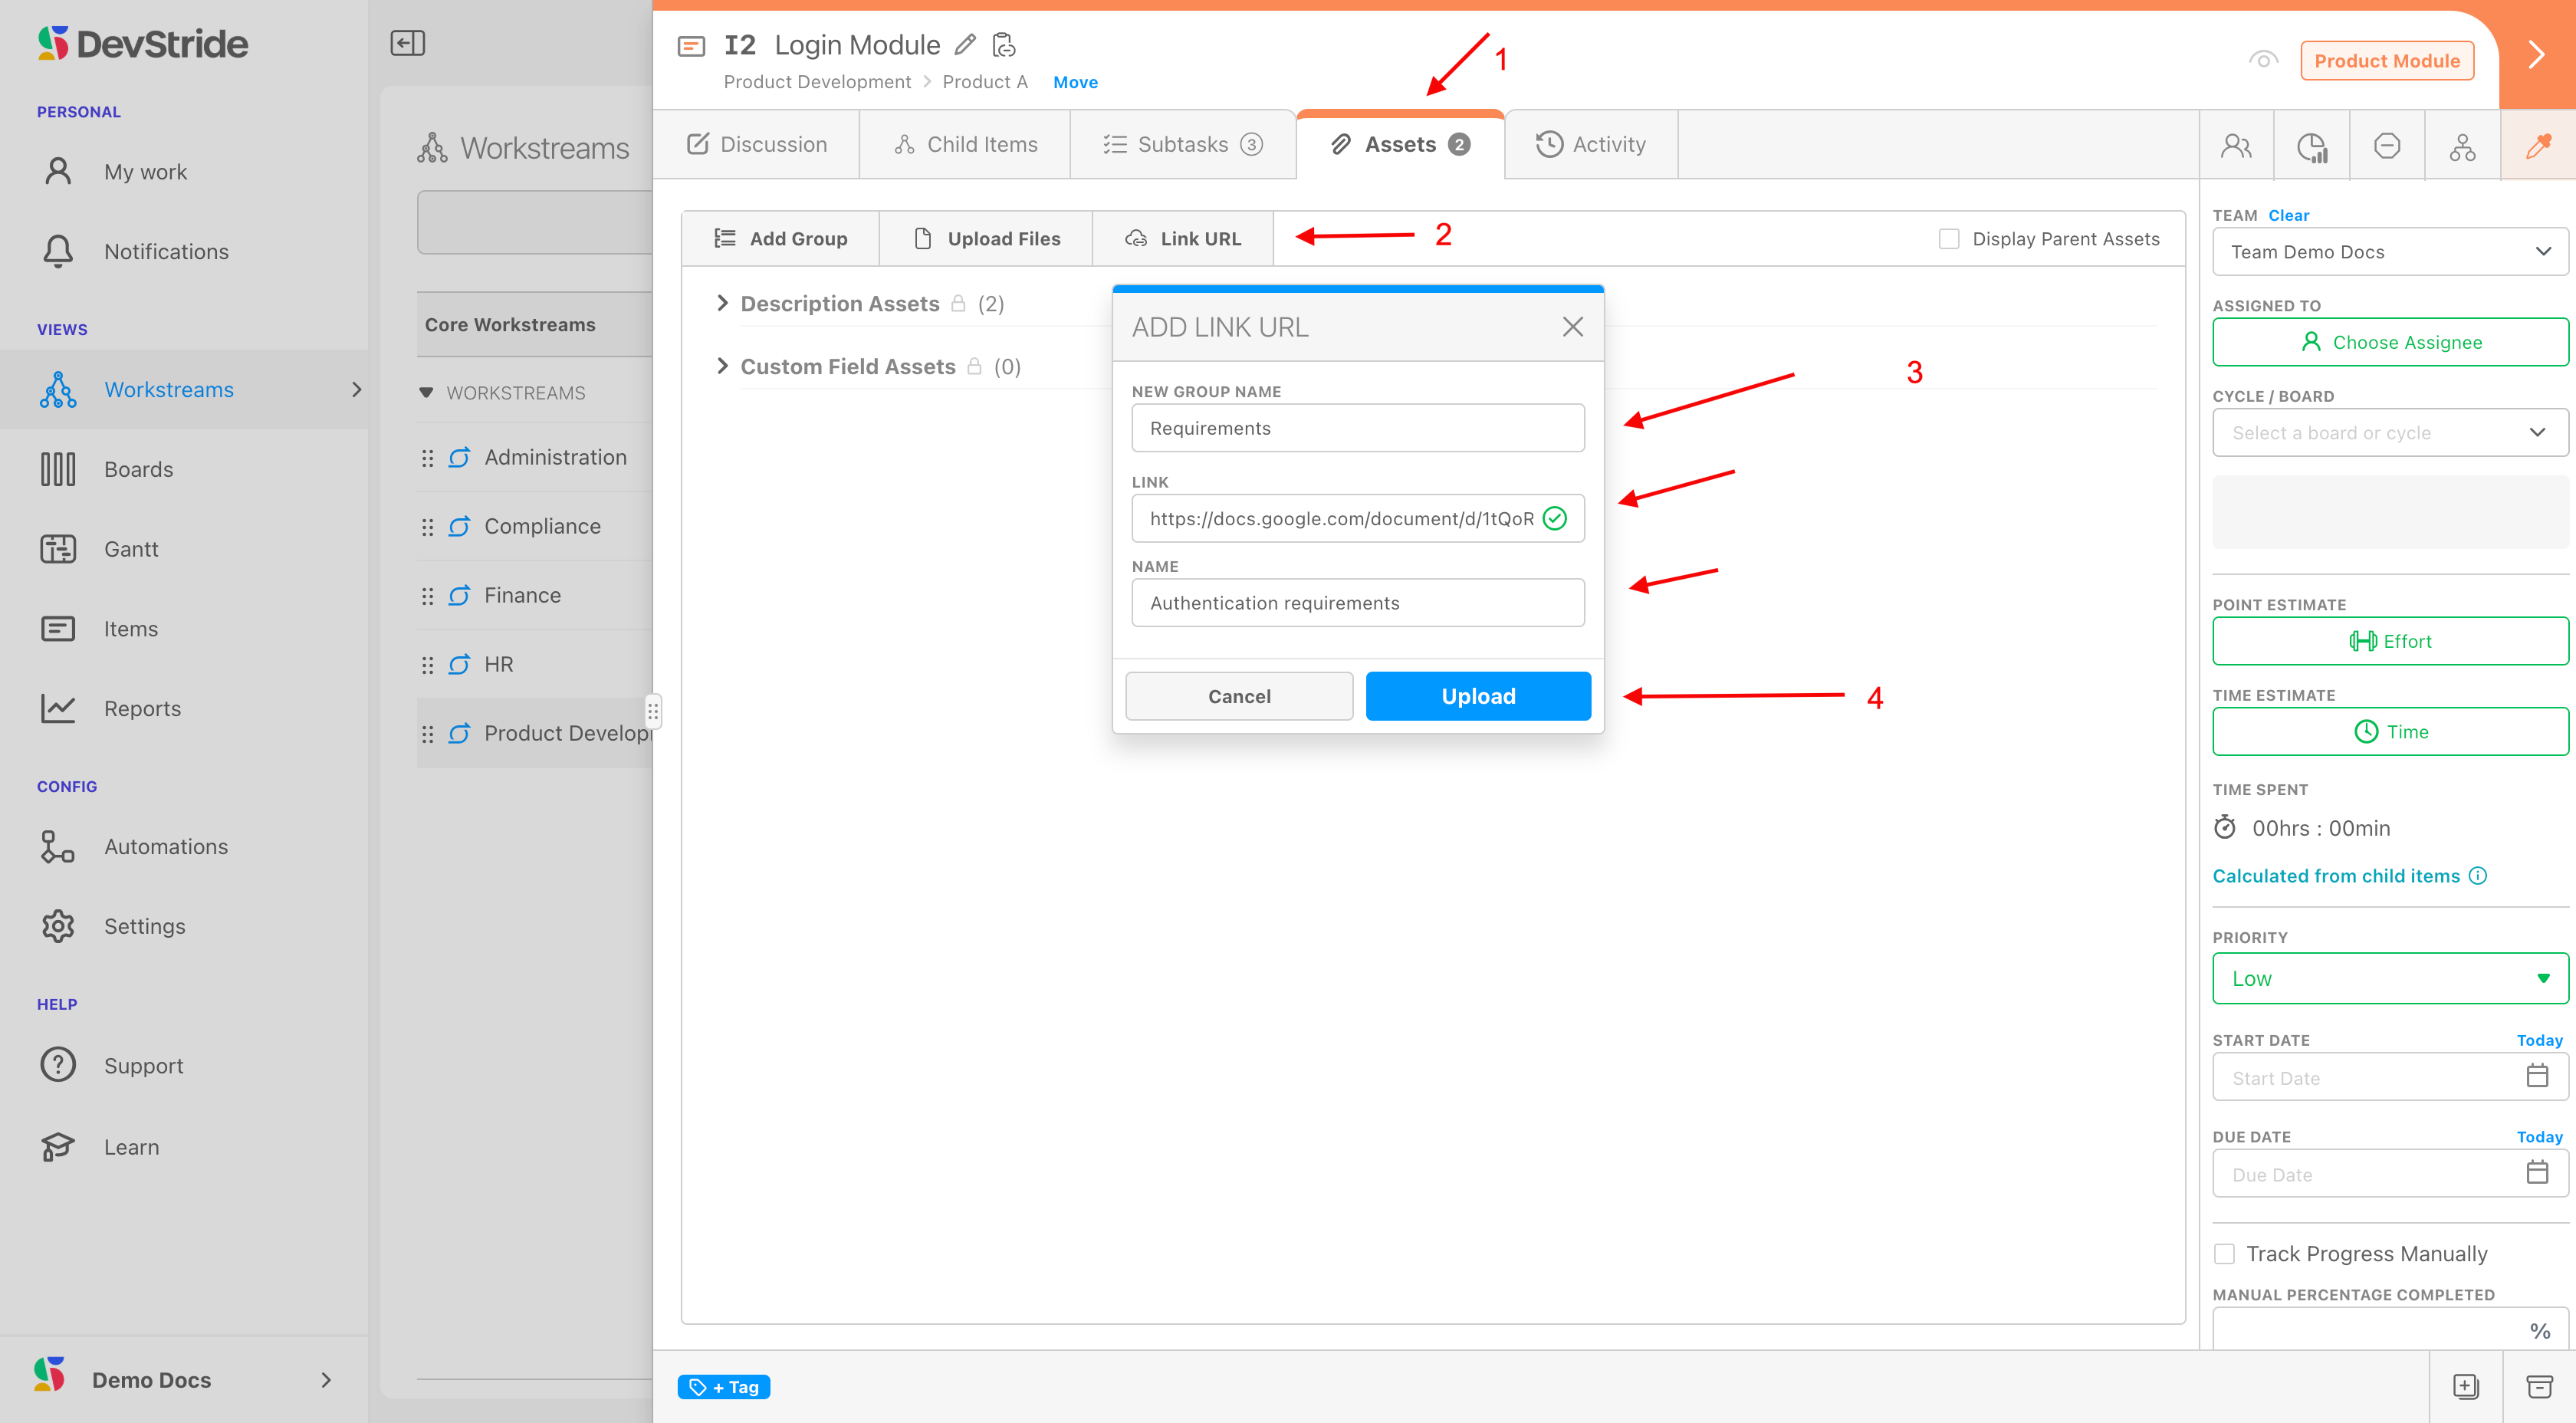
From the Assets tab (1), click Link URL (2).
Then, fill in the name of the group you would like to house this link in (3) — you can create the name at this time or select it from the drop down if you have previously created the desired group name.
During this step, you can also type or paste in the link to the file. Name the file as you would like it to display under the Group (3).
Click upload (4).
The asset will now appear in the group you created (1). You can add or remove assets from the group anytime (2).
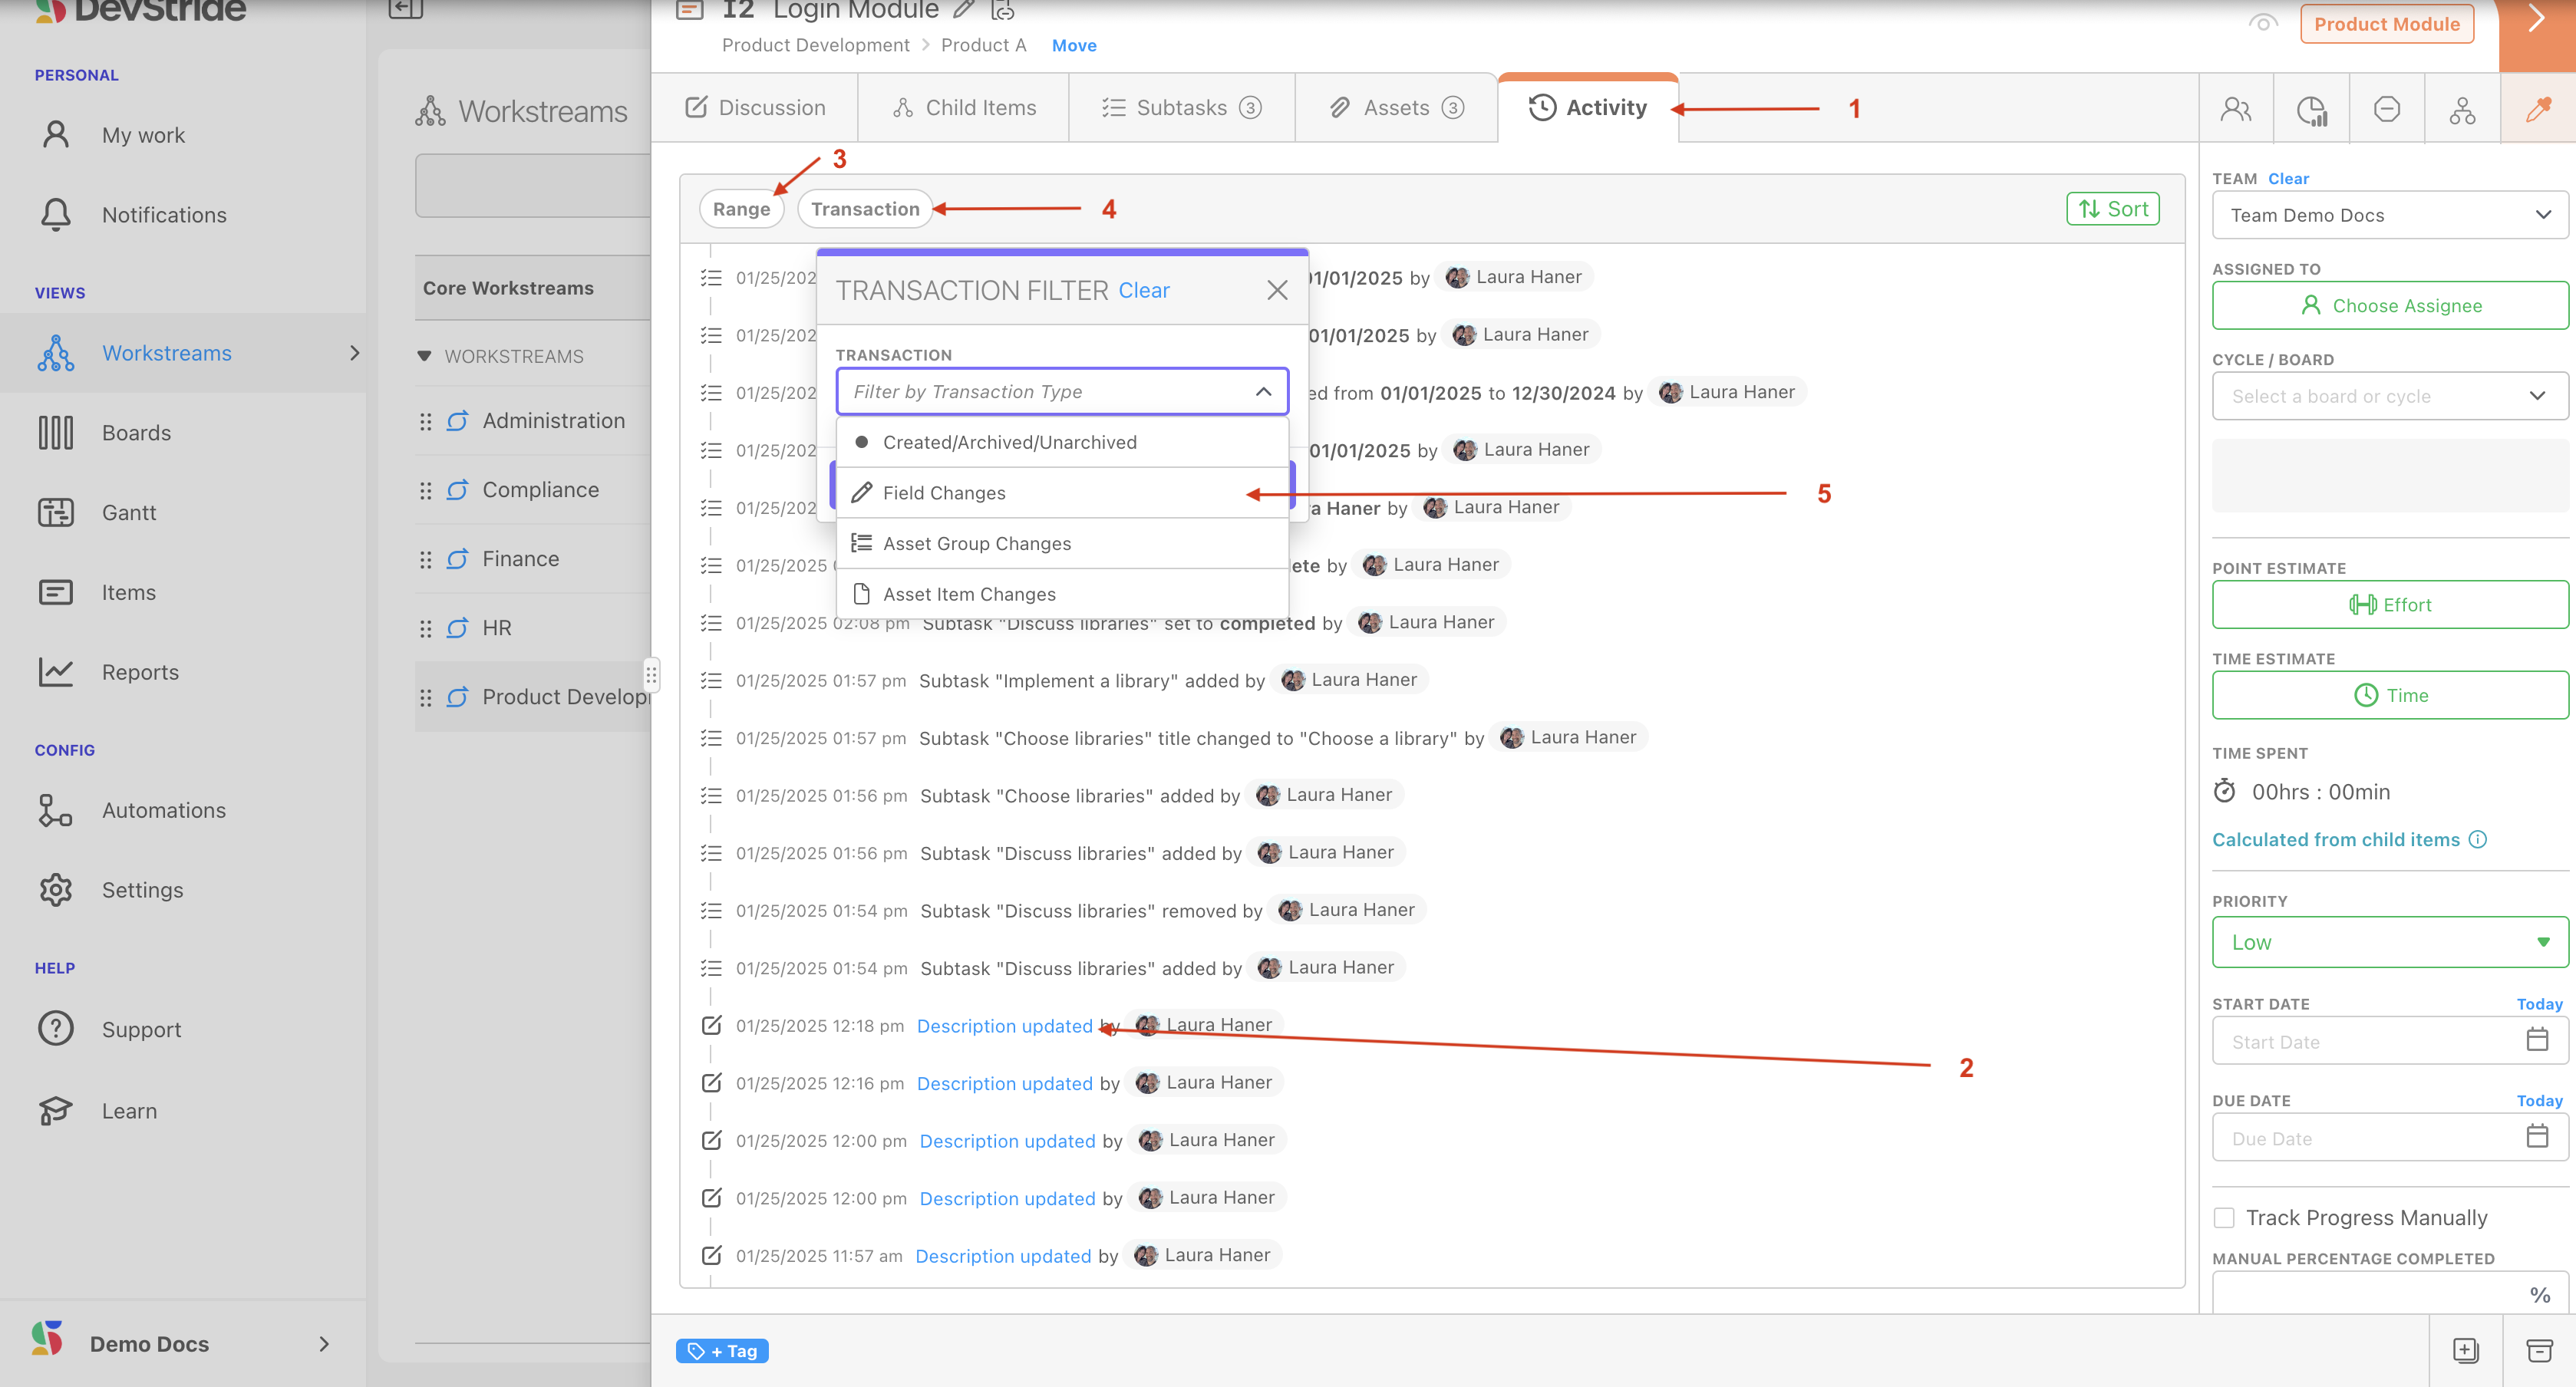
Activity Tab
The activity tab provides an audit trail. It displays all the actions that have been taken on the item. It's an immutable list, so the list of actions on this list cannot be deleted.
If you ever need to track down who made a particular change or when they changed it, the Activity Tab (1) provides that information.
You can interact with the list of activities (2) by clicking on links, searching by date range (3) and transaction type (4-5).
Next, let's take a look at the item workspace quick links.
Was this article helpful?