O5: Admin Onboarding - Item Workspace Tour
- 19 Feb 2025
- 26 Minutes to read
- Contributors

- Print
- DarkLight
O5: Admin Onboarding - Item Workspace Tour
- Updated on 19 Feb 2025
- 26 Minutes to read
- Contributors
- Print
- DarkLight
Article summary
Did you find this summary helpful?
Thank you for your feedback
Configure Item Properties
The items we created in the steps above are really just a shell with a name at this point.
Each item has a data model underneath it where we can track a host of details about the items.
You can also customize the properties that will appear on items to match your workflow requirements such as custom fields, priority levels, and estimation types.
Item Workspace Tour: Header
Let's open an item and take a look at what we can manage about items.
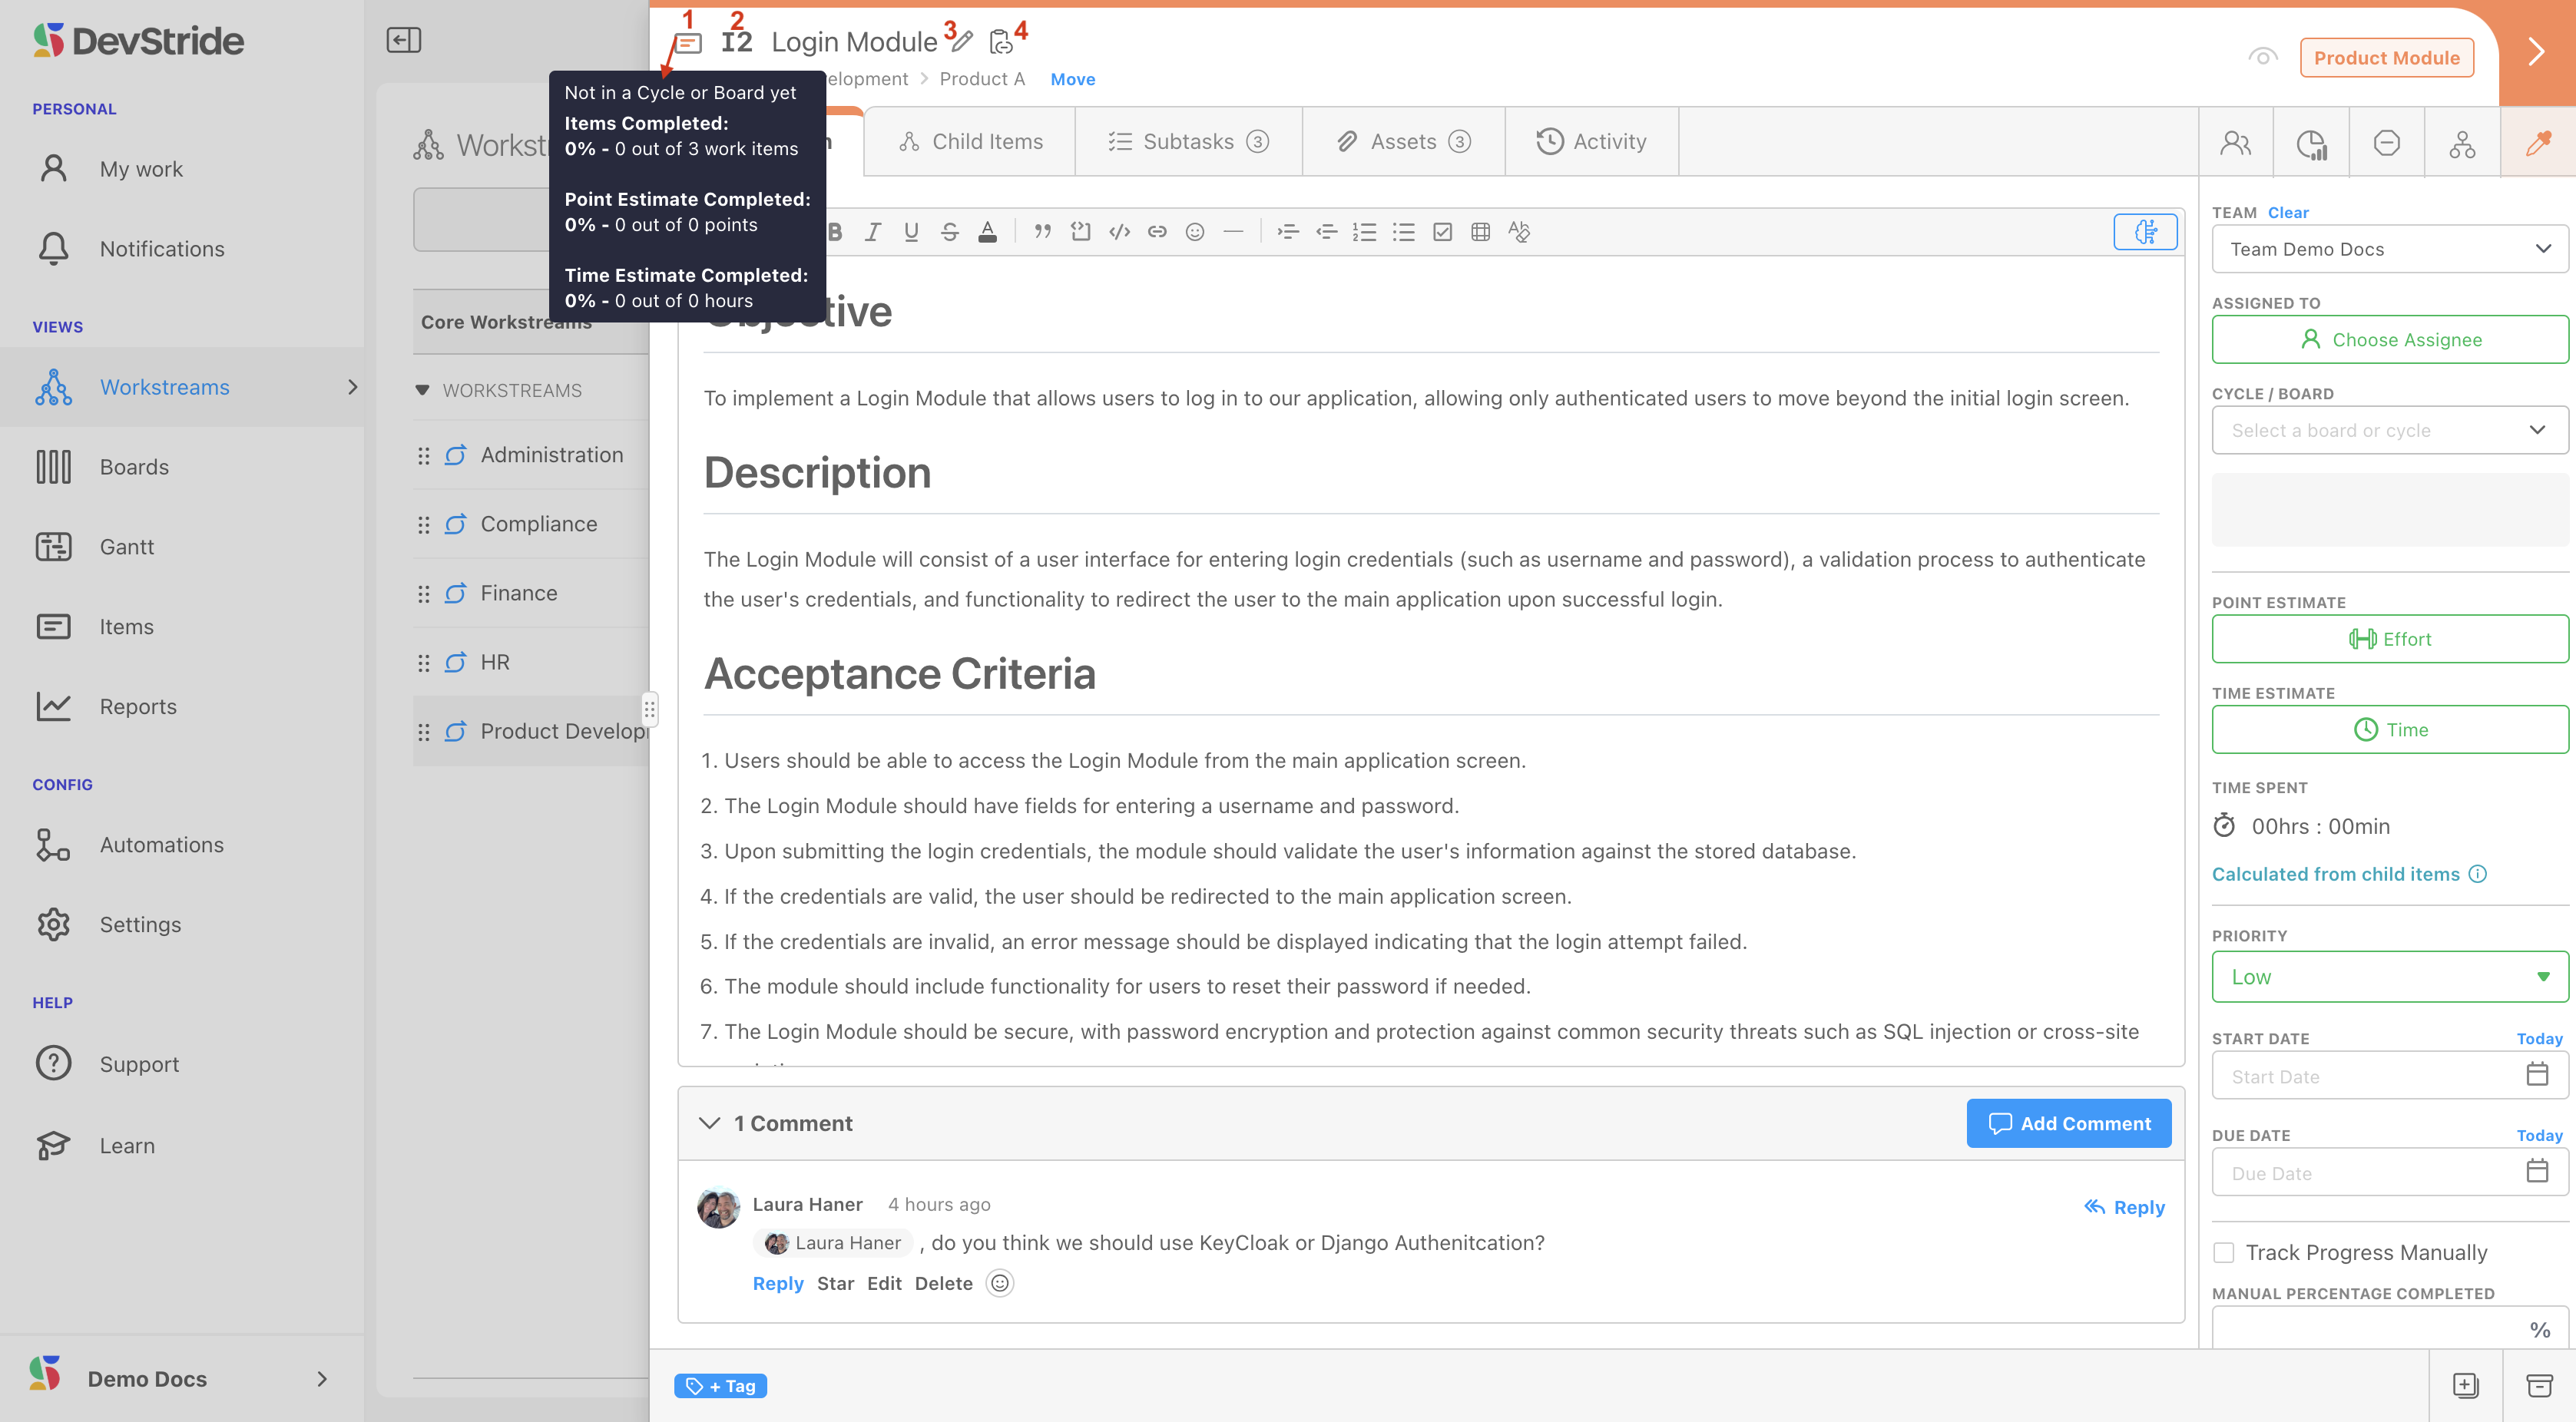
Item Header
There are several pieces of information about the item that we can get right from the header.
- Item card (1) - displays completion stats
- Item number (2) - this is a system-assigned number in the DevStride database. It starts with "I" for Item.
- Item name (3) - you can edit the name by clicking on the pencil icon. The new name will display system-wide.
- Copy item link (4) - this can be used to create a link that when clicked will drop the user right back to this item. This is great for referring to items in Slack, email, on lists, etc. It can clicked on from anywhere or pasted right in a new browser instance. It is a link that works internet-wide for any logged-in users.
Breadcrumb Trail
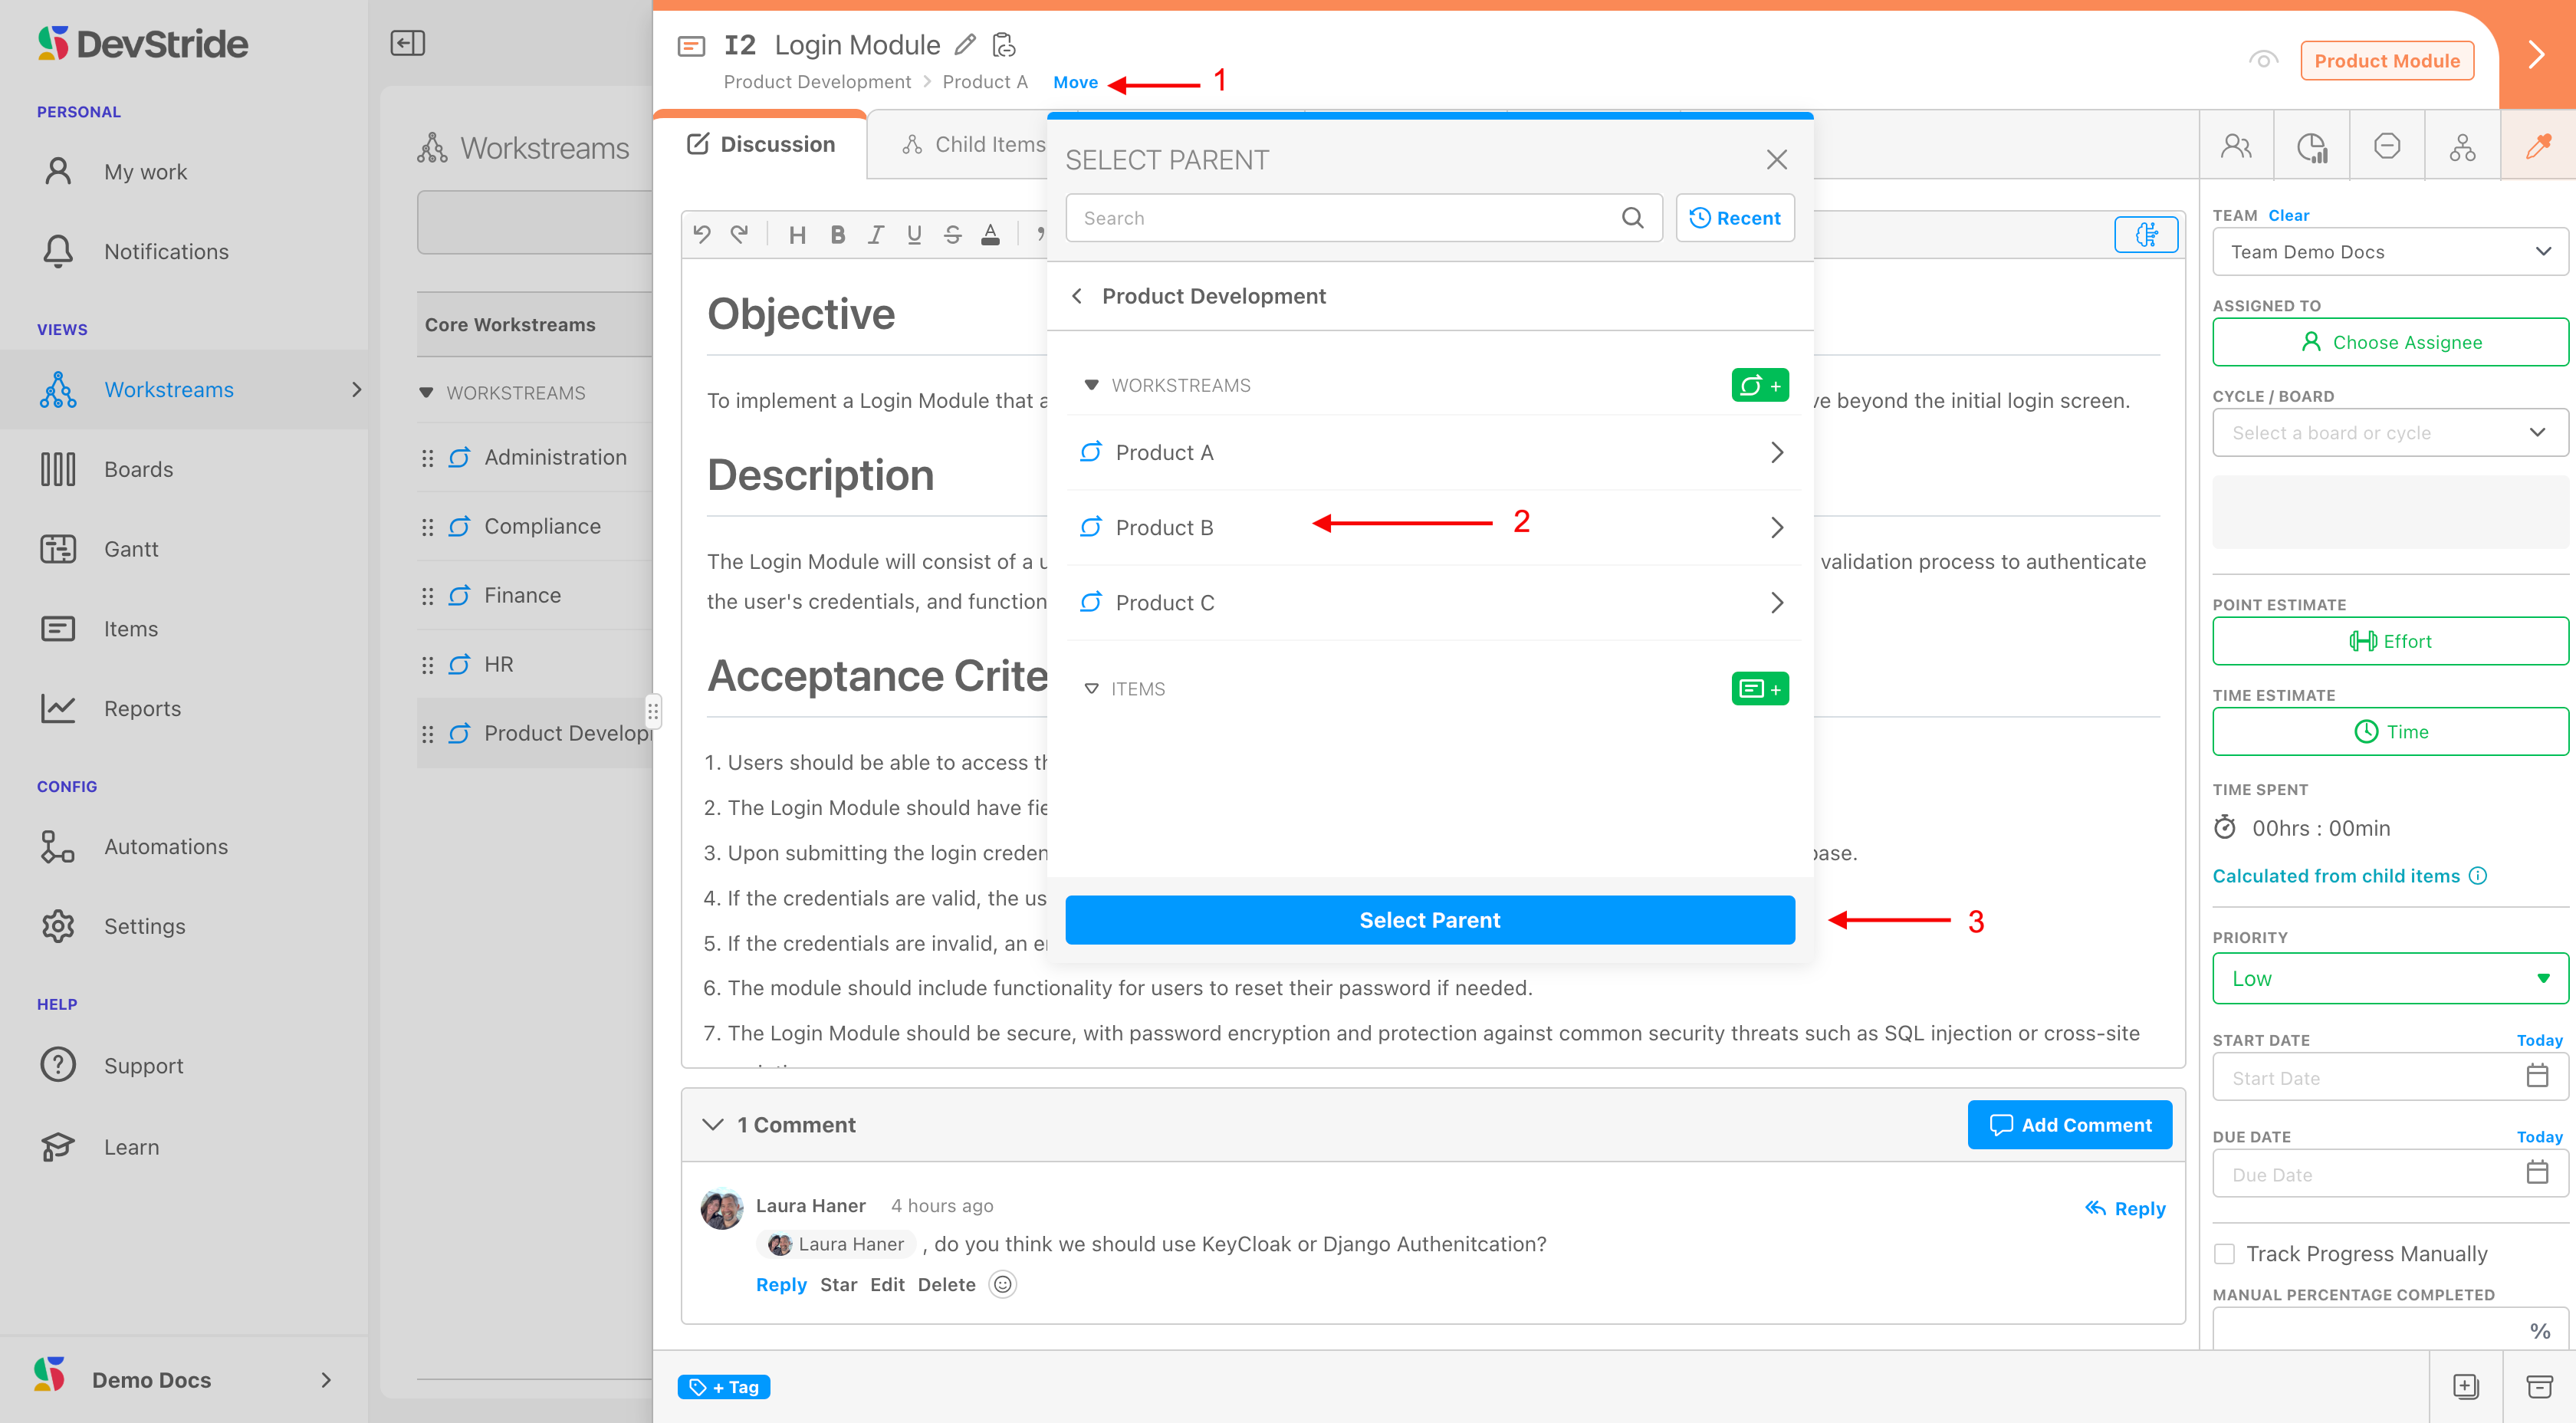
The breadcrumb trail under the item name reflects where the item is in the Workstream map. In addition to using it to navigate to other places in the workstream, you can move the item to a different location from here.
To move an item, click on the Move link (1). In the pop-up box that displays, select where you want to move the item to by navigating to and clicking on the desired location in the workstream (2). Click Select Parent (3).
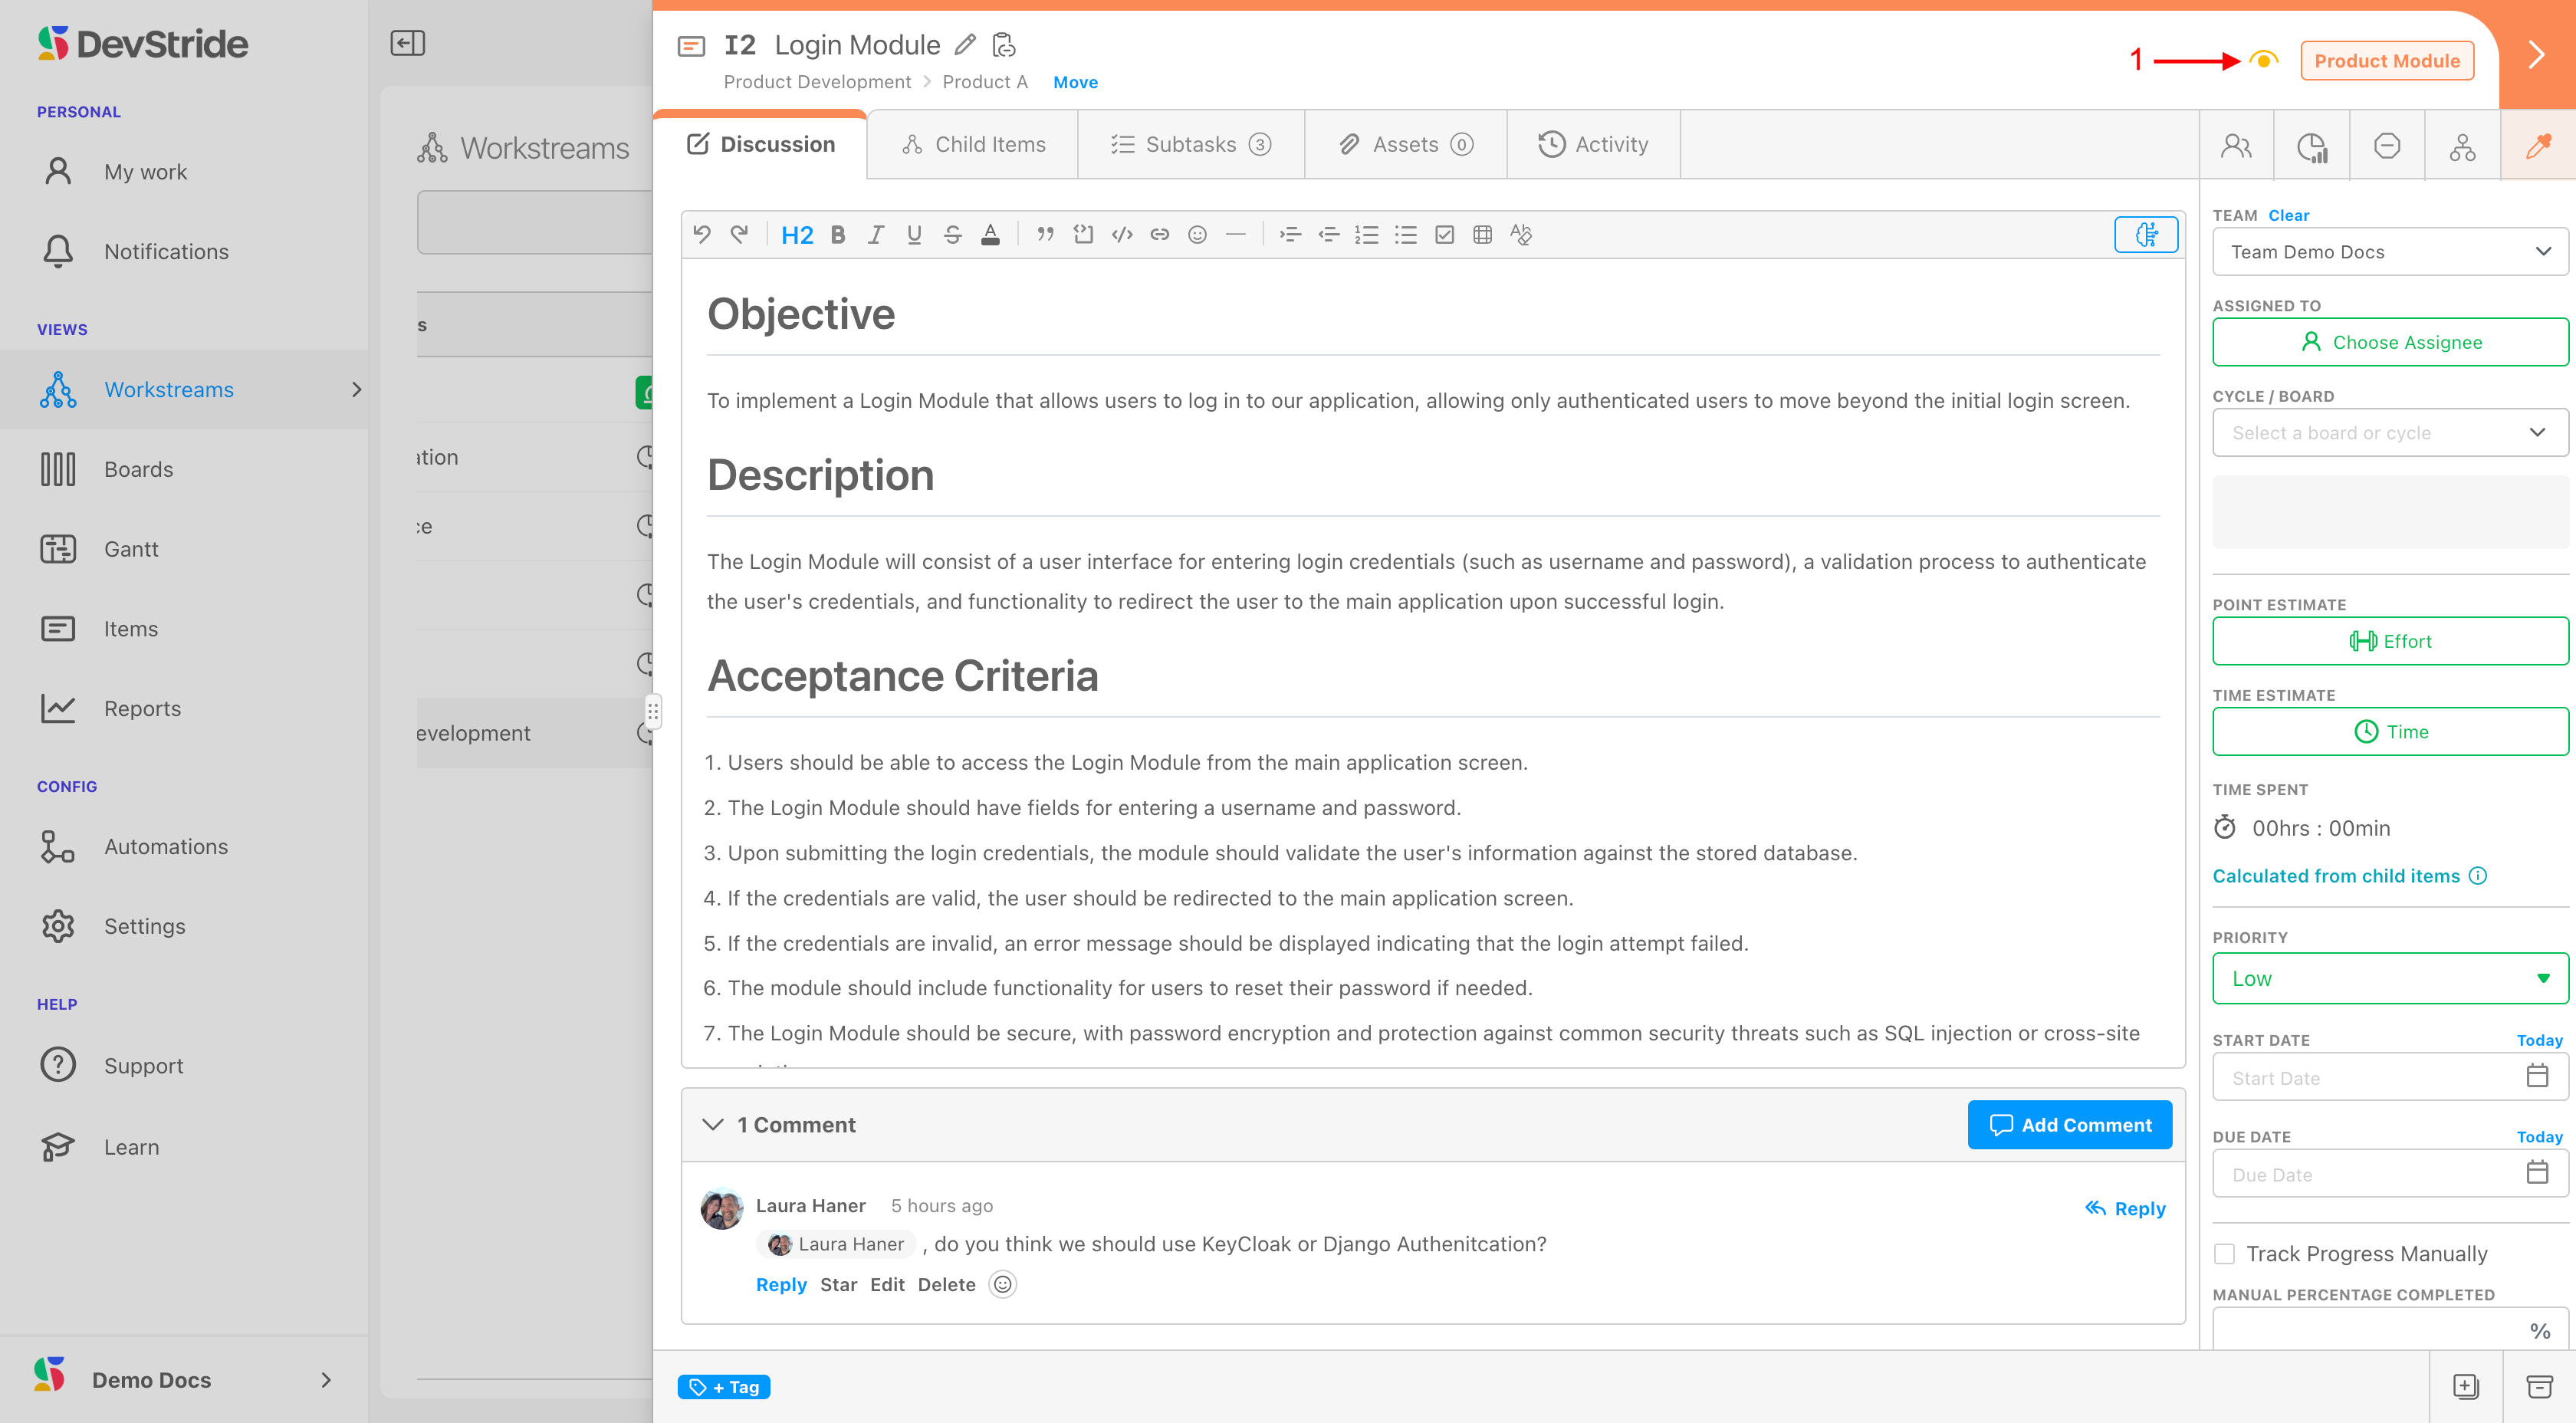
Watcher
If you would like to be included on notifications and changes about a particular item, you can click on this link (1).
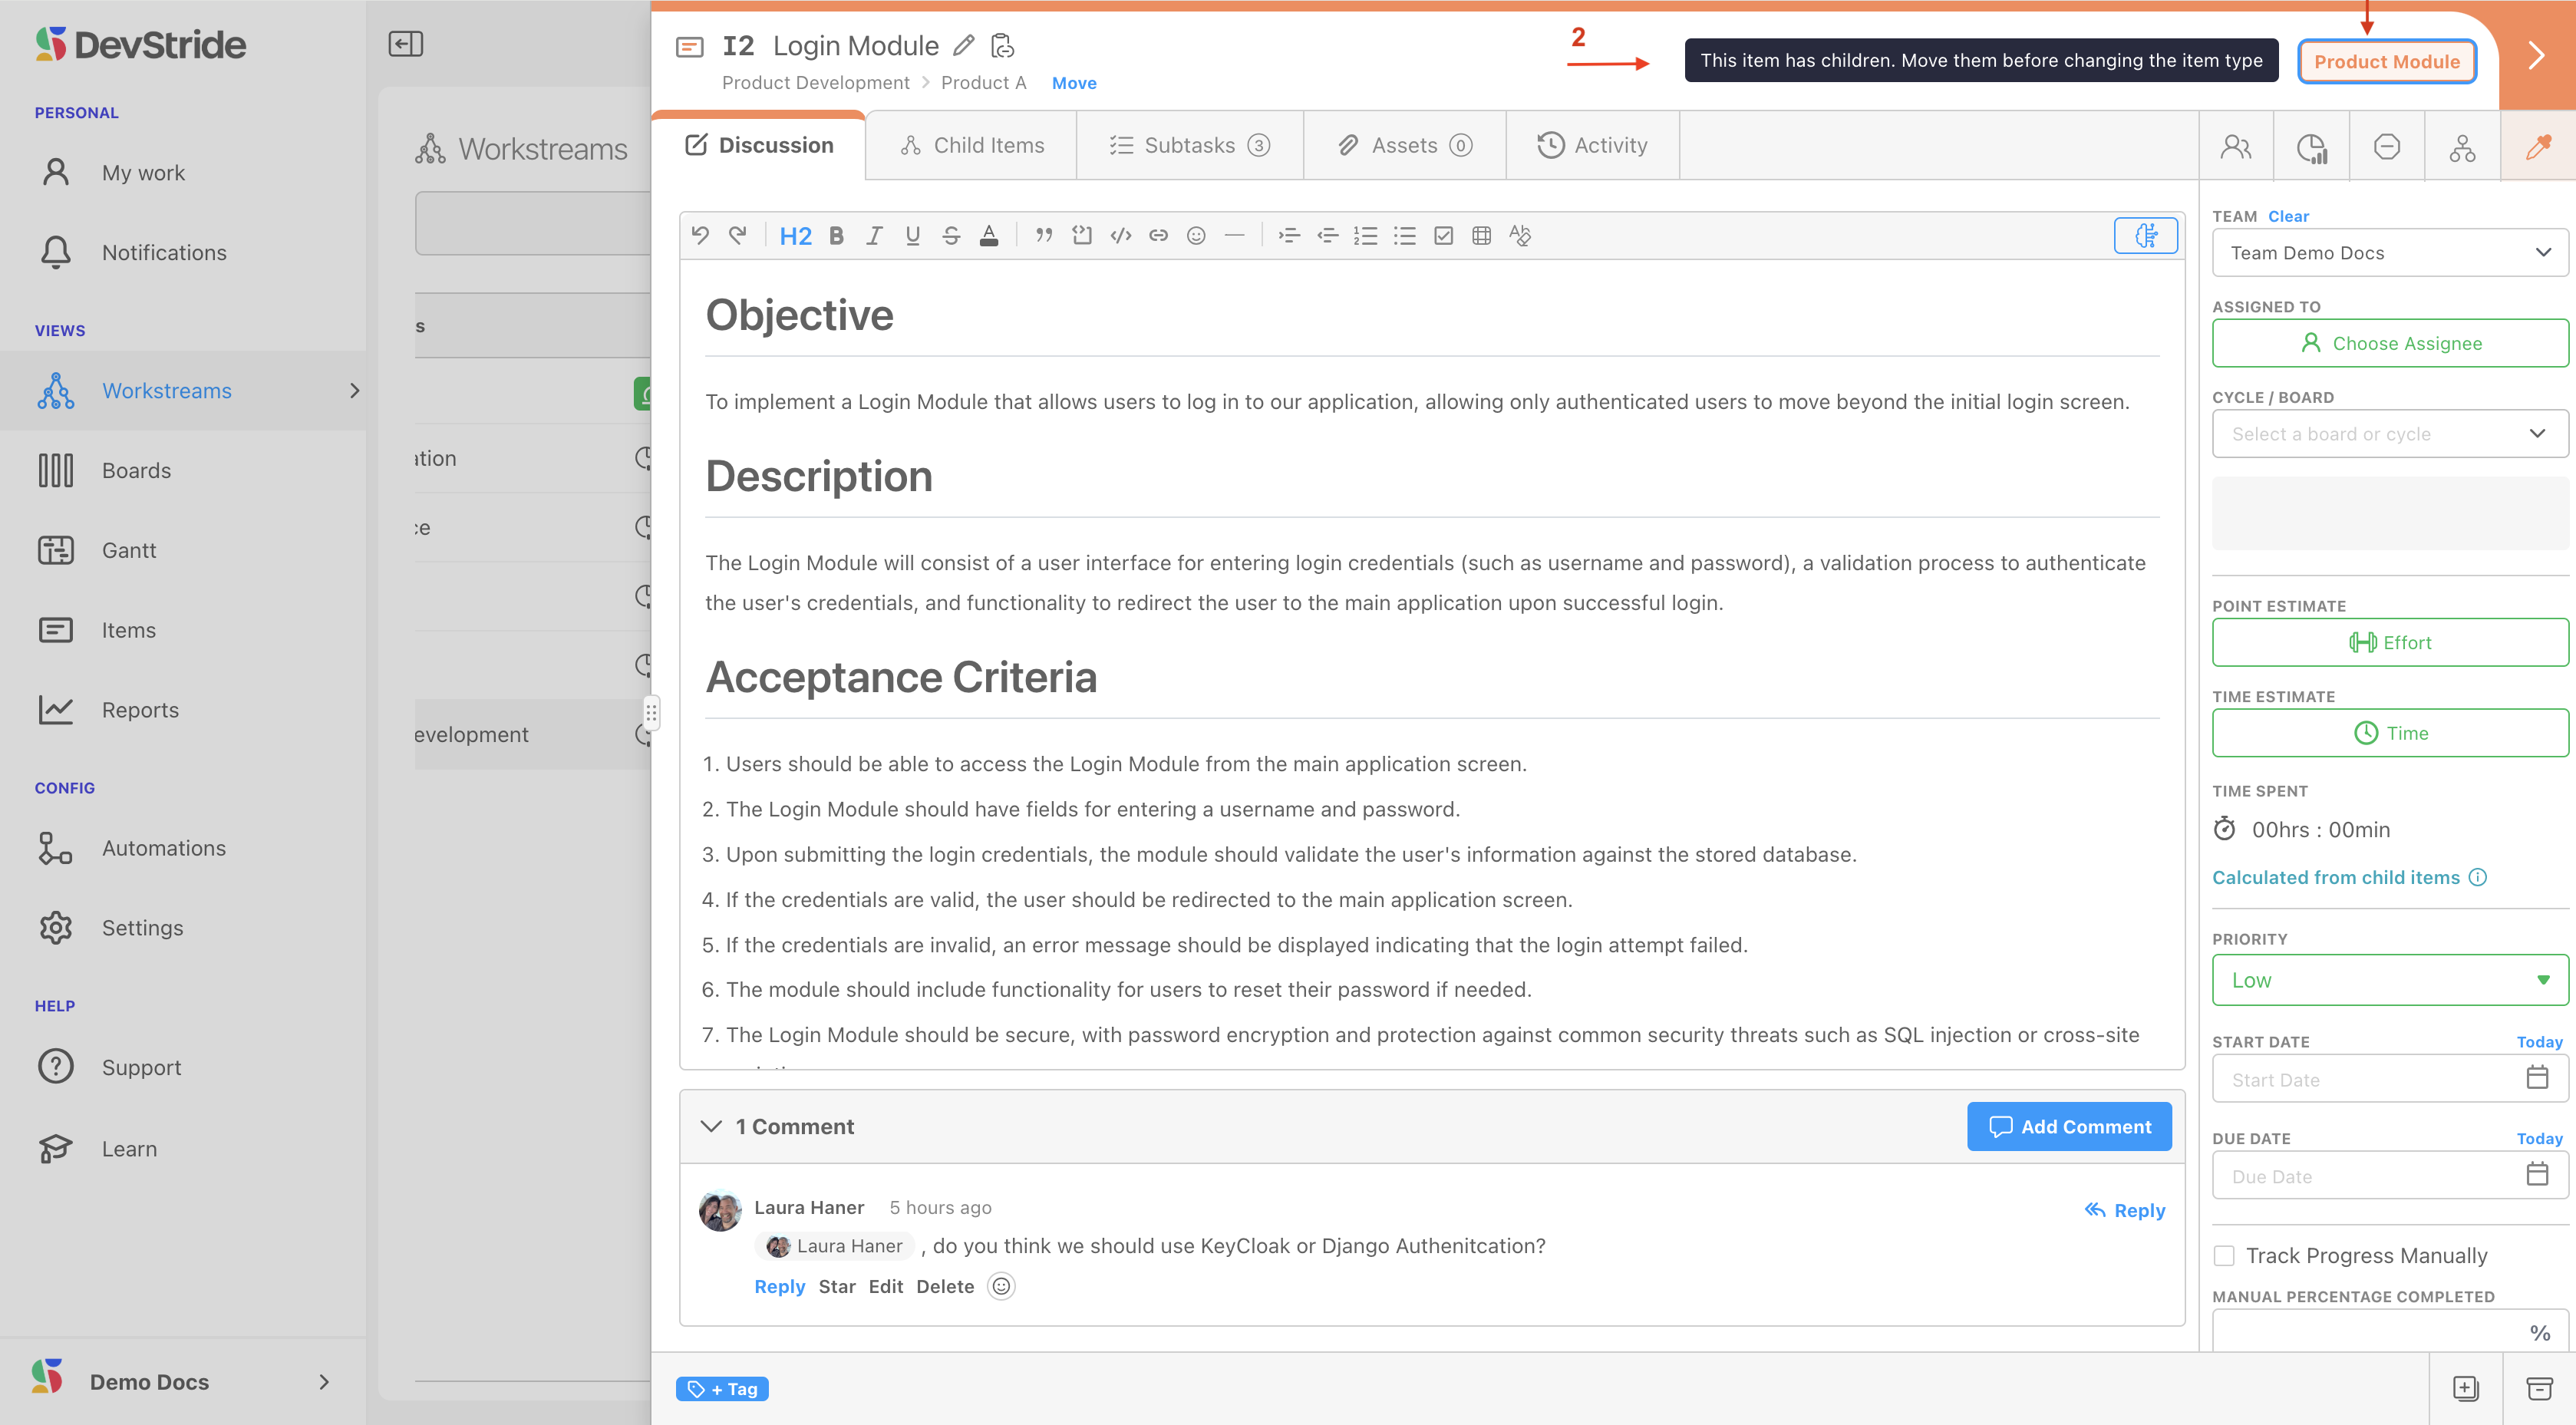
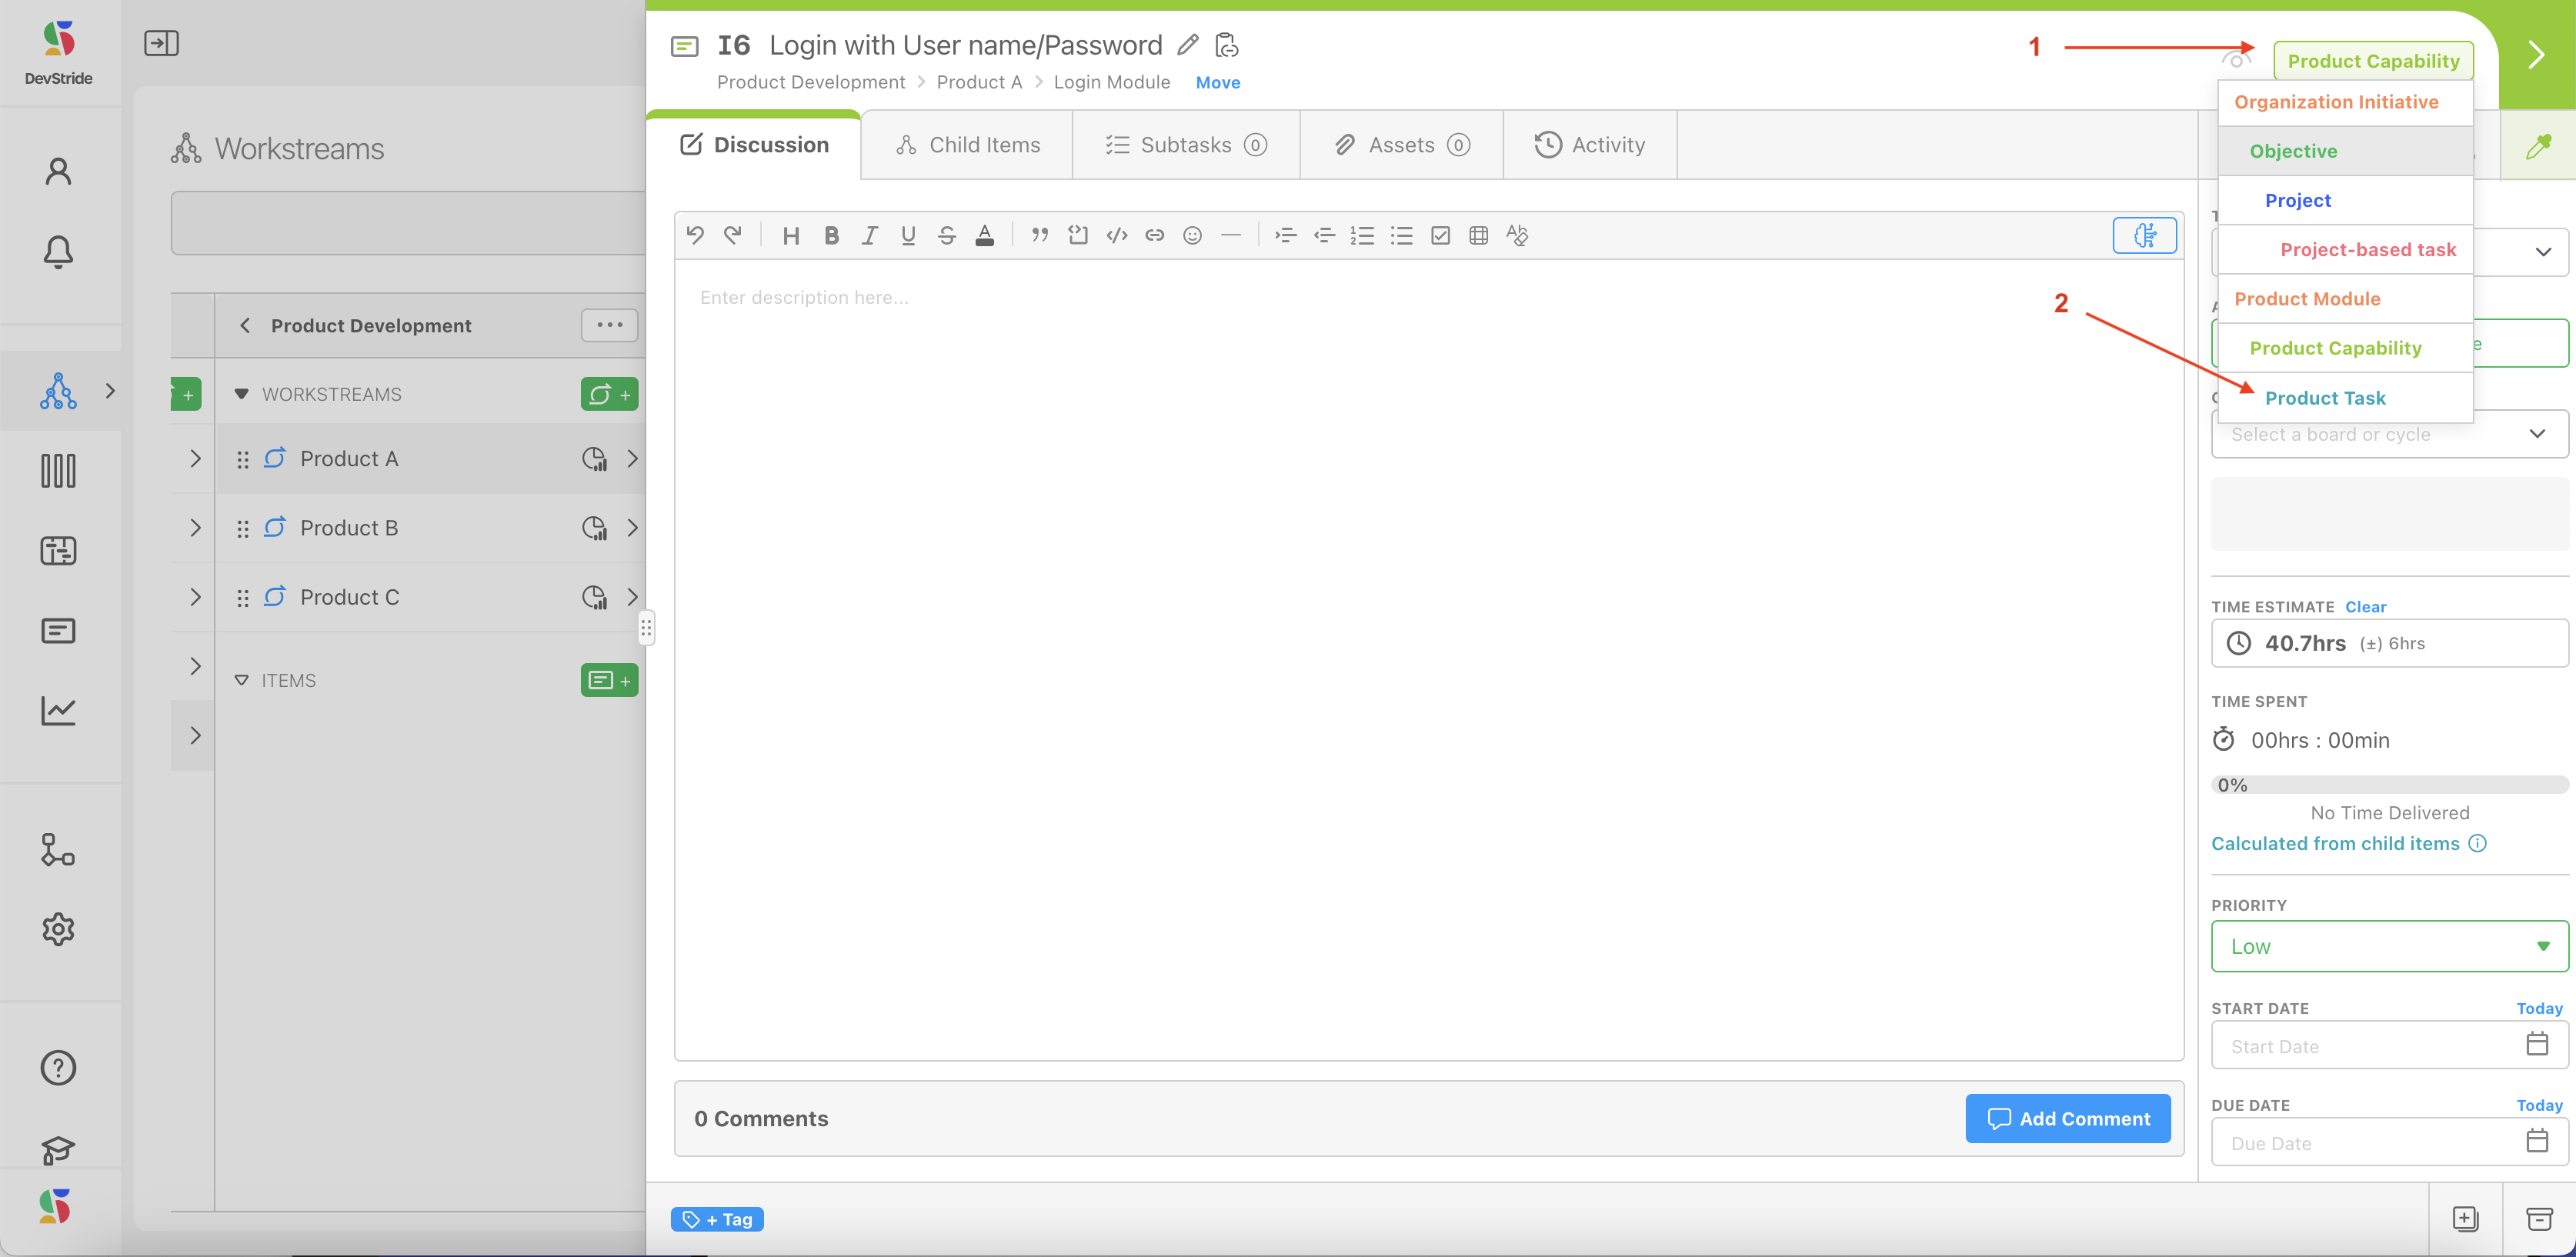
Item type label
The label on the far right indicates the item type. You can click it (1) and edit it to be a different item type, but only if it doesn't have children. This is what is displayed if an item type already has children underneath it (2).
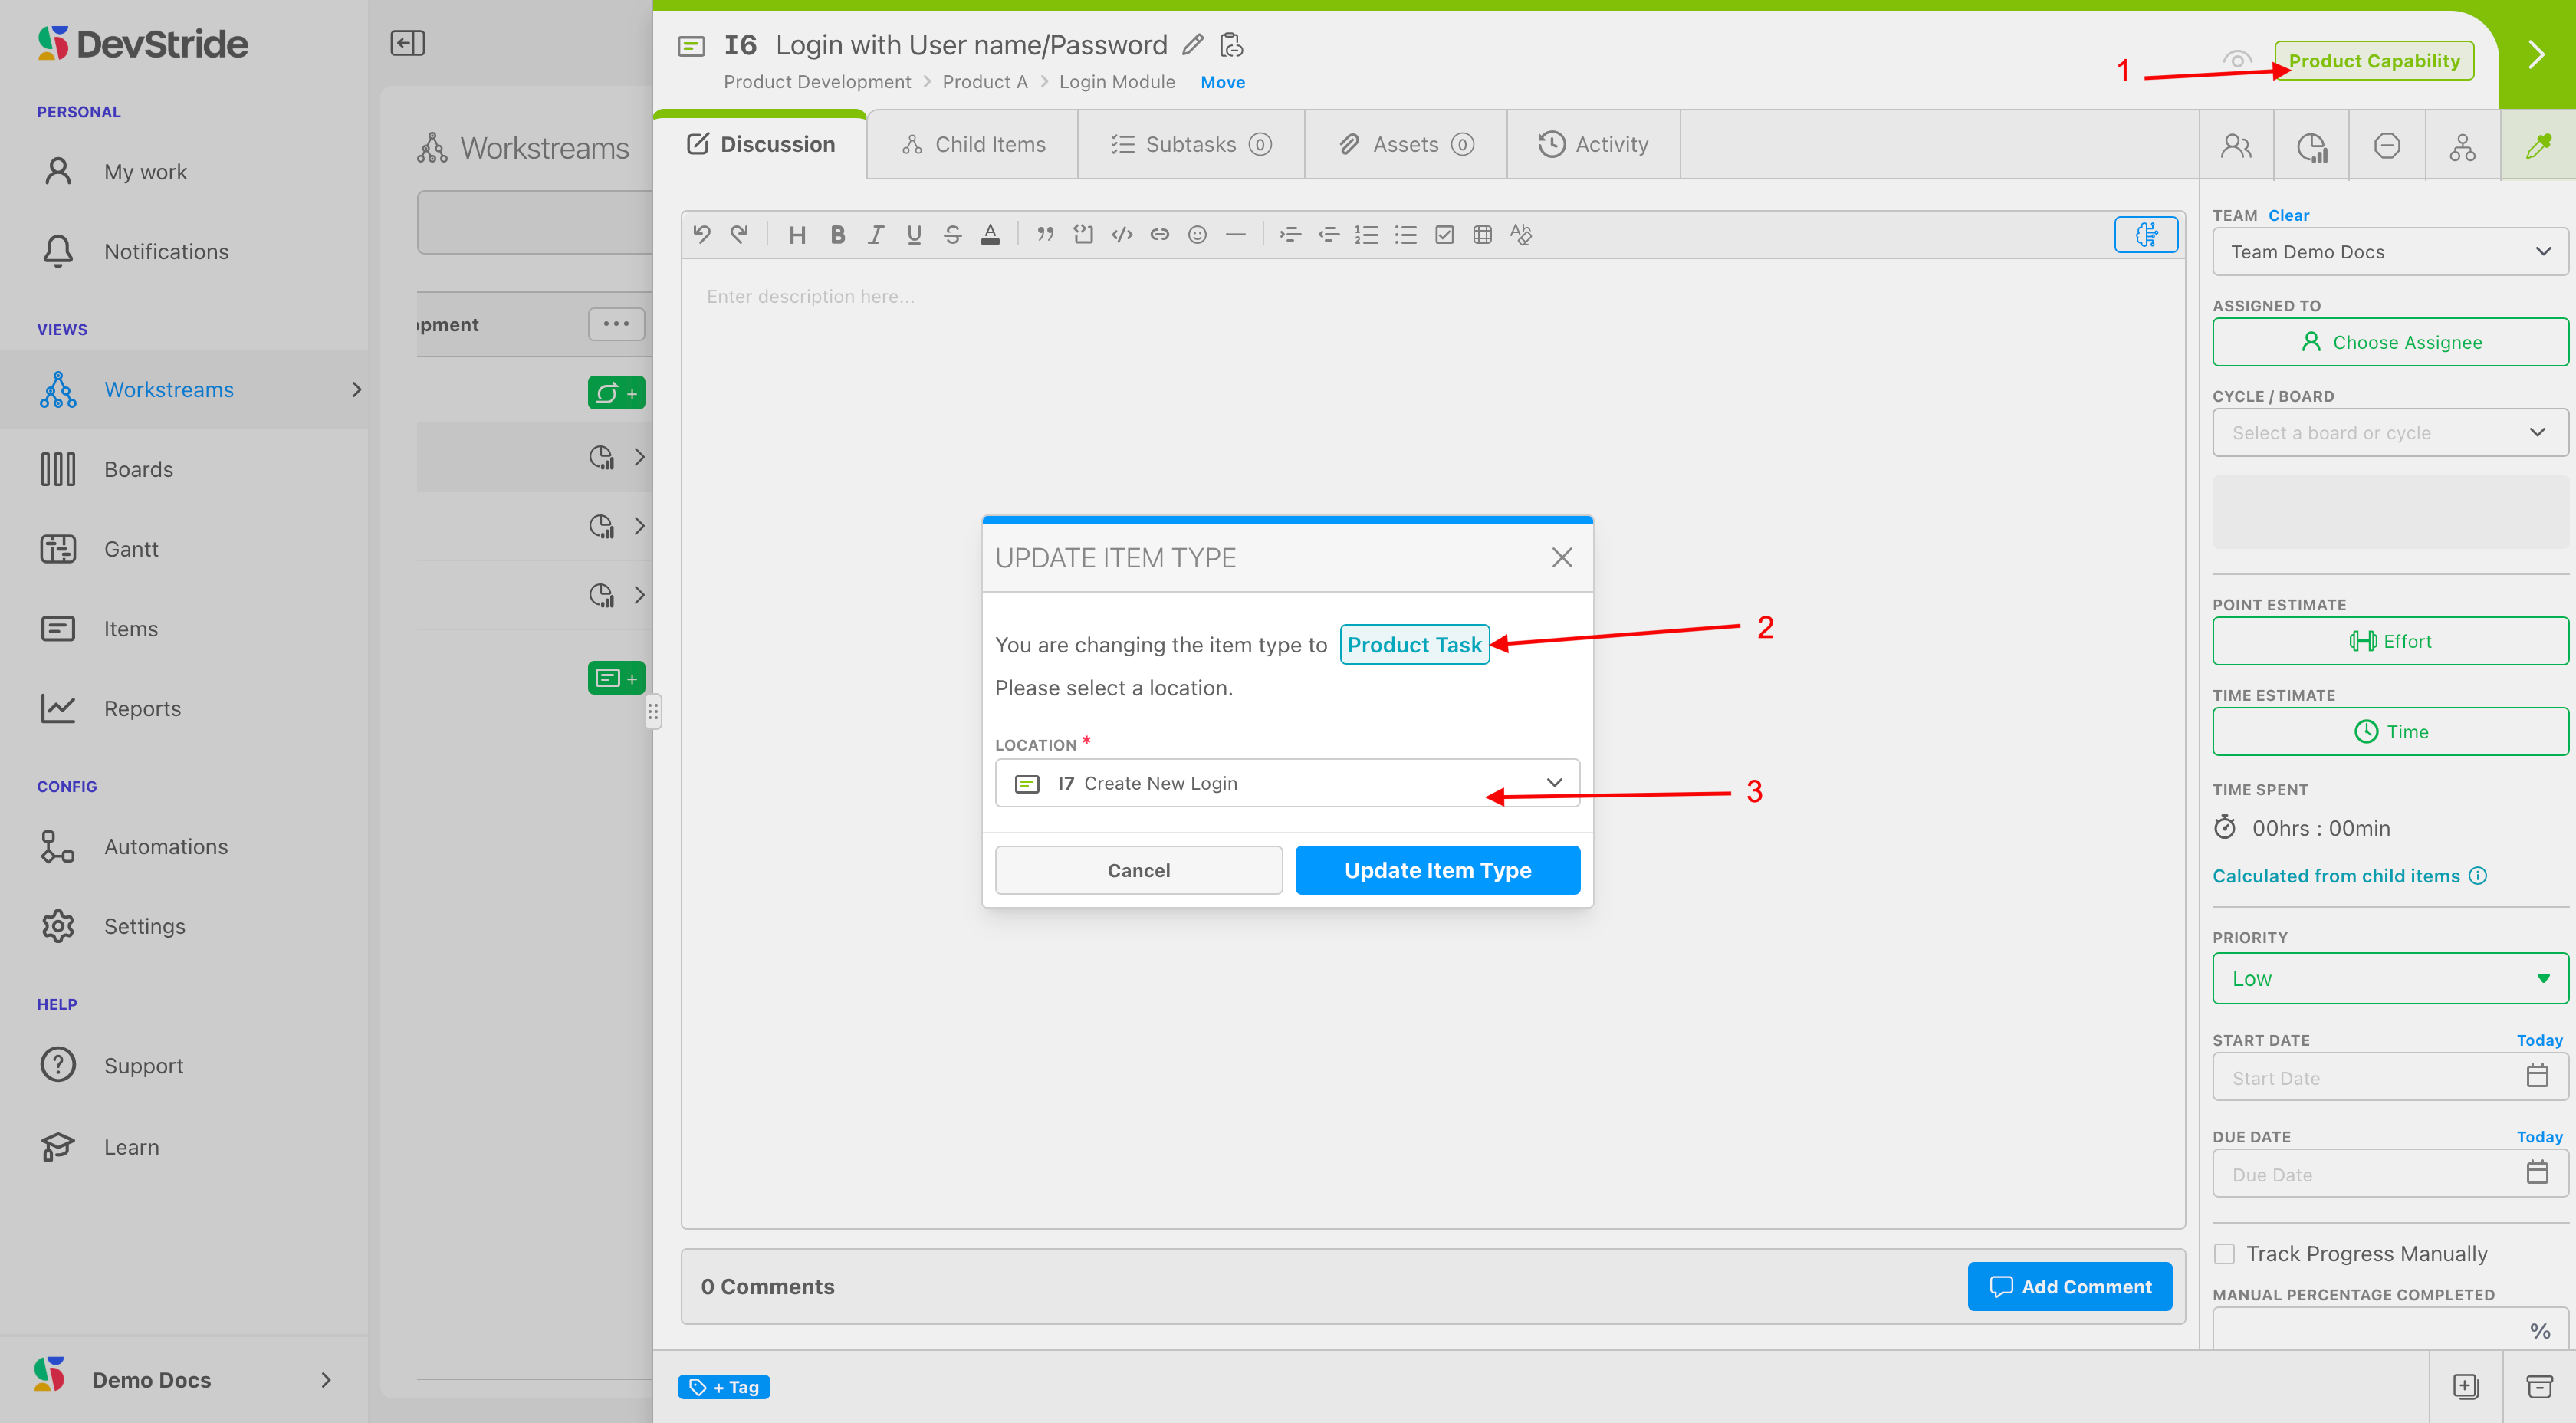
If the item type is eligible to be changed, there are just a few steps.
In the following example, we want to make the Login with User name/Password Capability (1) a Task instead. So we indicate the type of change (2) and the location (3) it should be in on the Workstream Map. Then we can click on Update Item Type.
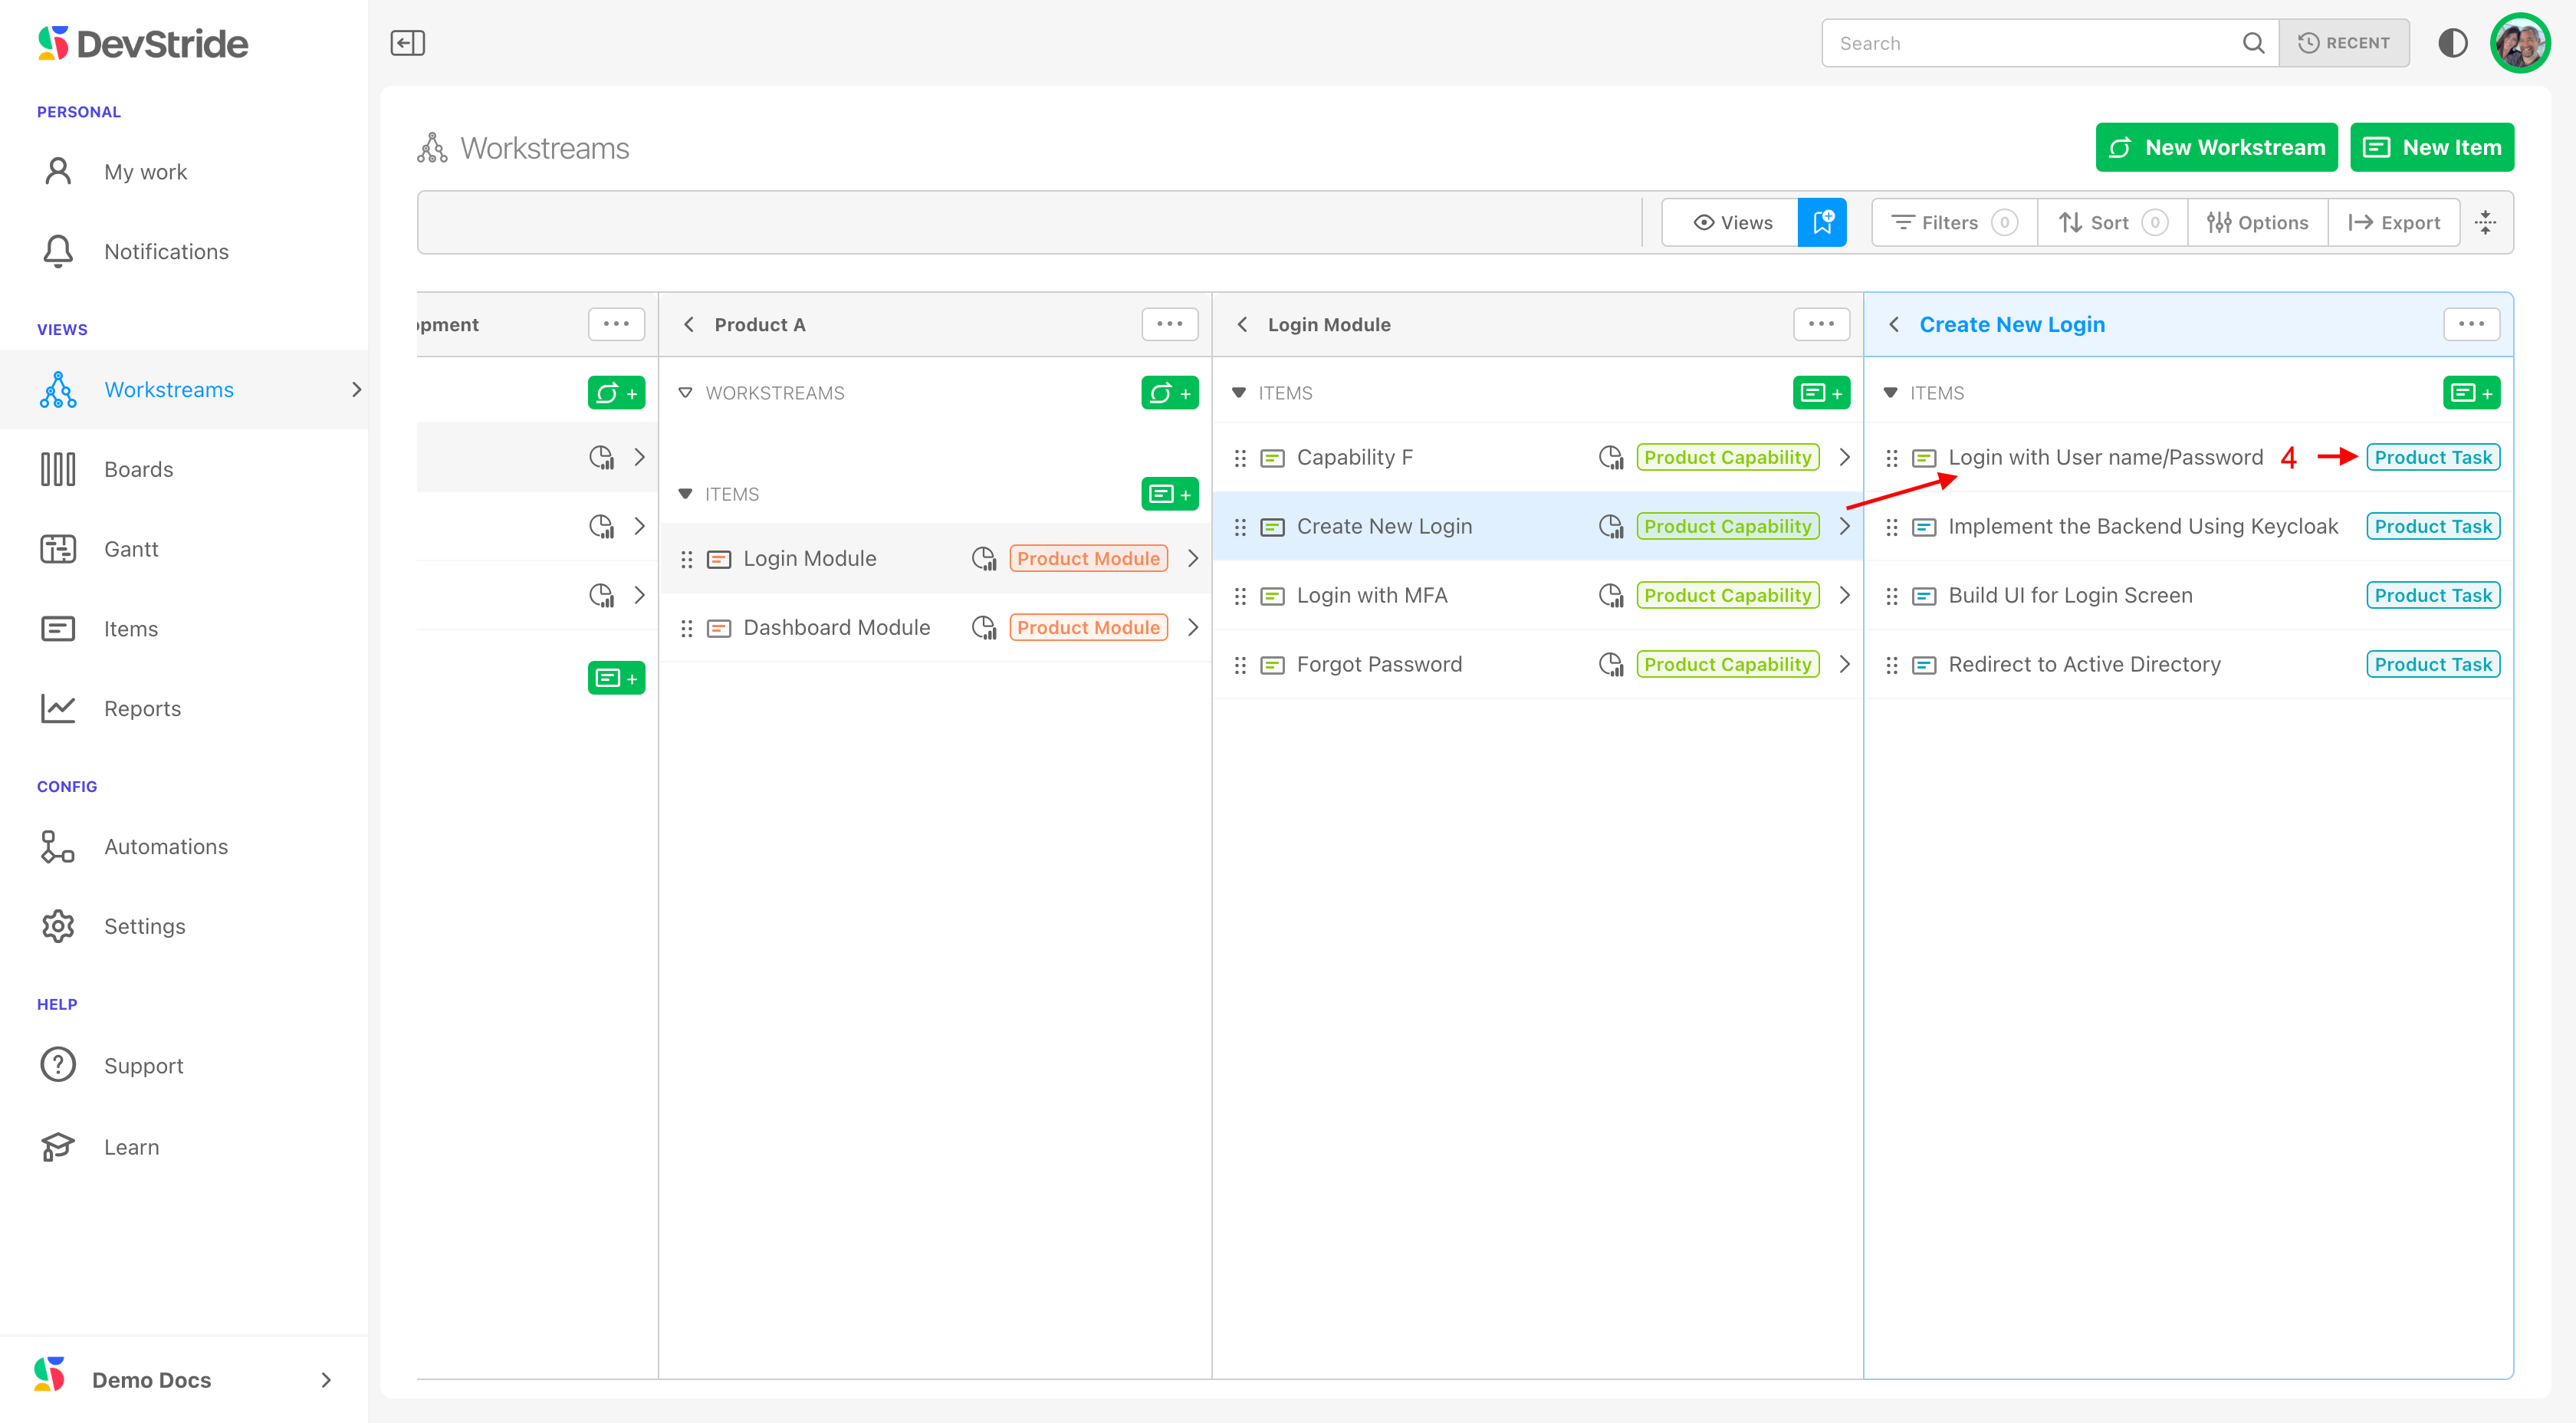
Our Module was changed to a Product Task and we moved it. We can now see it on the Workstream Map under the Create New Login Capability as a Project Task called Login with User Name/Password (4).
Item Workspace Tour: Tab Features
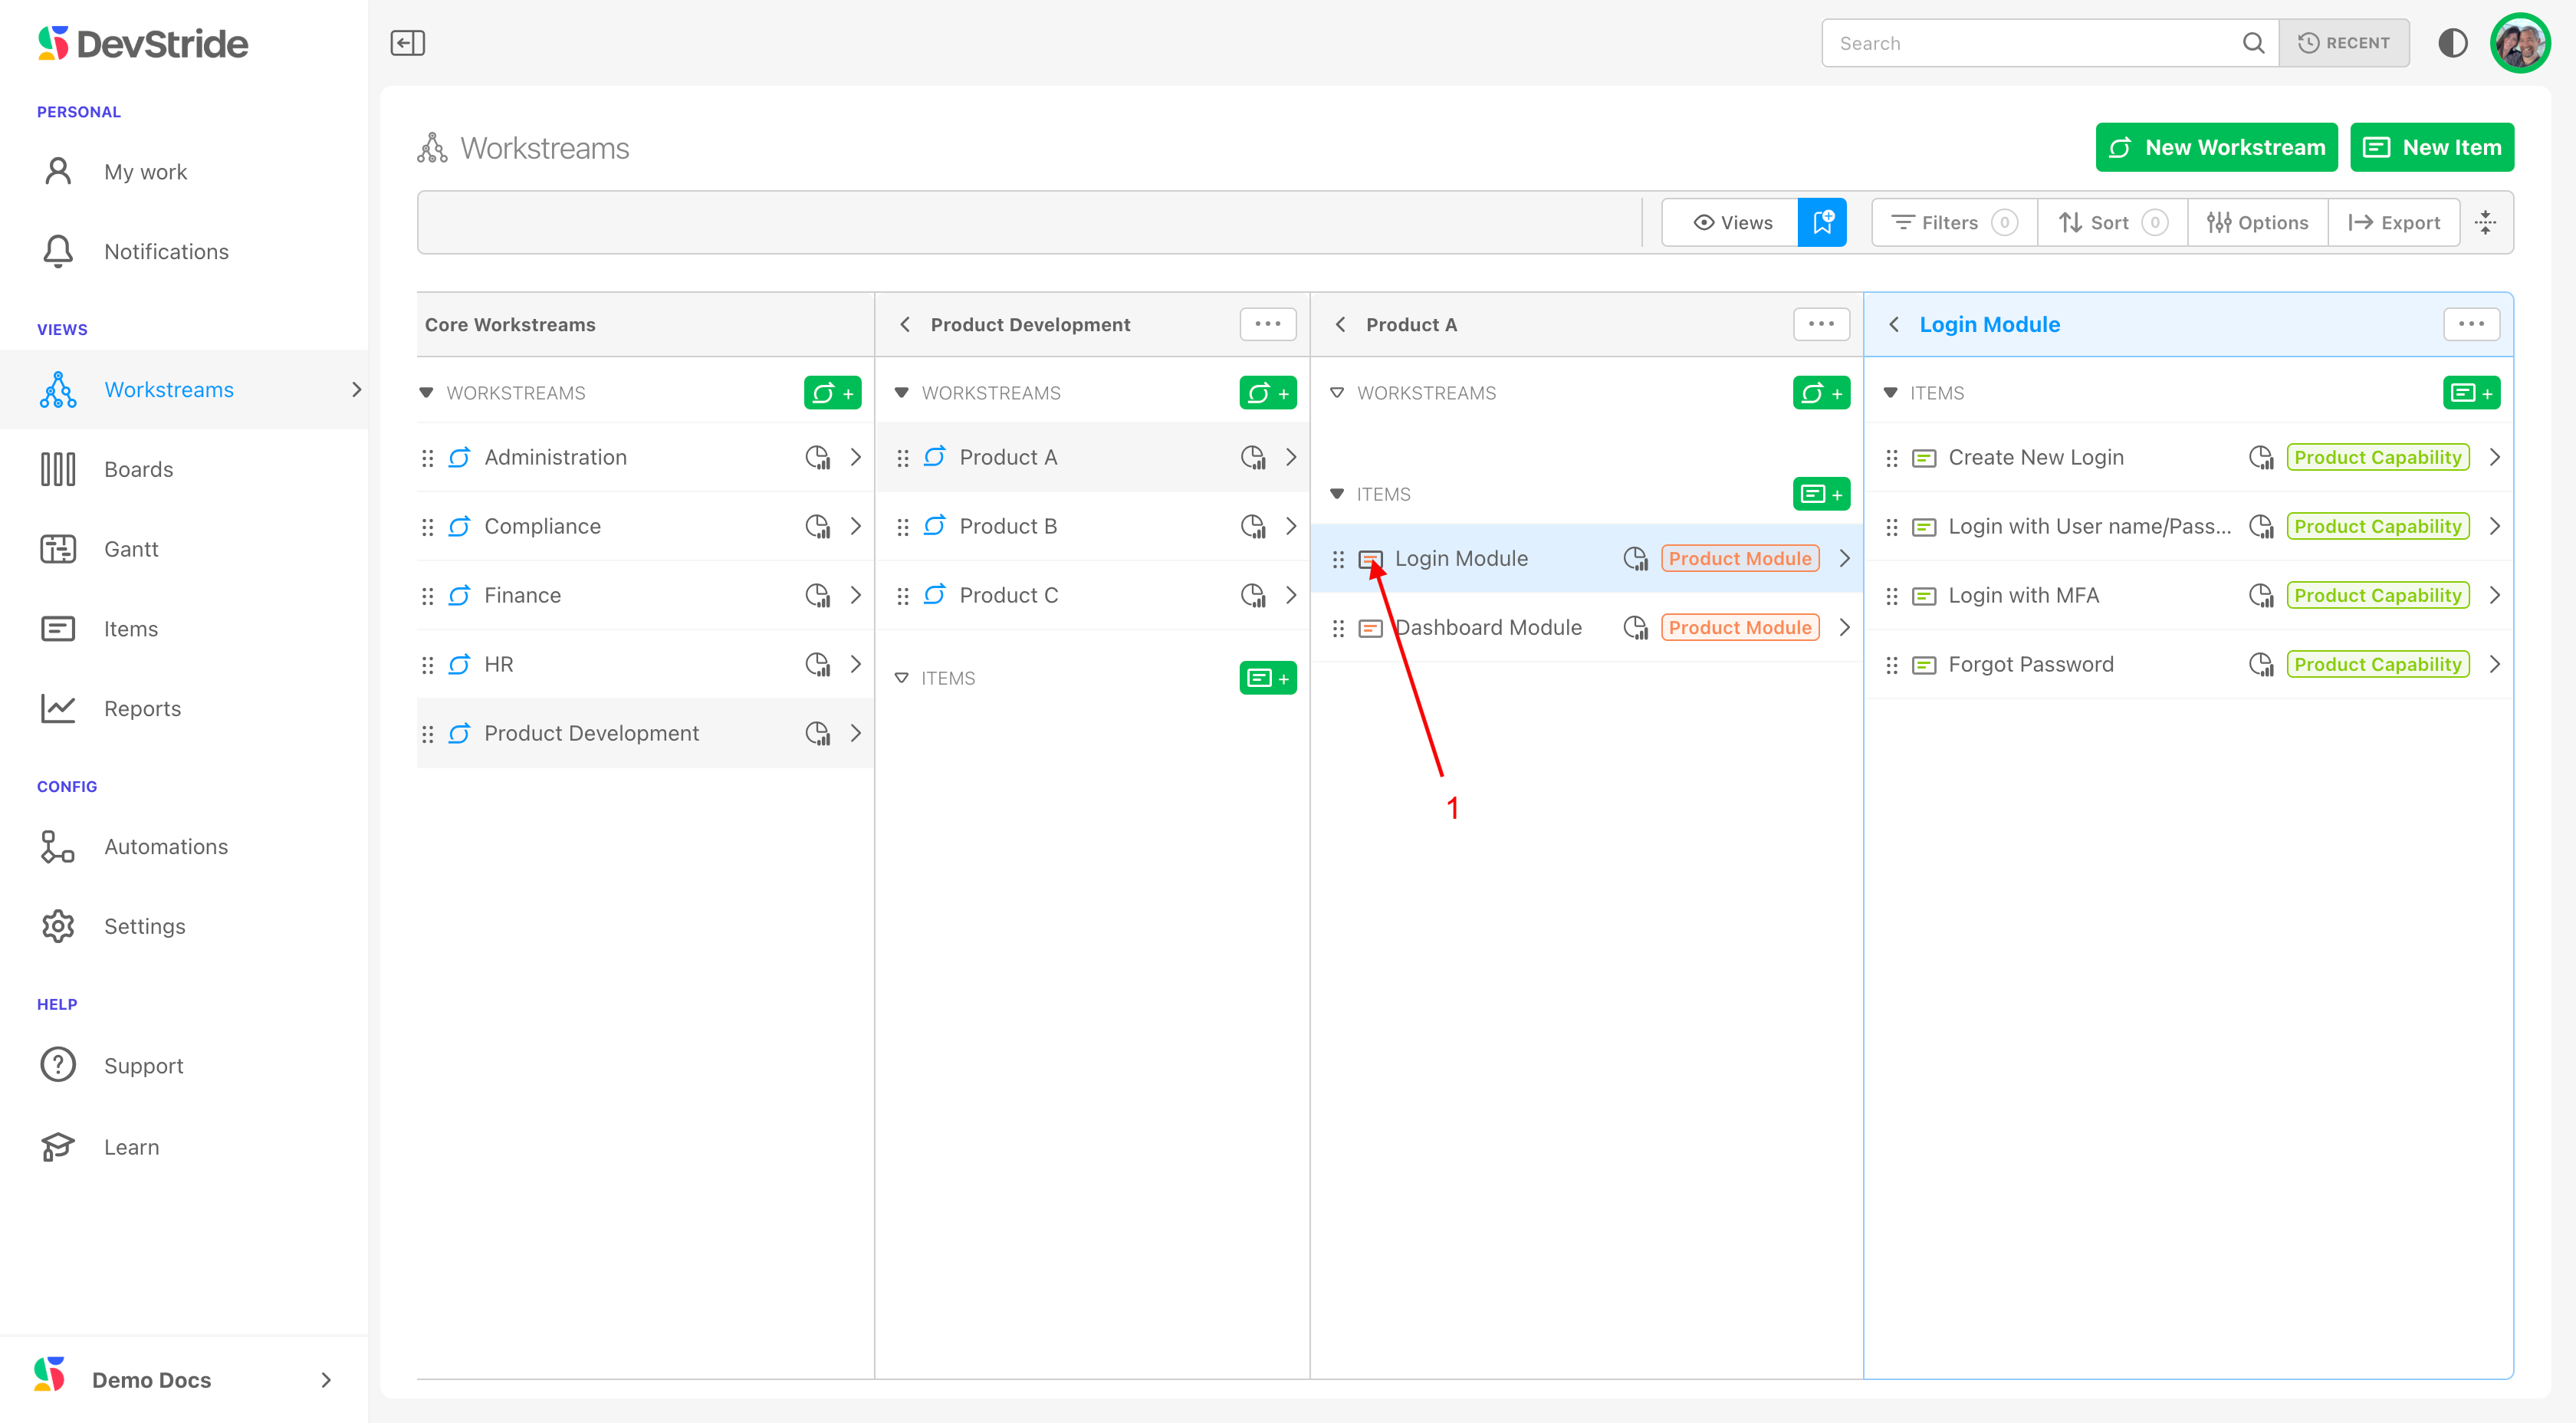
Discussion Tab
To review the tabs on the item workspace, we will take a look at a Module Item (1) from our earlier example. There are a few more tabs that come with custom fields that we will cover later.
We might want to describe what the expected module will deliver. We can do this in the Discussion tab (1). This tab allows you to describe the item using a feature-rich text editor (2).
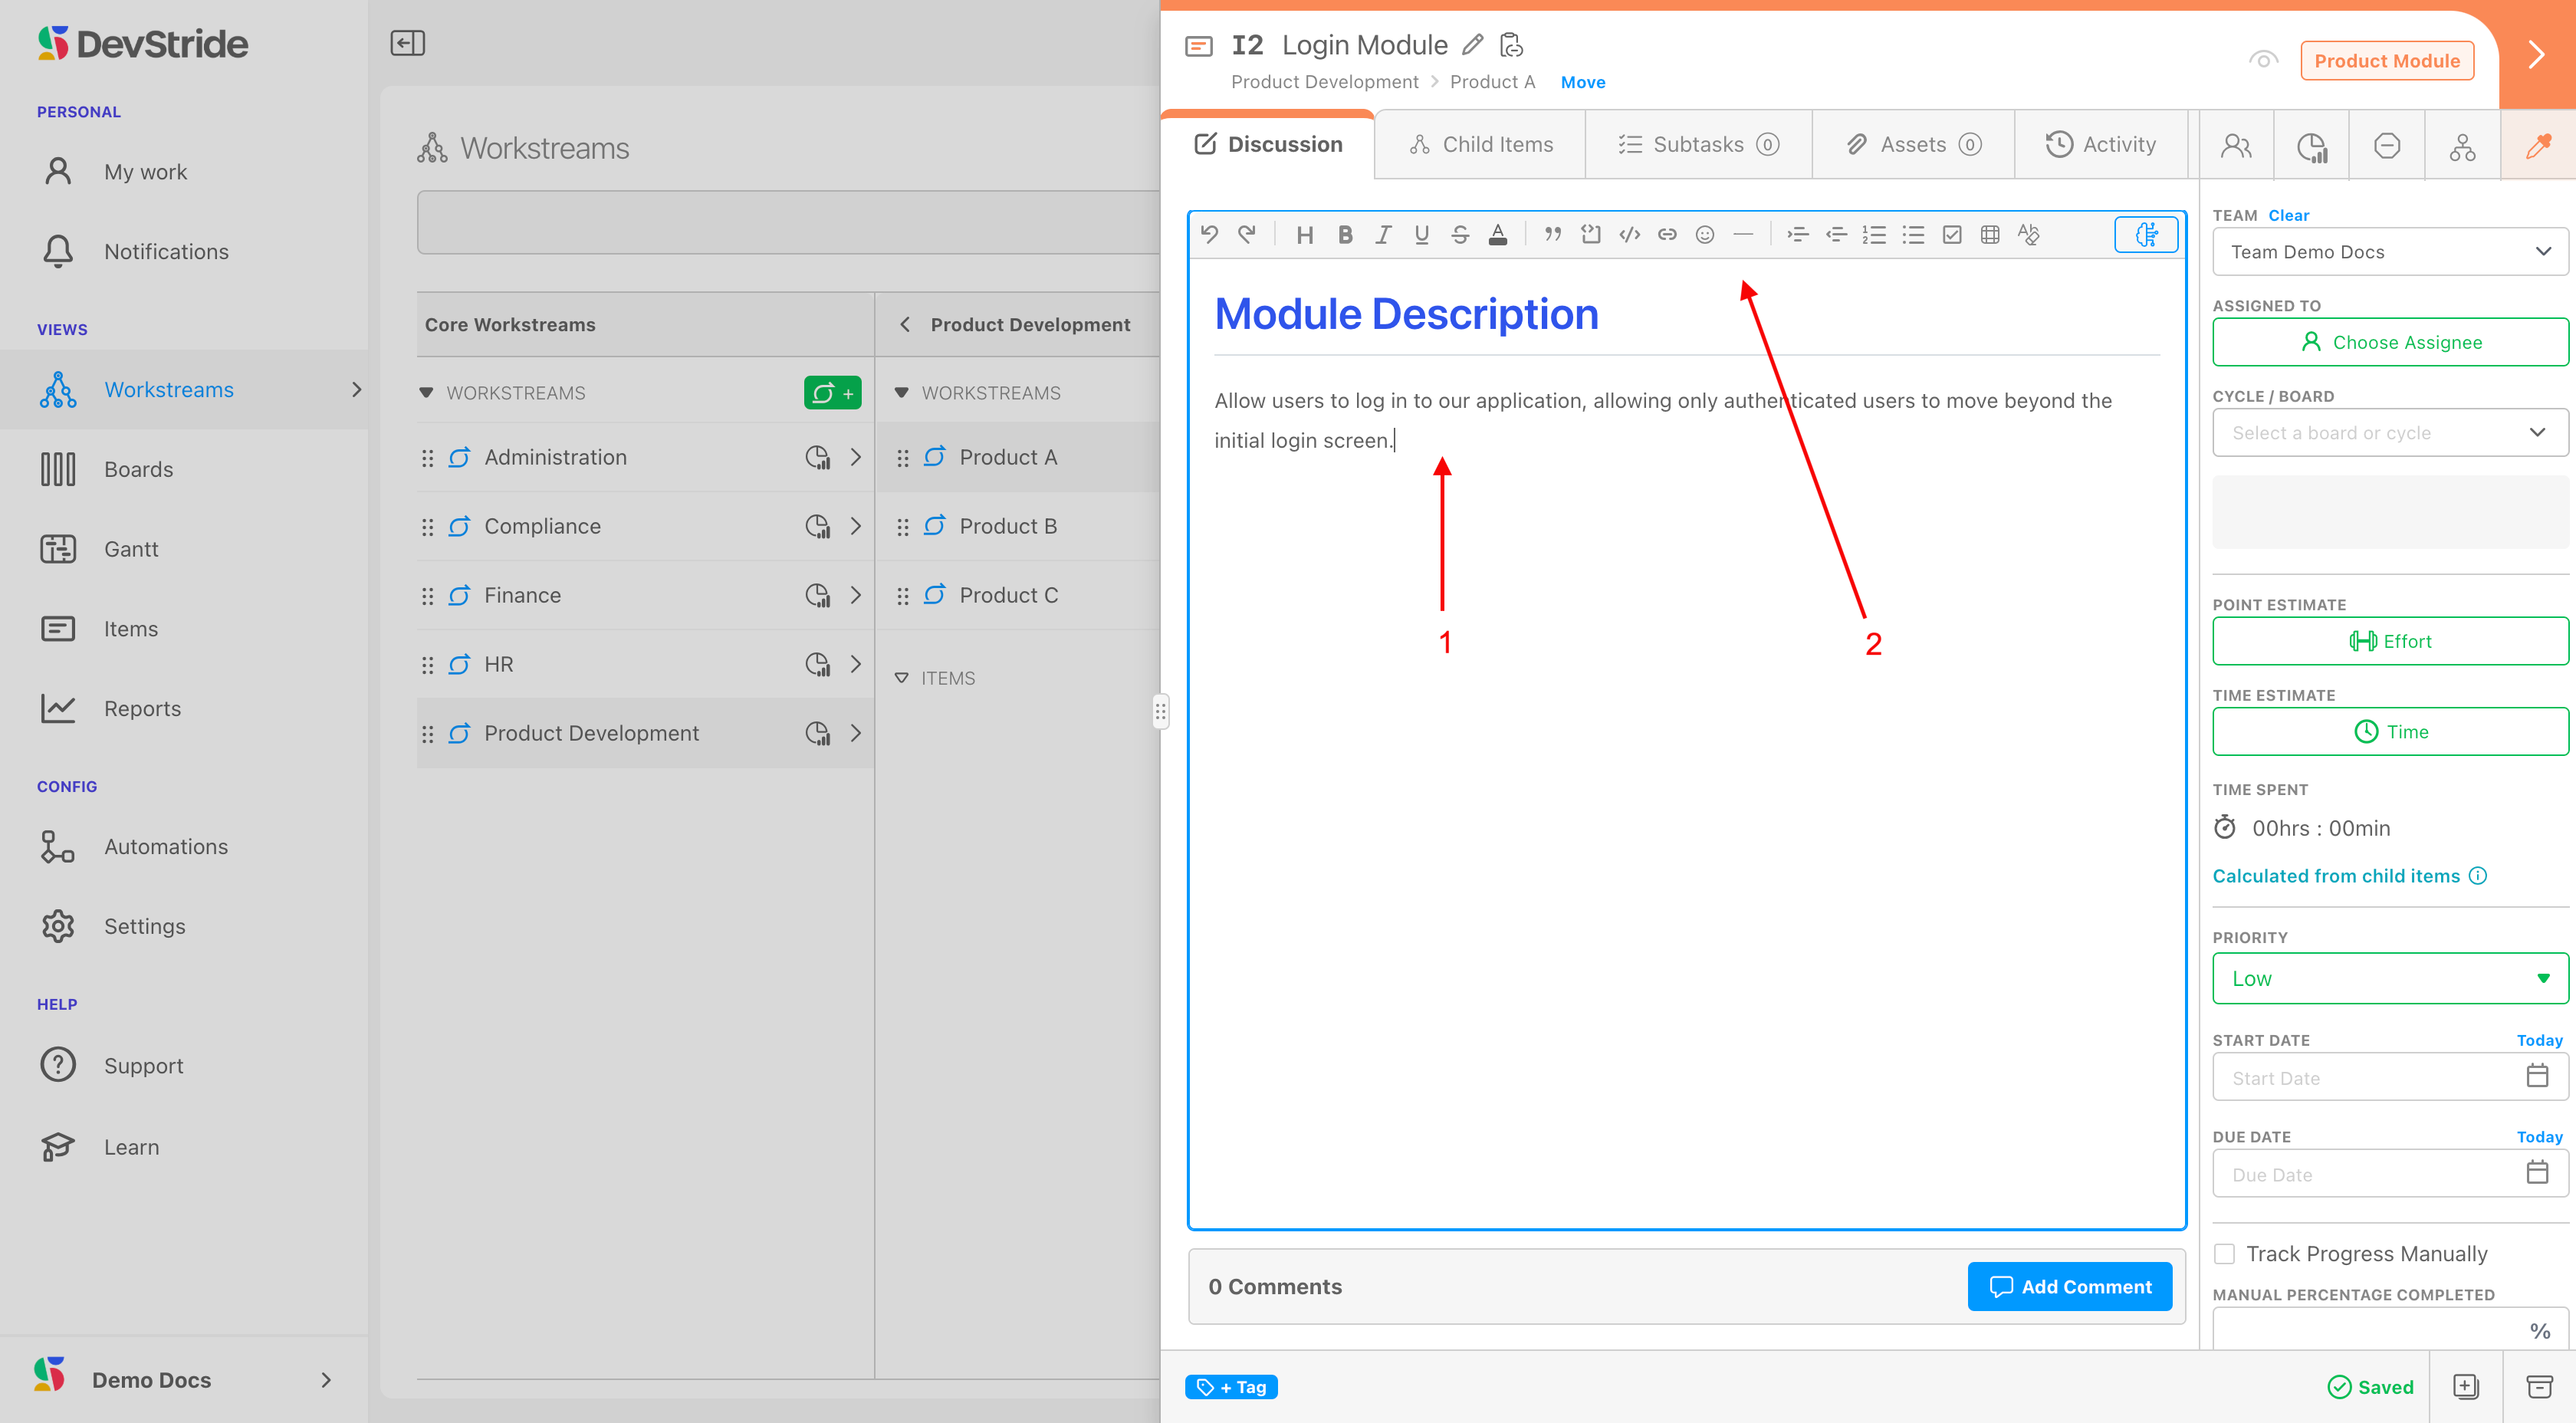
→ AI Time Saver
You can take advantage of AI in DevStride's to help generate your description. You can simply click the AI icon (2), and DevStride will generate results based on your item name.
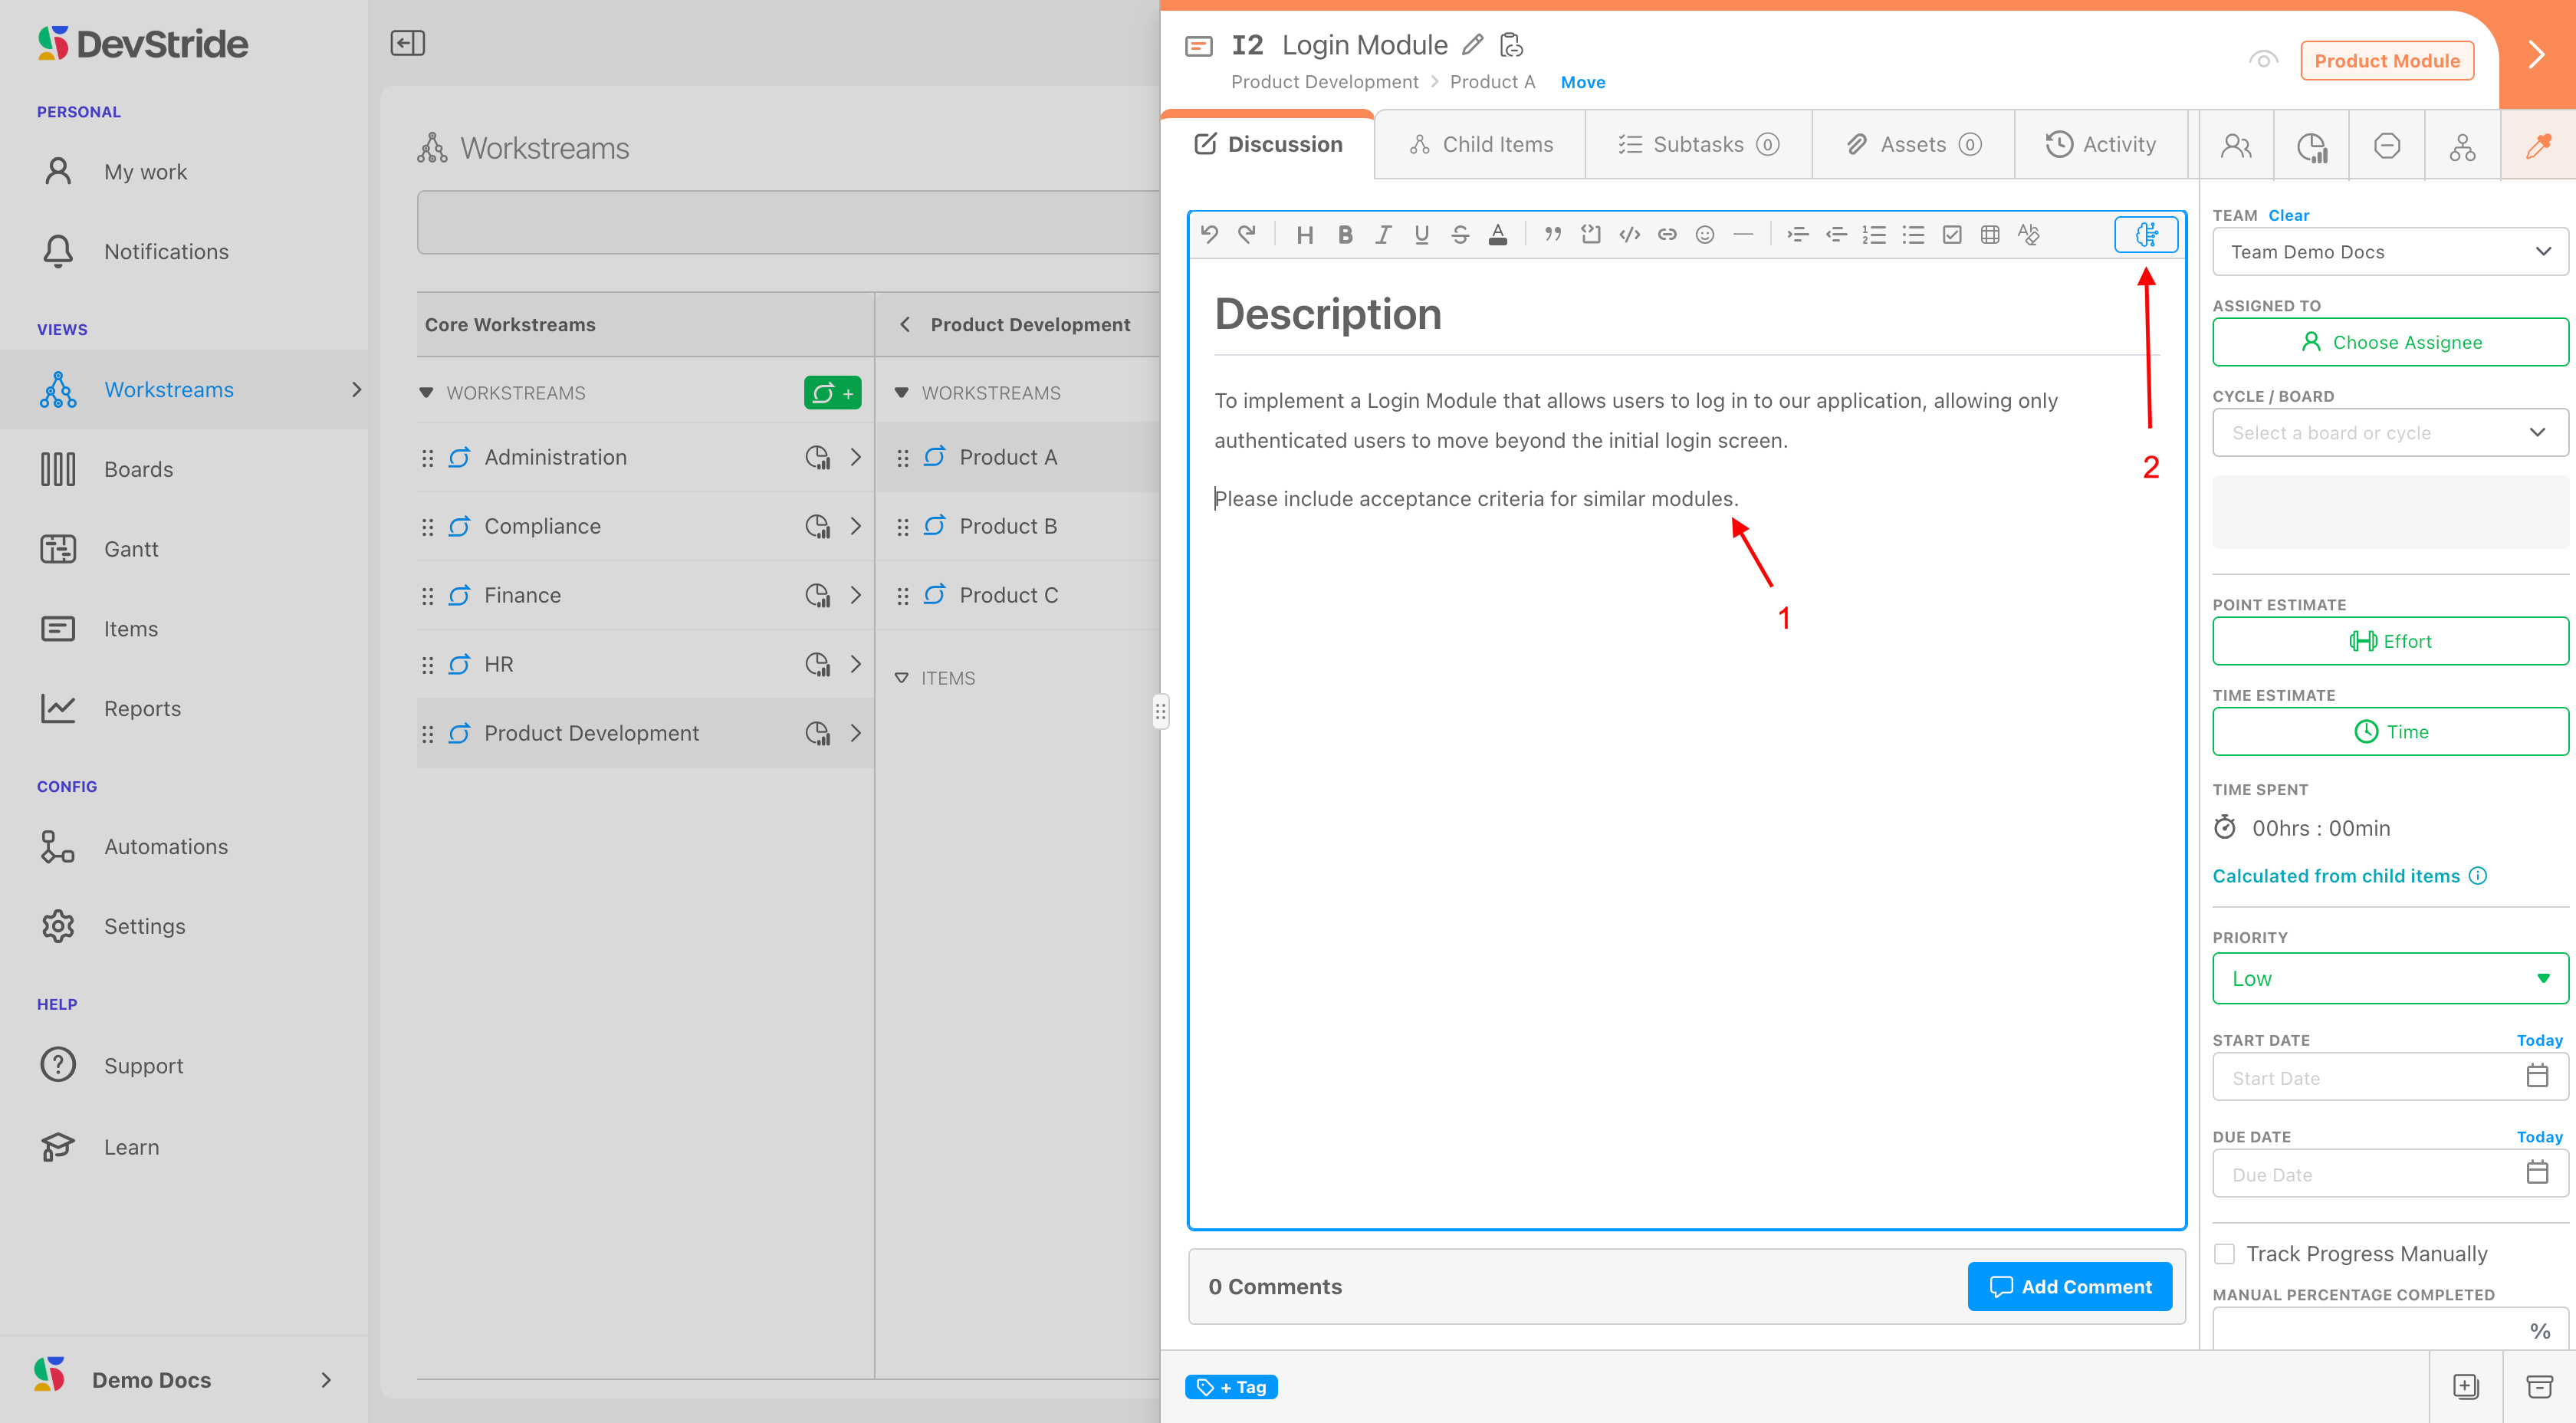
If you include prompts or relevant links in the discussion box (1), you can get even better results once you click generate (2).
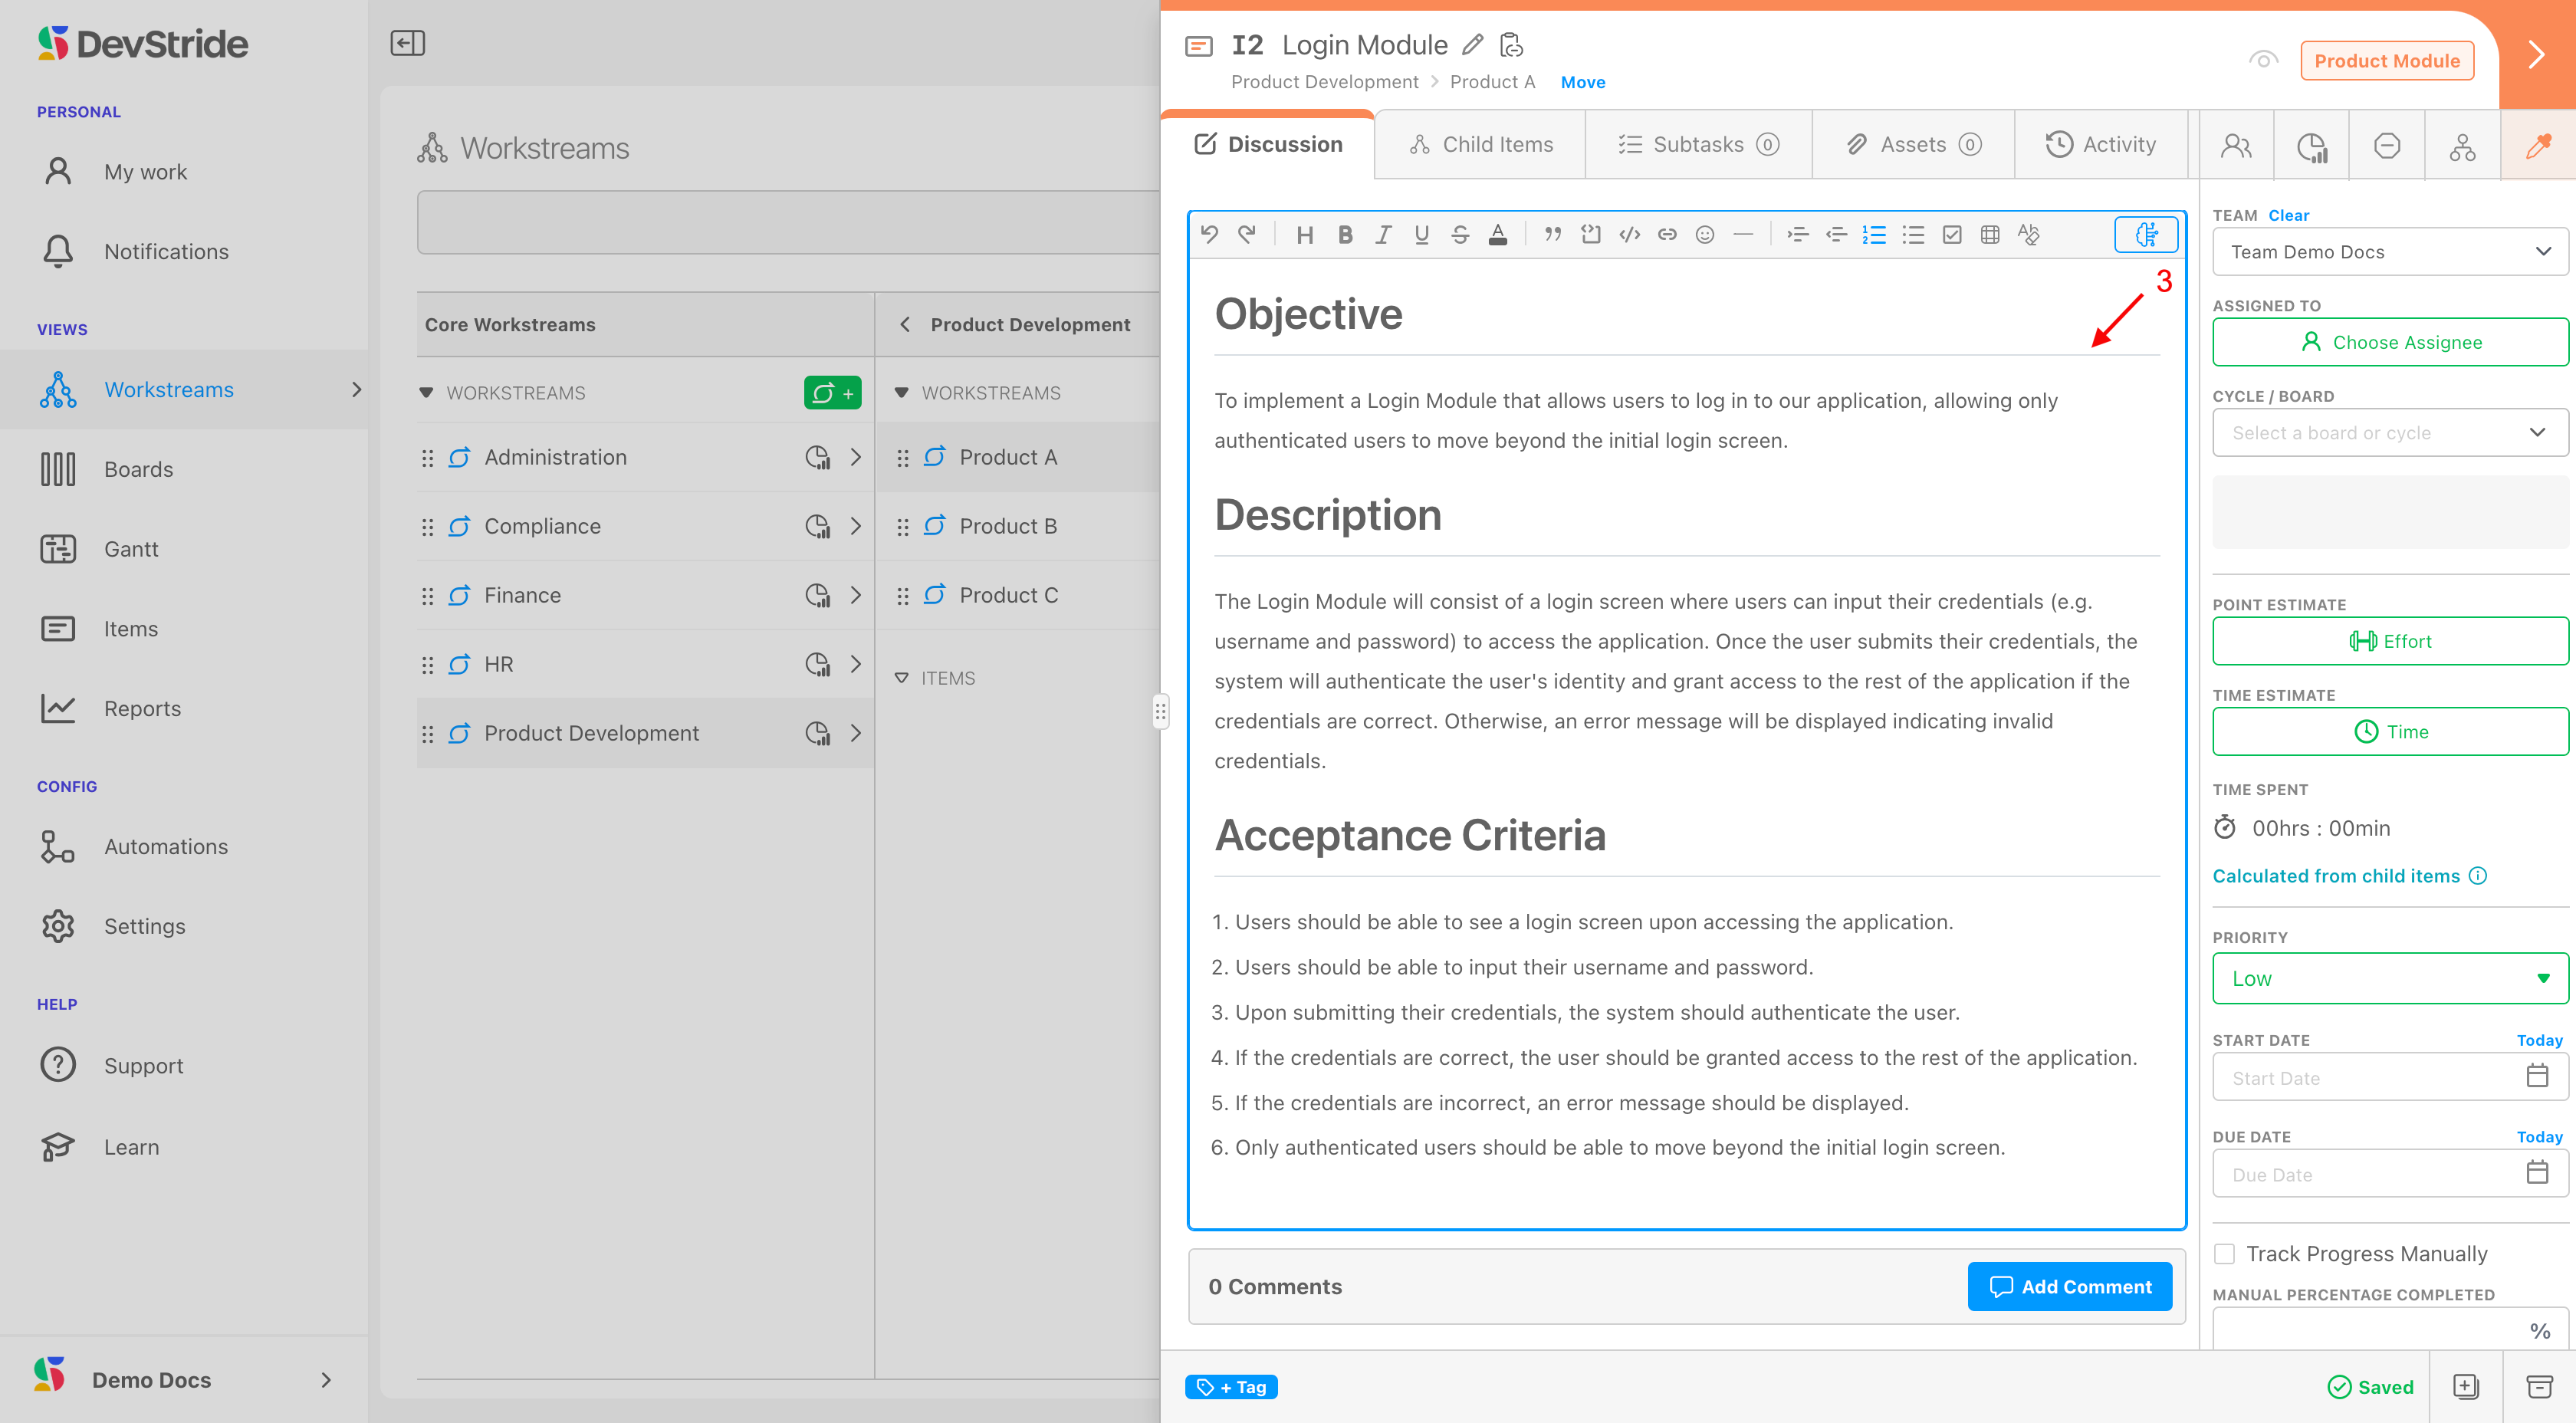
What This Gives You
The AI feature can save countless hours by providing relevant content, a consistent way to describe an item, suggested steps or considerations, or any additional information you would like to include based on a specific AI prompt.
You can see an example of an AI-generated description below (3).
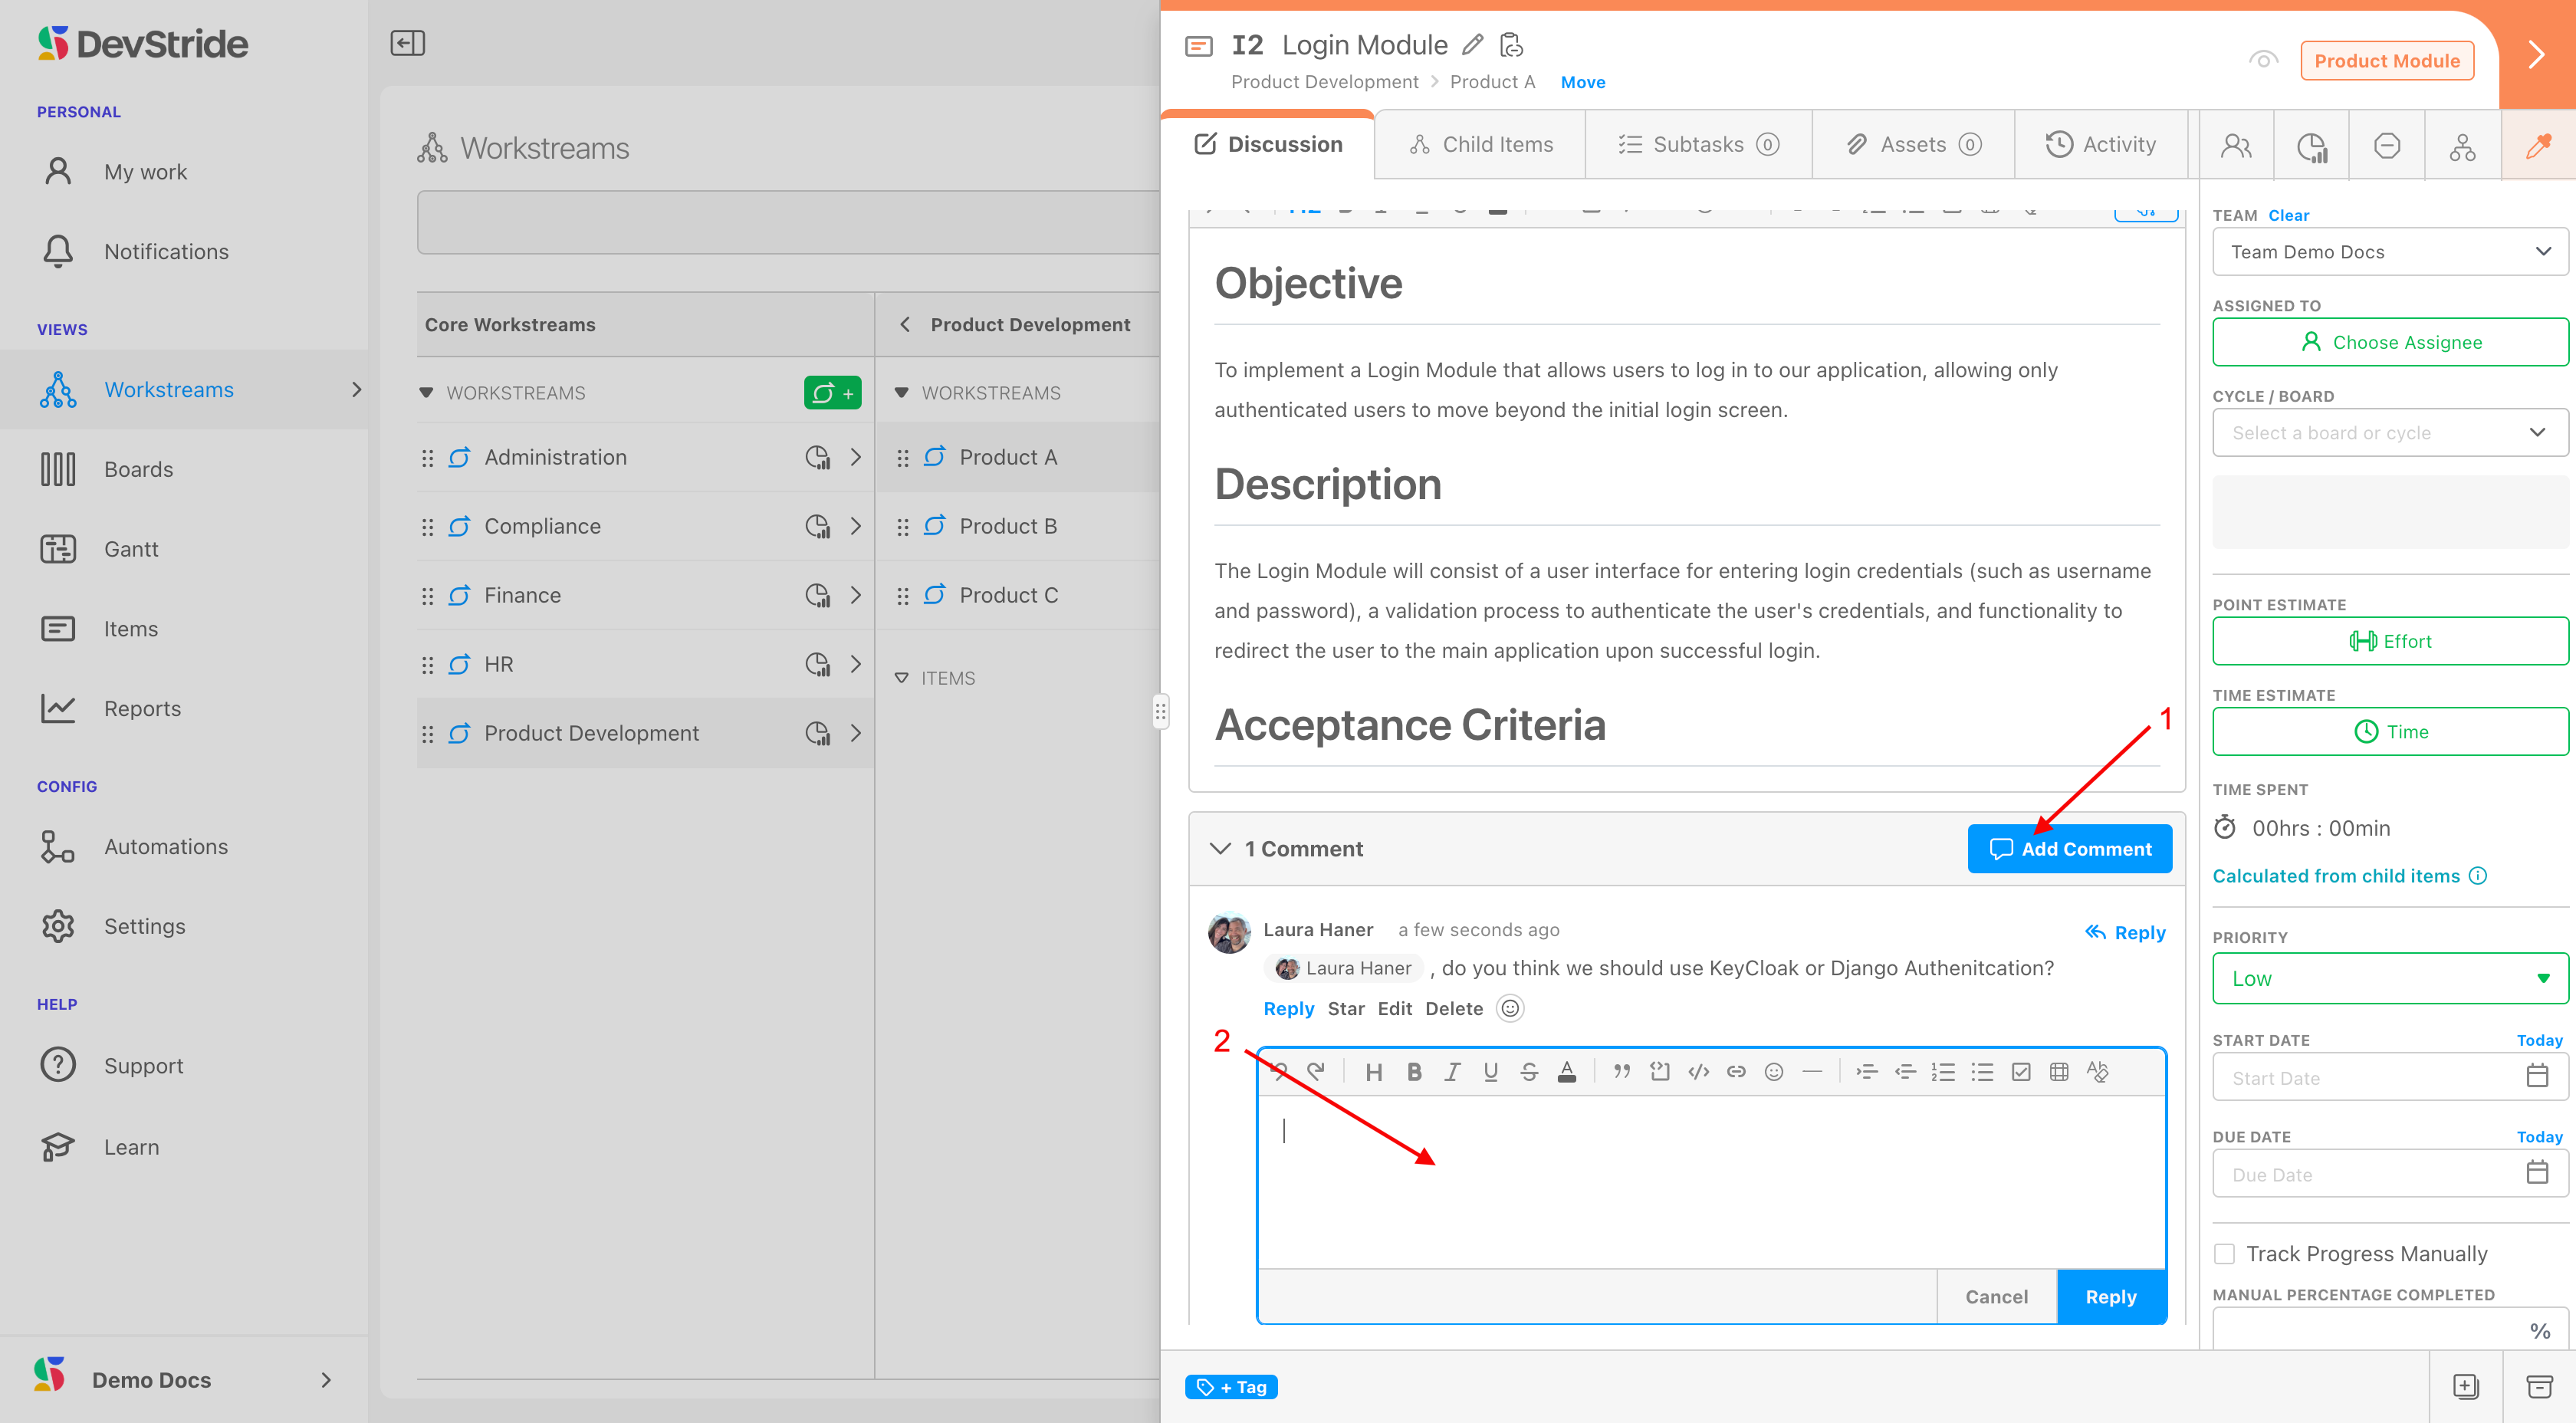
The Discussion tab also has a Comments feature (1). This feature helps you capture valuable discussions pertaining to the item (2). This comments section is also integrated with DevStride Notifications and email.
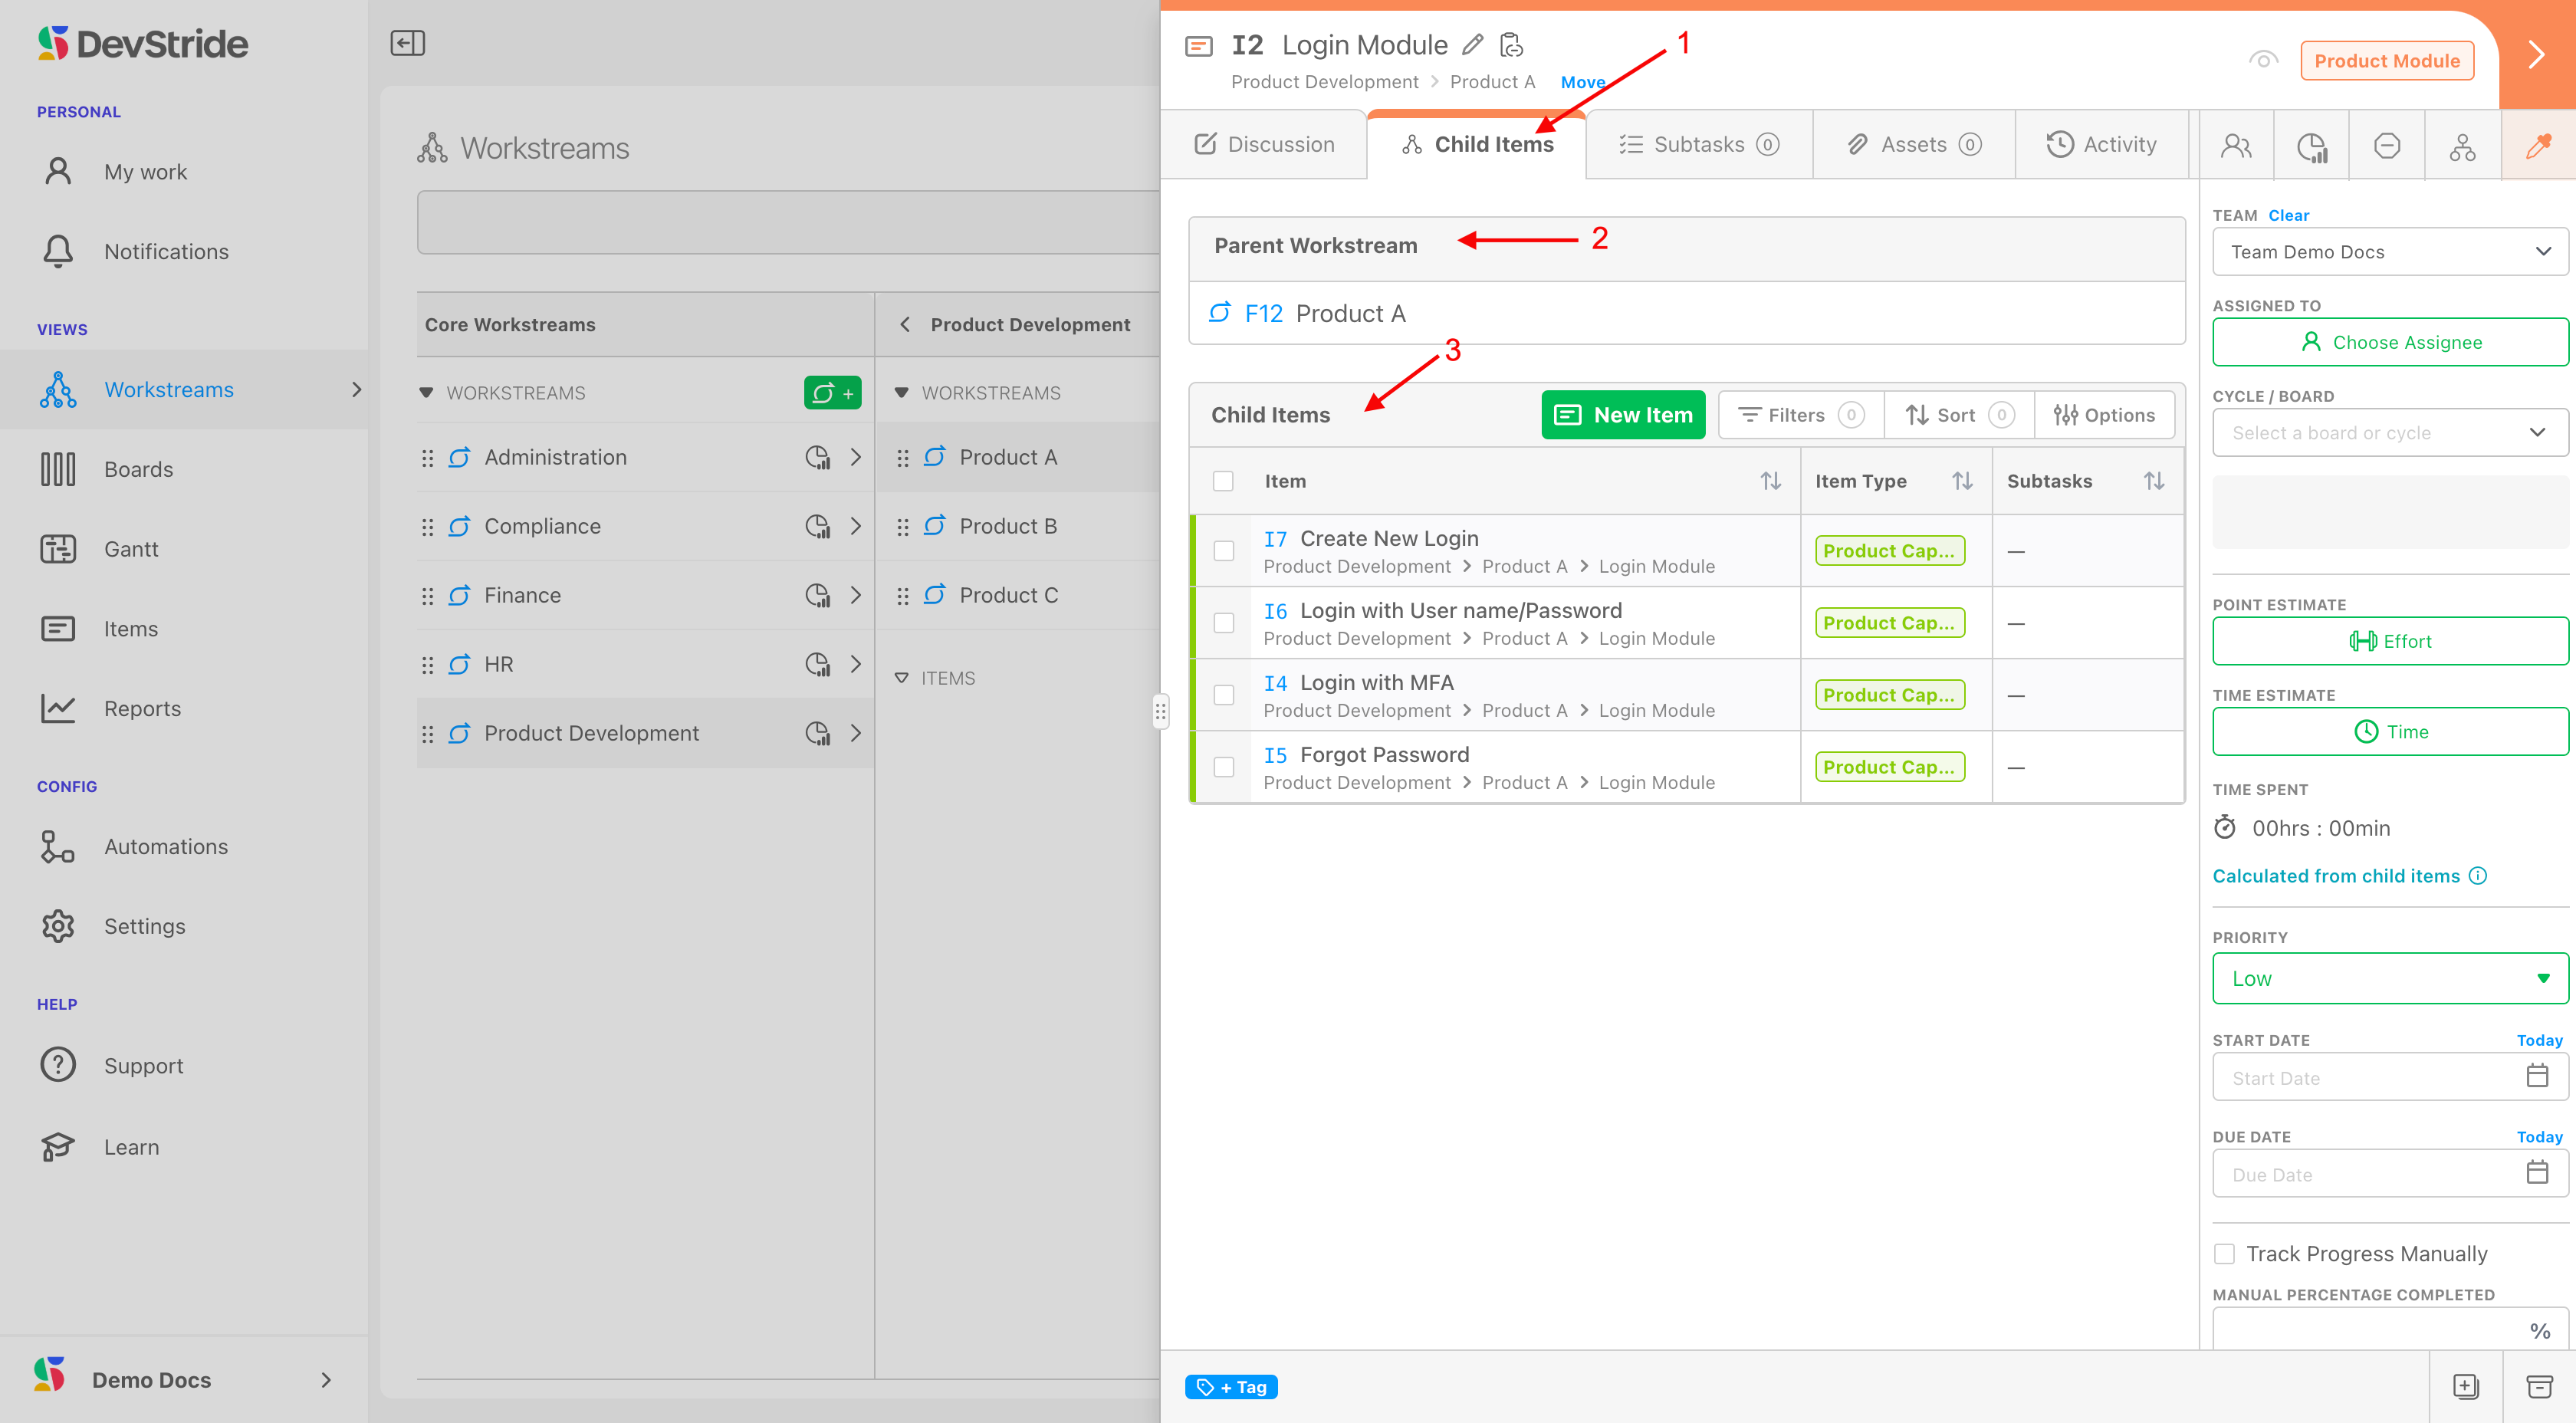
Child Items Tab
This tab (1) provides another quick link to reference where this item lives in the workstream map.
You can see both its parent workstreams (2) and its child items (3). This section provides the child information in a table format. This tab is a convenient place to make changes to child items - as the data in table are actionable as well.
New child items can be added here.
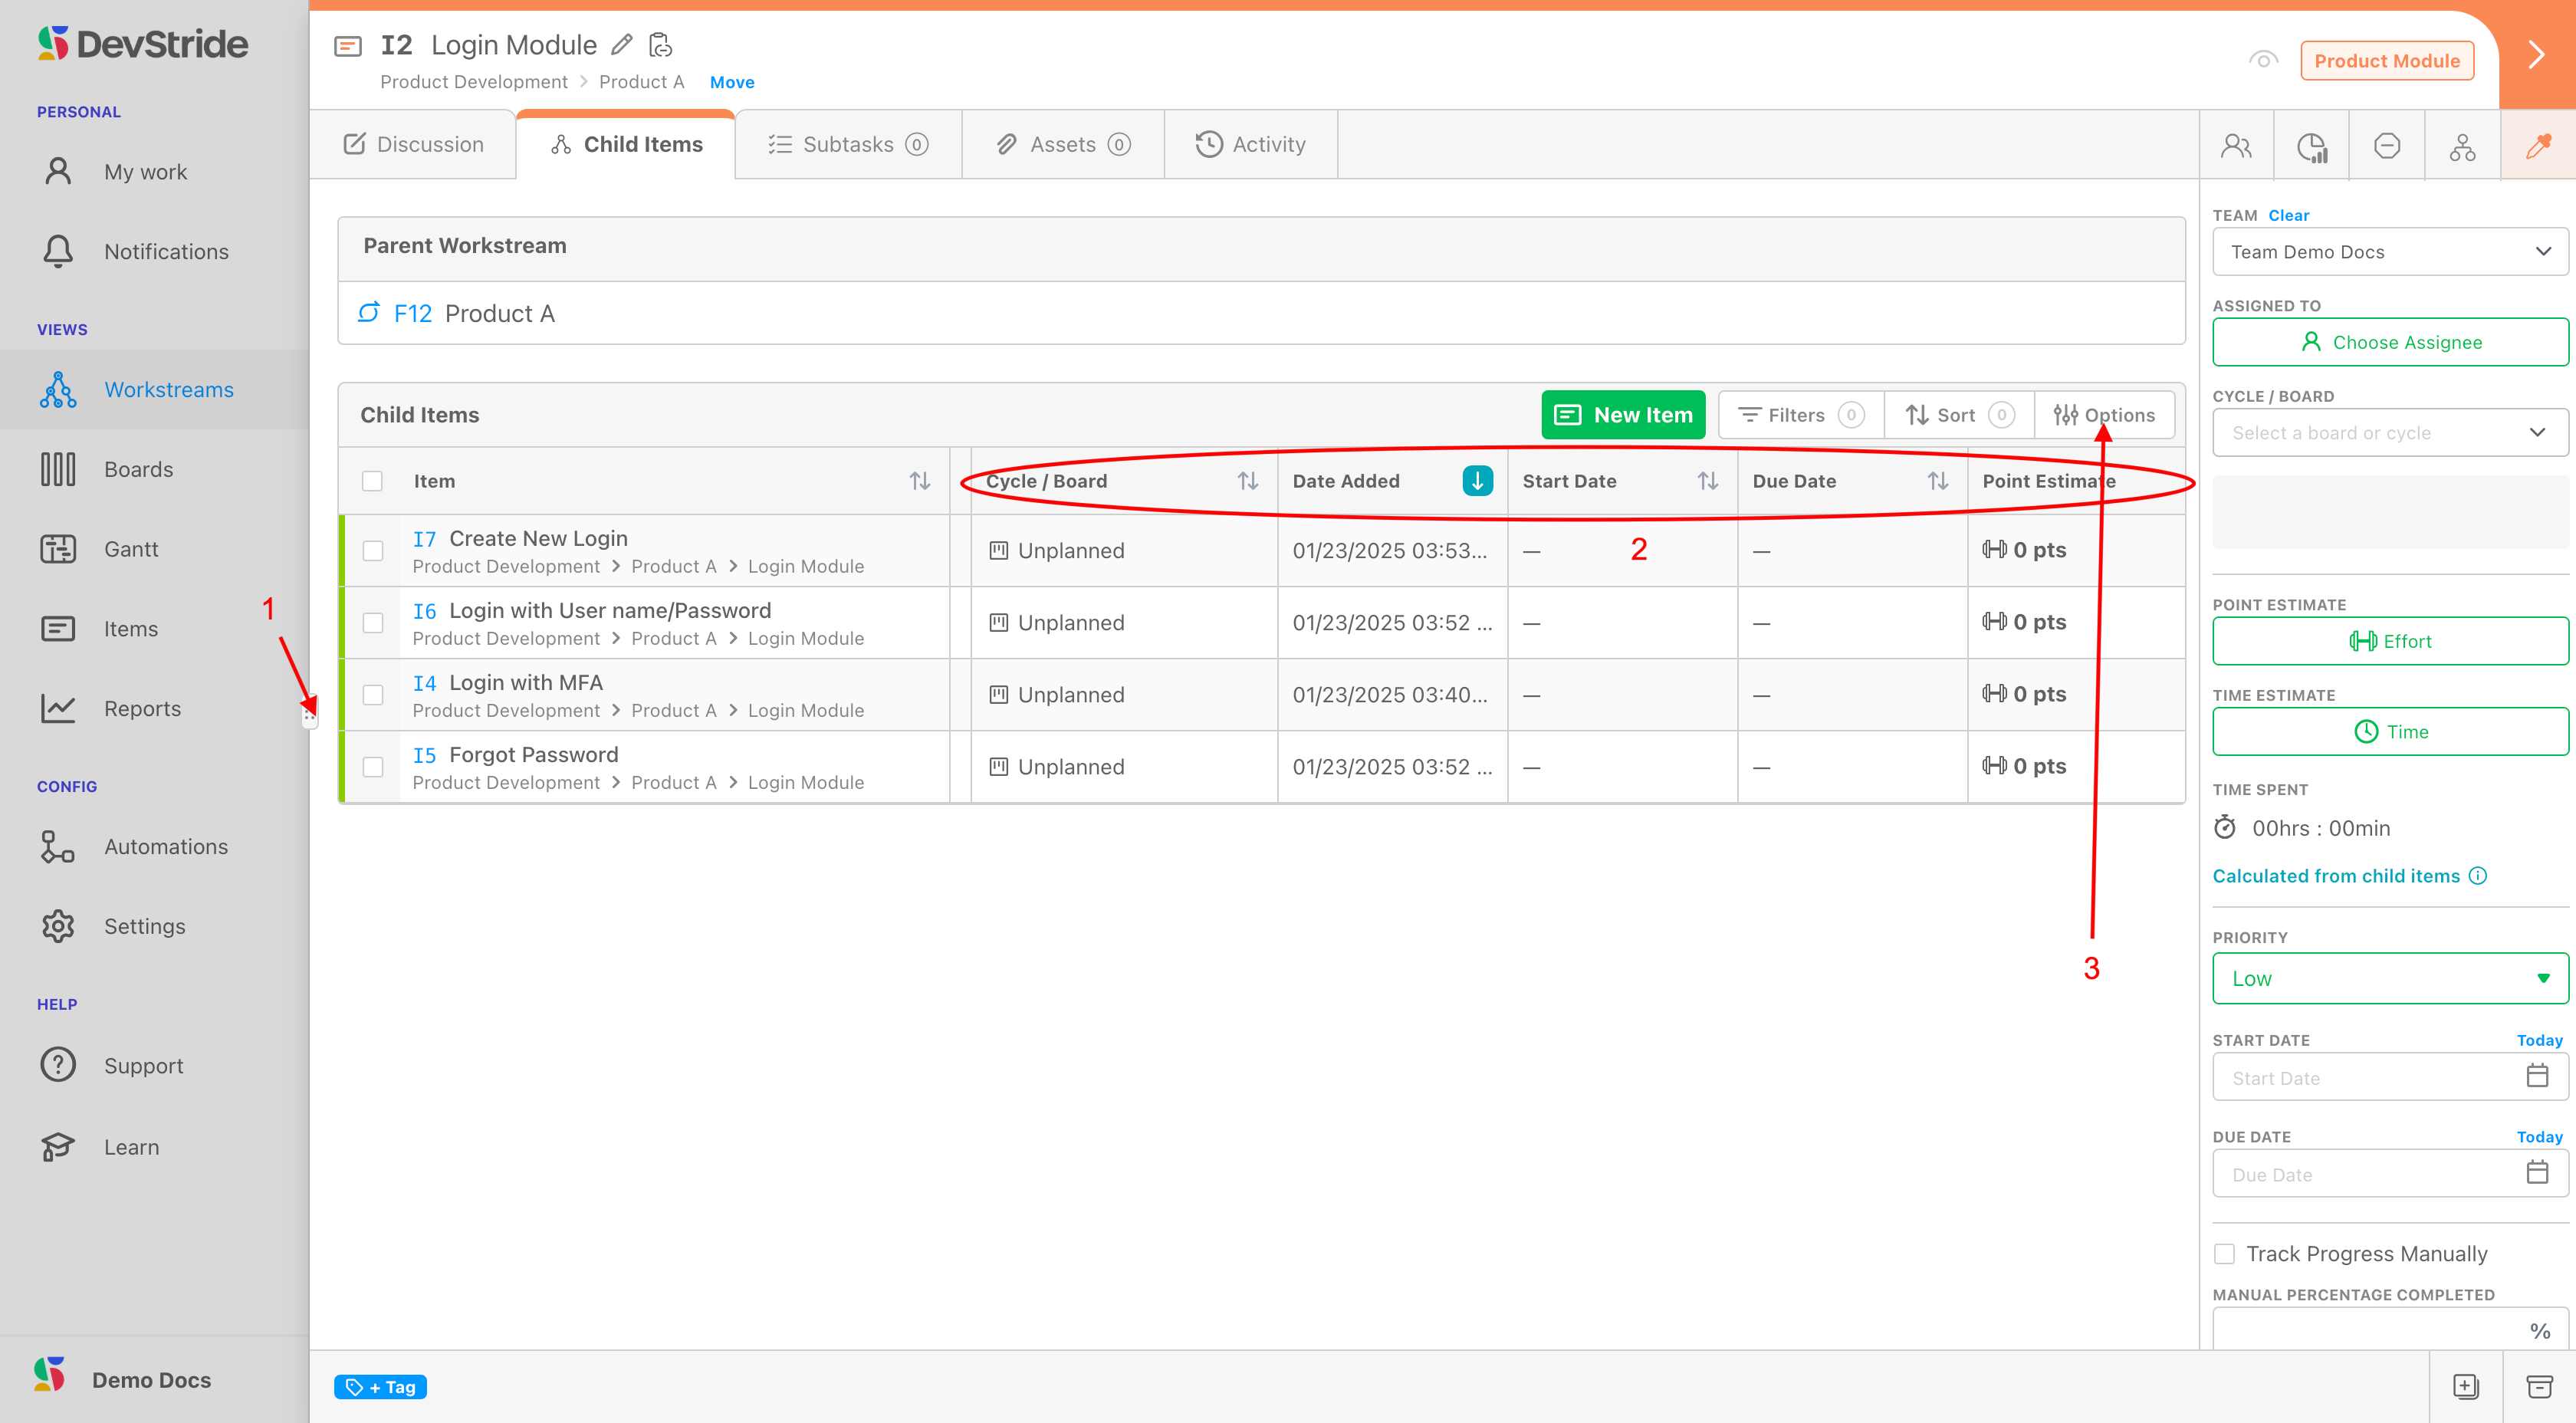
In addition, if you click on the grabber bar (1) and drag it to the left, you can expand any item window to provide a larger view.
Inside this table, you can filter, sort by fields, determine which columns you would like to see. You can also and set columns using the options available.
You can also manage large lists of items here through Filter, Sort and Options views (2). If you'd like to manage which columns you view from here, click on Options (3):
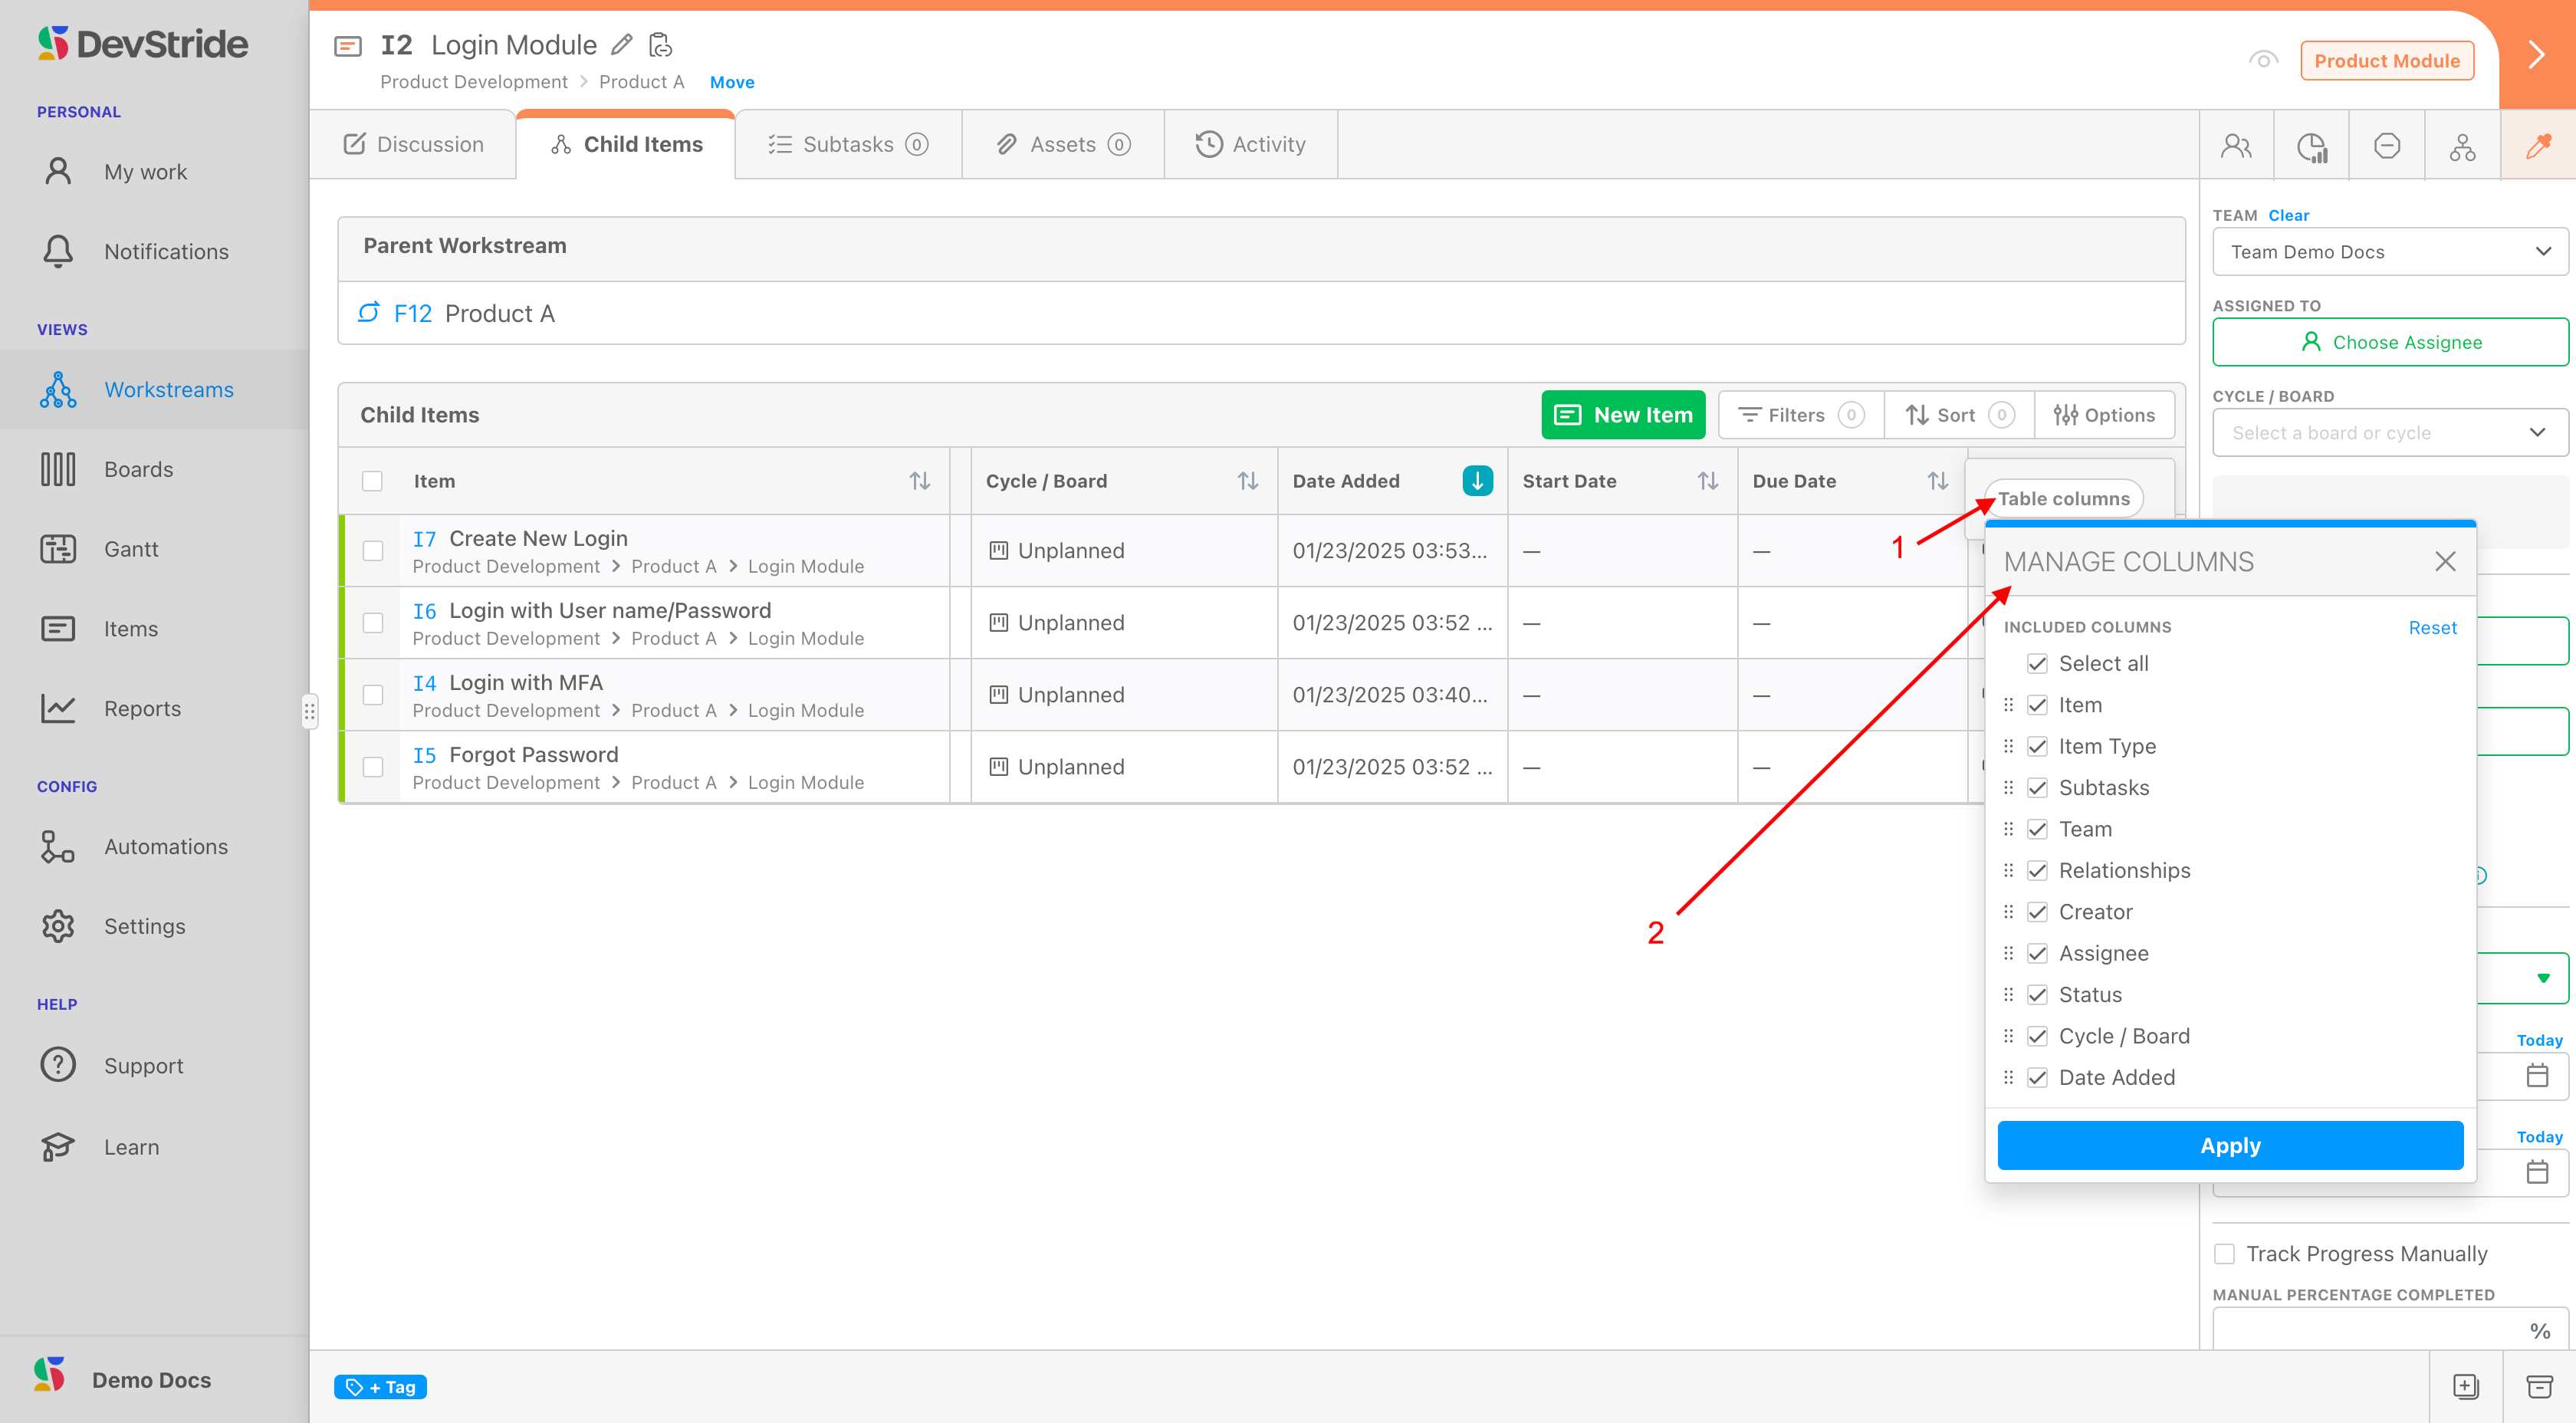
Then click Table Options (1) and select the columns you'd like to see (2):
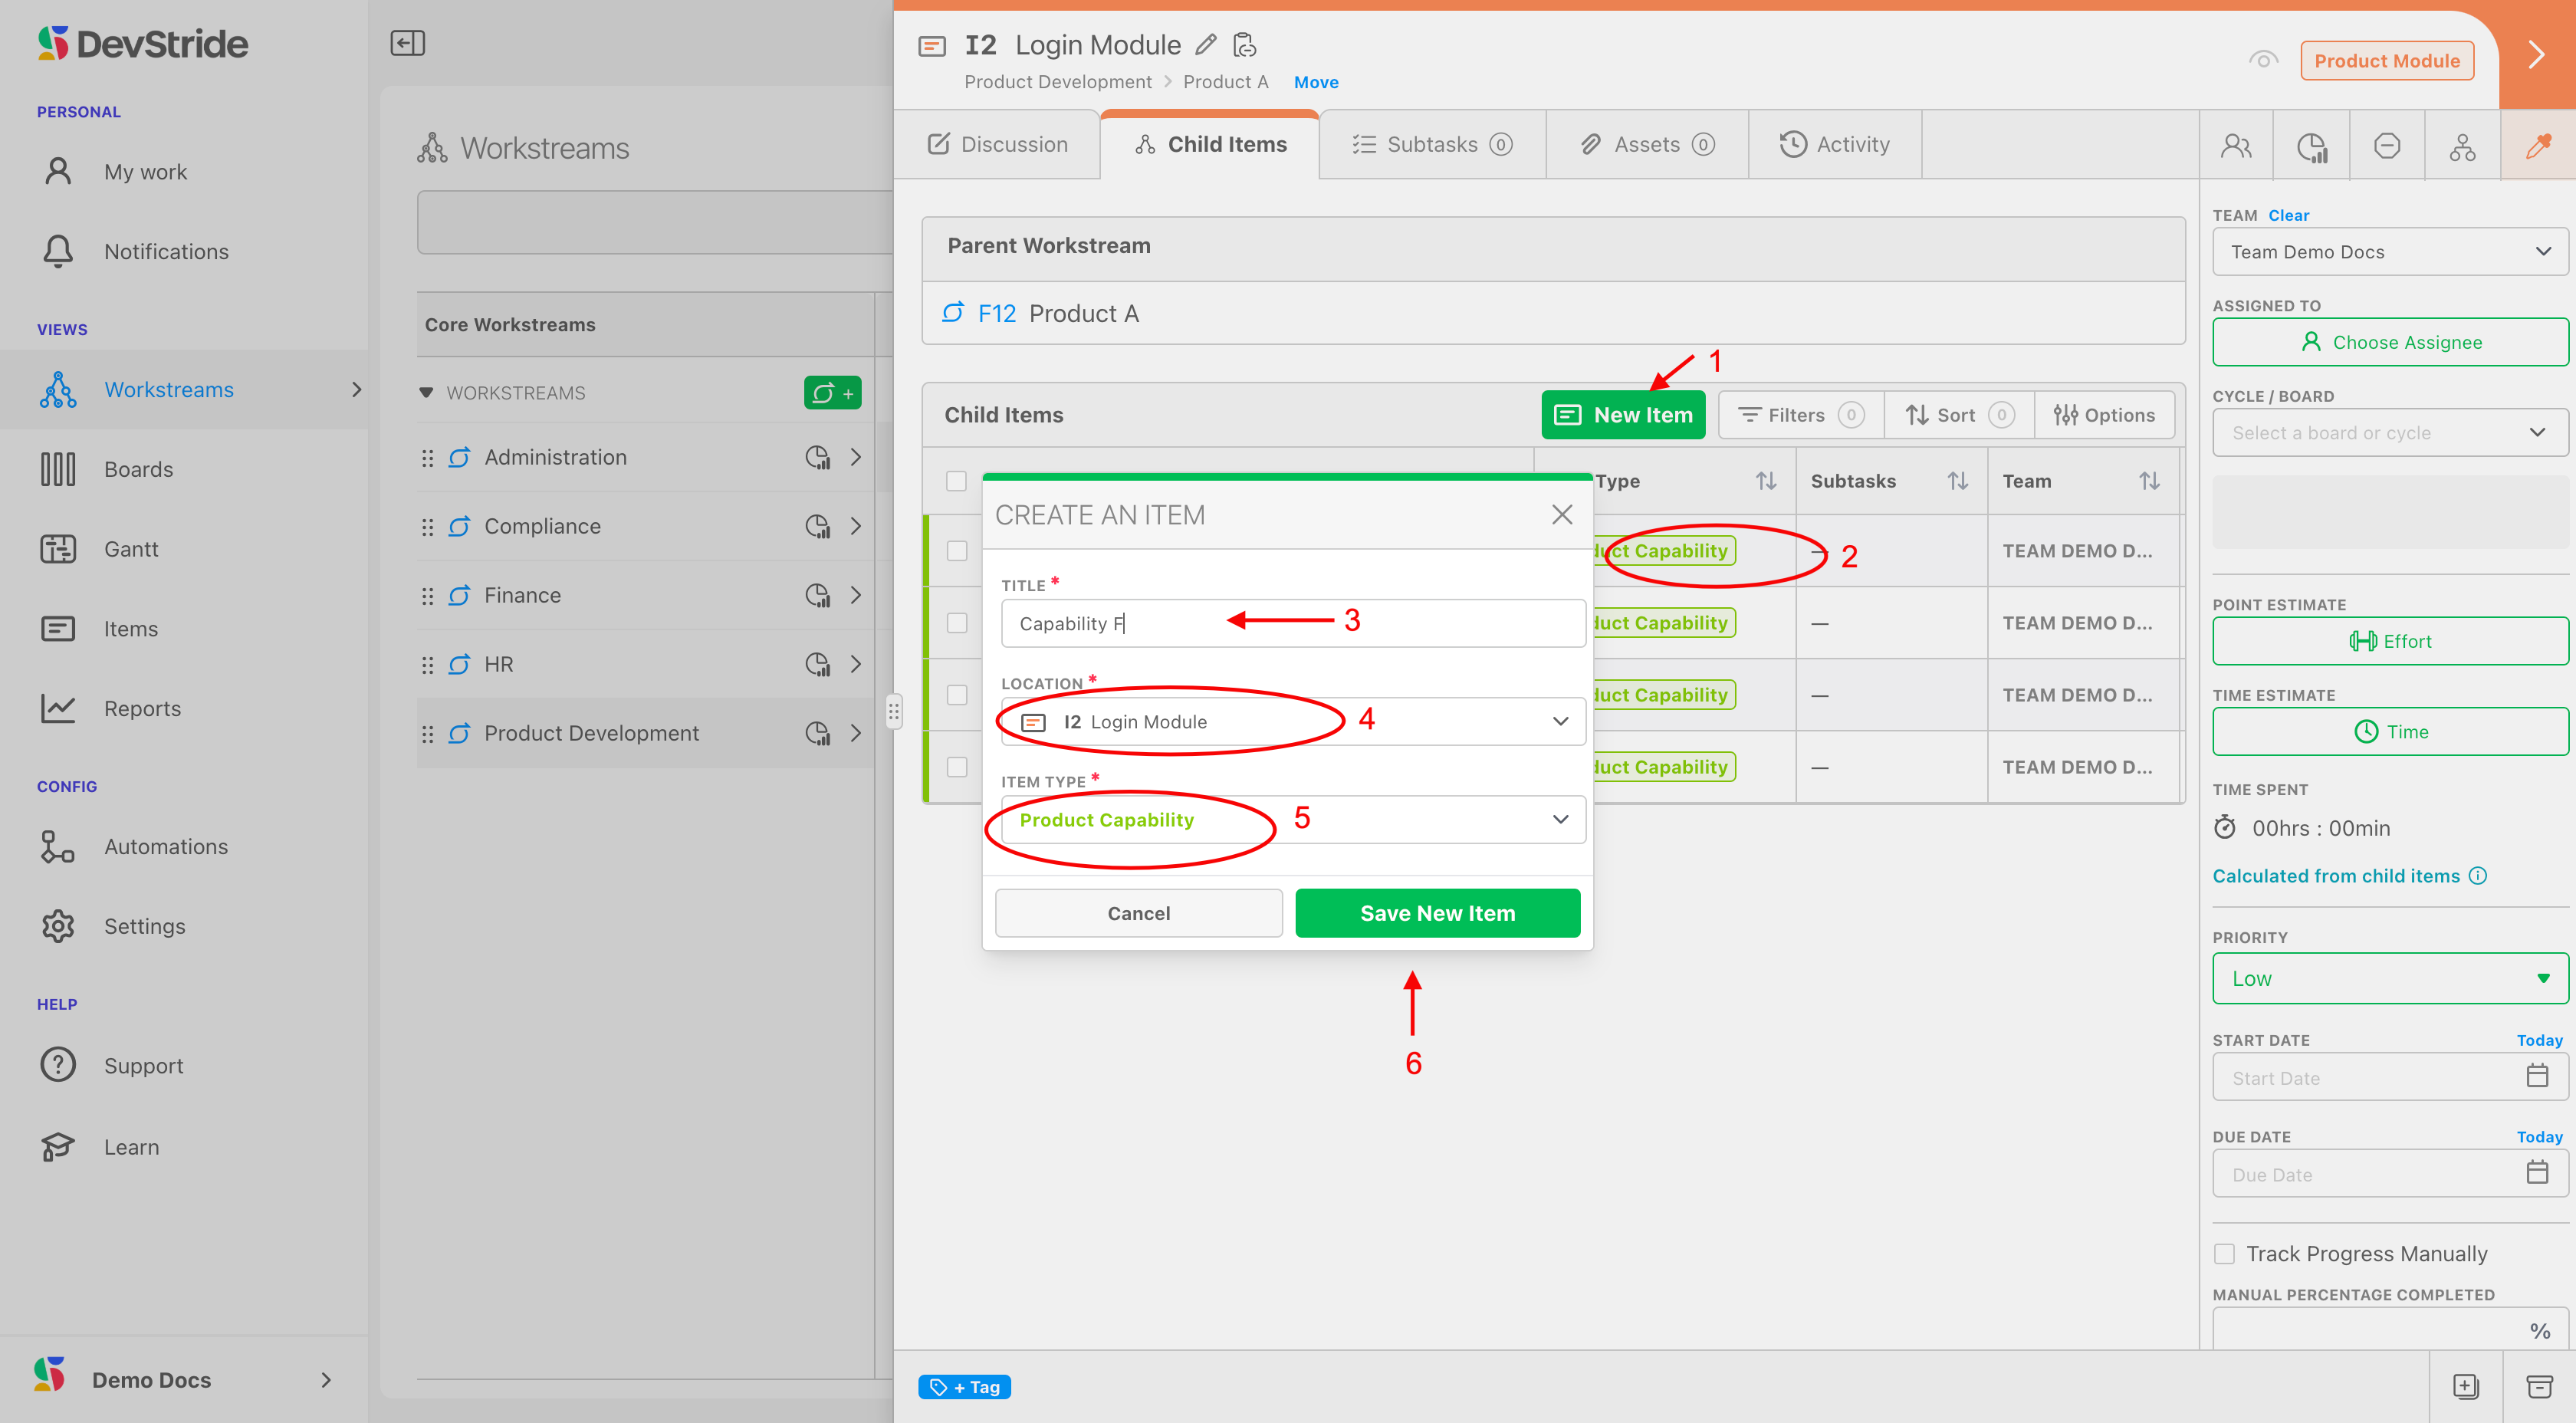
If you'd like to add a new work item right from this screen, click on New Item (1). Note that the default new item type assumes the hierarchy of the child items in current list (2).
A pop-up window displays. Name the item you are adding (2). You can accept the location and item type or, you can change the location and item type as well throught these dropdowns (4 - 5). Click Save New Item (6) when finished.
Adding items here is synchronized with the main Workstream Map and will automatically populate in the map as well. Here, our example, Capability F, is now on the Workstream Map in the correct location (1).

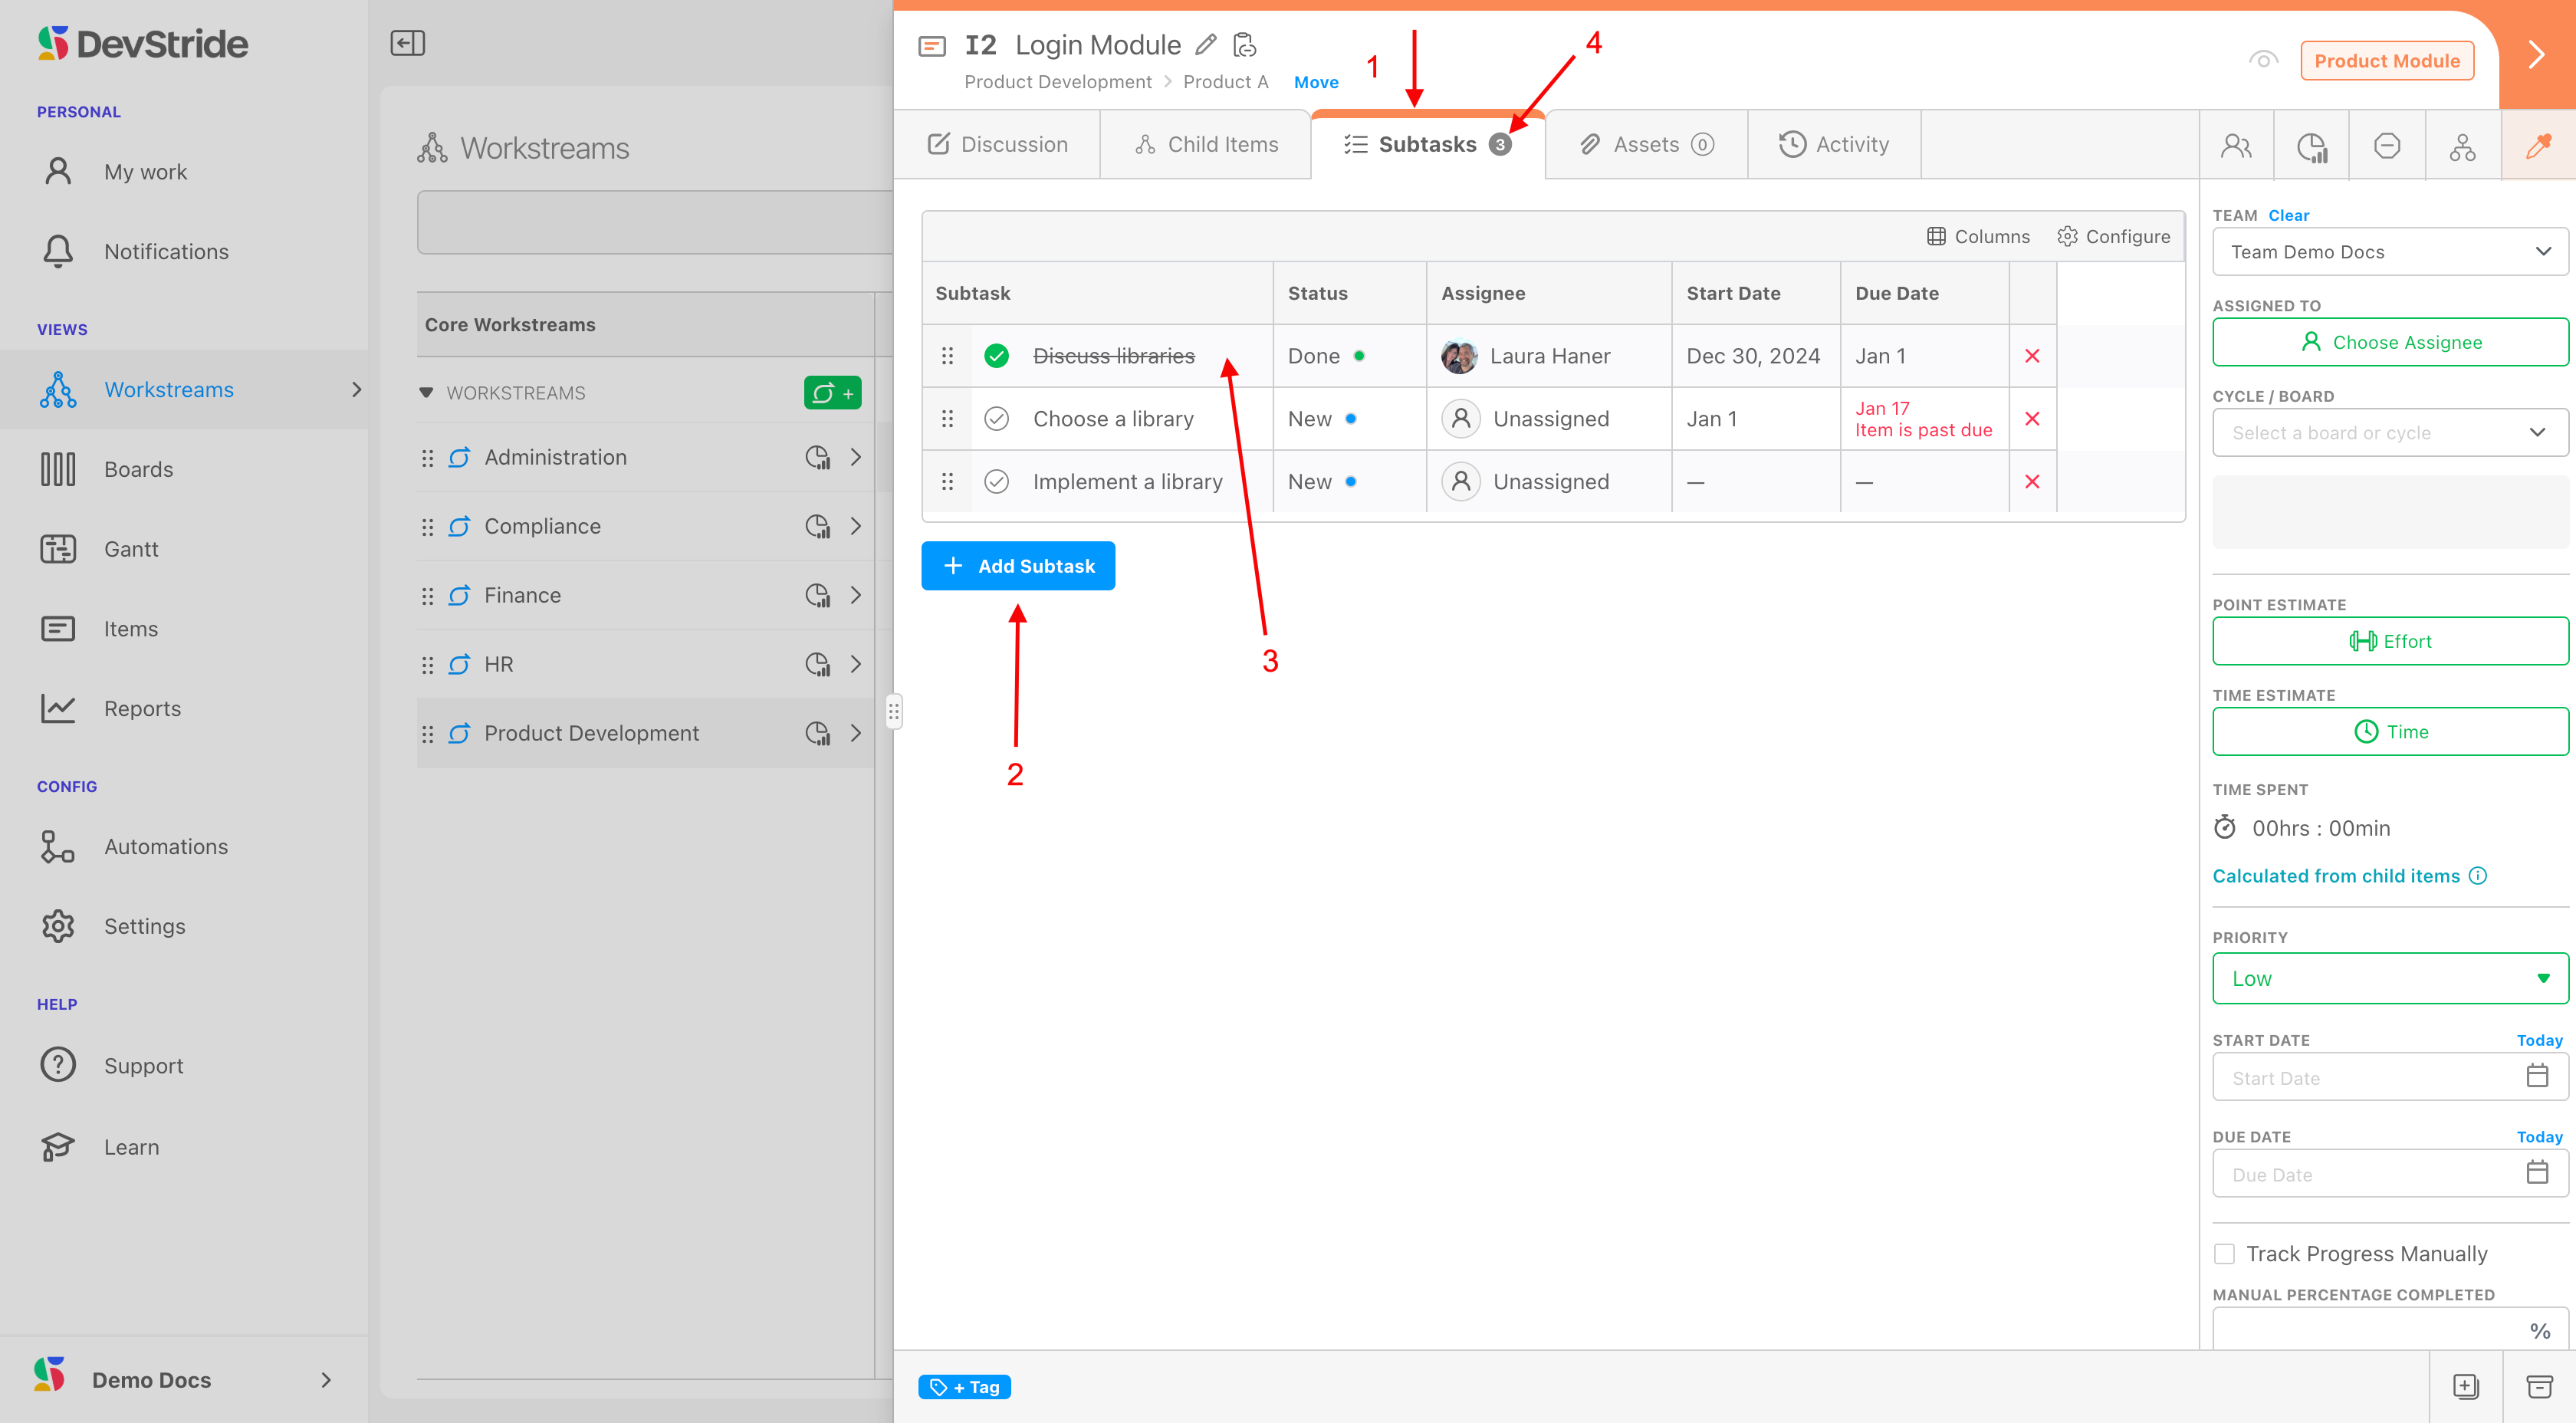
Subtasks Tab
Subtasks exist for the purpose of creating a light-weight task list. This is not designed to be work with a data model and reporting, etc. It's meant to be a checklist of small activities you want to remember to do related to this particular item.
To sub-task or not to sub-task
If you need to report on the activity, do not manage it as a sub-task item.
Subtasks are not represented in DevStride reports in any meaningful way. While they have some helpful capabilities (can be copied as part of a template, can have due dates, an —if they are on the lowest level of the item hierarchy—can track time against them, etc.), they are meant to be used as simple checklist items.
You can assign subtasks to people and give each of the sub-tasks their own due dates (as long as they do not exceed the item's due date).
If you use a subtasks list, your item will not be considered "done" until the sub-tasks are also completed.
To create subtasks:
From the Subtasks tab (1) click on Add subtask (2).
To indicate a subtask is complete, simply click on the checkmark next to it (3). Note that you can see that there are subtasks on this tab by glancing at the badge counter (4).
Assets Tab
The Assets Tab is a way of organizing and linking to the item's relevant external resources. Great examples of useful assets are:
- Google Docs of living or static documents
- Figma boards or other design files
- Spreadsheets
- Websites
- Local files (these can be uploaded instead of linked)
What this gives you
This functionality creates durable assets for ongoing reference and use.
Assets help keep everything up-to-date and all in one place for visibility, without having to reproduce it manually.
Rather than trying to recreate large amounts of information in the description tab or pass around and update documents, use links in Assets wherever possible.
Links allow you and your team to refer to and work on the most current version of any given file.
Asset links preserve access rights protection so that only team members with the appropriate rights can actually open the document.
How to Do it
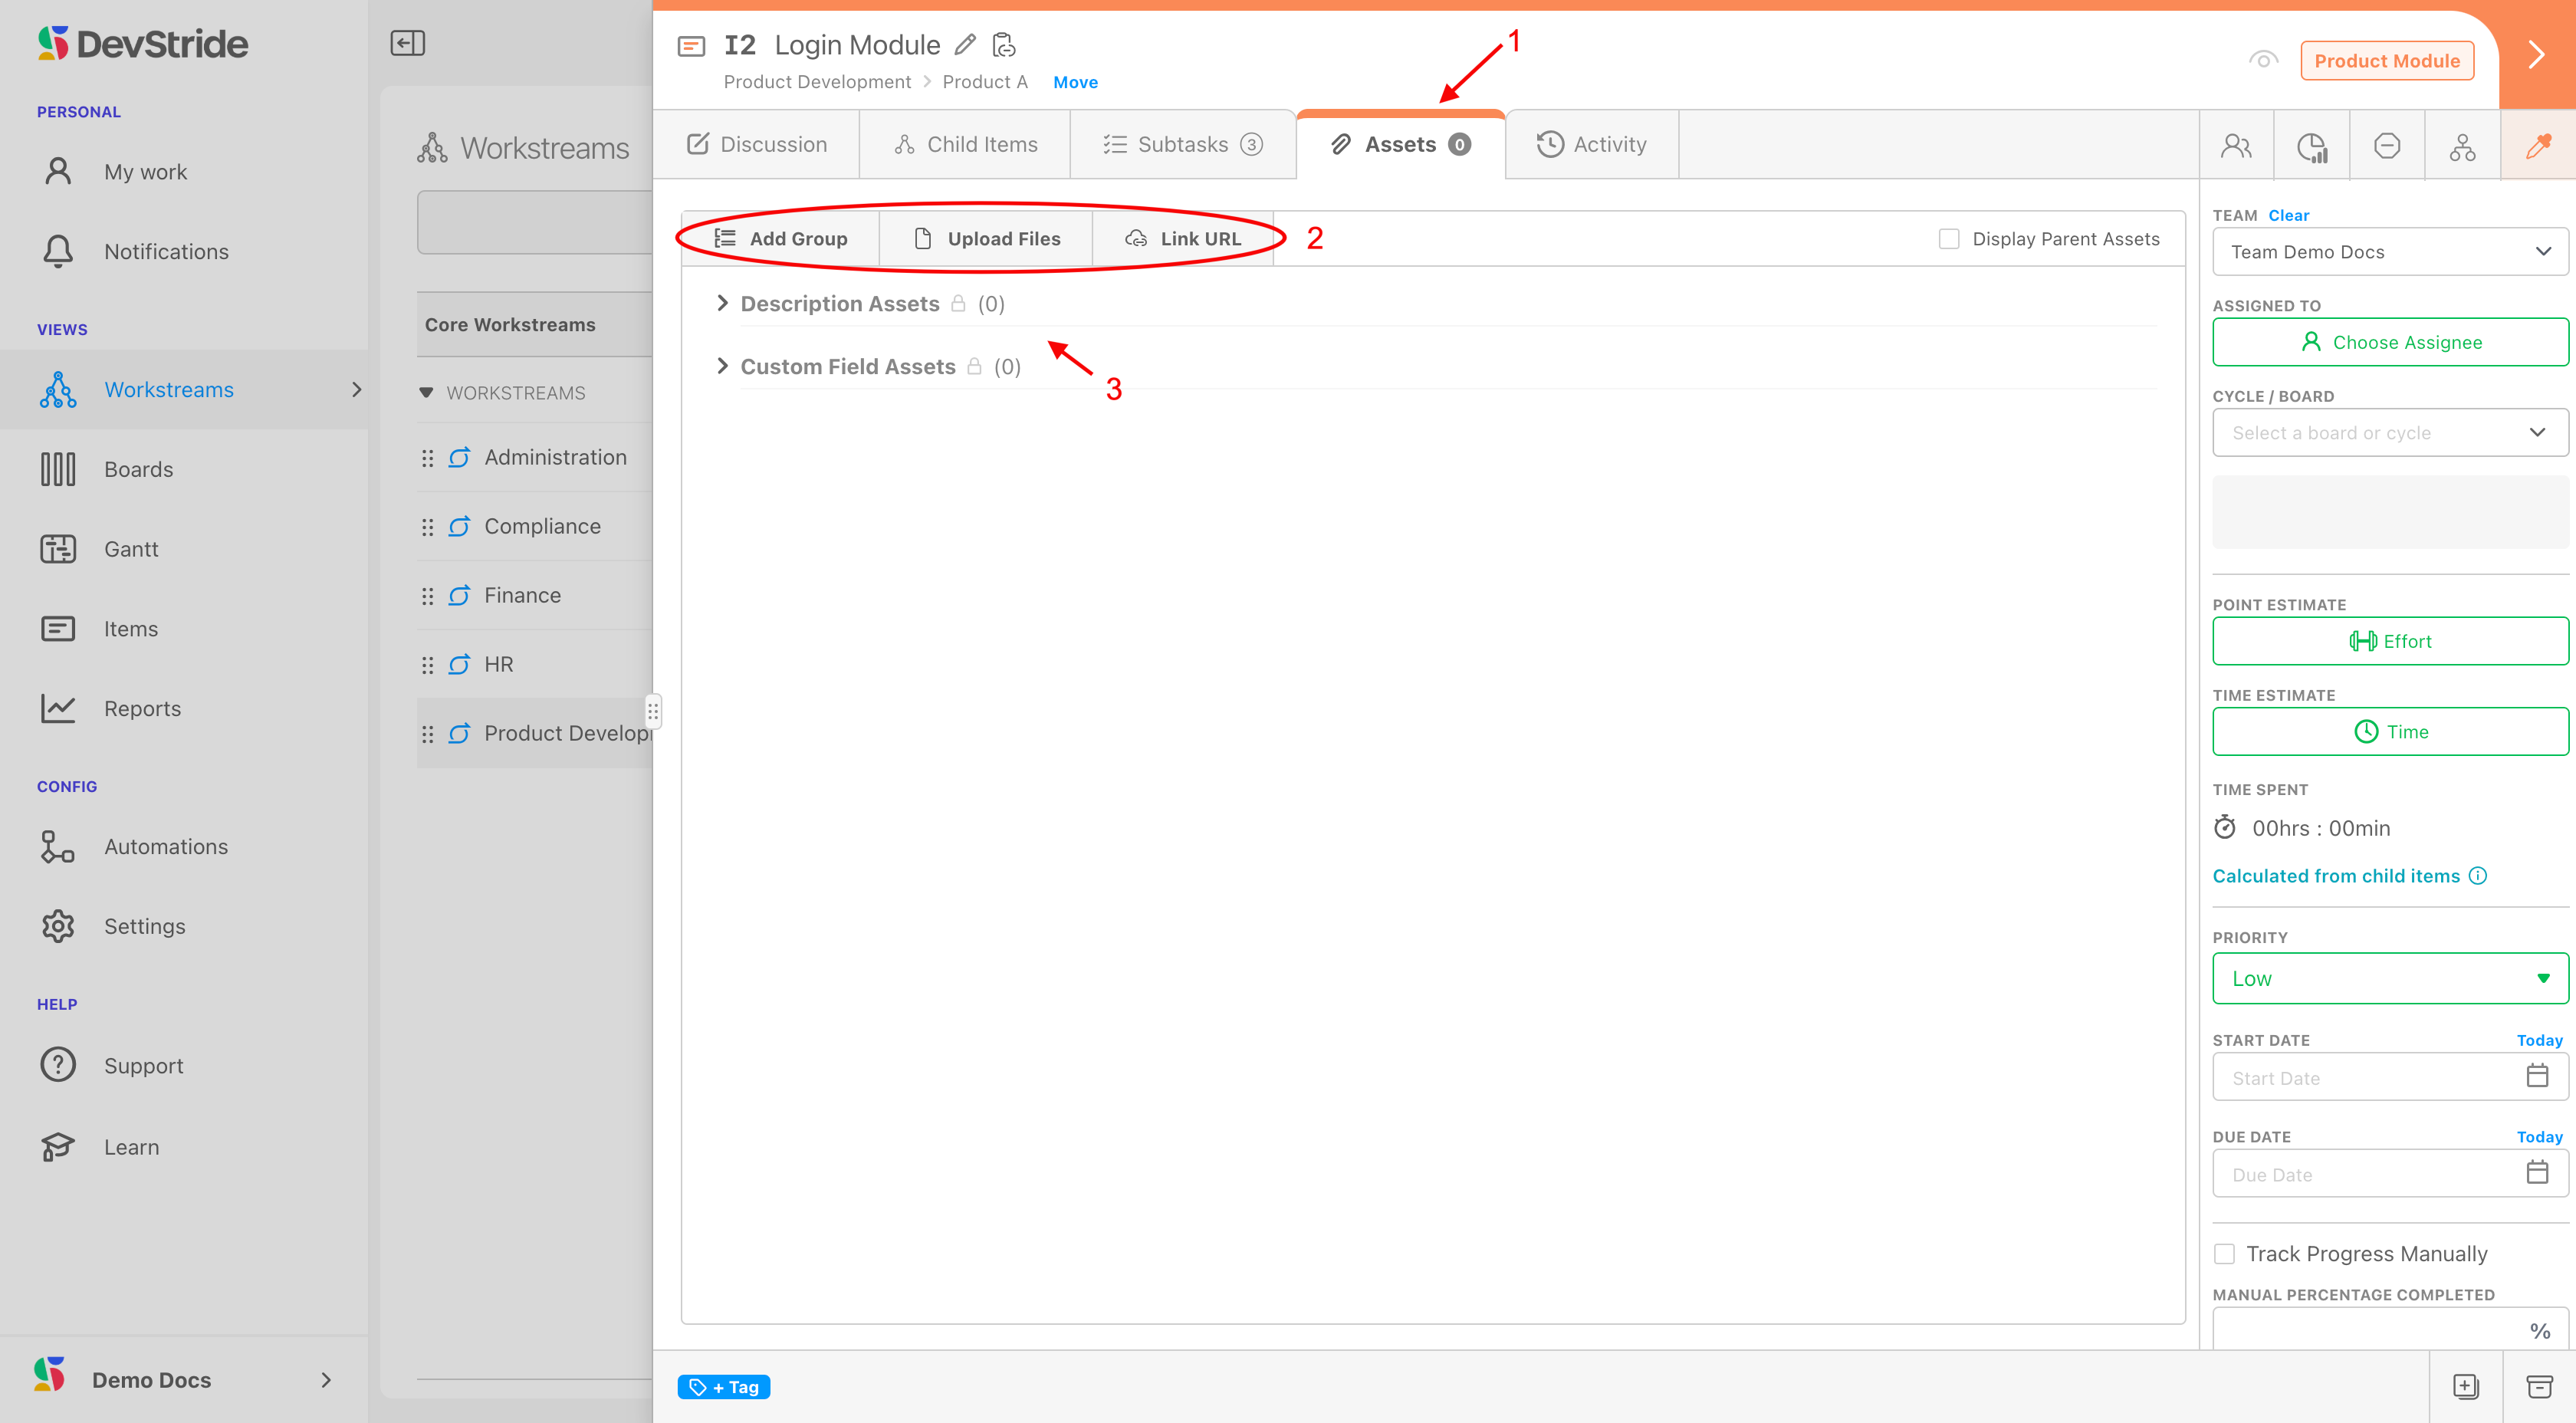
From the Assets tab (1) you can upload a file or link a URL (2). Note: Use link a URL if you want to link to a living shared file that is stored online (like Googe Docs).
You can further organize how Assets display, by clicking on Add Group and Naming it.
Assets that are mentioned in the Description Tab are auto-populate in the Description Assets Section. Assets that might be added to Custom Fields that are part of this item are auto-populated in teh the Custom Fields Assets section. See (3).
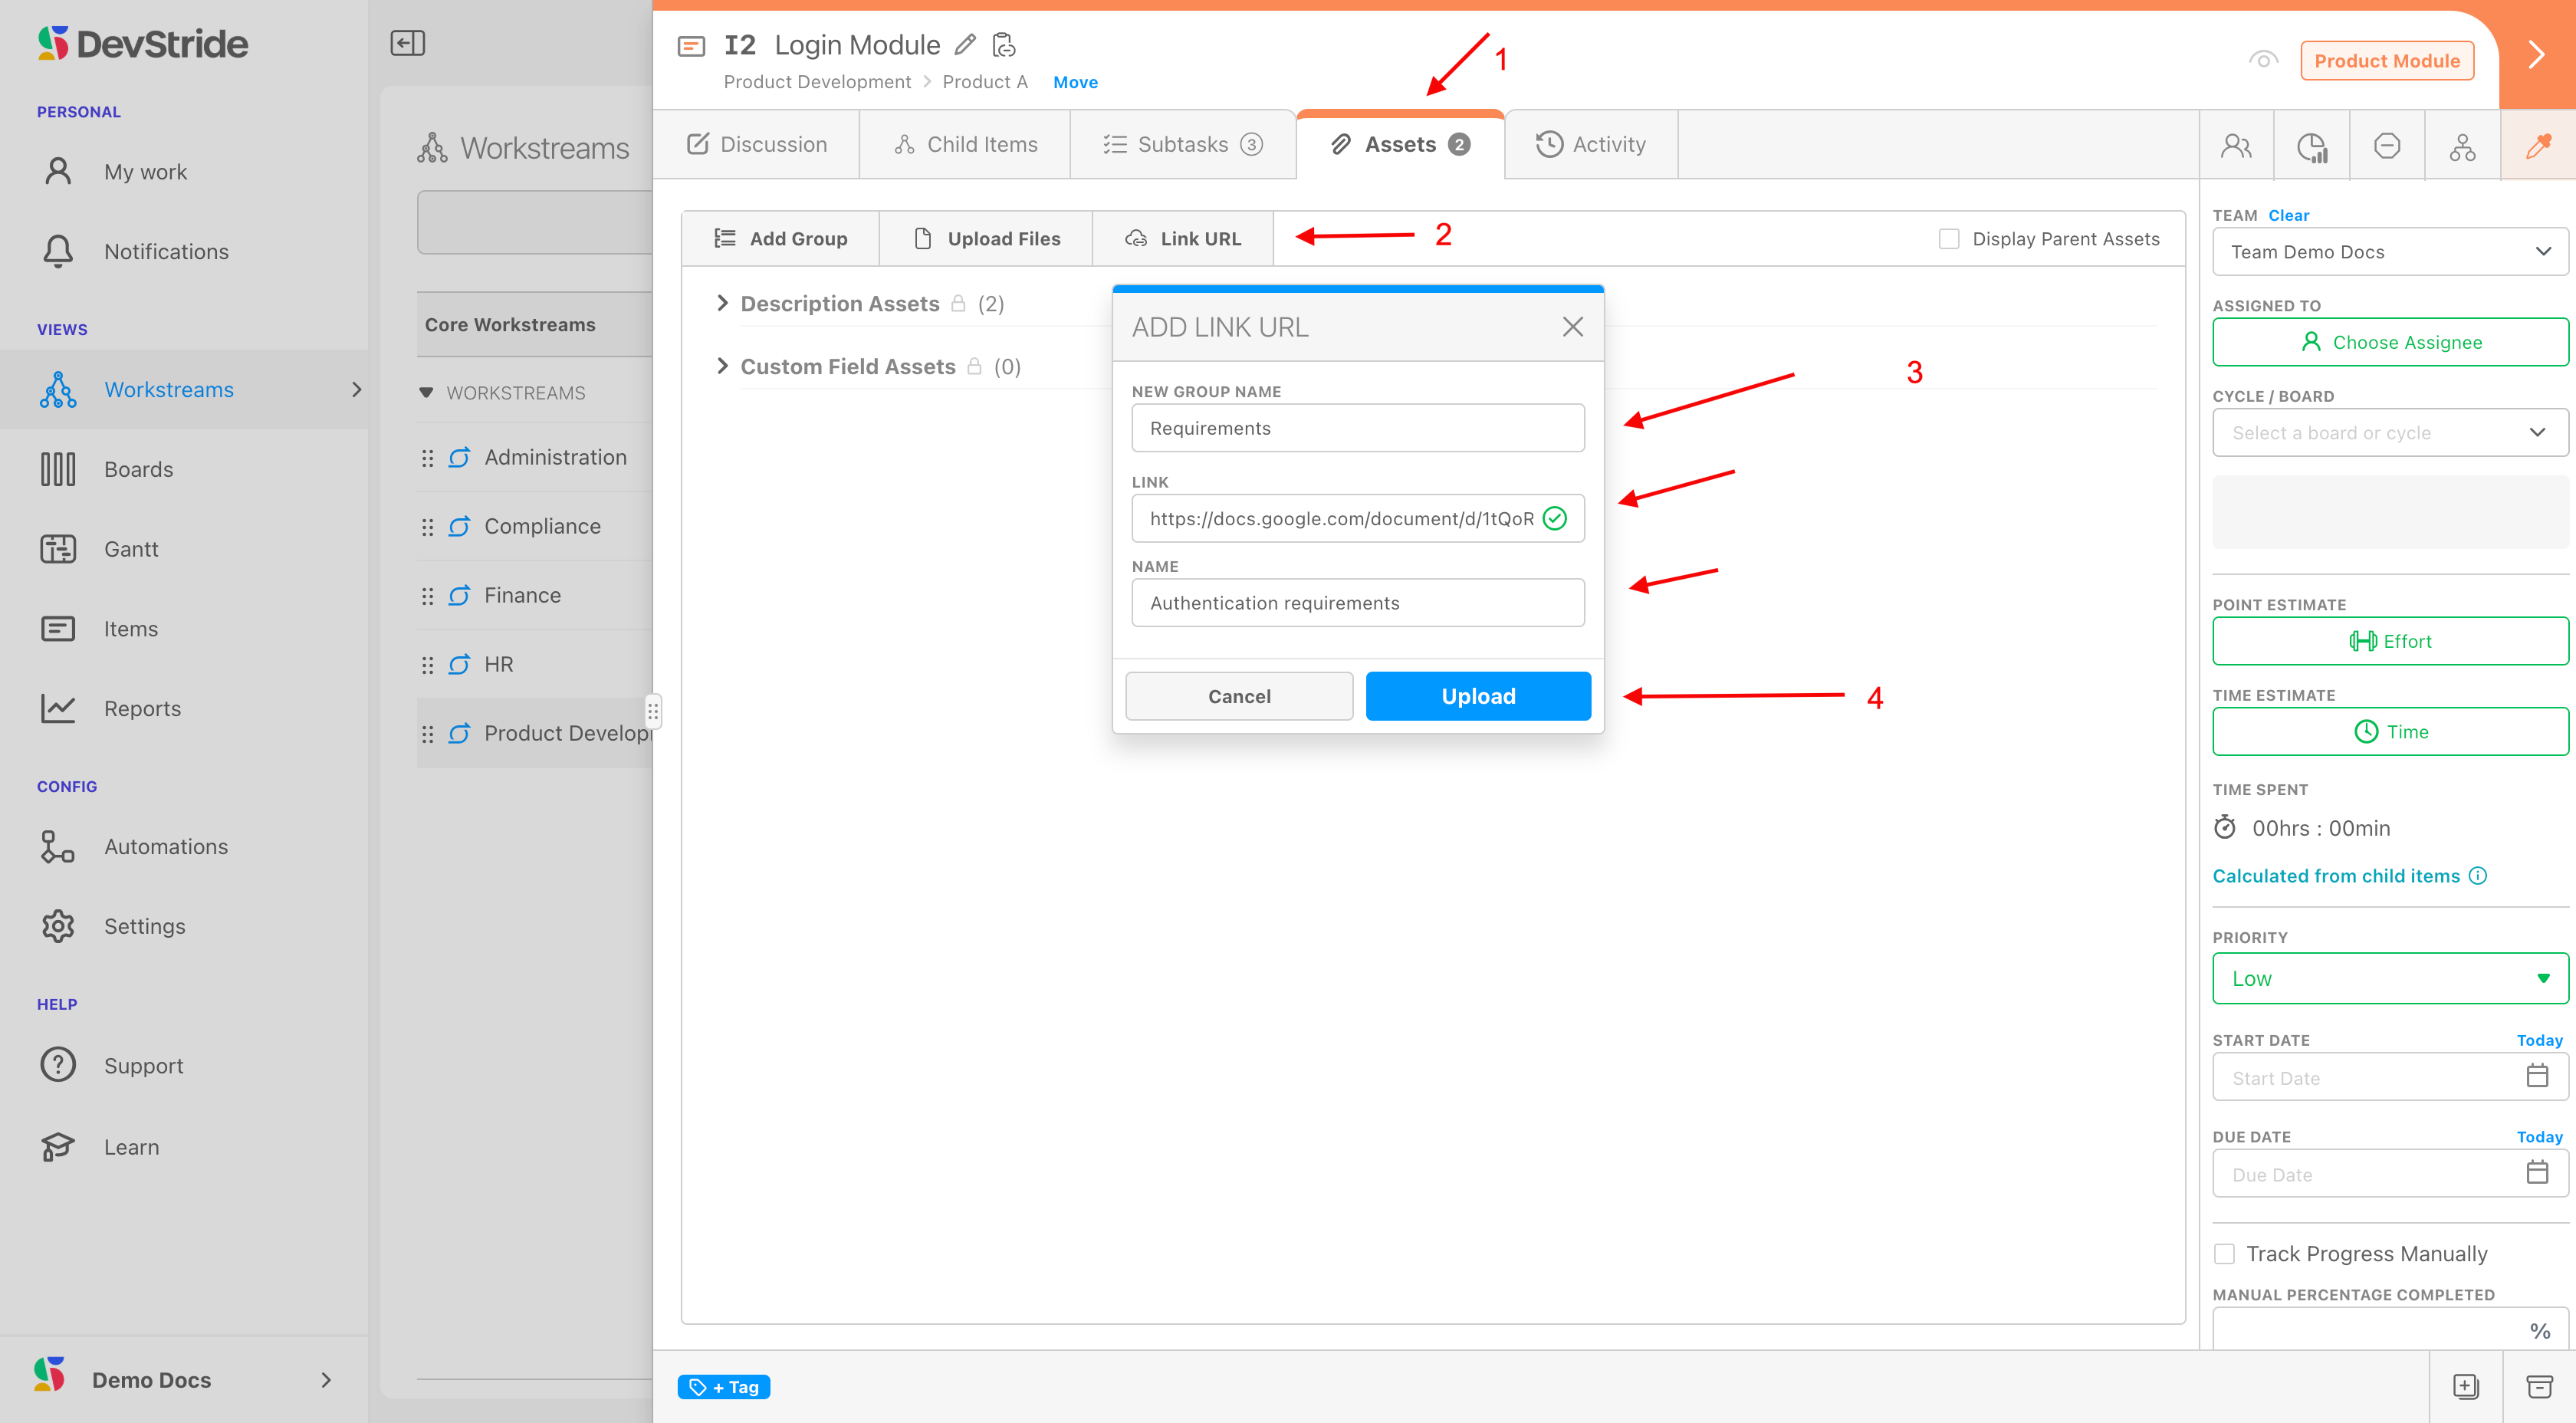
As an example, here's how to create a group and link a URL.
From the Assets tab (1), click Link URL (2).
Then, fill in the name of the group you would like to house this link in (3) — you can create the name at this time or select it from the drop down if you have previously created the desired group name.
During this step, you can also type or paste in the link to the file. Name the file as you would like it to display under the Group (3).
Click upload (4).
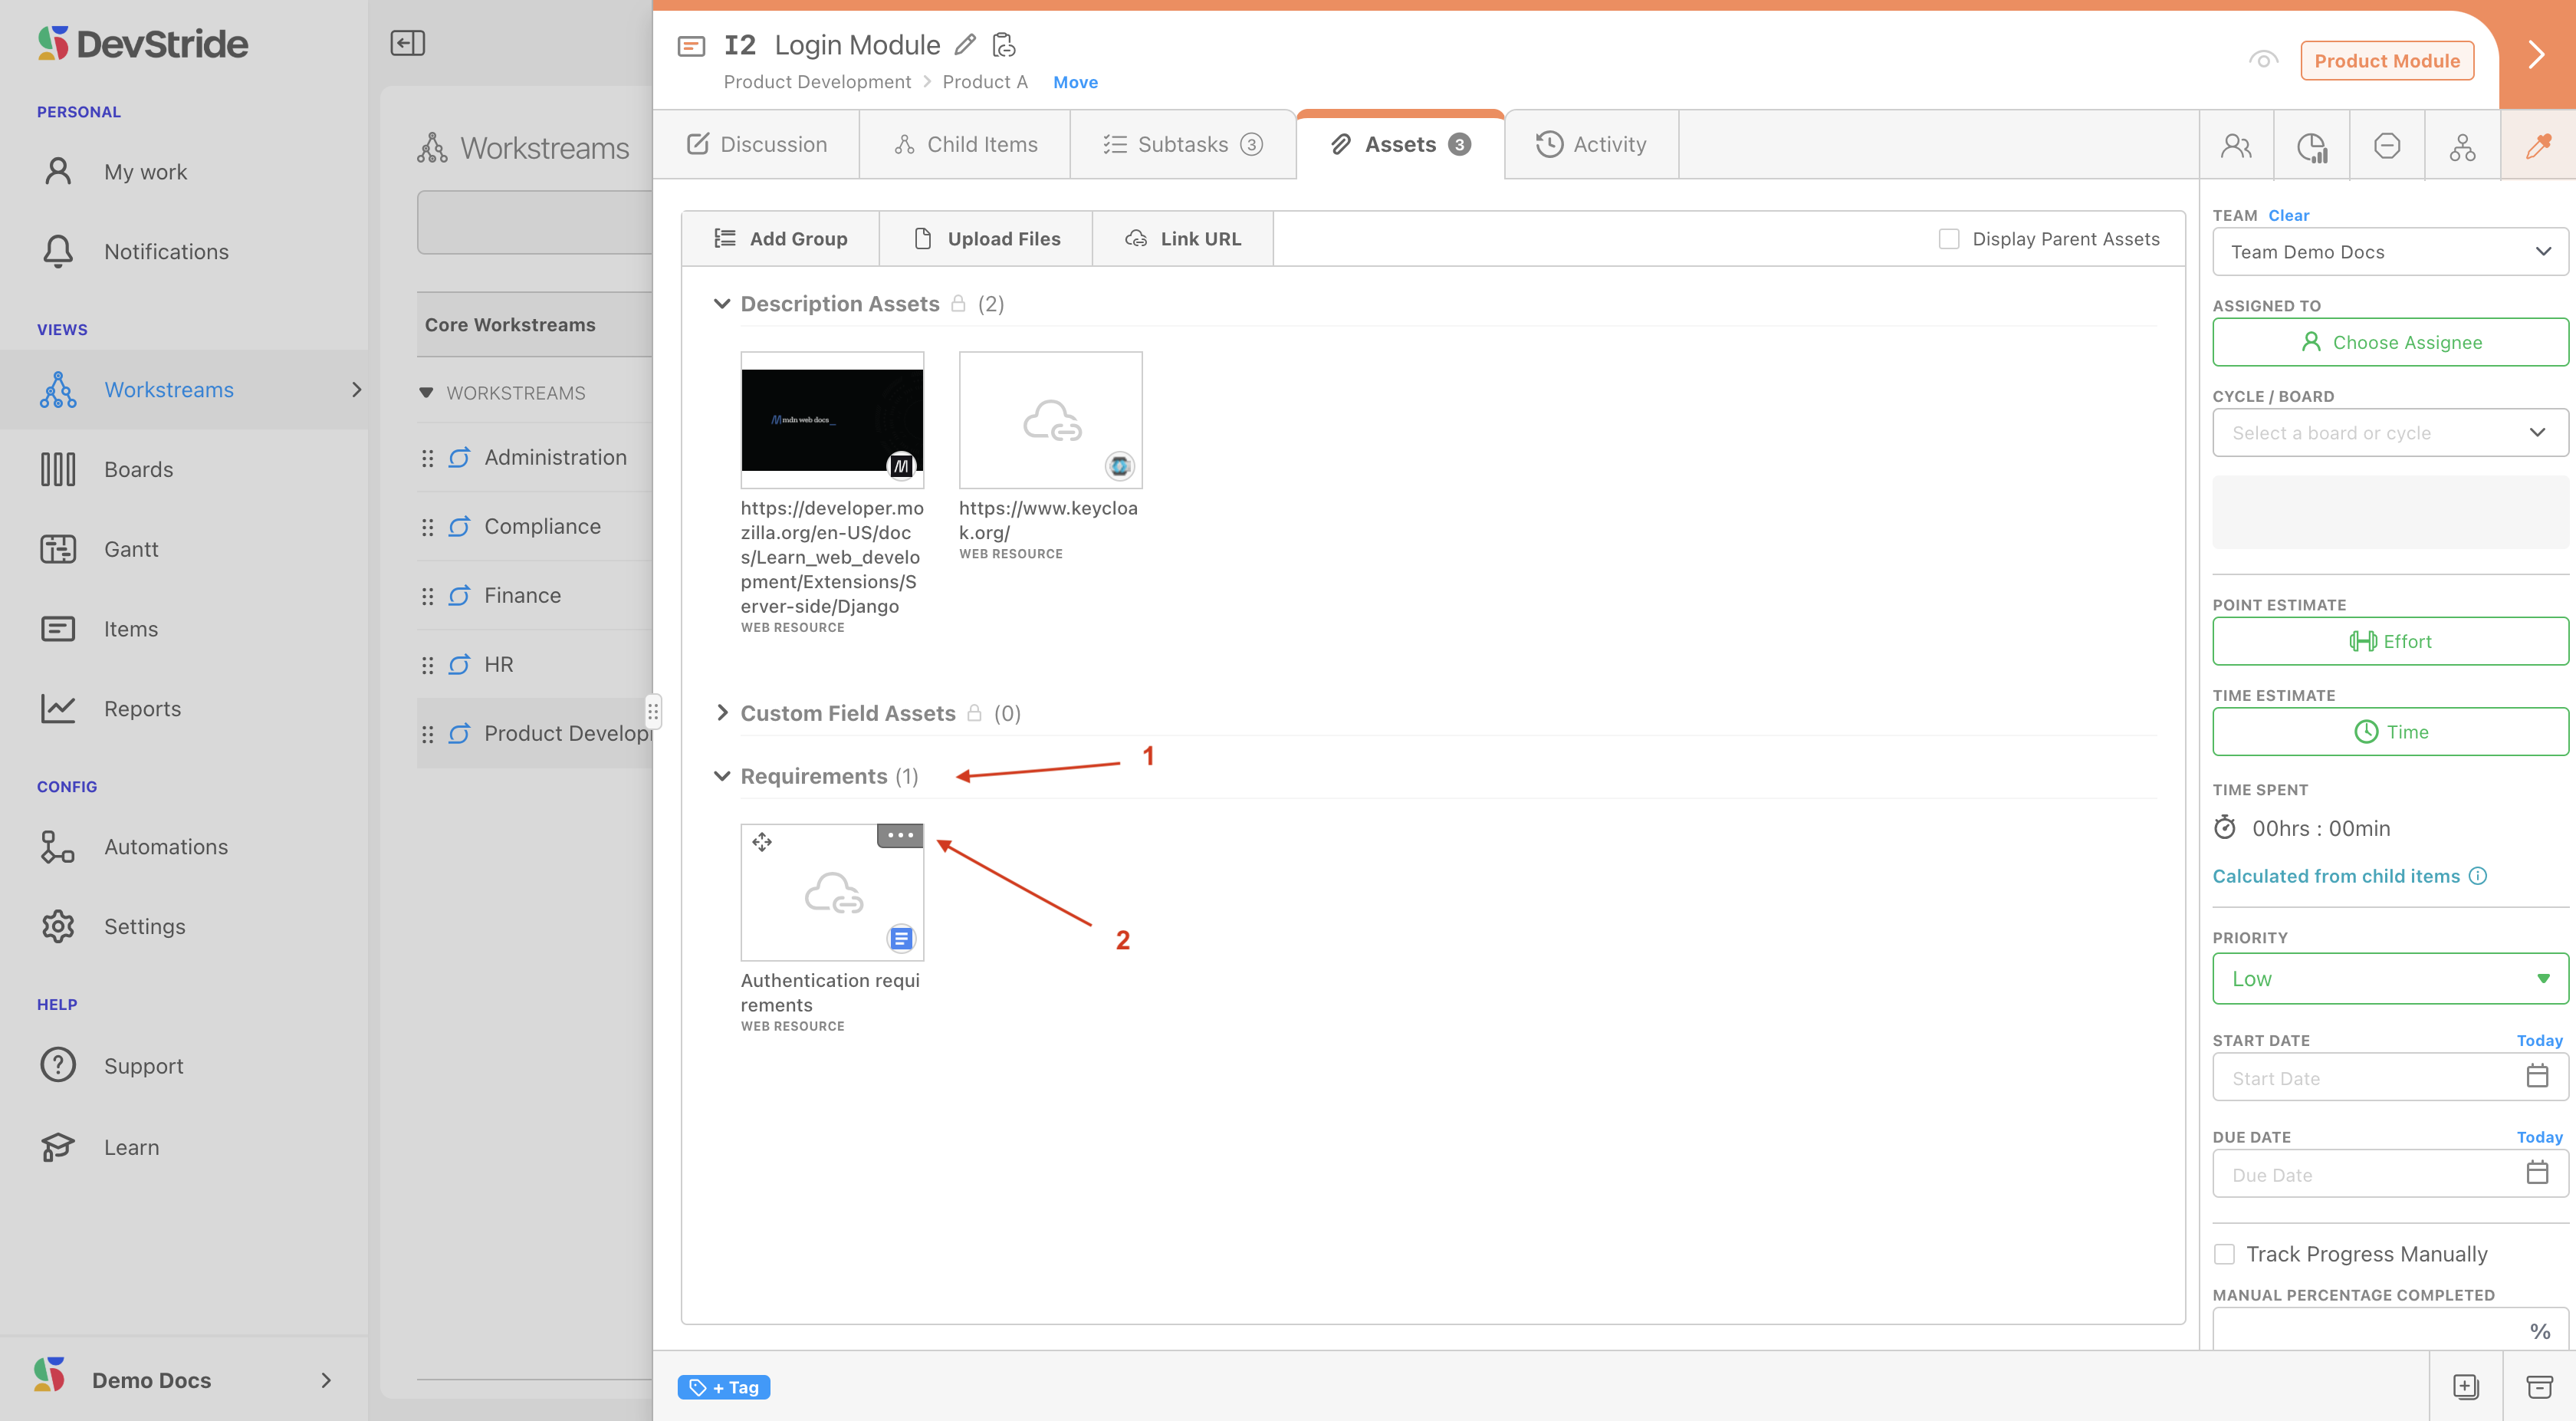
The asset will now appear in the group you created (1). You can add or remove assets from the group anytime (2).
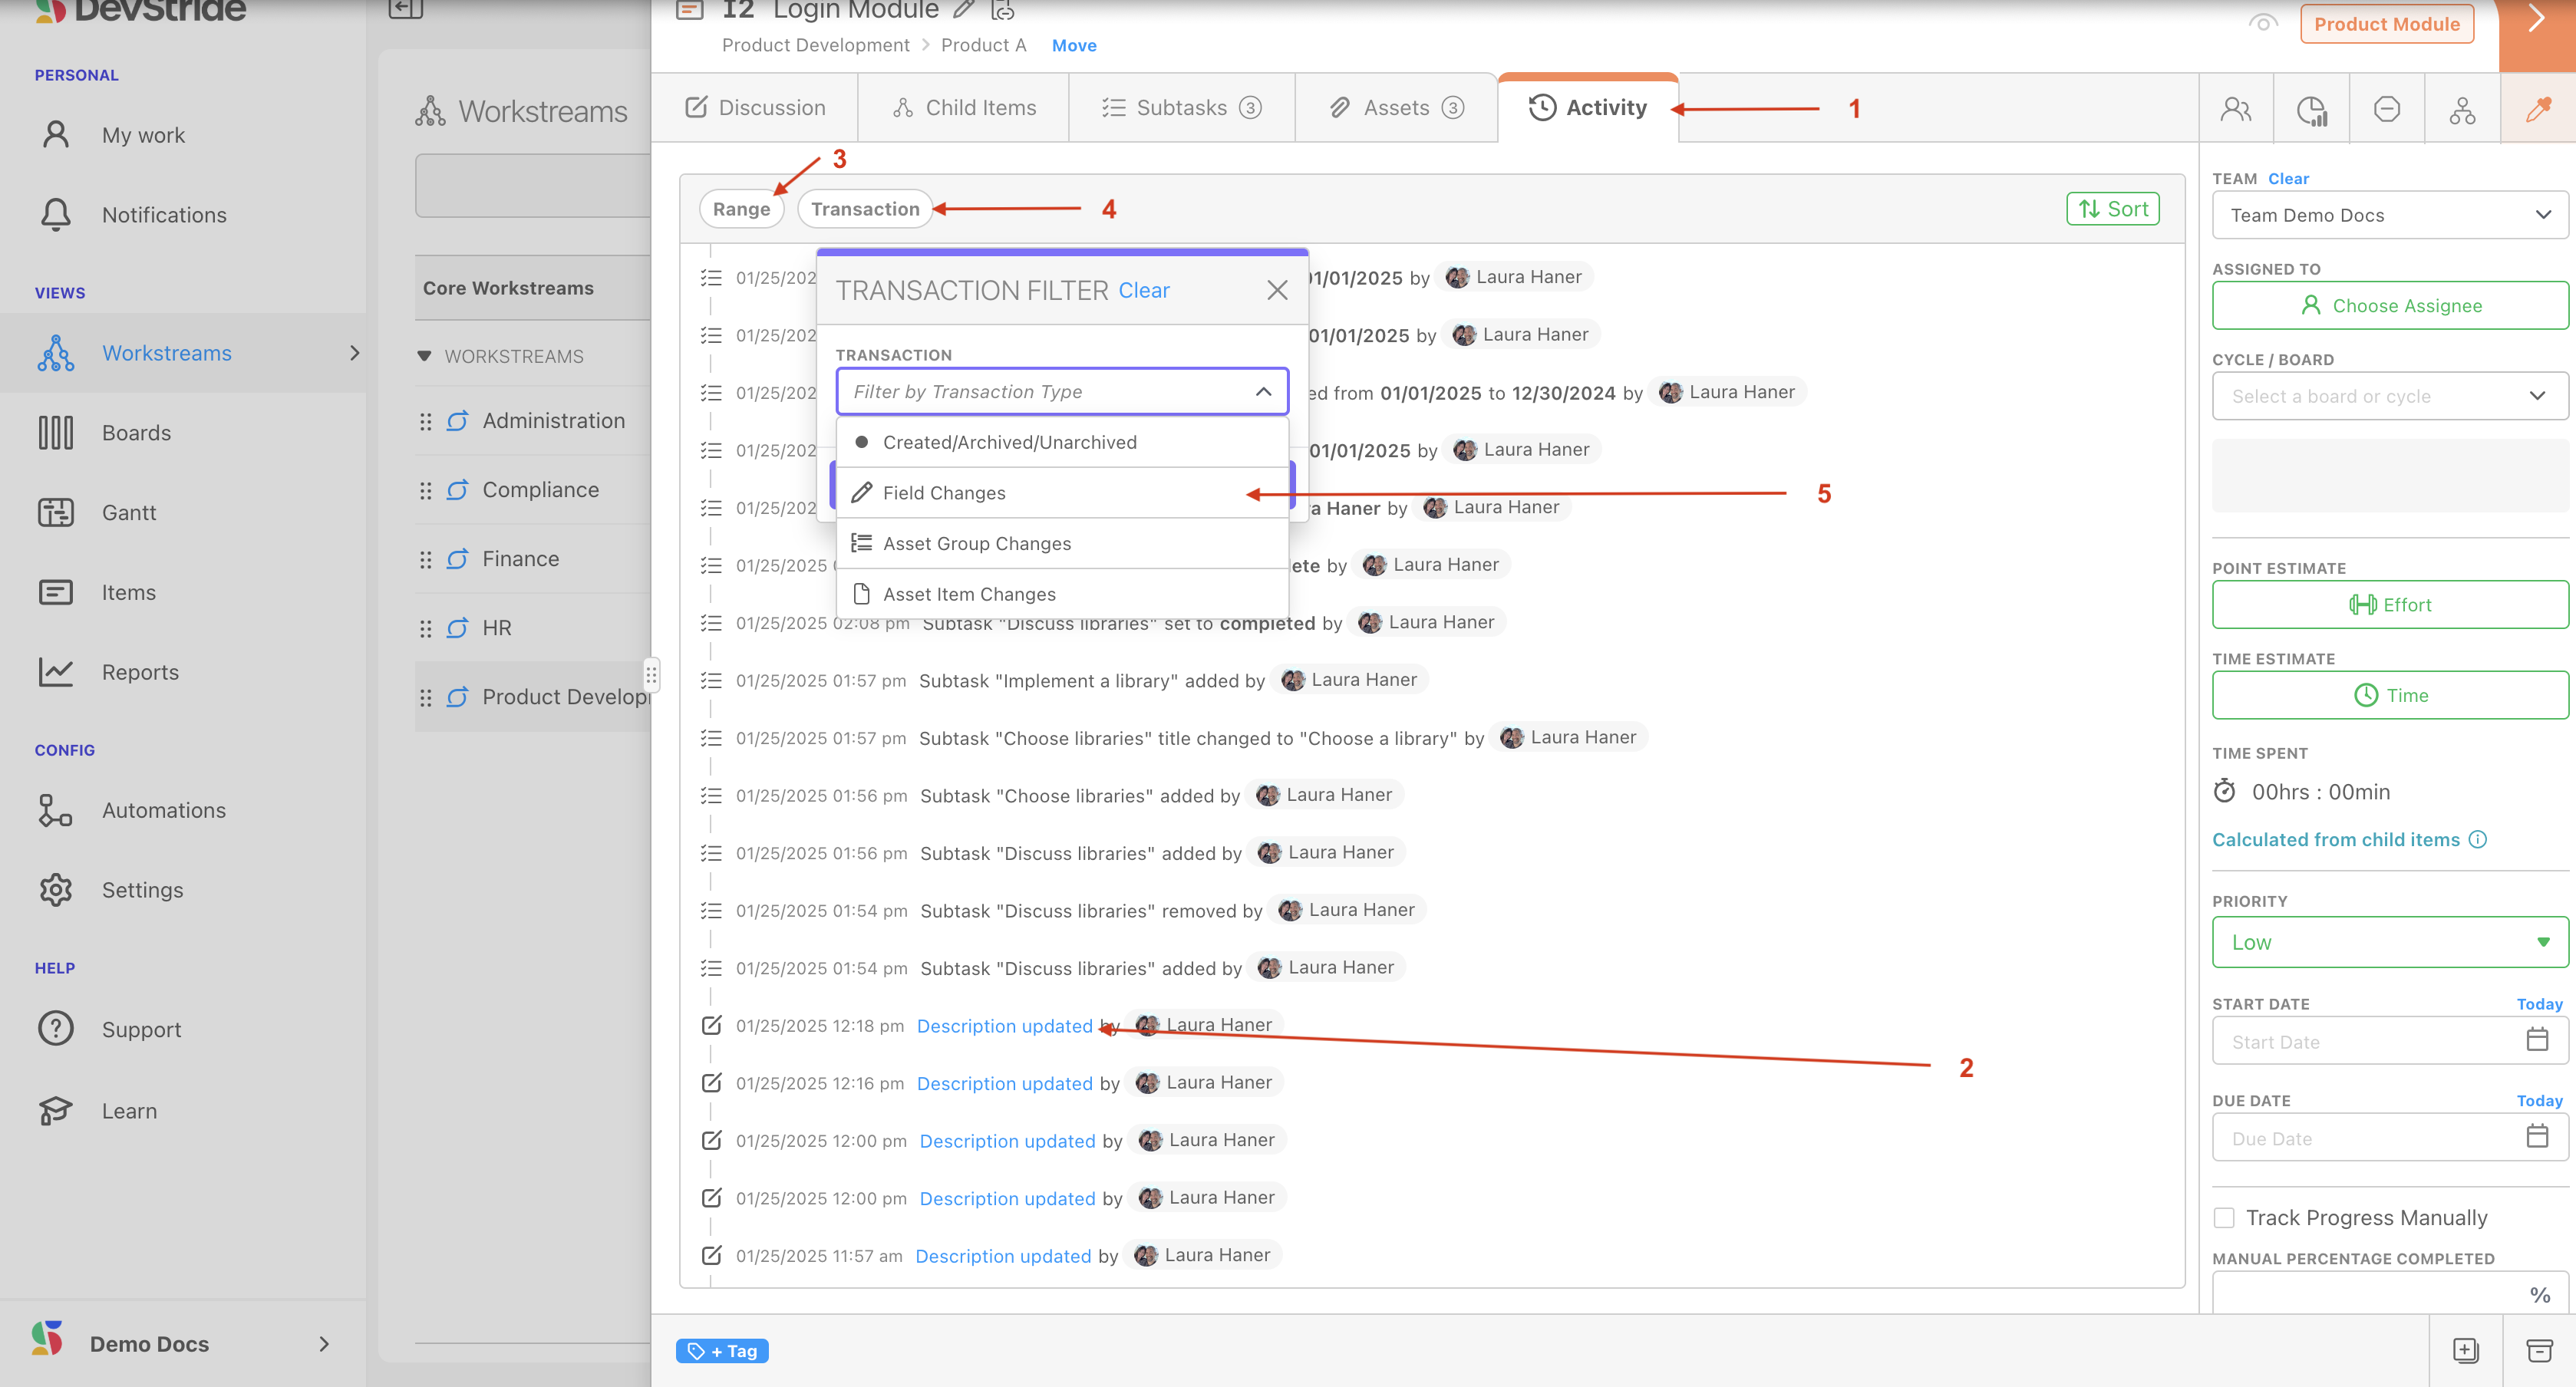
Activity Tab
The activity tab provides an audit trail. It displays all the actions that have been taken on the item. It's an immutable list, so the list of actions on this list cannot be deleted.
If you ever need to track down who made a particular change or when they changed it, the Activity Tab (1) provides that information.
You can interact with the list of activities (2) by clicking on links, searching by date range (3) and transaction type (4-5).
Workspace Tour: Quick Links
The following Quick Links are available for other useful information right from the Item Header:
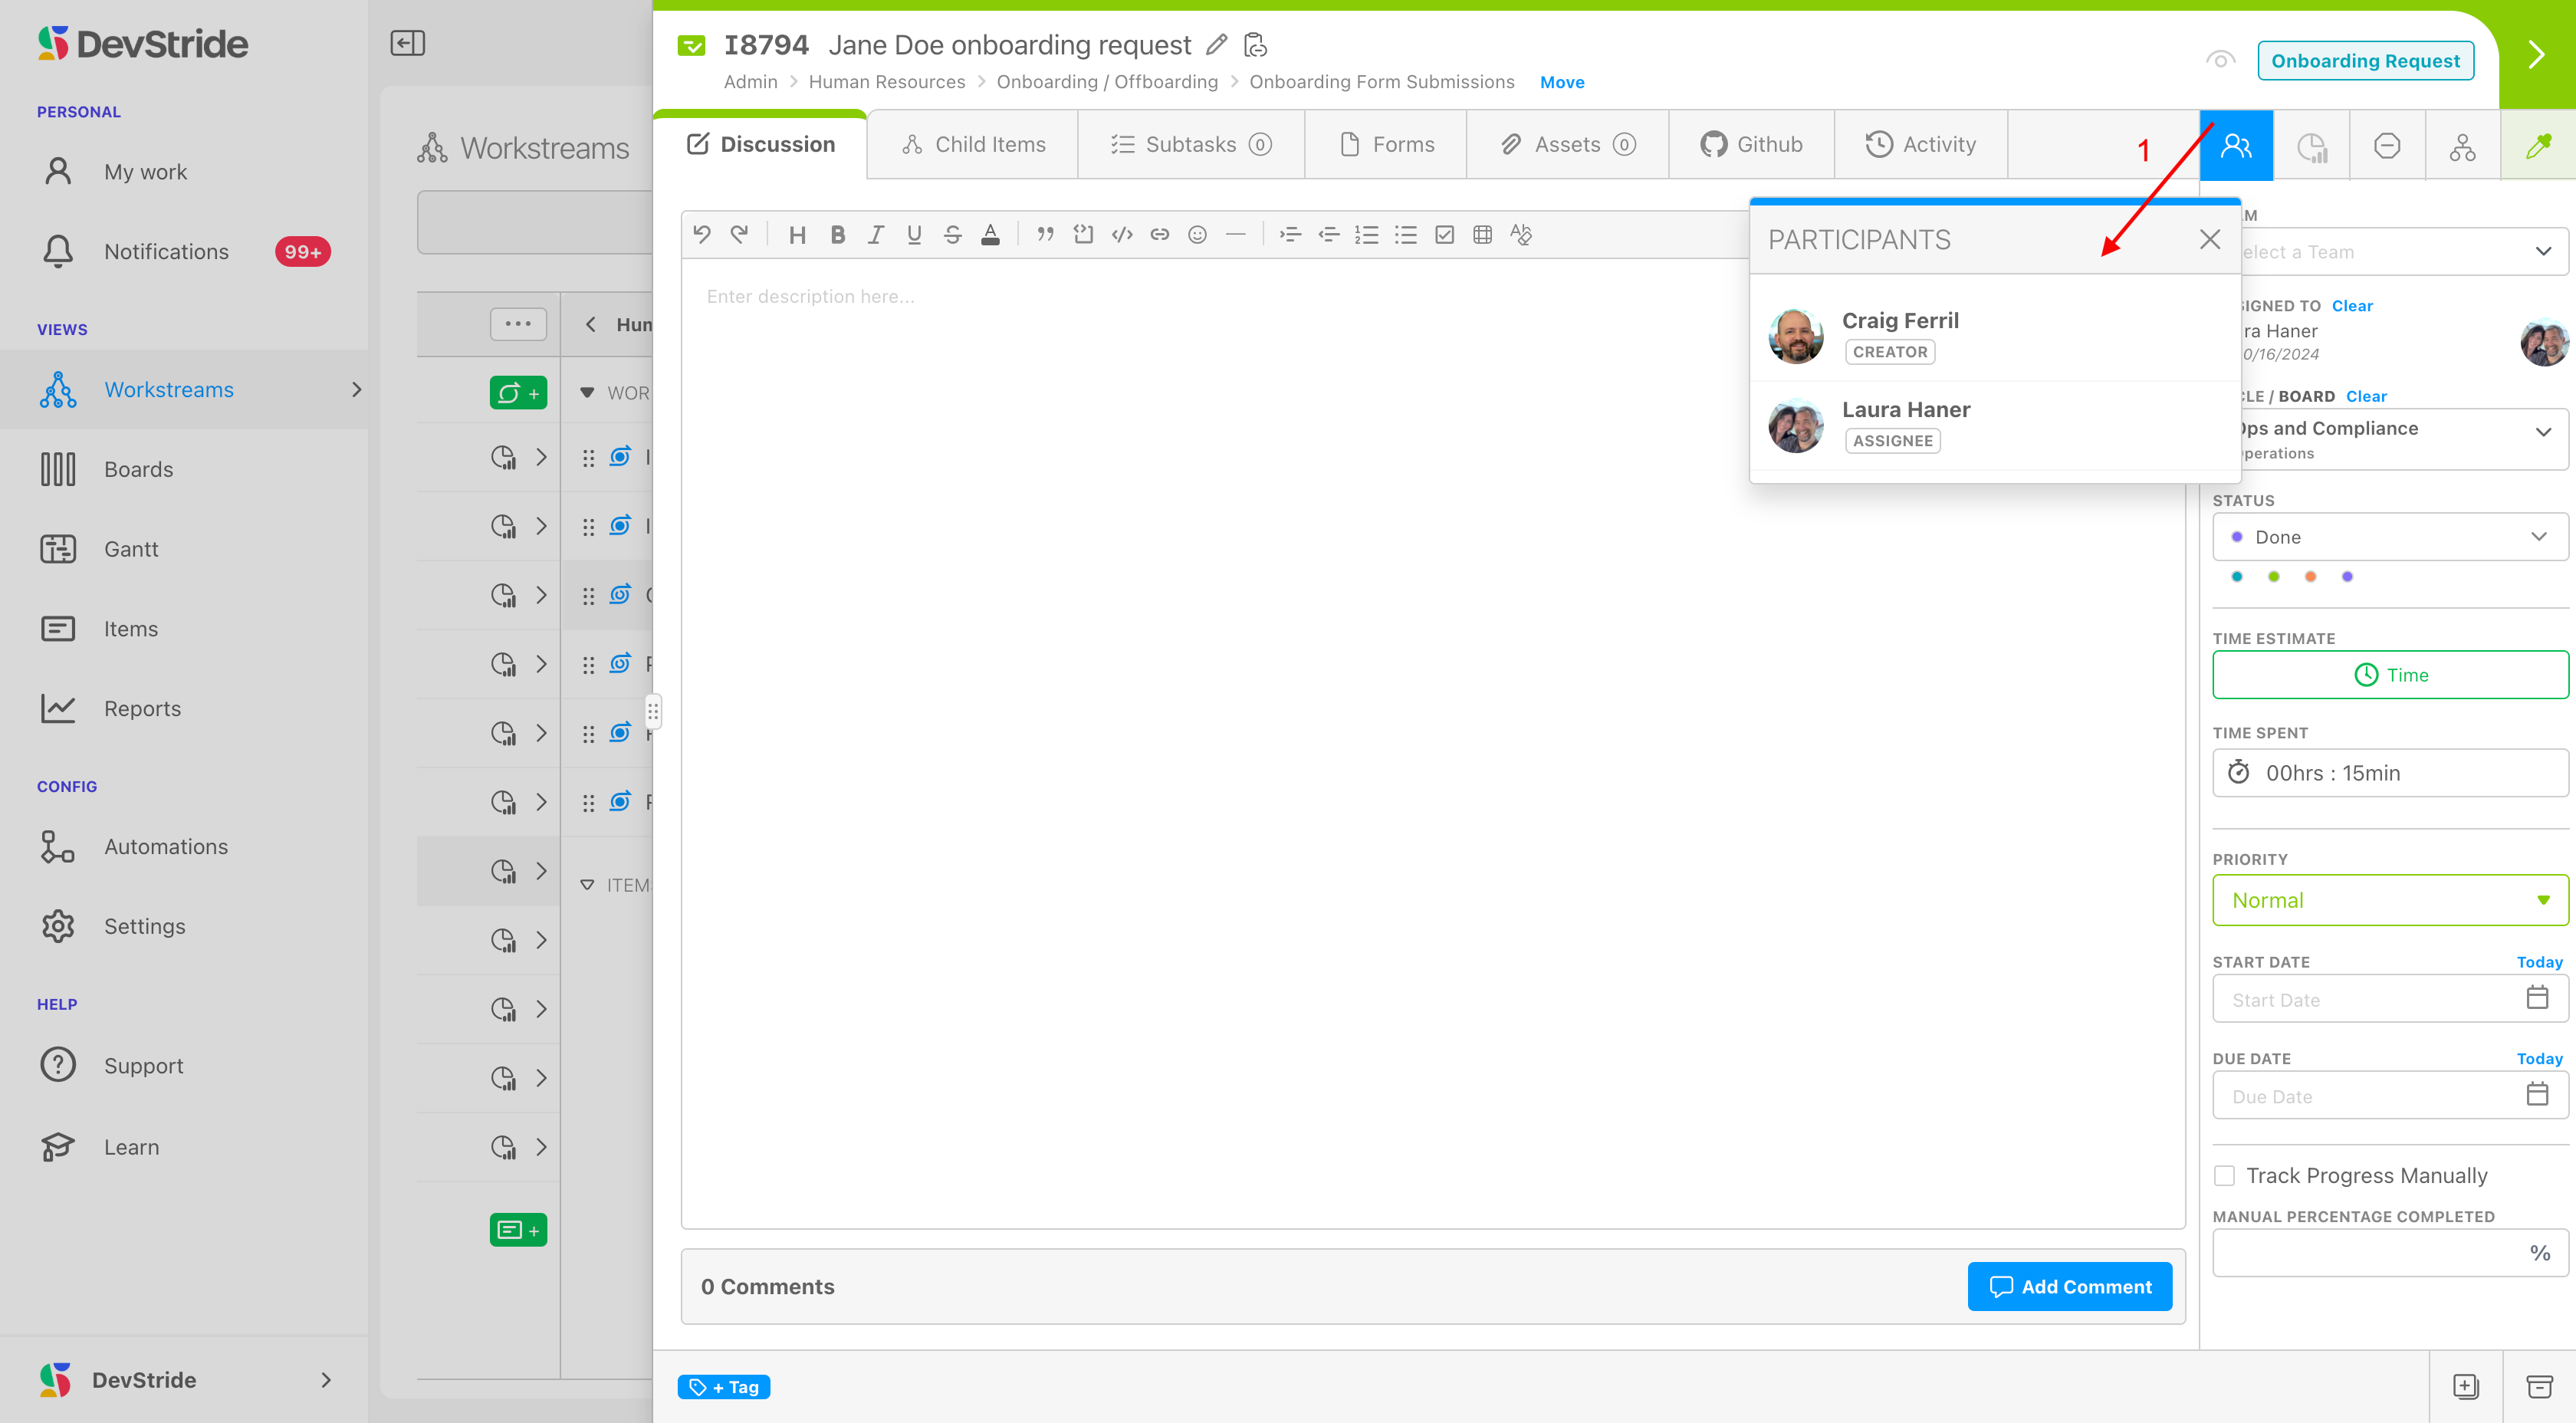
Participants
Clicking on Participants icon (1) allows you to see at a glance who is involved with this item, including creators, assignees, and watchers.
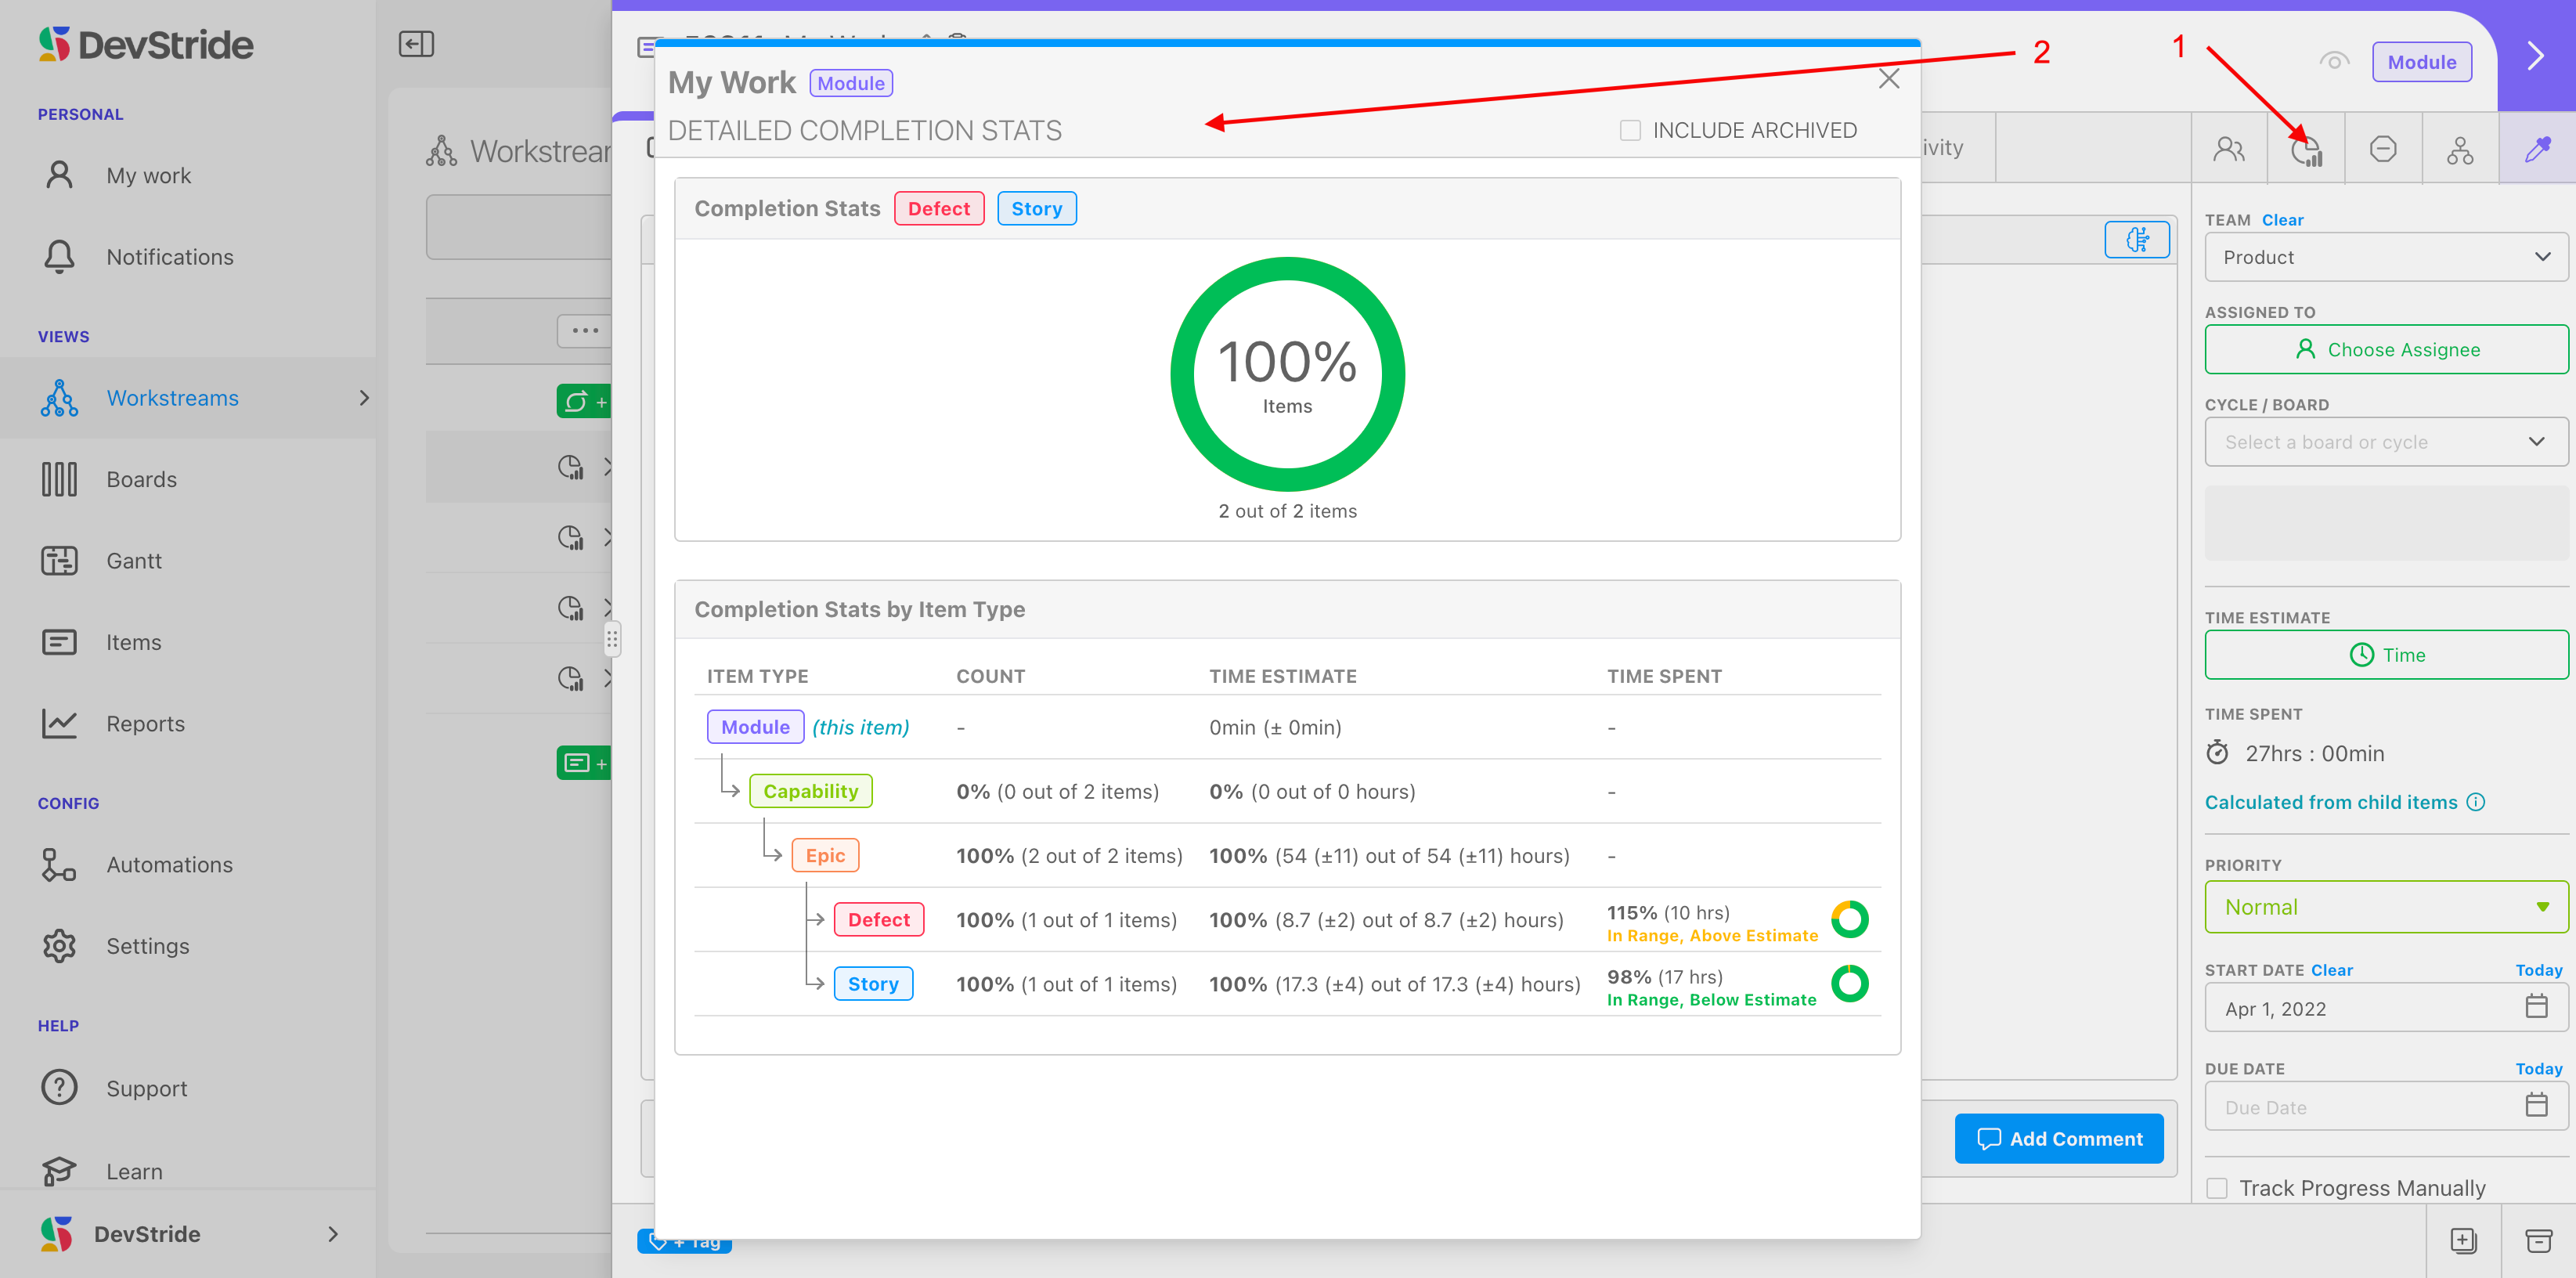
Completion Stats
The Completion Stats icon (1) displays a pop-up widget (2) with information about the progress of the item. We will detail this more later.
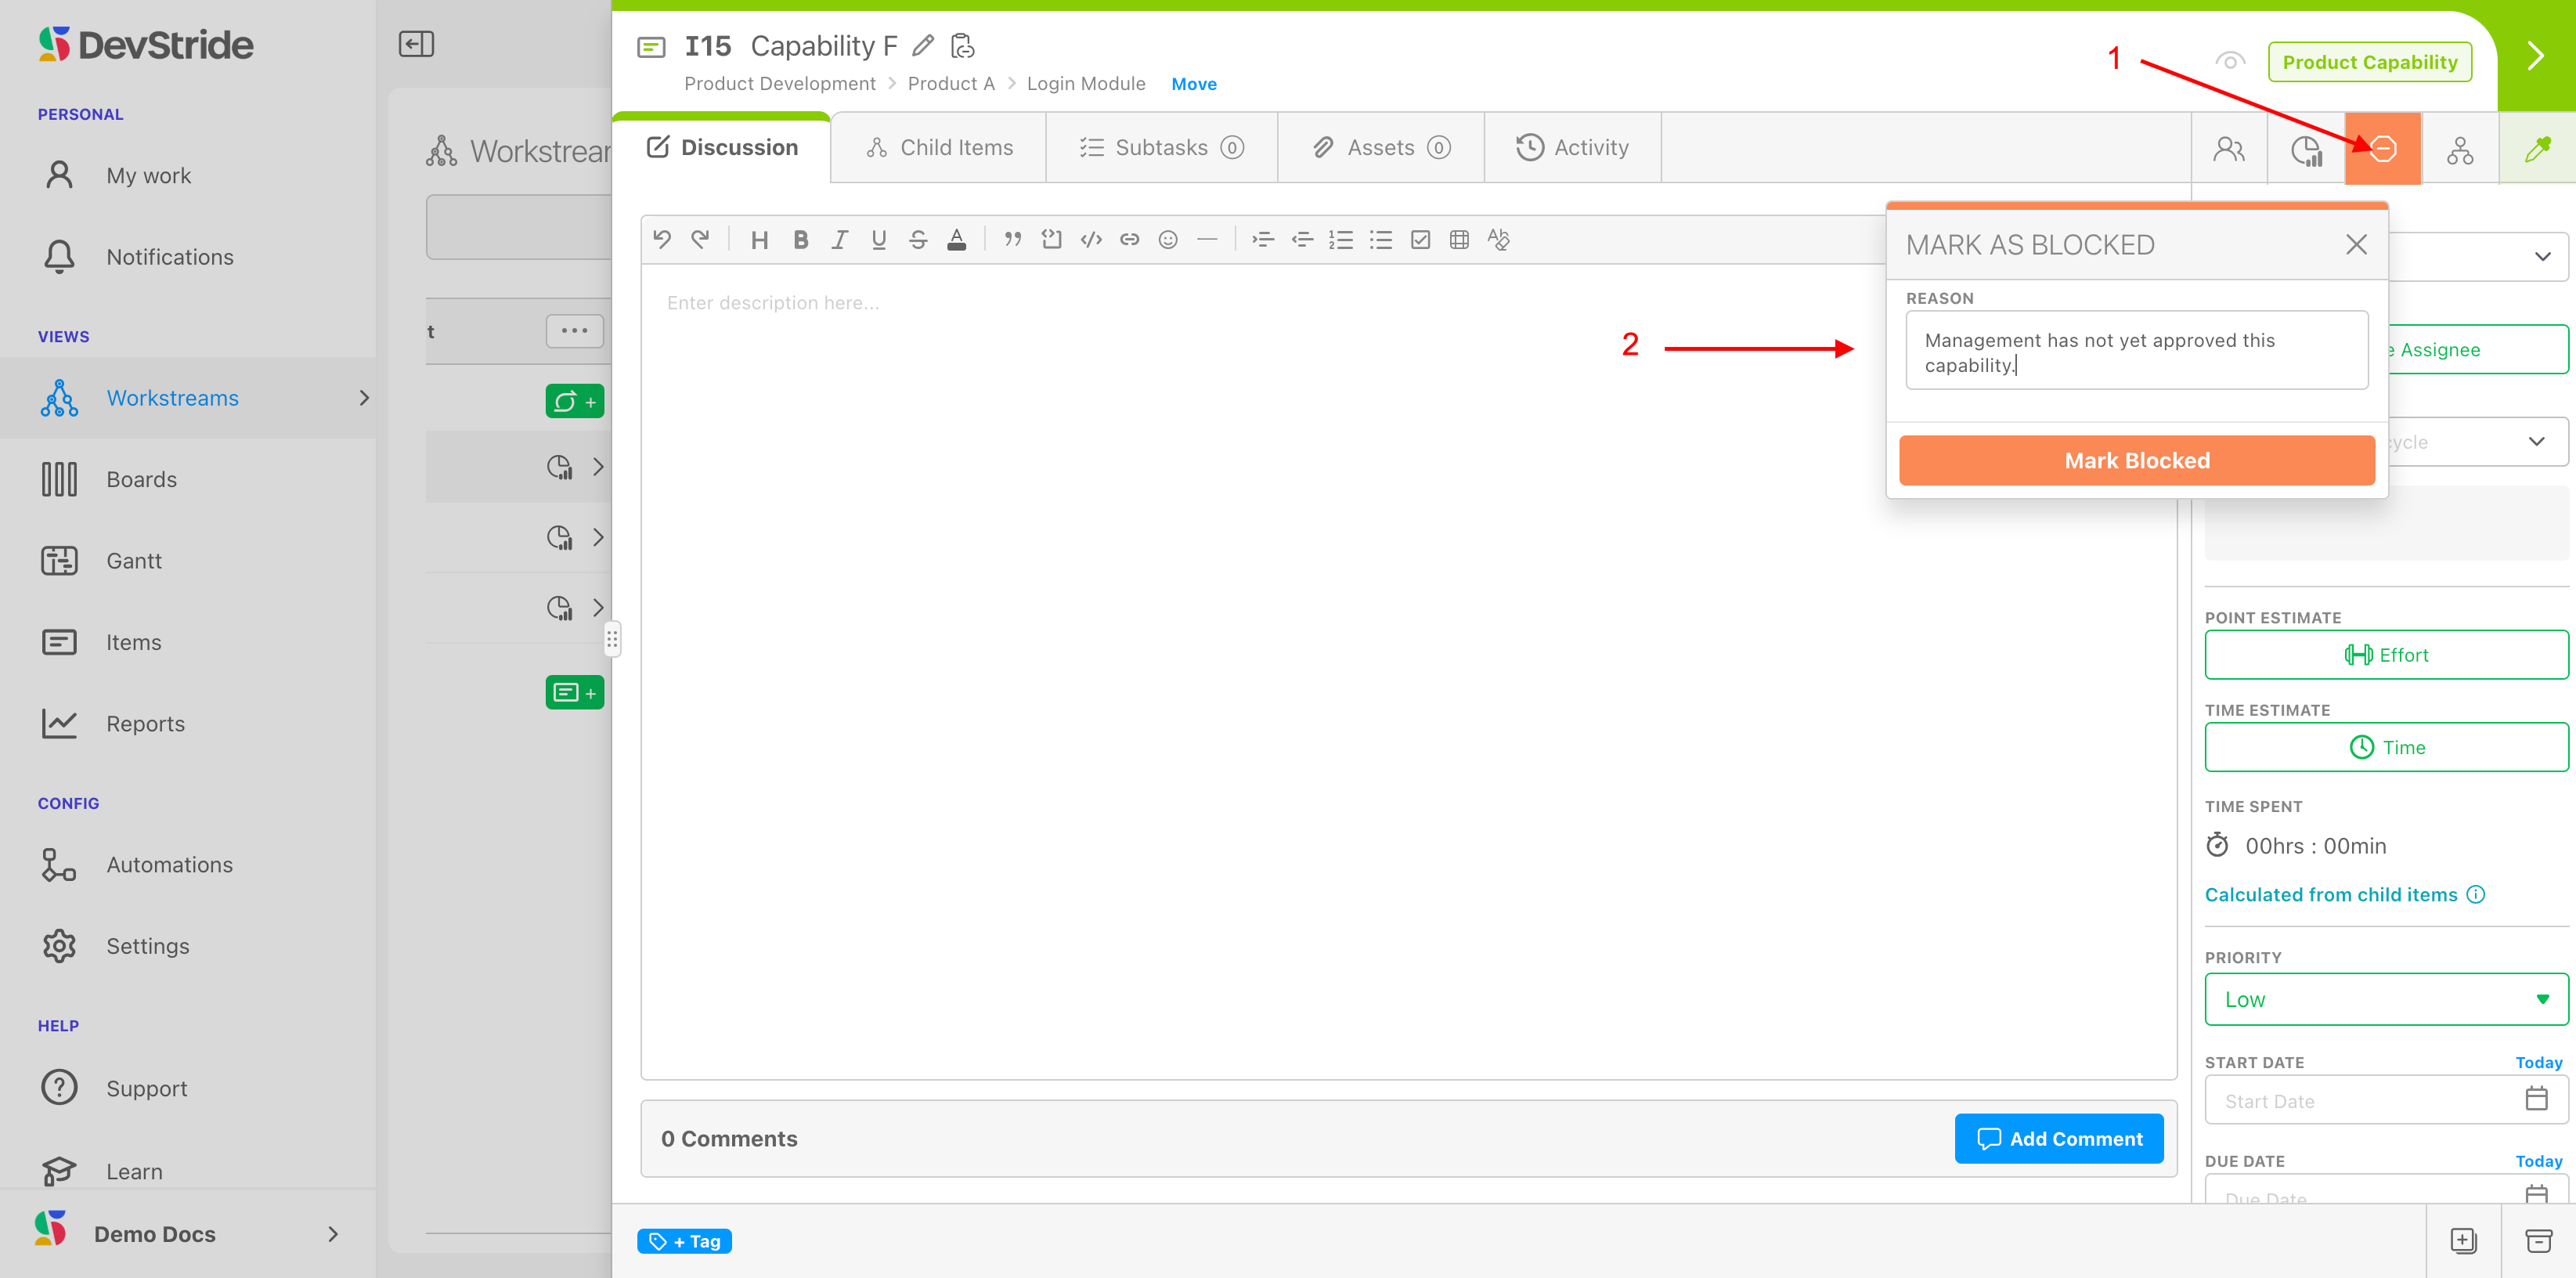
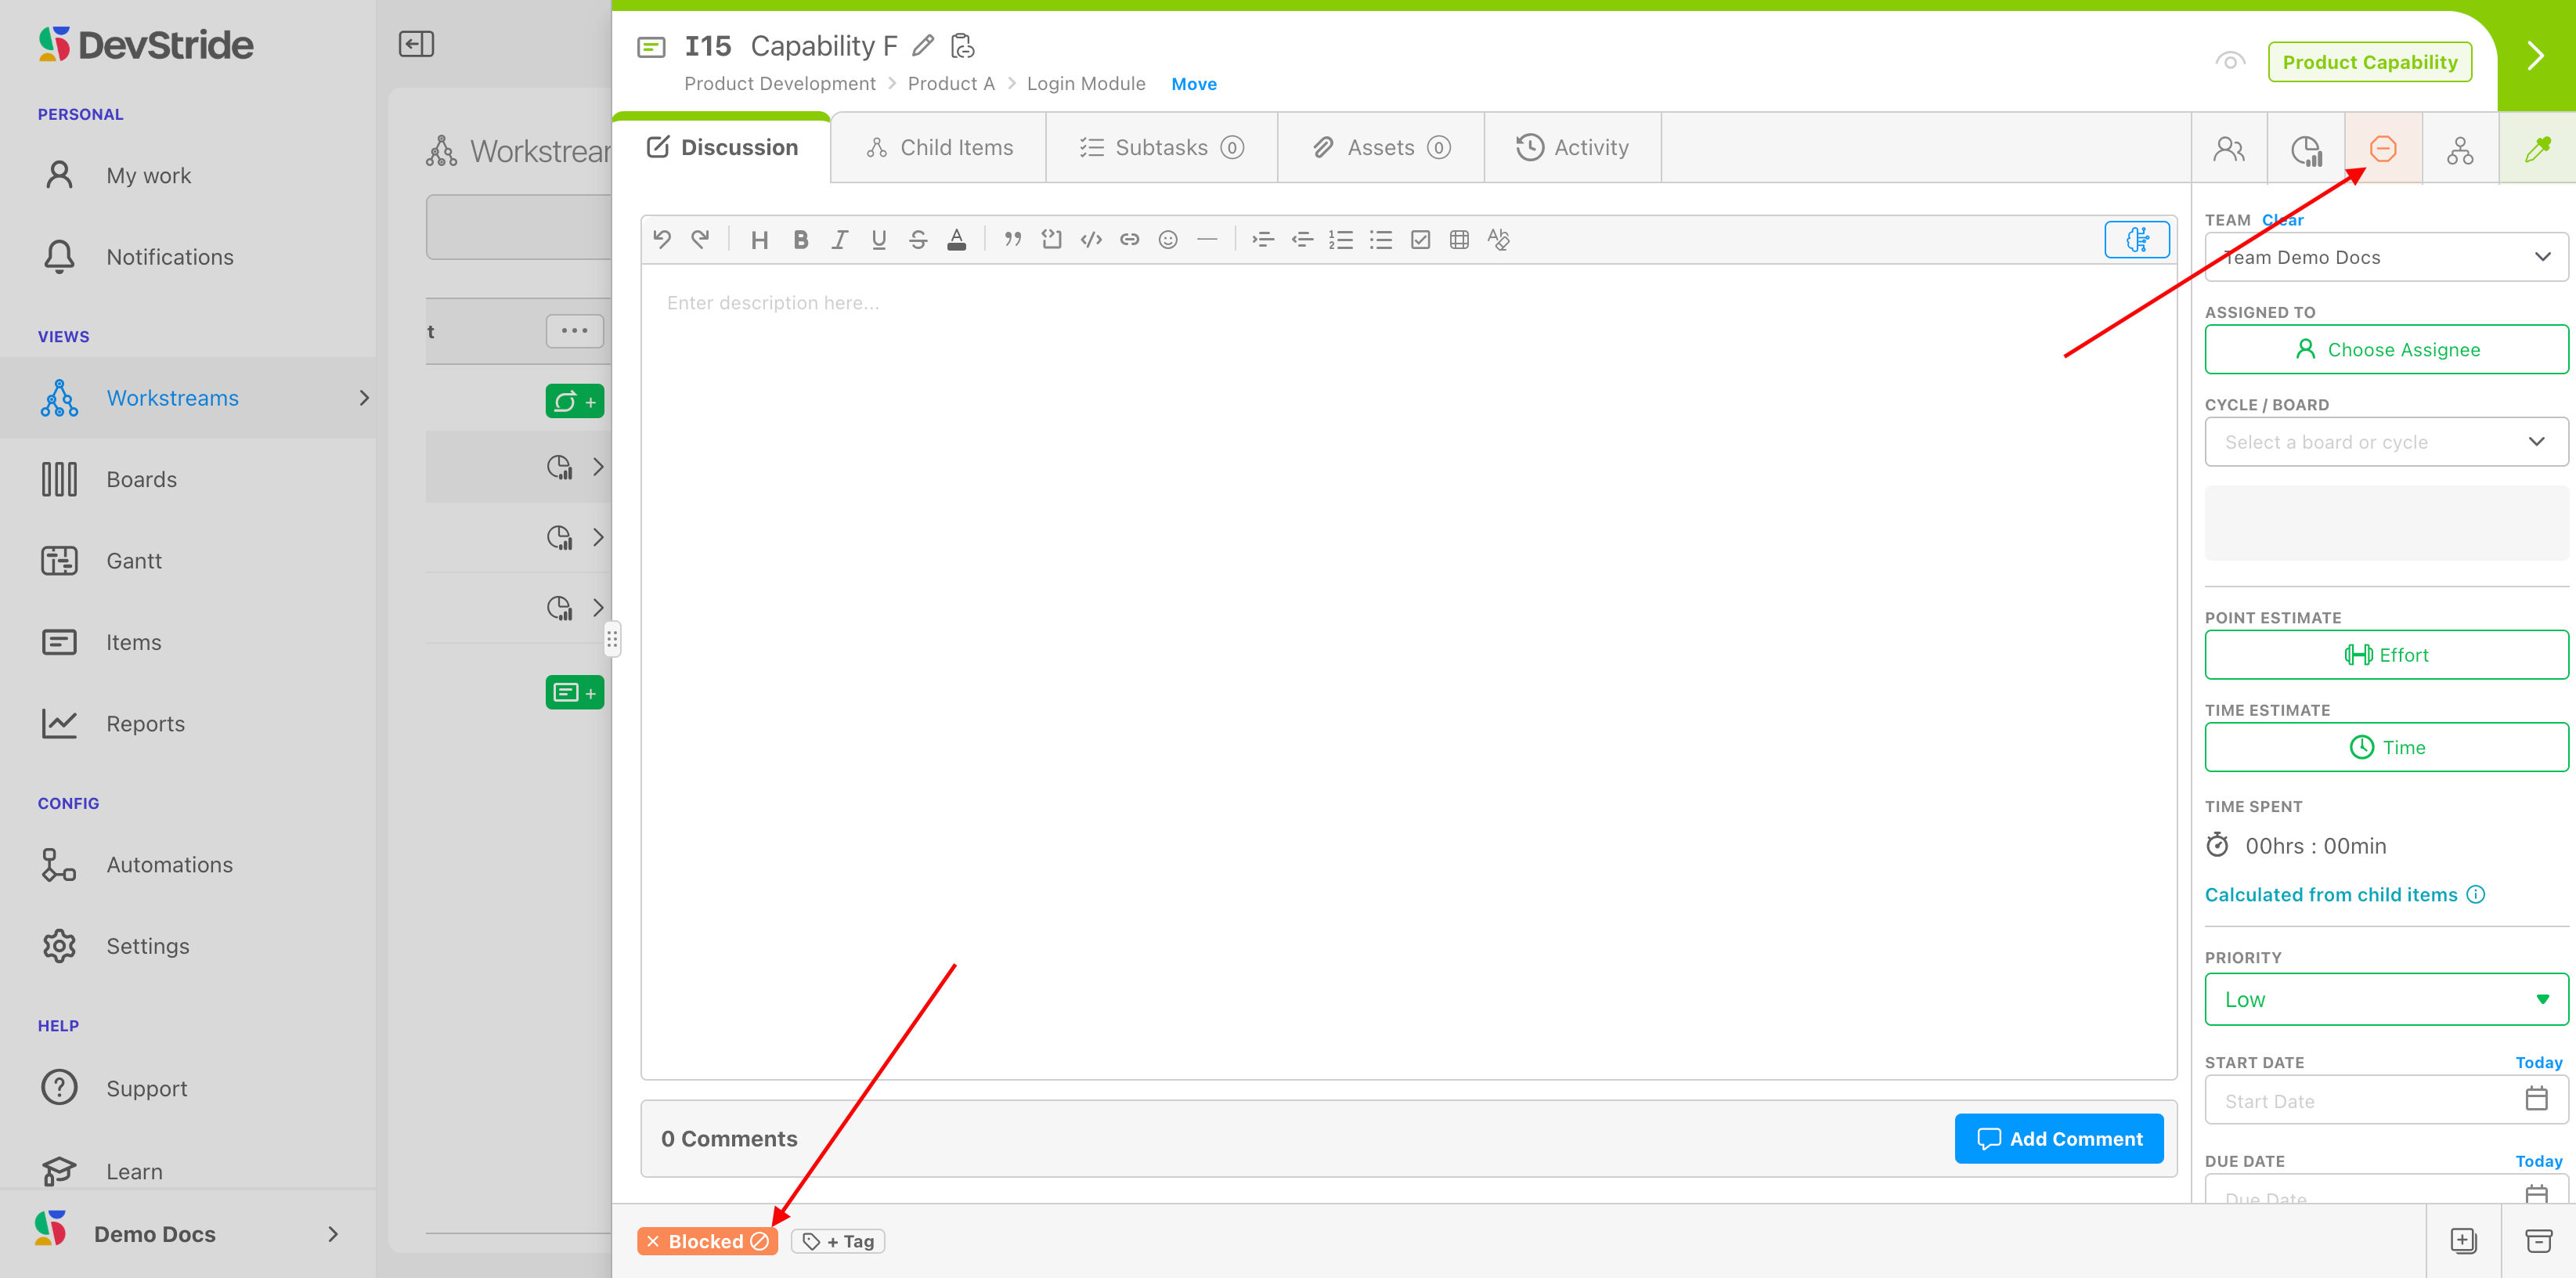
Blocked Indicator
The blocked indicator is extremely valuable for raising a flag on work that cannot move forward. You can mark any item as blocked by simply clicking on the the block icon (1) and typing in the reason the item is blocked (2).
You can see that the item is blocked right from the item's workspace:
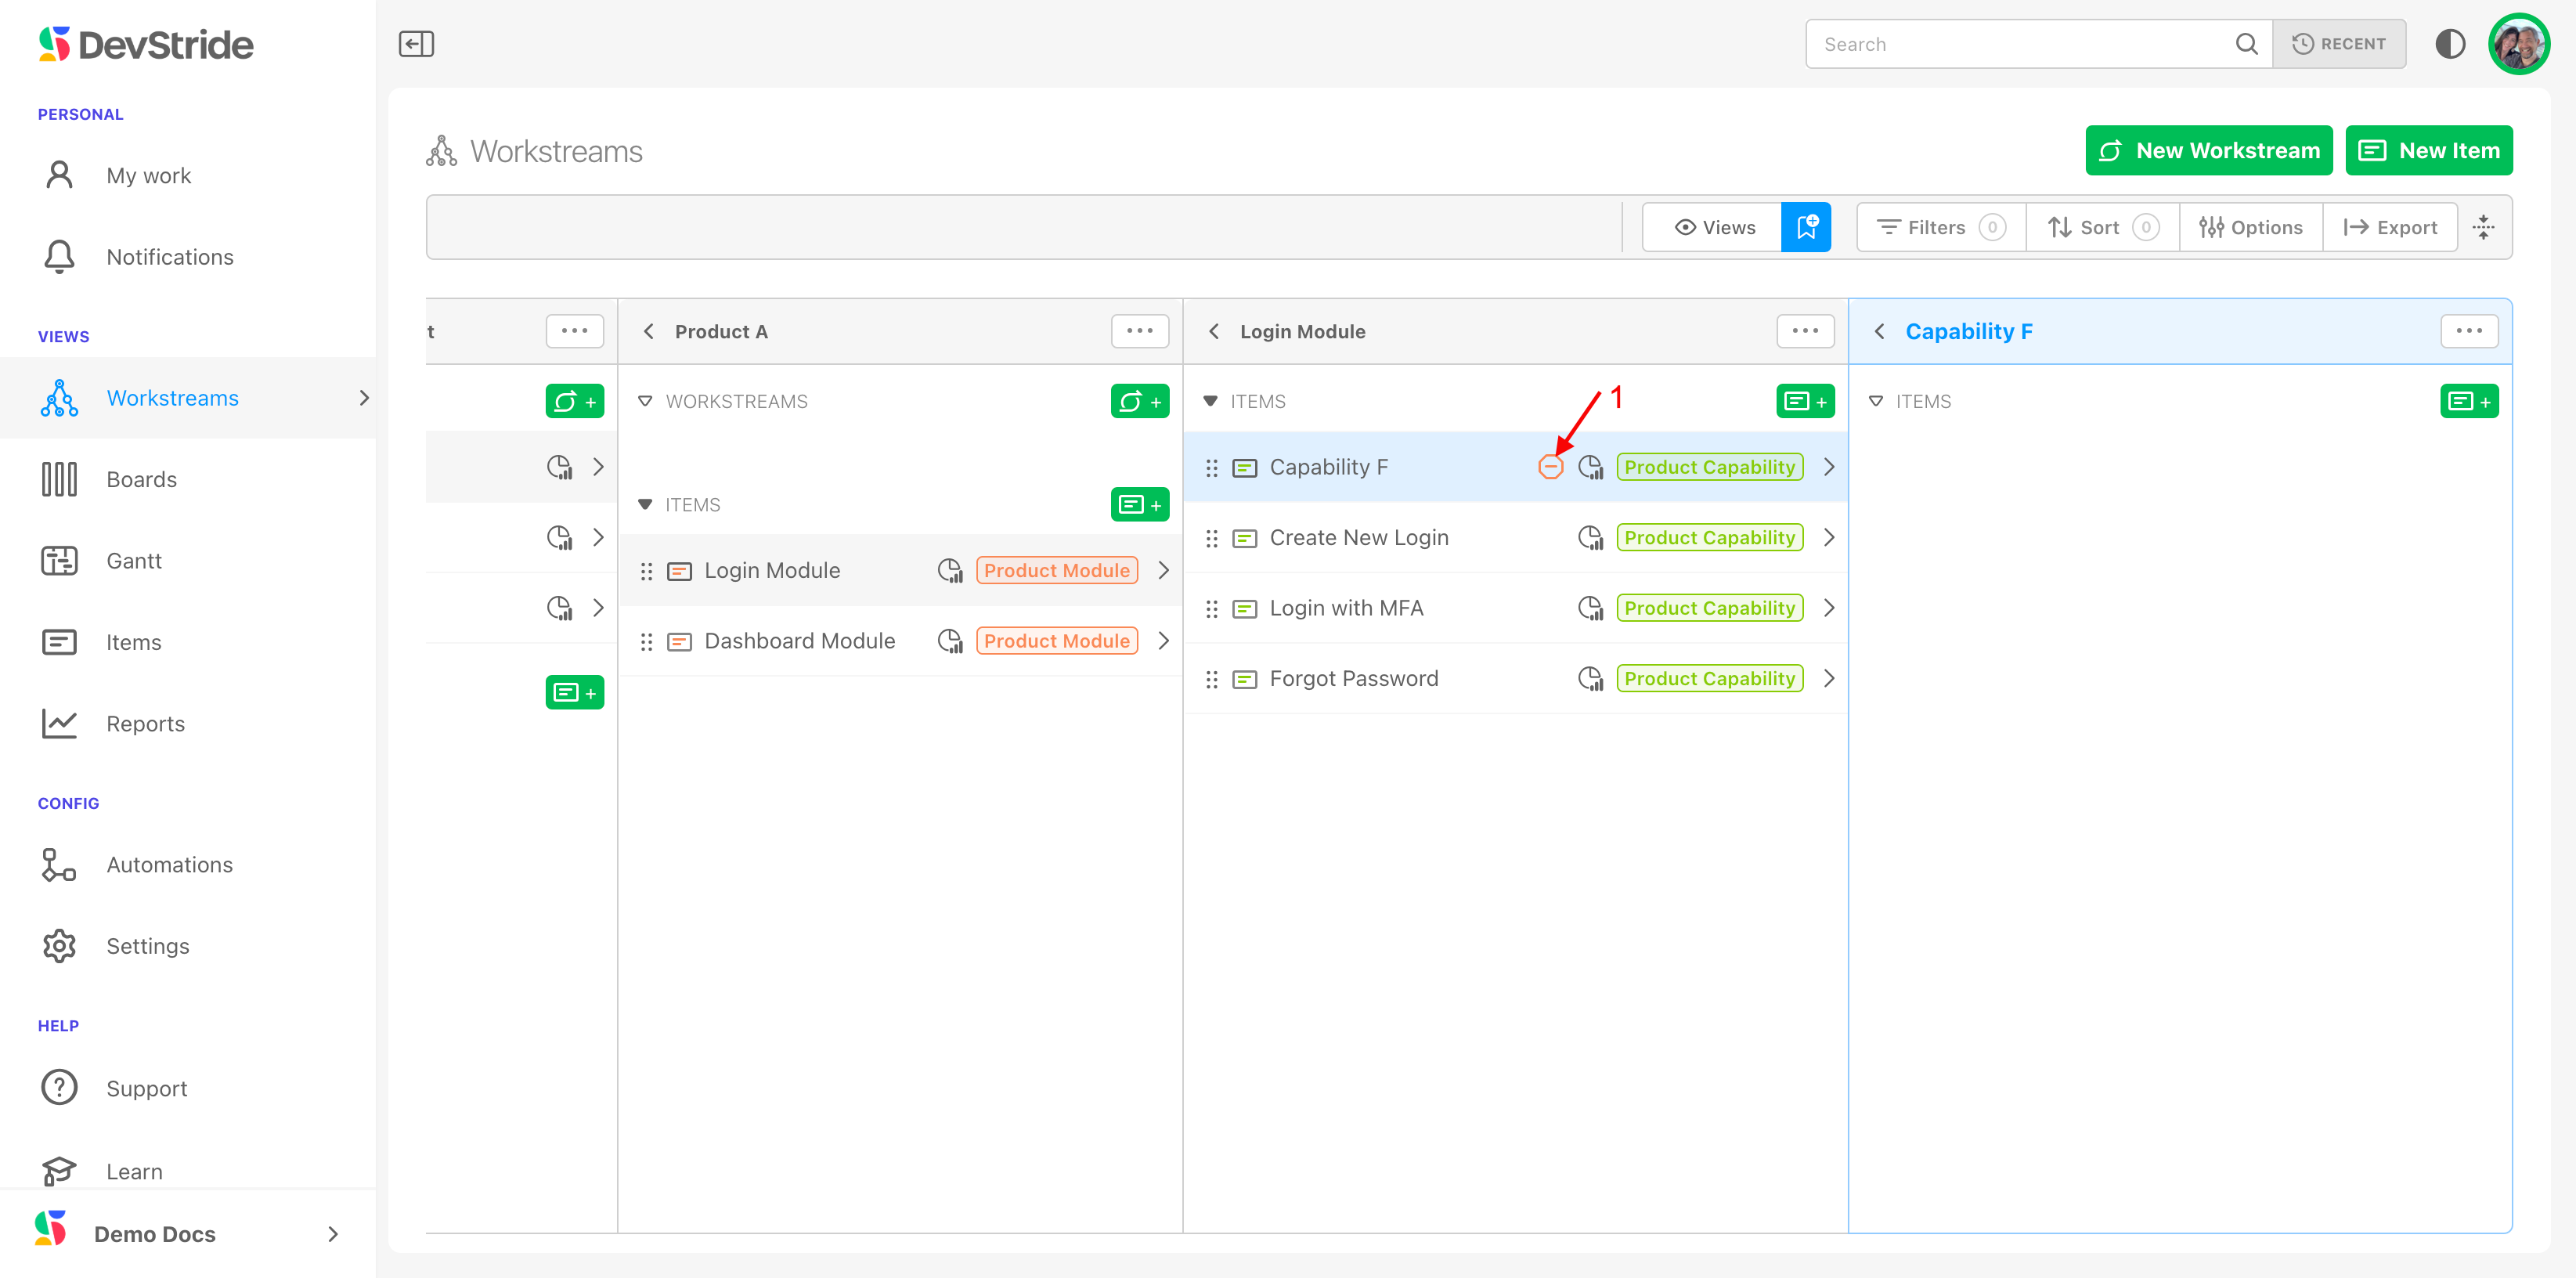
The Workstream Map also indicates the item's blocked status:
What This Gives You
A powerful way to raise a red flag, the blocked indicator displays wherever it is relevant throughout the system. It shows up on boards, tables, reports, and gantt charts as well, features which we will visit later.
Manage Relationships
Relationship management is a concept that exists in several different places in DevStride and this is one of them. We will discuss more about Relationship Management and the places you can see relationships in other sections.
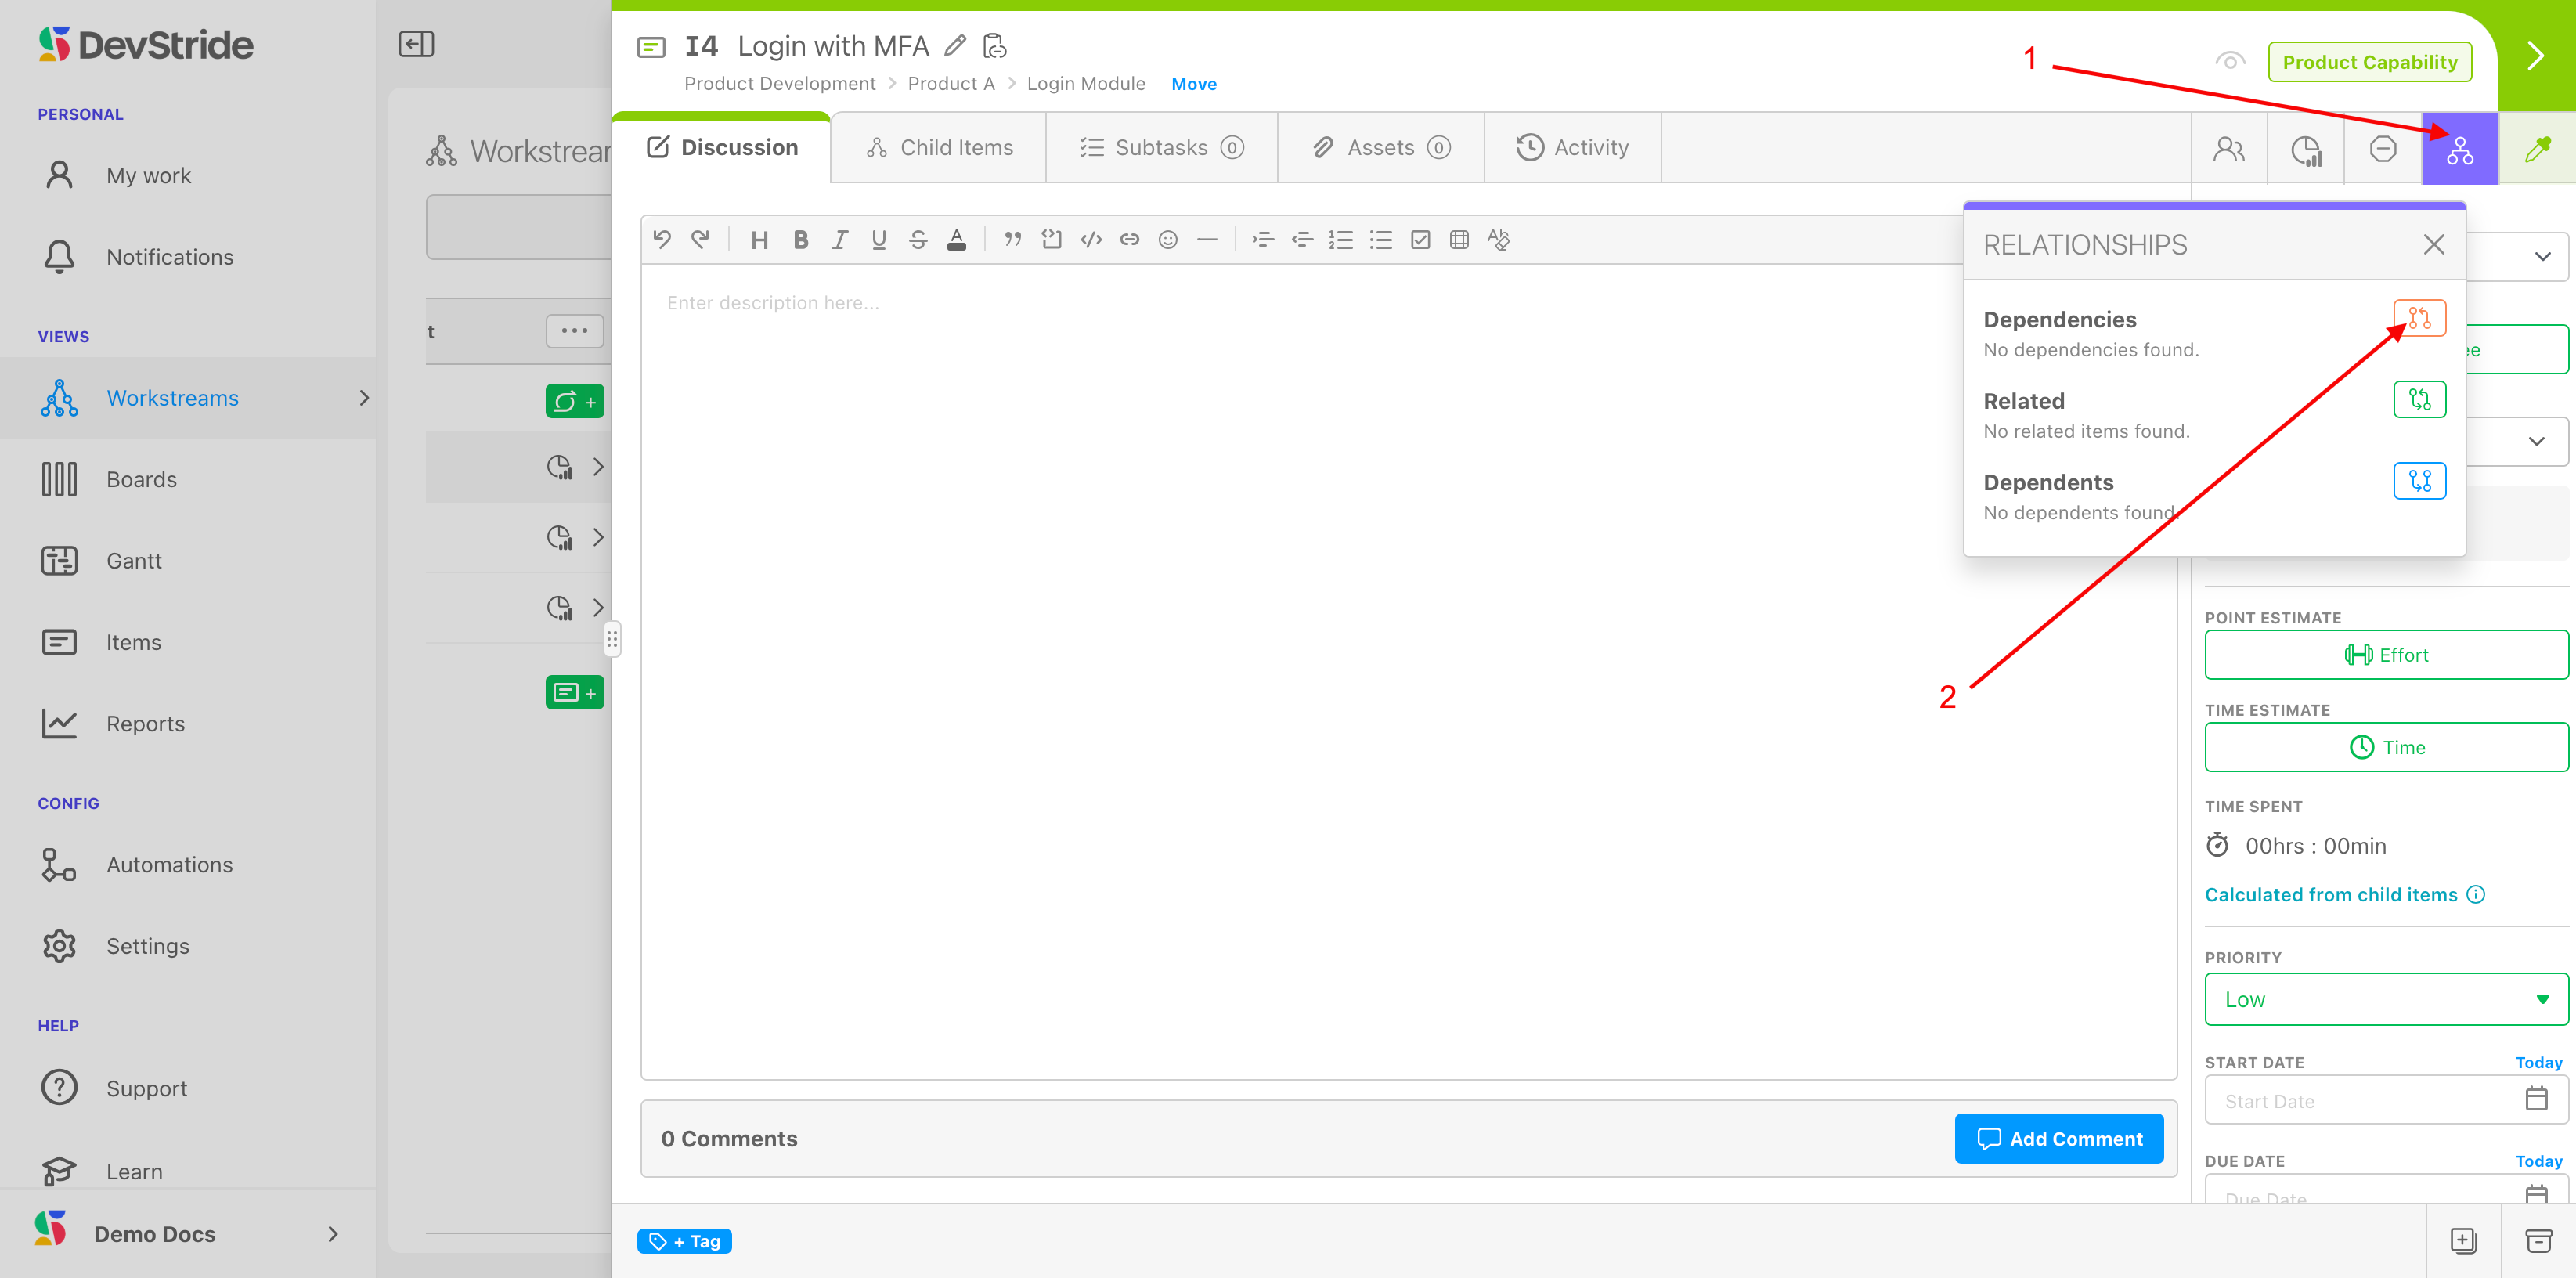
The Manage Relationship view helps you to see or edit any of the following relationships that exists for the item:
Dependencies - something that has to happen first before this item can be completed
Related - something that is associated in some way but is not directly dependent. This item is related to another item in some way that should be tracked.
Example: a feature-based item might be related to a documentation item.
Dependents - items that rely on this item to be done before they can be completed
This view is a useful way to create relationships, view relationships, and quickly jump back and forth between items that have some kind of relationship.
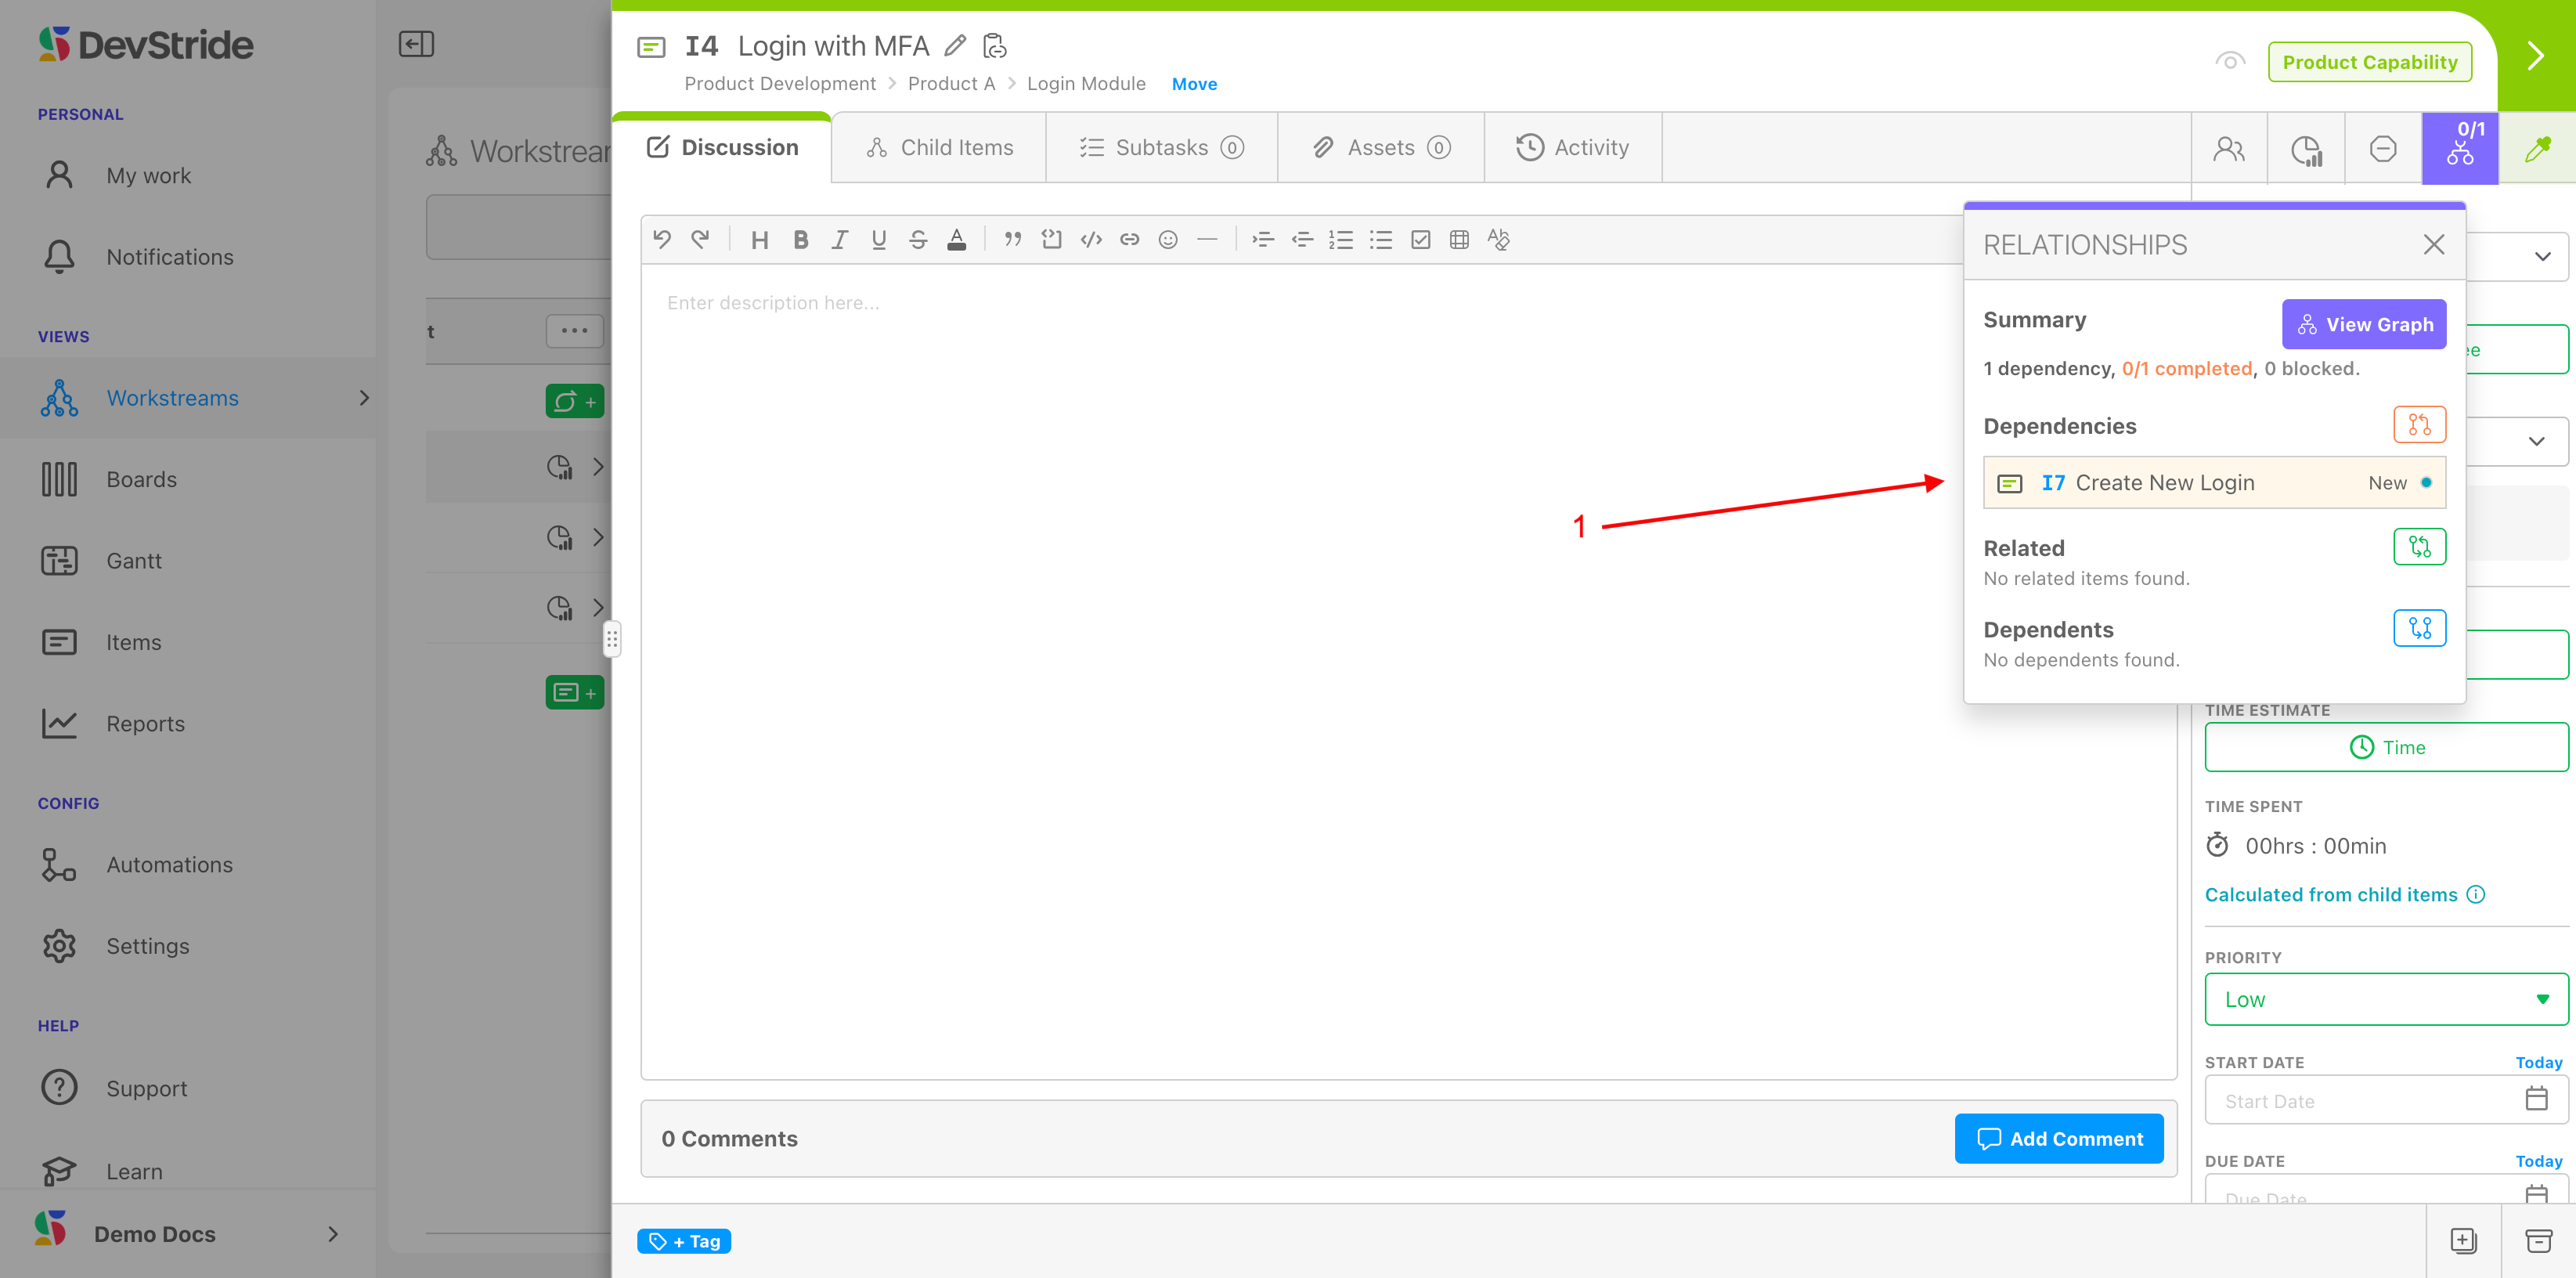
To create a relationship, click on the Relationship icon (1) in the relevant item. Click on the type of relationship you would like to create (2).
Navigate through the workstream map in the pop-up window (1) to the item you want to create a relationship for and add it to the pane on the right (2). Click Save.
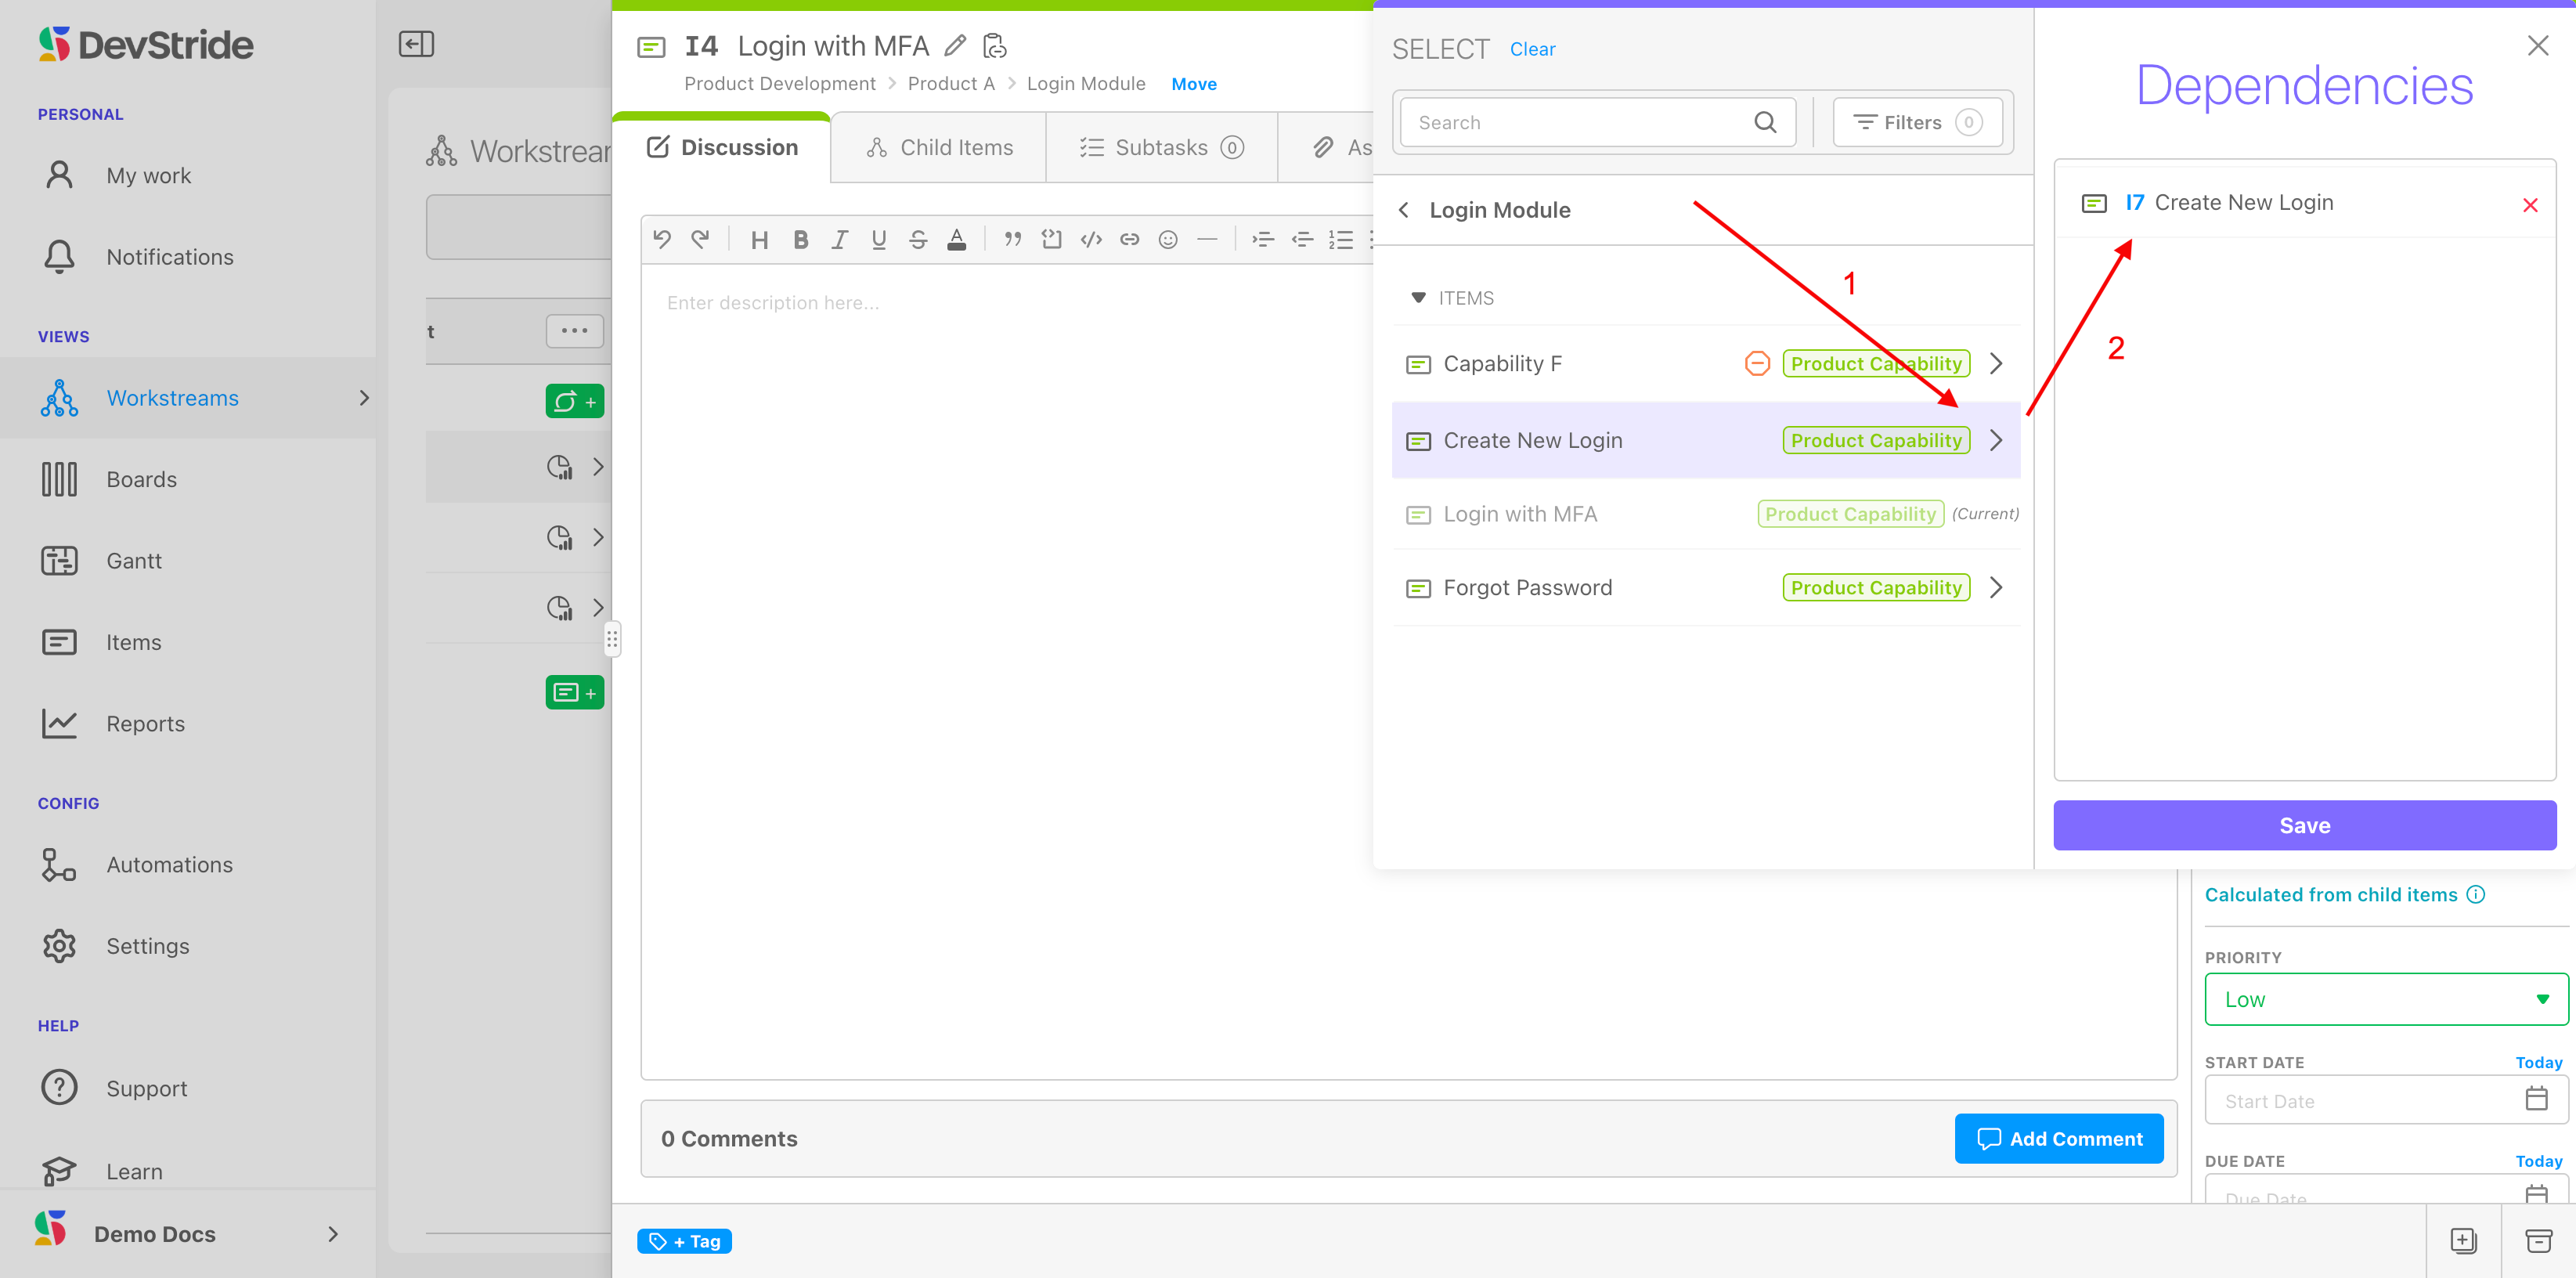
You can now view the relationship you created in the pop-up. The items that appear here are interactive, so that you can link to them as needed.
Color Picker Icon
By default, items inherit their item type color (found in Settings). You can change the color on a given item to adhere to your own business rules or for your own purposes.
Note: The color you make an item is not a personal view - it will show up that way to all users.
Item Workspace Tour: Right Bar Features
The features along the right bar of the item's workspace have to do with your data model.
In this section, we will move down to cover each of the features contained in the bar.
Team
The team picker (1) allows you to select which team is associated with the item for the purpose of assignments. The teams that appear here are the ones that were set up in your organization's Settings.
To assign a team to an item, click on the team picker (1) and select the team. You can also clear (2) the team name if you want to change it to remove any team association.
Identifying the team for the item populates the Assigned to dropdown with the members of that team. If it is an empty team, this will be blank.

To assign a team member to the item, click on Choose Assignee (1). Then select a team member from the list (2) or search by their name (3). If you want to clear the assignment, click on clear (4) here next to Assigned To in the bar.

Cycle/Board
This one of the places where the "when" of the work can be indicated for the item. We will discuss this in more detail in the Set up Cycles and Boards Section coming up in this guide.
Point Estimate
This is another key piece of the data model if you choose to use it. It is a powerful way to manage work.
If you are not familiar with point estimates, see the summary below.
About Point Estimation
Some types of work benefit greatly from the concept of point estimation.
Estimation of effort helps teams assess if planned work is reasonable or not. As a general rule, there are 2 types of estimation, Effort and Time. We will discuss Effort estimation here:
Effort Points
Effort points is an arbitrary measure that the team agrees on and is relative to the team who is doing the estimation. This is critical to interpreting effort points correctly. Different teams are comprised of different levels of expertise, and what might represent one level of effort for one team is different for another team.
Effort points are often represented by the idea of numbers (such as 1-low, 5-medium 10-large, or by employing a Fibonacci scale of 1, 2, 3, 5, 8, etc.). Whatever method is used, remember that estimates are relative to each team, so one team's "3" shouldn't be compared to another team's "3."
It's also important to note that effort points aren't meant to approximate back to a certain number of days or hours. Again, they are a relative measure of effort.
Effort points are especially valuable when you don't yet know who is going to do the work. A task that is estimated to be larger effort - say an "8" - that is assigned to a senior person will take less time than for a junior person assigned to the same task.
When you do know who will do the work, time estimation tends to be more helpful.
See our Project Management Principals and Best Practices articles for more information on best practices with Point Estimation.
How to Do It
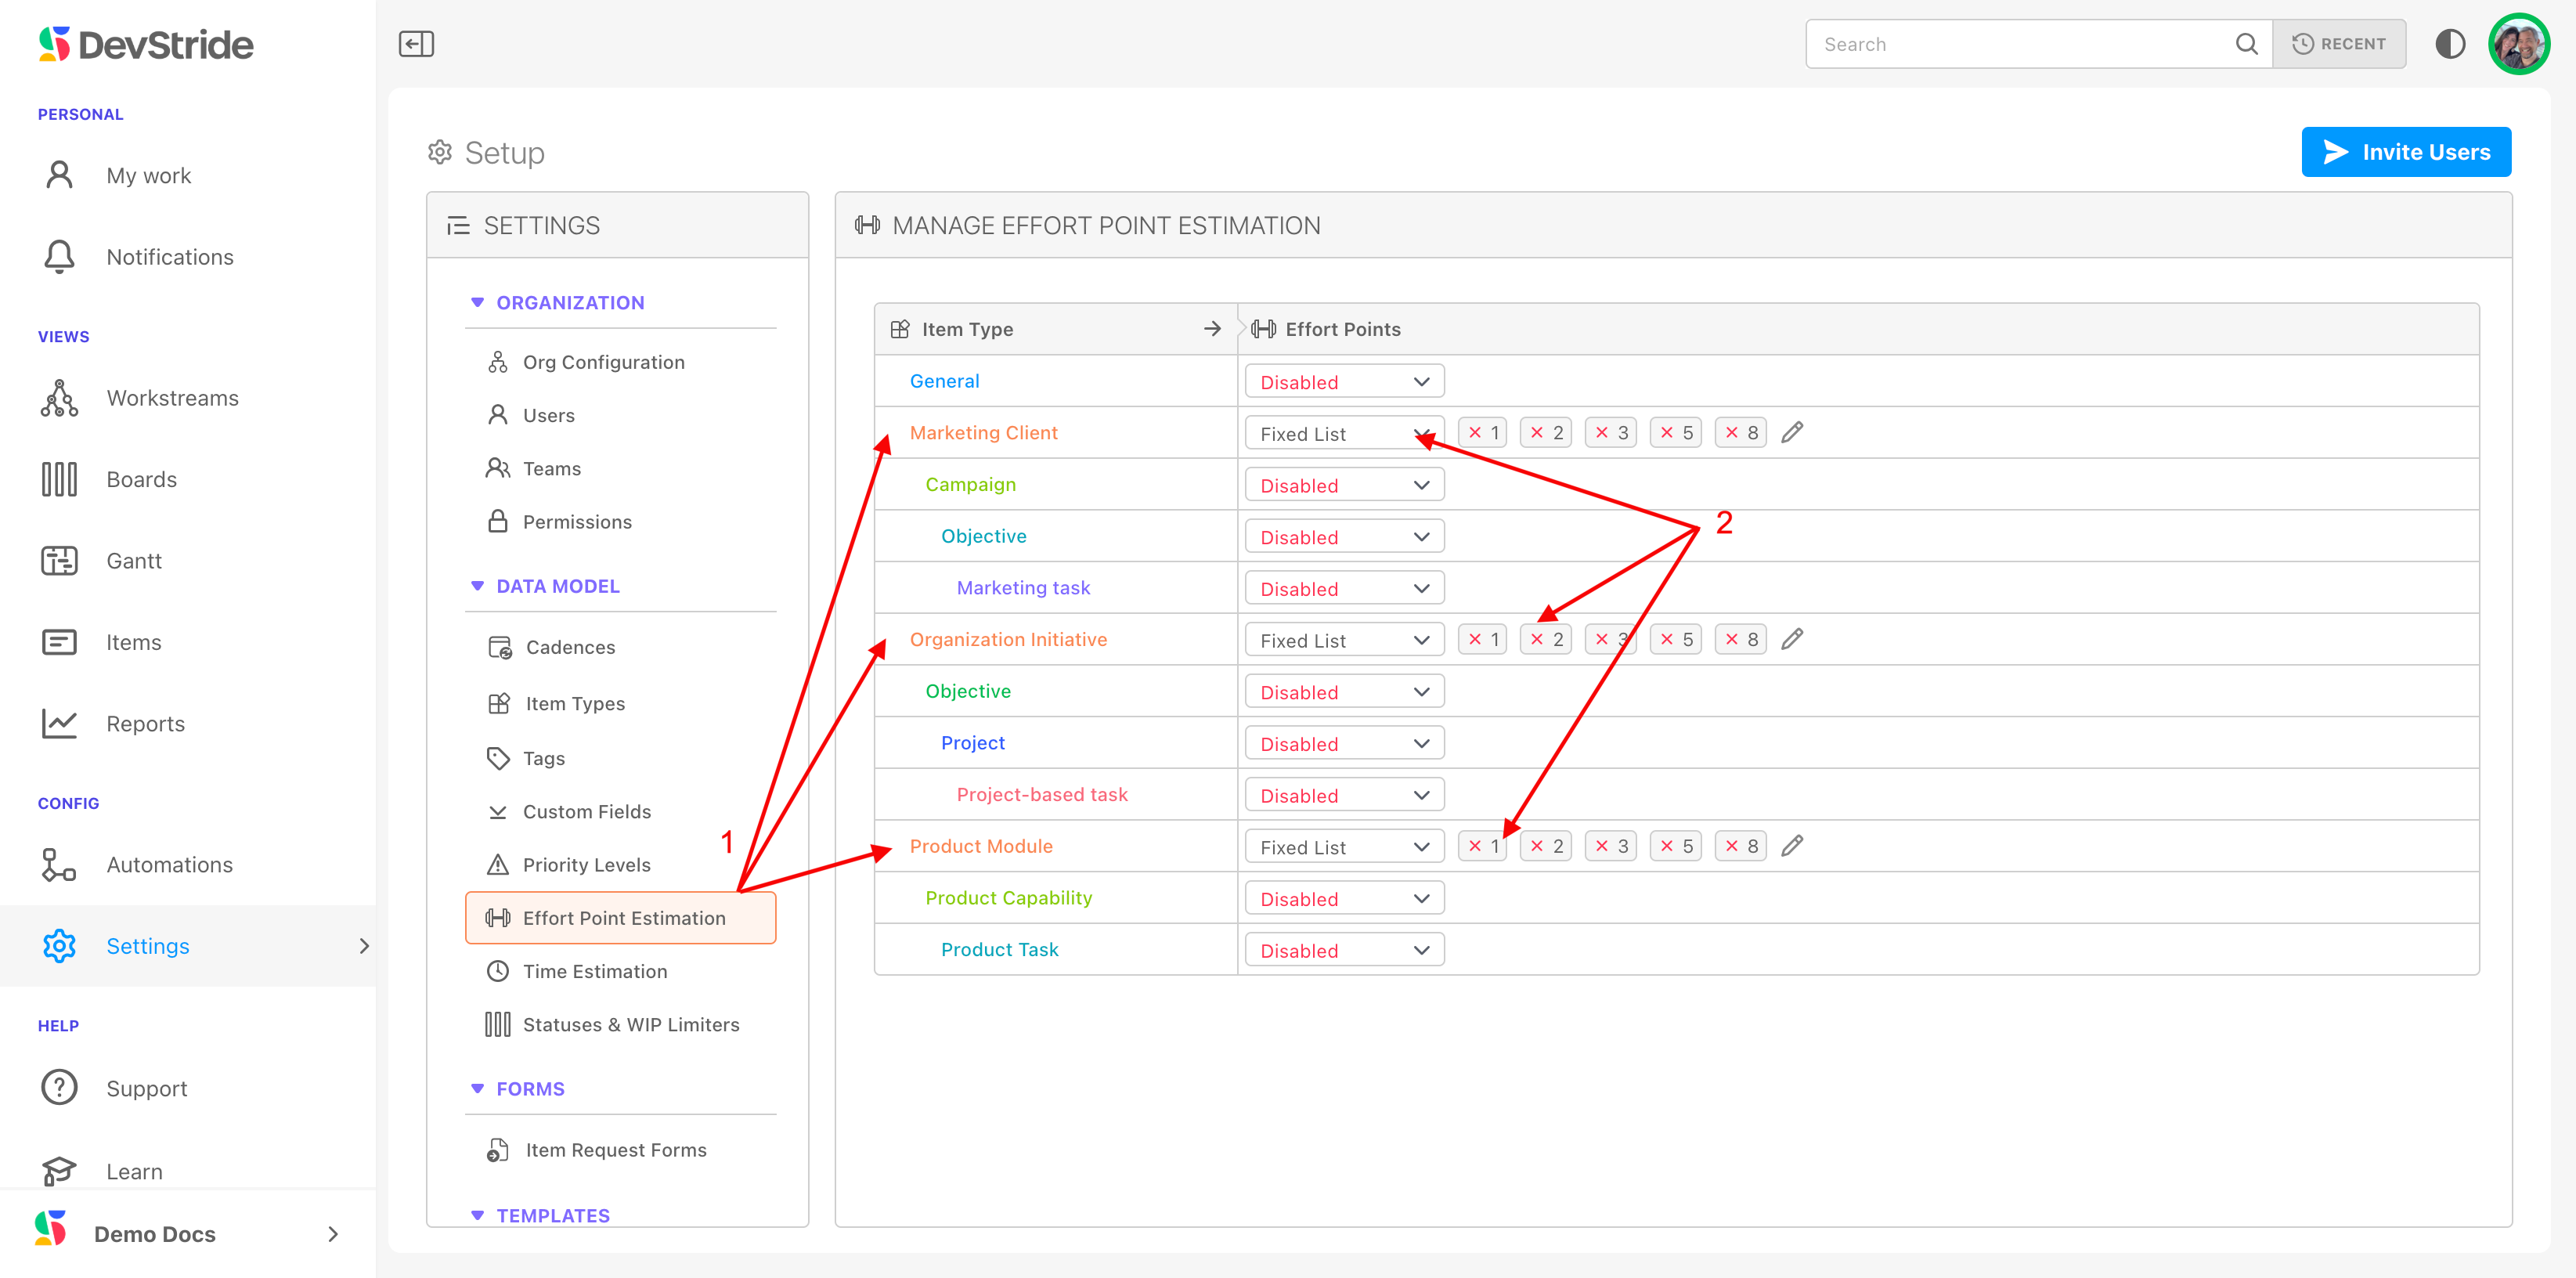
To set up Effort Point options, go to Settings > Data Model > Effort Point Estimation.
Your item types hierarchies will be displayed here under the Manage Effort Board Estimation panel.
You can set up the effort point estimation scale you prefer for each type, or can choose to disable estimation for any or all types. Once you set up your scale in Settings, these options are available to you in Items for their corresponding item type.

A more common method of managing project estimation is by time.
About Time Estimation
Time esimtation is probably the most useful method of estimating time, especially when you know who will be doing the work.
DevStride uses a system called the PERT method for estimating time.
PERT forces an optimistic estimate, a likely estimate, and a pessimistic estimate, and then provides a weighted average estimate.
DevStride provides a default list of pre-sets that you can customize to use for your most typical estimate of time in the form of T-shirt sizes (extra small, small, medium, large, etc.), where a size always equals the same amount of time.
For example, on your projects, your team might consider an extra small task one that typically takes 1 hour, a small task one that takes 4 hours, and a medium task one that takes 8 hours.
The degree of range within each estimate drives the resulting confidence level calculation.
How to Do It
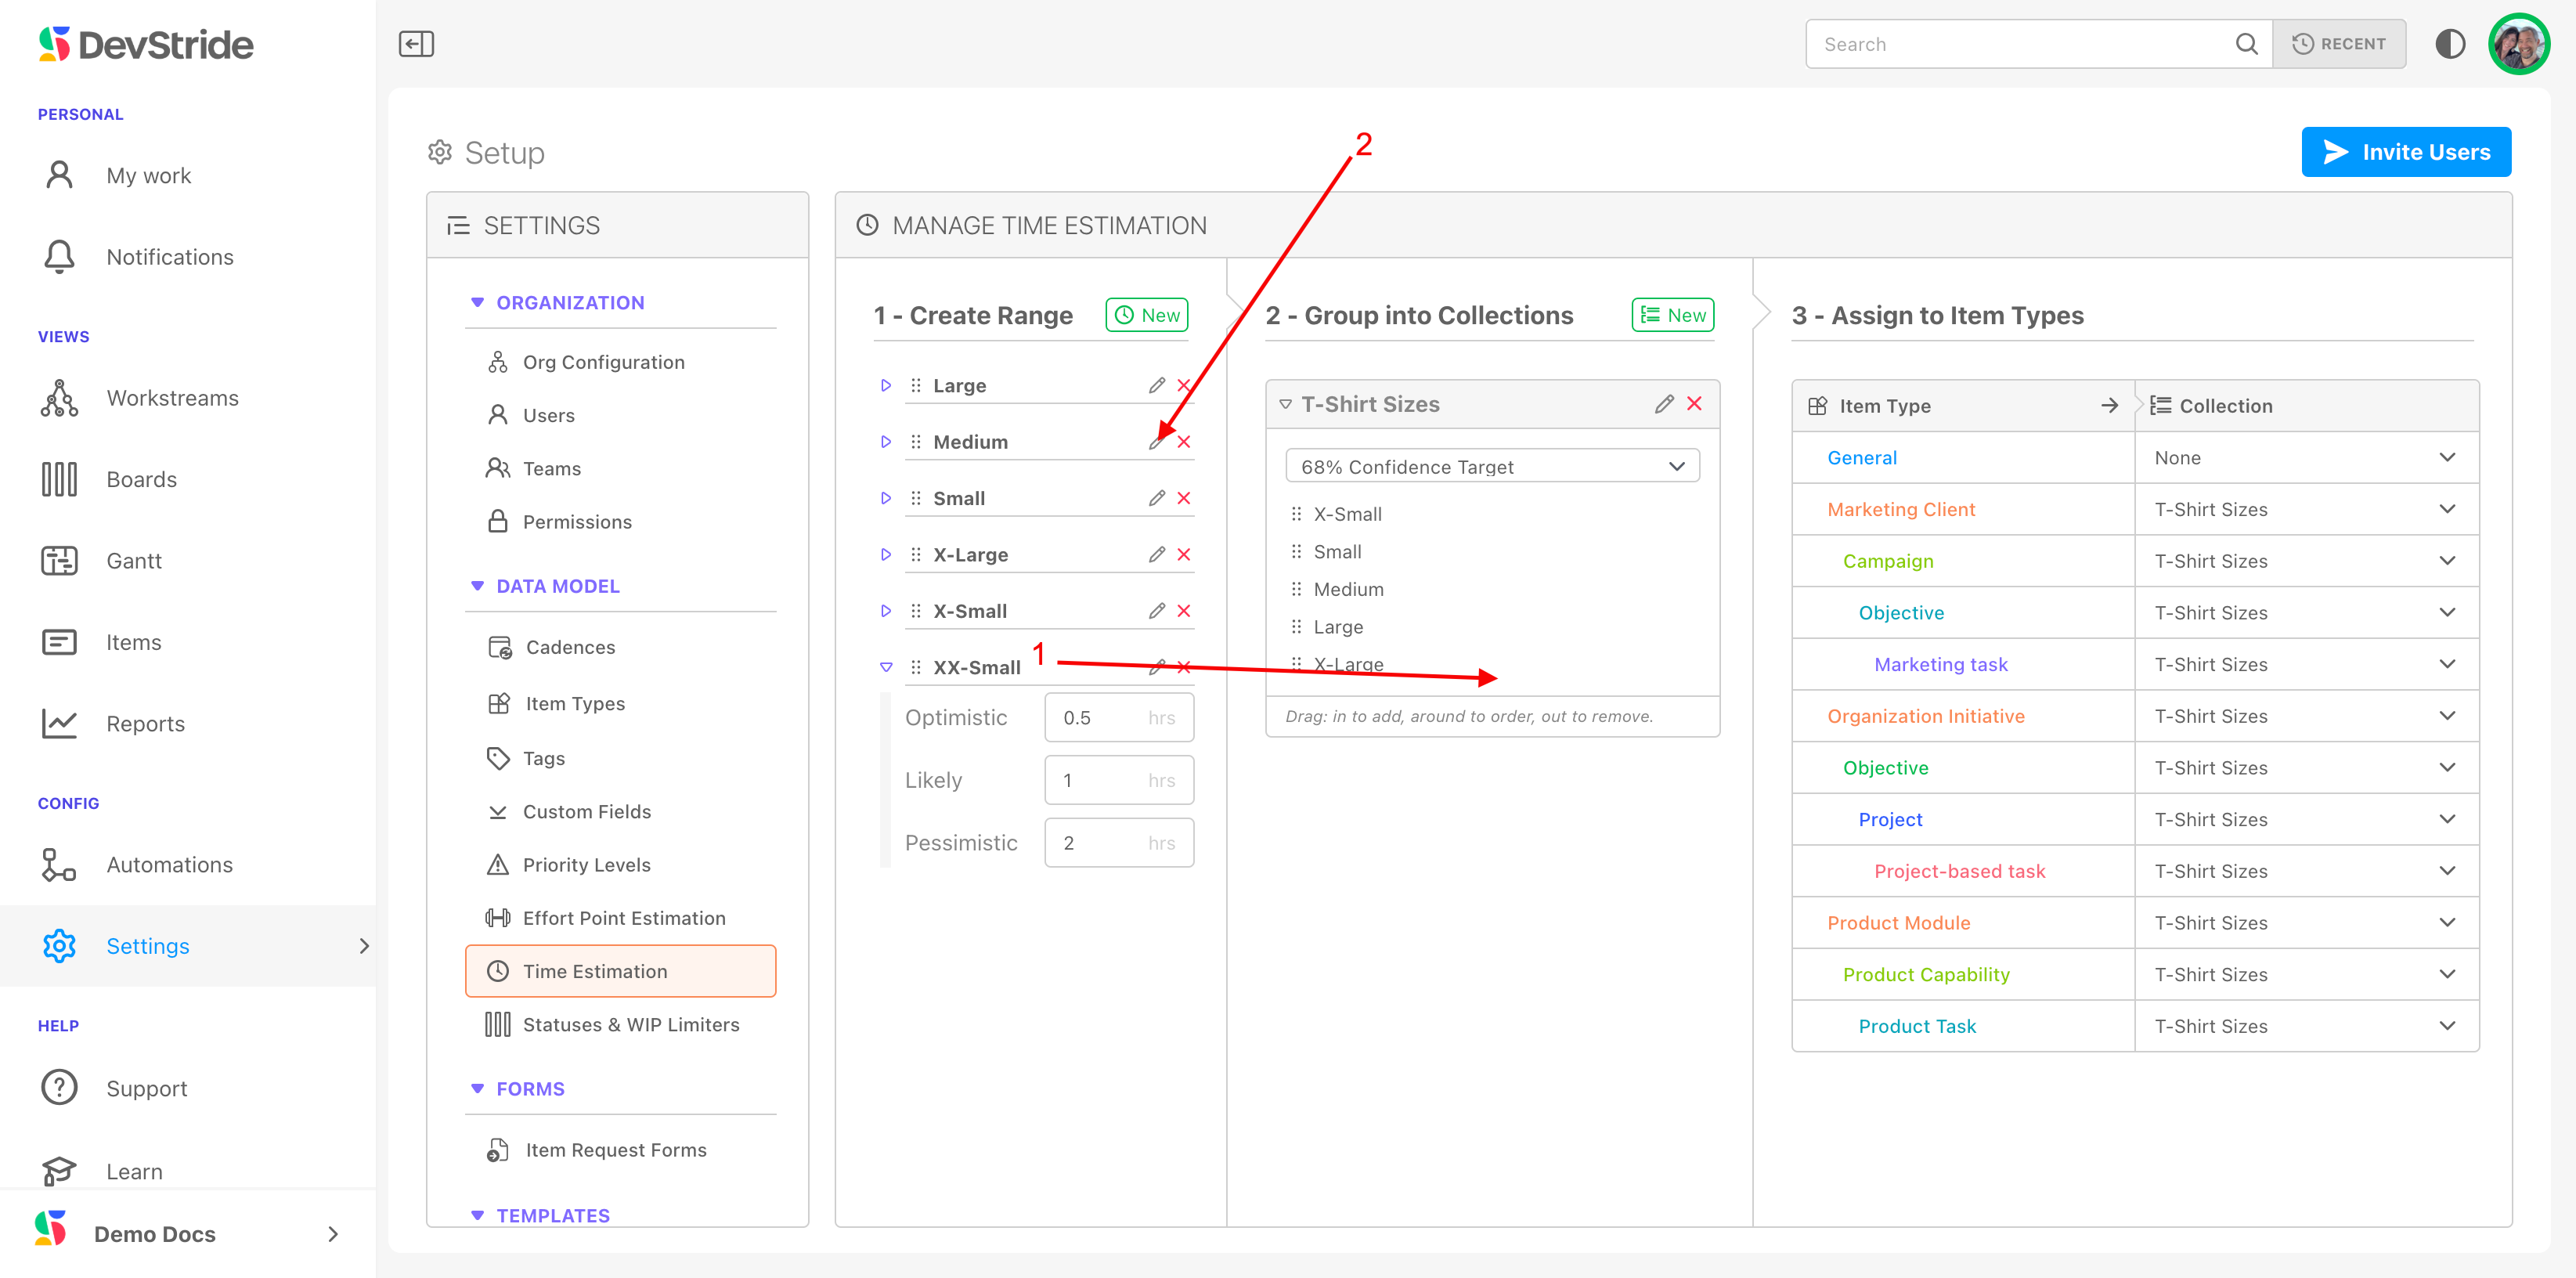
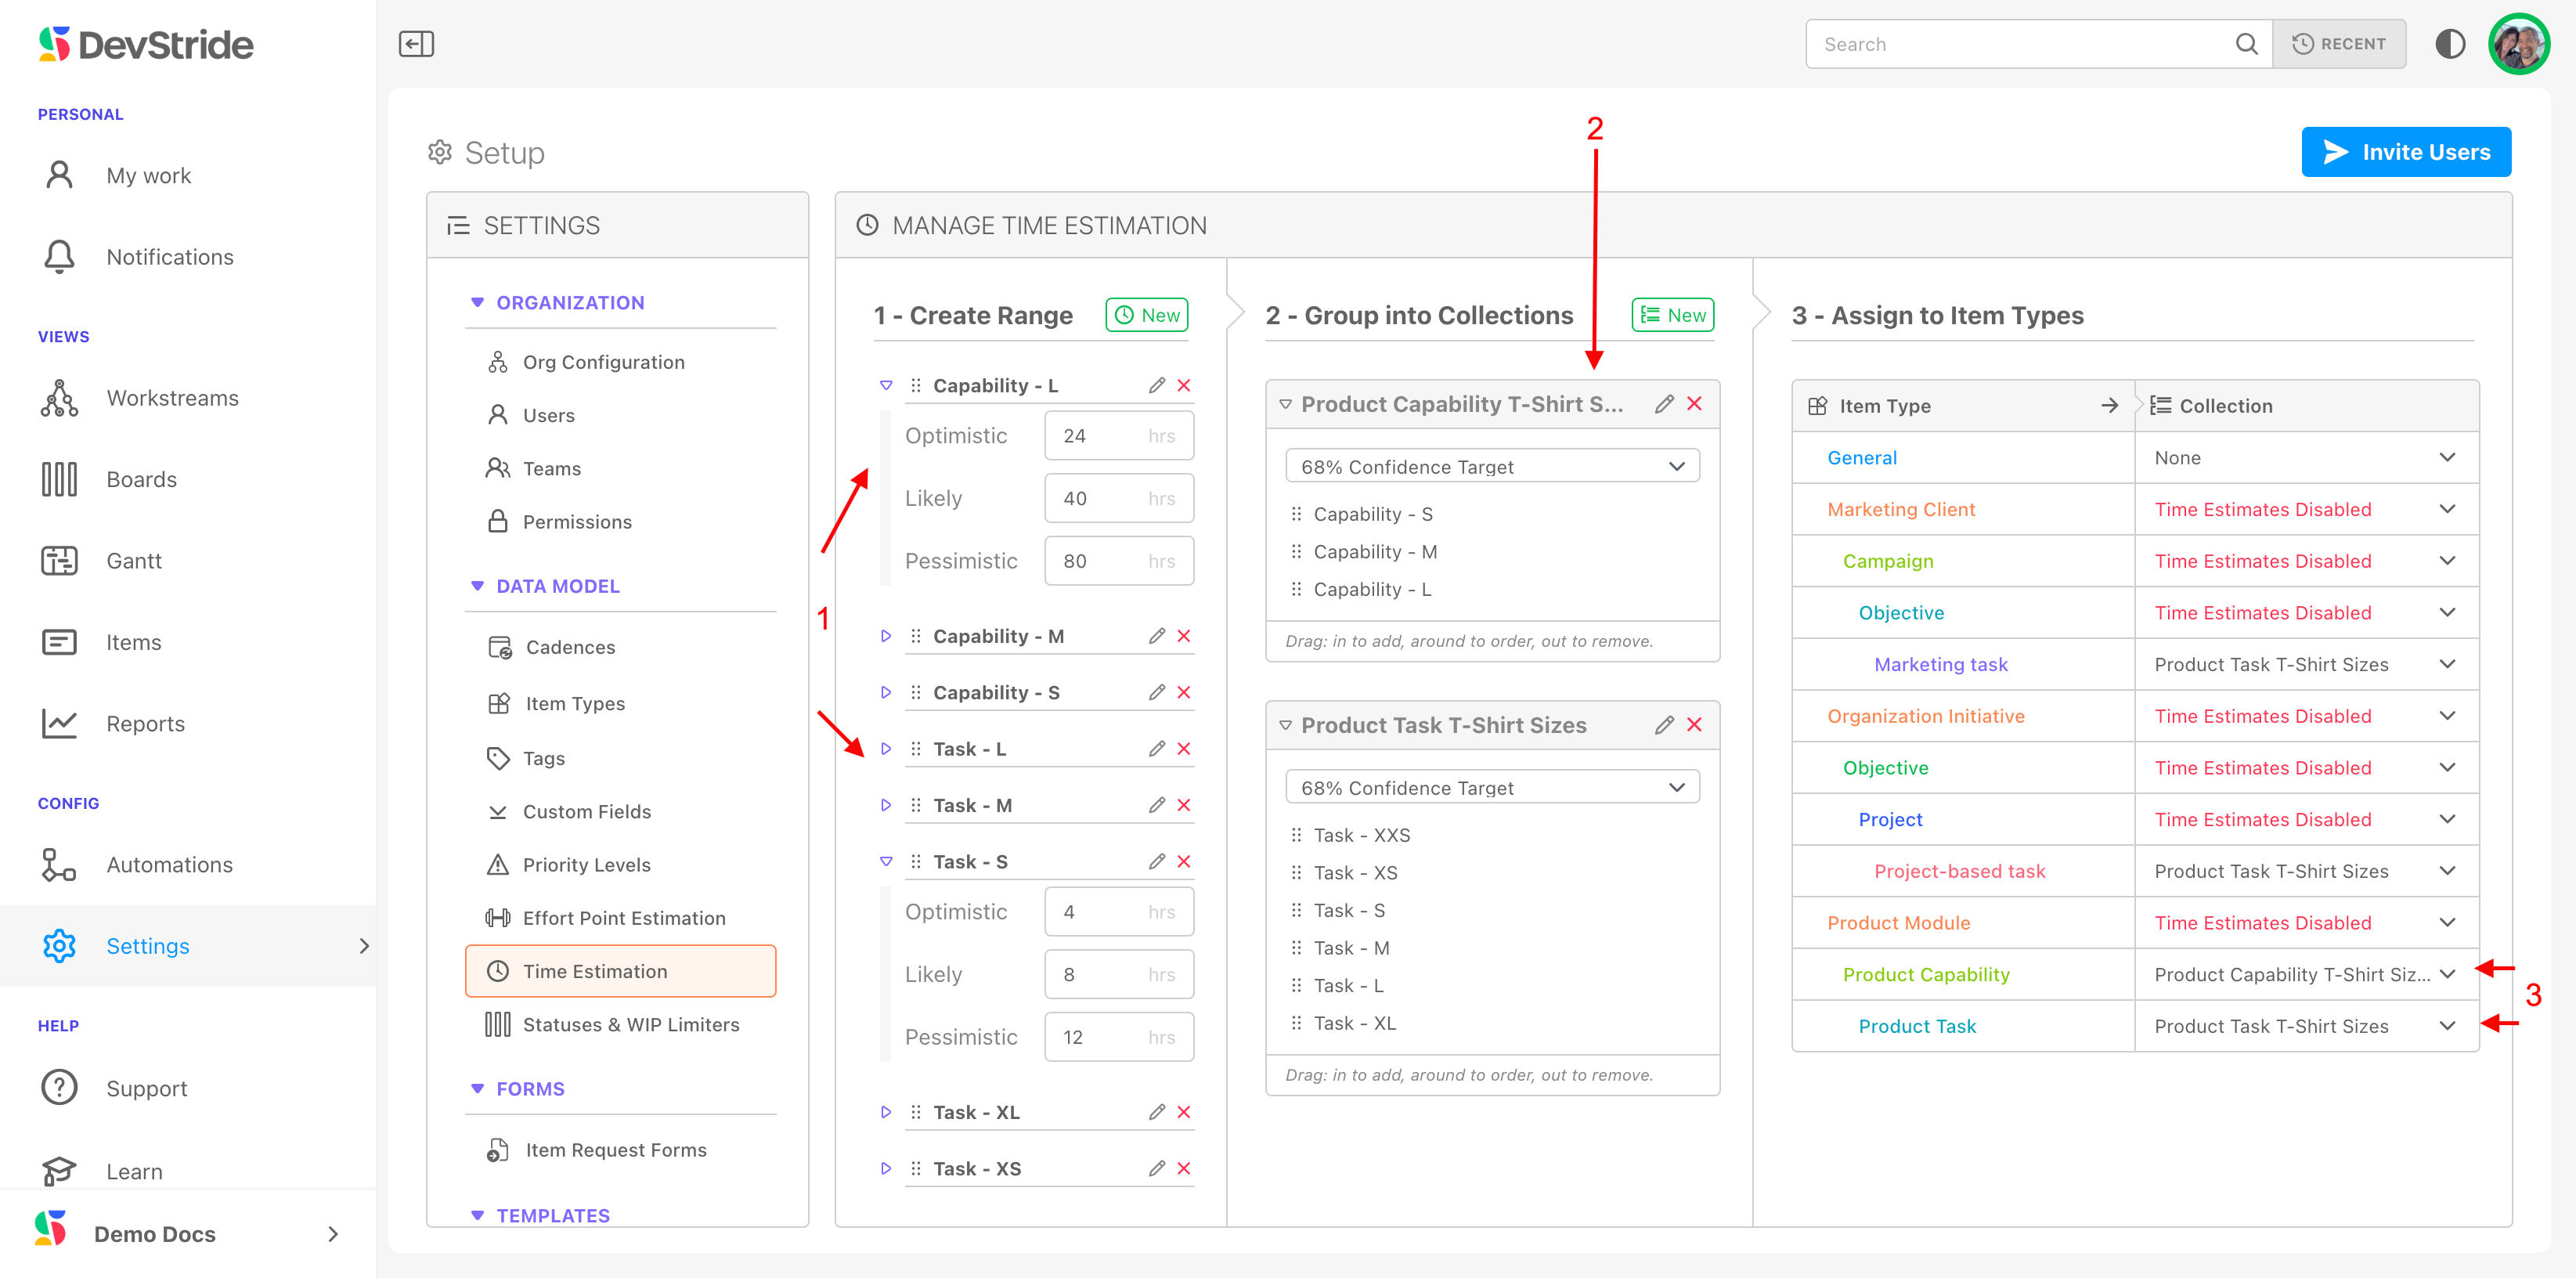
To add options to your Time Estimation settings, go to Settings > Time Estimation (1) and click on the New icon (2) next to Create Range.
Fill in the details of how you want your new option to appear (3). In this example, we are adding a new size, xxs, with time estimates that we consider appropriate for our team. Click Create Estimation Range.

We just added xxs as an option, but we need to identify the list (collection) we wish to use it in. We need to do this, because you can create multiple collections of time estimates.
To add your new option to a collection, simply drag it from the list pane and drop it into a collection in the Group Into Collections pane (1). You can also rename any option by clicking on the pencil icon next to it (2). Any changes you changes you make here will flow through to the collections that use them.
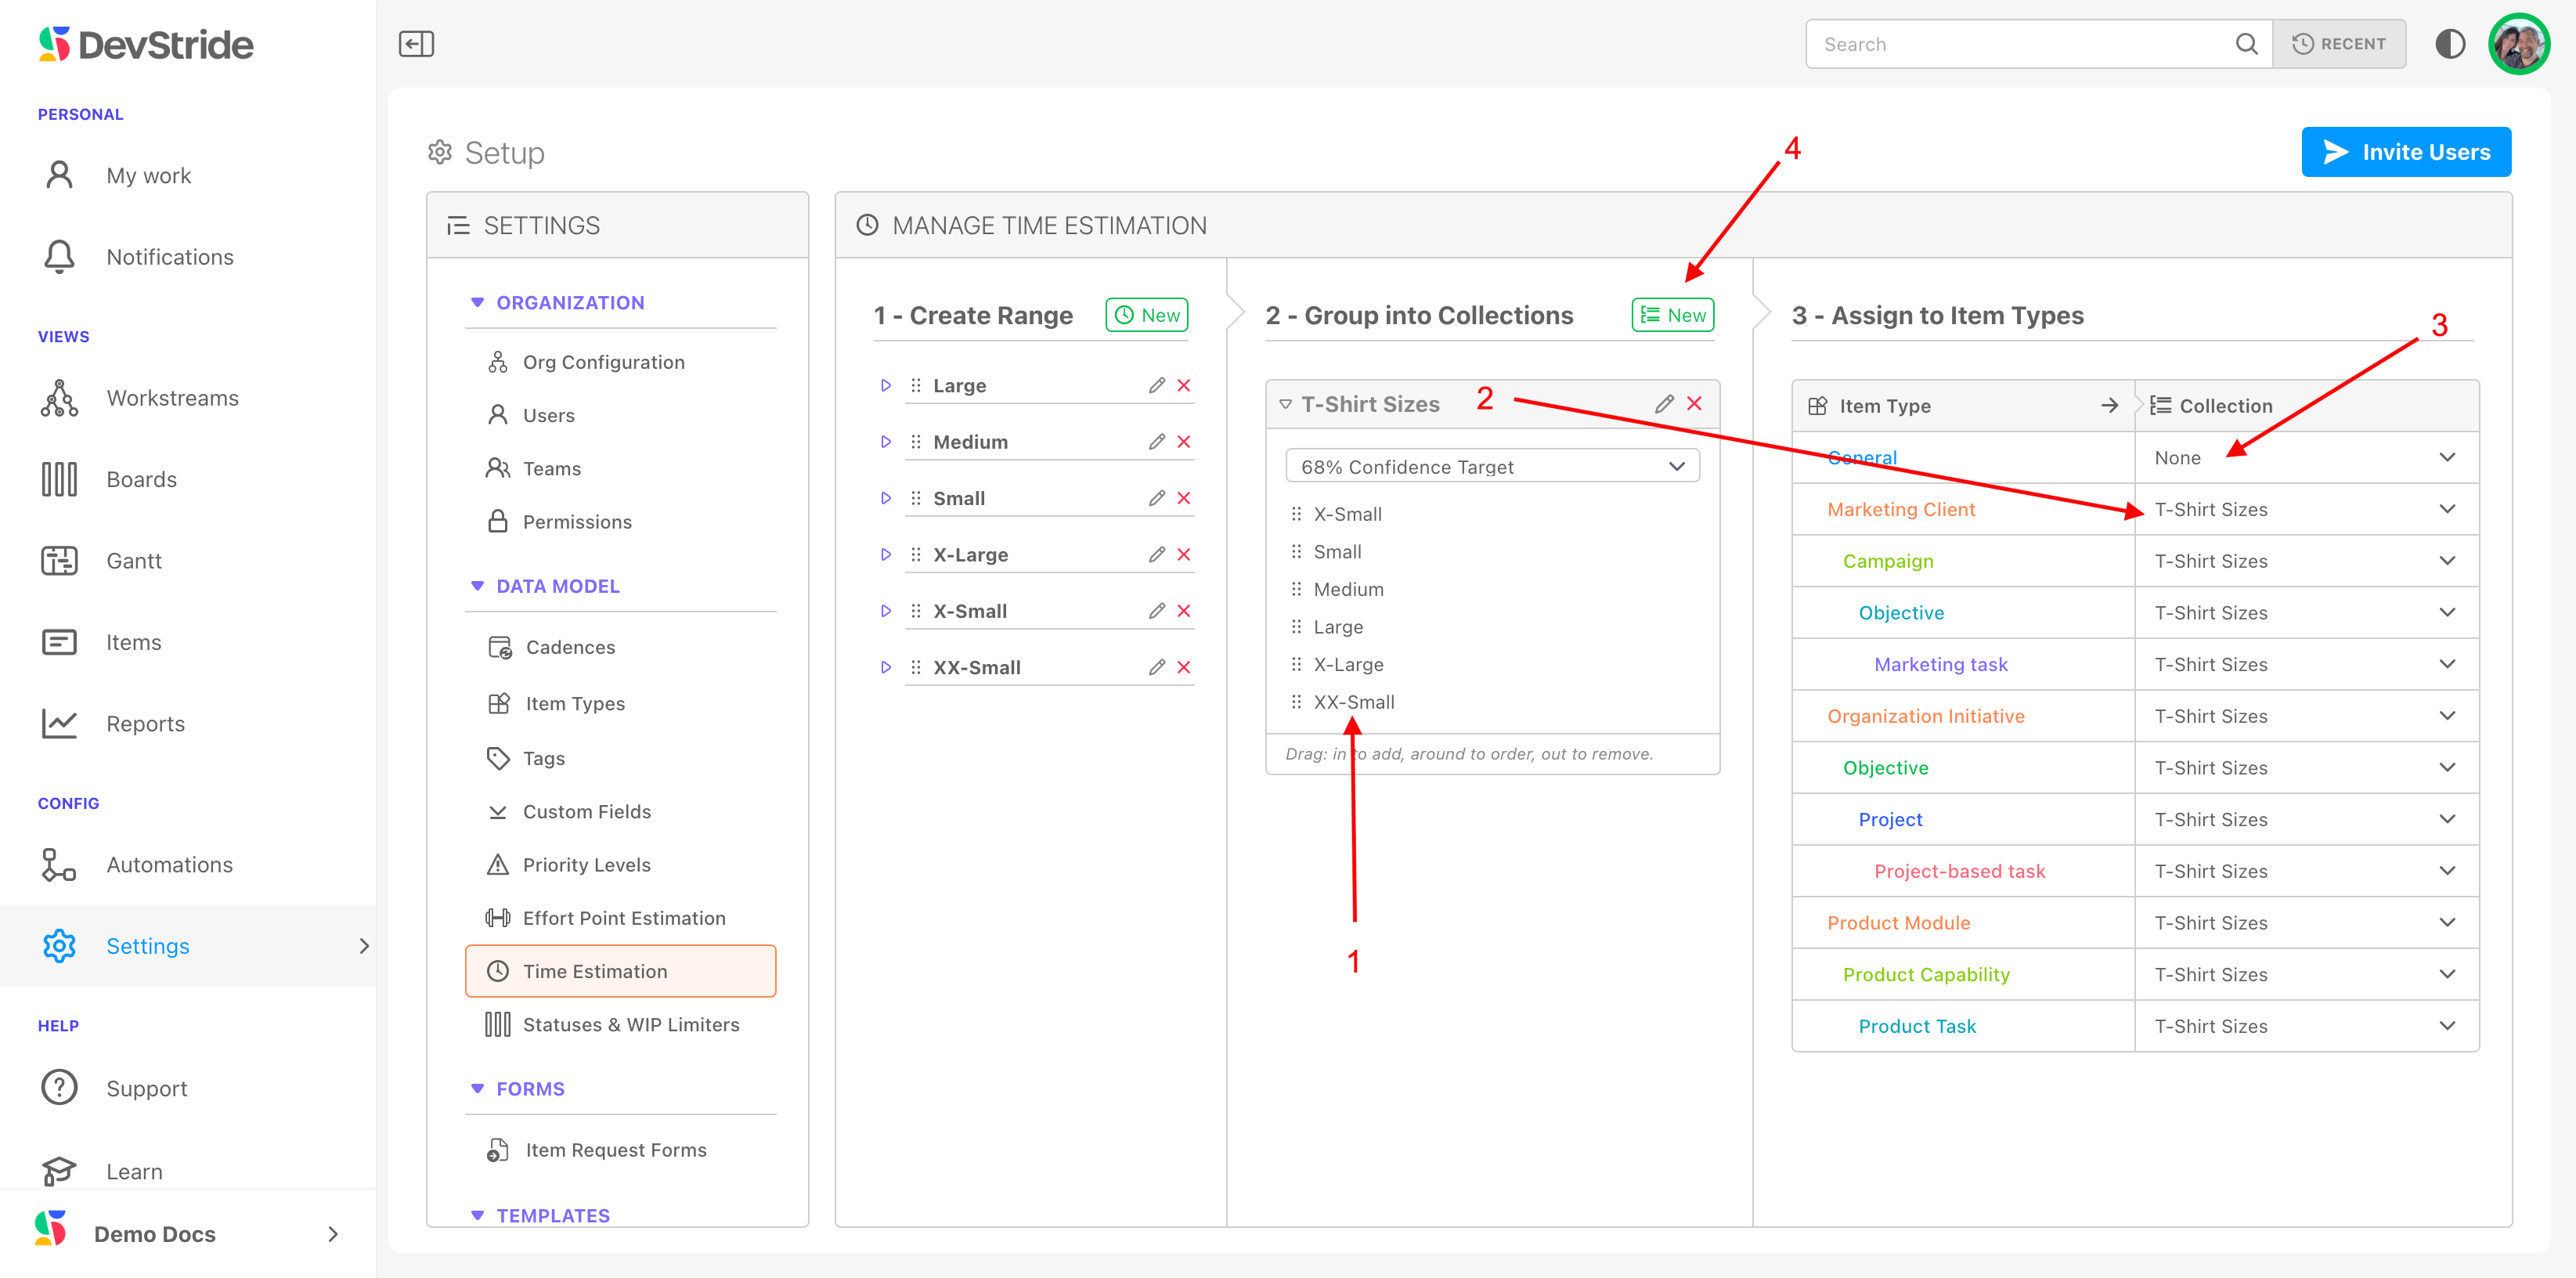
Once you drag an option to the appropriate collection, it shows up in the associated drop-down lists in DevStride.
You can see the newly added xx-s range (1) that we created in our example. It is now one of the available options in the T-Shirt Size list (2). The T-Shirt size list can be associated with any of the item types (2). Item types can also be set to a different list or to none (3).
You can create new lists by clicking on the New icon (4) and defining your list. If you want different ranges, simply go back to the Create Range panel and click on New to create other ranges.
Note:
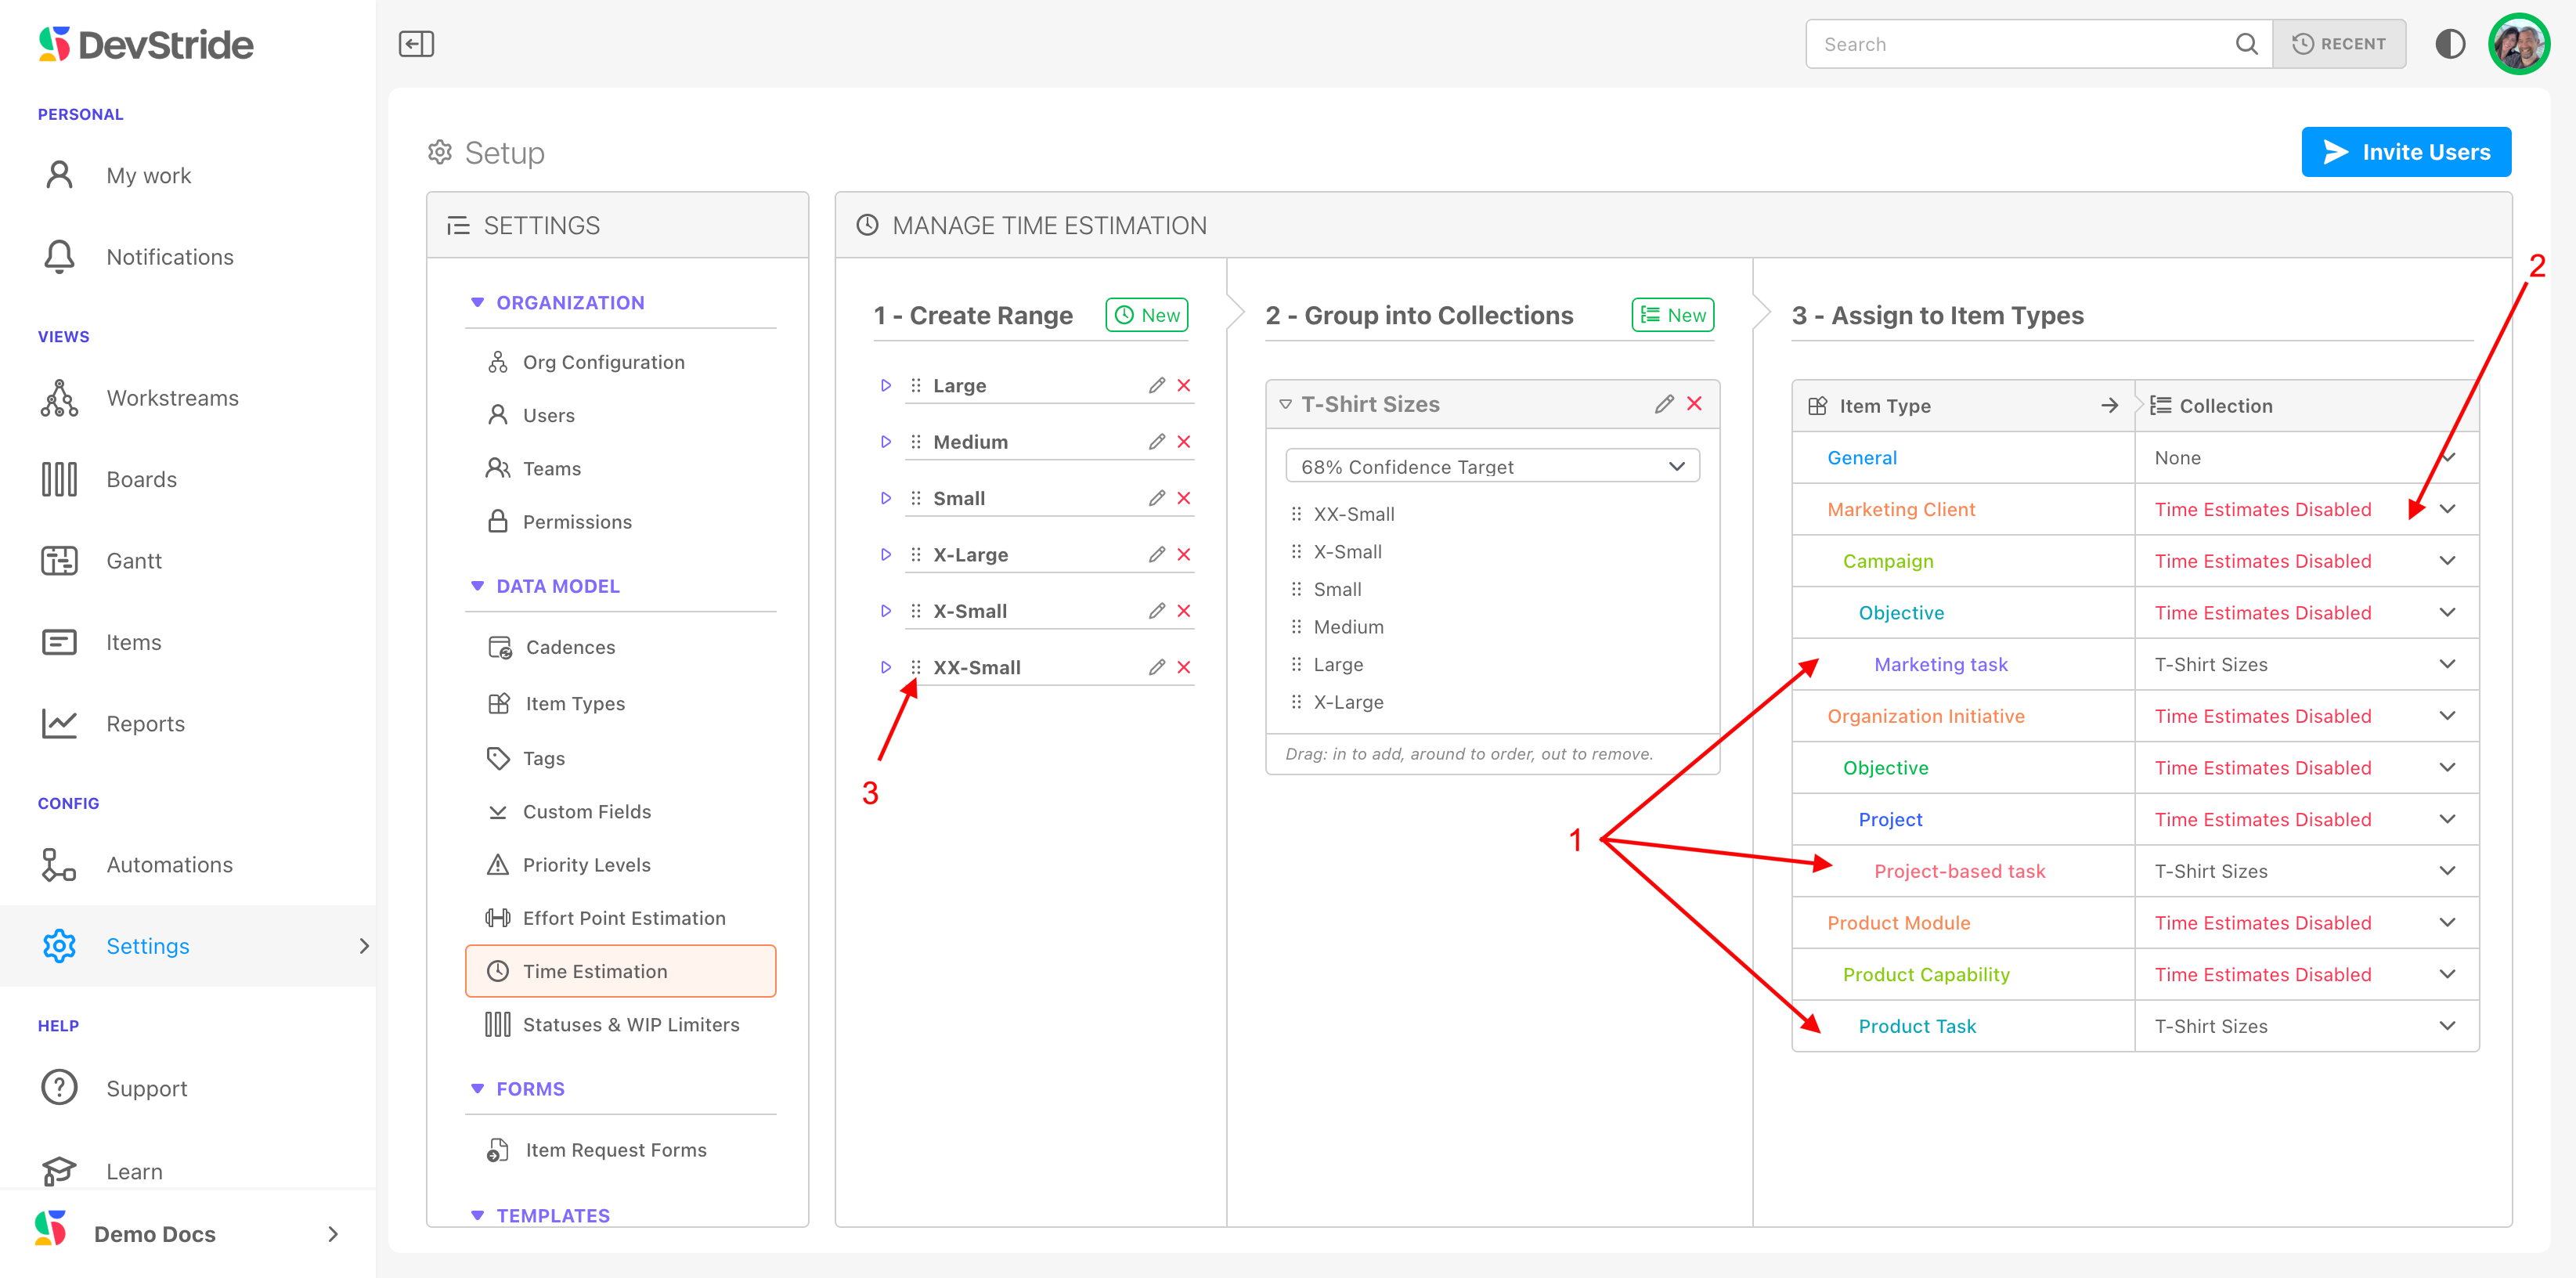
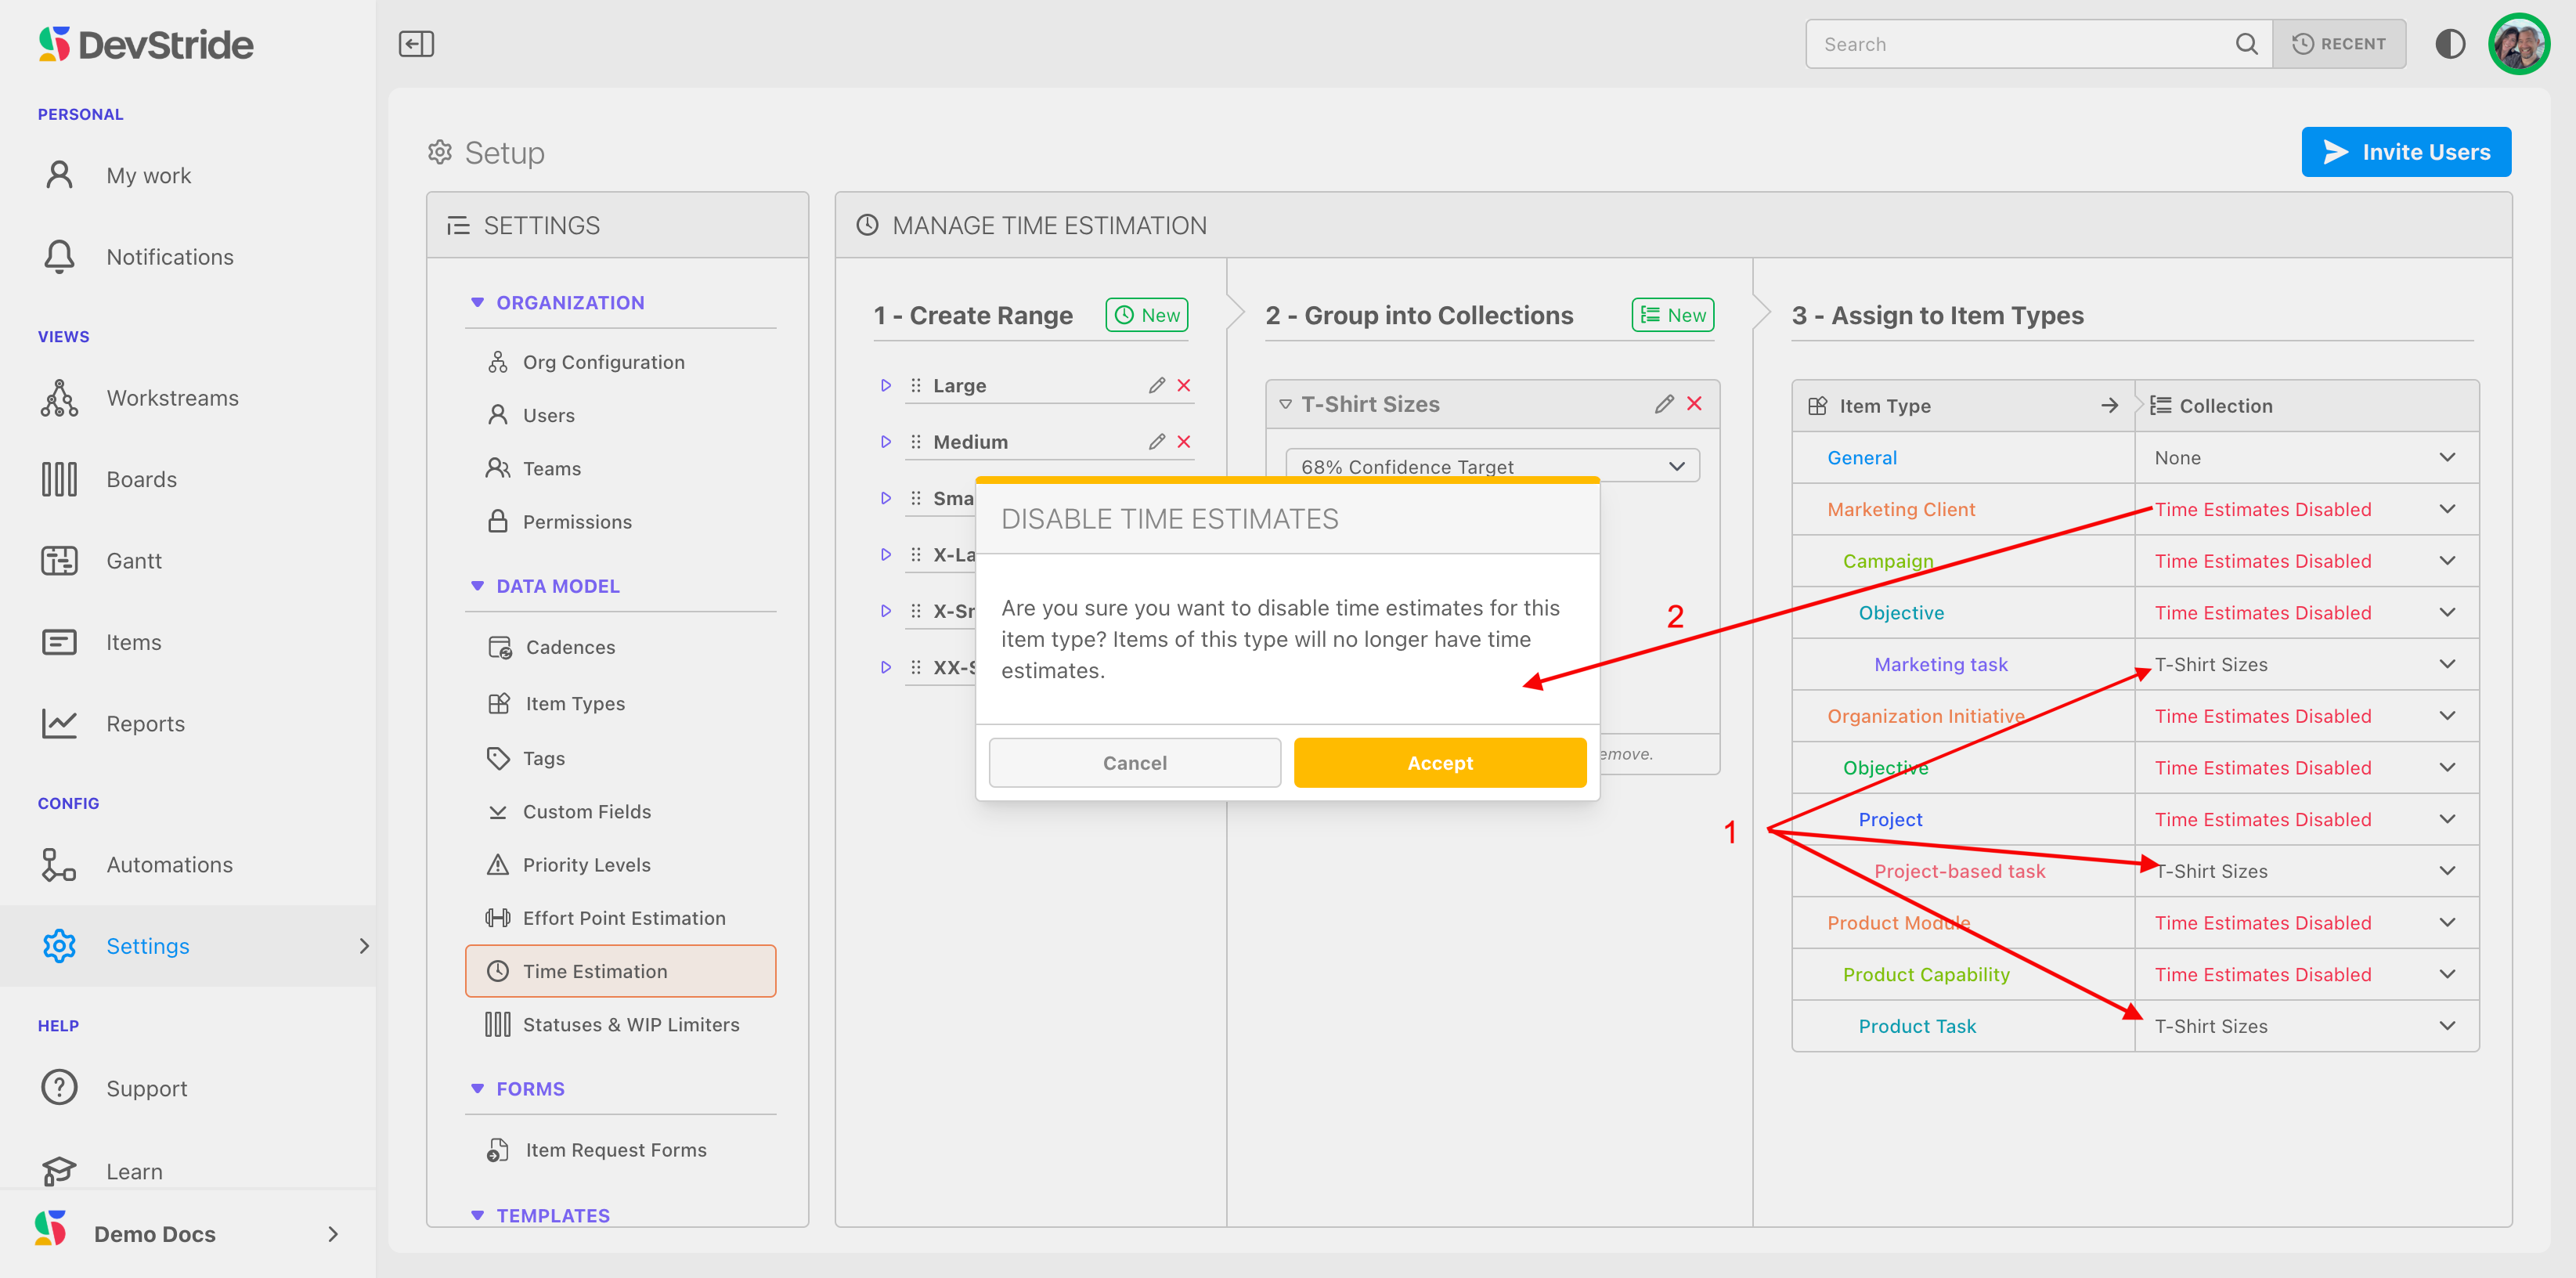
Teams often prefer that time estimates are only set up at the task level (1) as in our example below. You can disable any item types you do not wish to track time estimates on by clicking on "time estimates disabled" (2) in the drop down options for each relevant item type.
You can also re-arrange the order that your pre-set options show up in your drop-down list by using the grab bar and moving an item up or down on the list (3).
We can now take a look at the way our items are tracked in our example.
We are tracking estimated effort points in all Module item types in our hierarchy (1). You can see that we've used the fixed list of the Fibonacci-based scale that we created (2).
We are tracking all Task item types with time estimates using the t-shirt sizing list we set up (1). We disabled time estimation for all other item types (2).
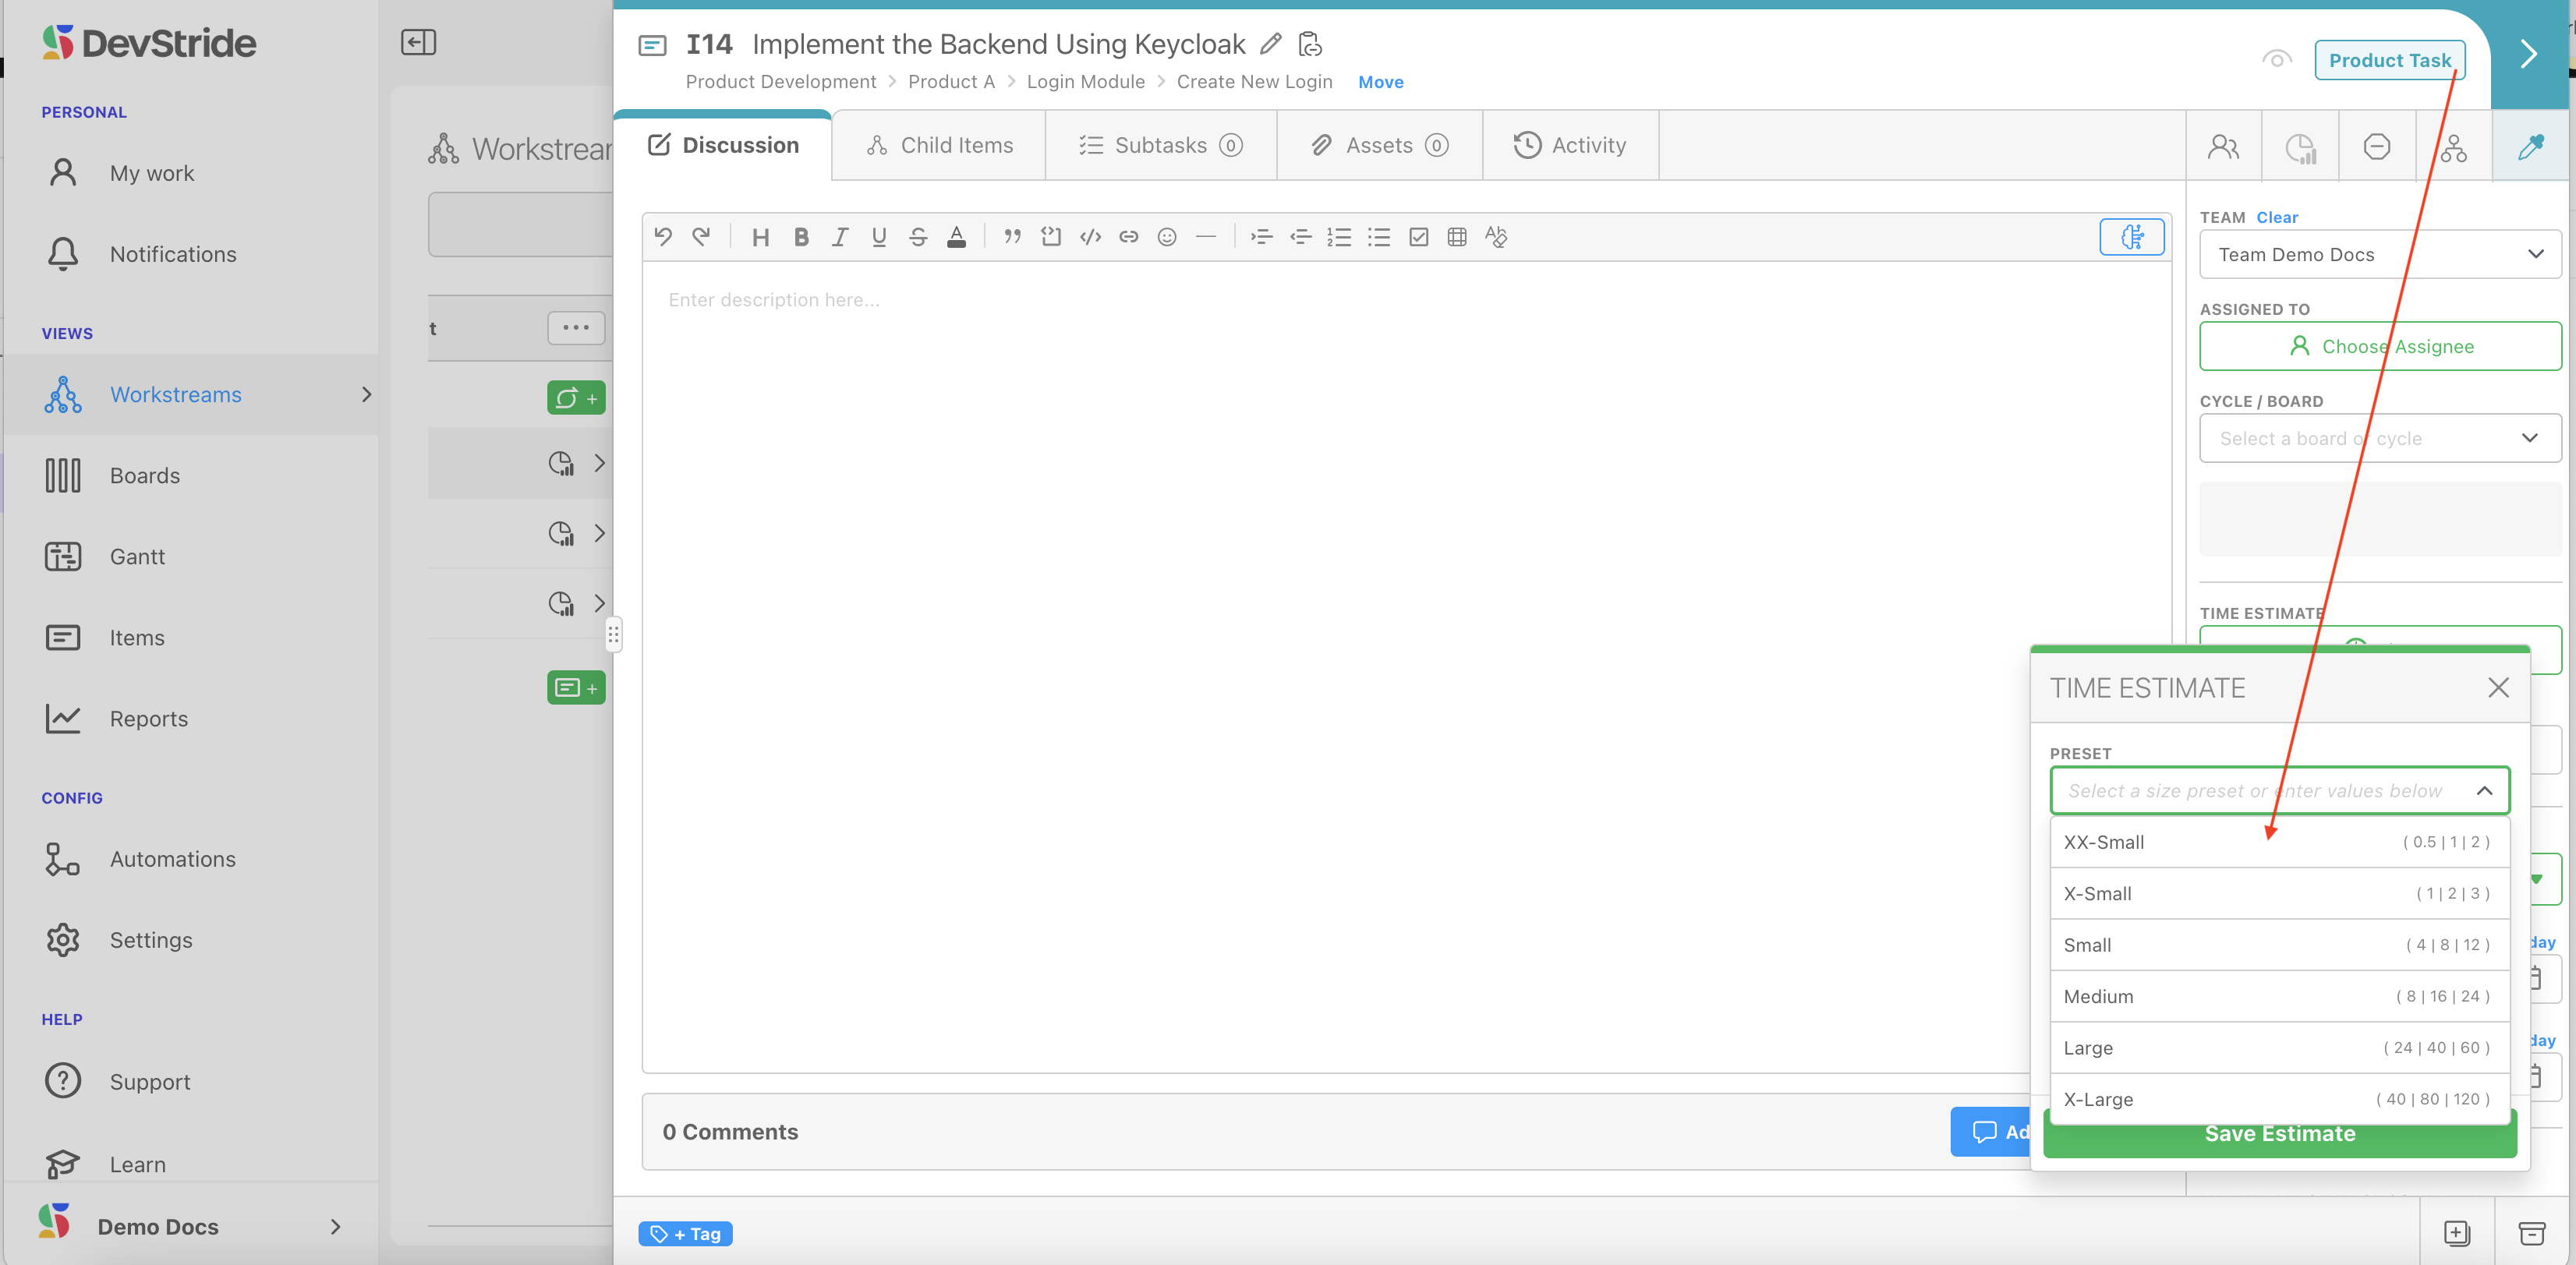
When we open an item, the estimation method presets that are available to us (1) is now based on these settings.
Note:
On any given item, your team can choose to either use pre-sets or can enter in their own estimates manually in the boxes below the pre-sets. DevStride automatically calculates the PERT and confidence level for manual entries as well.
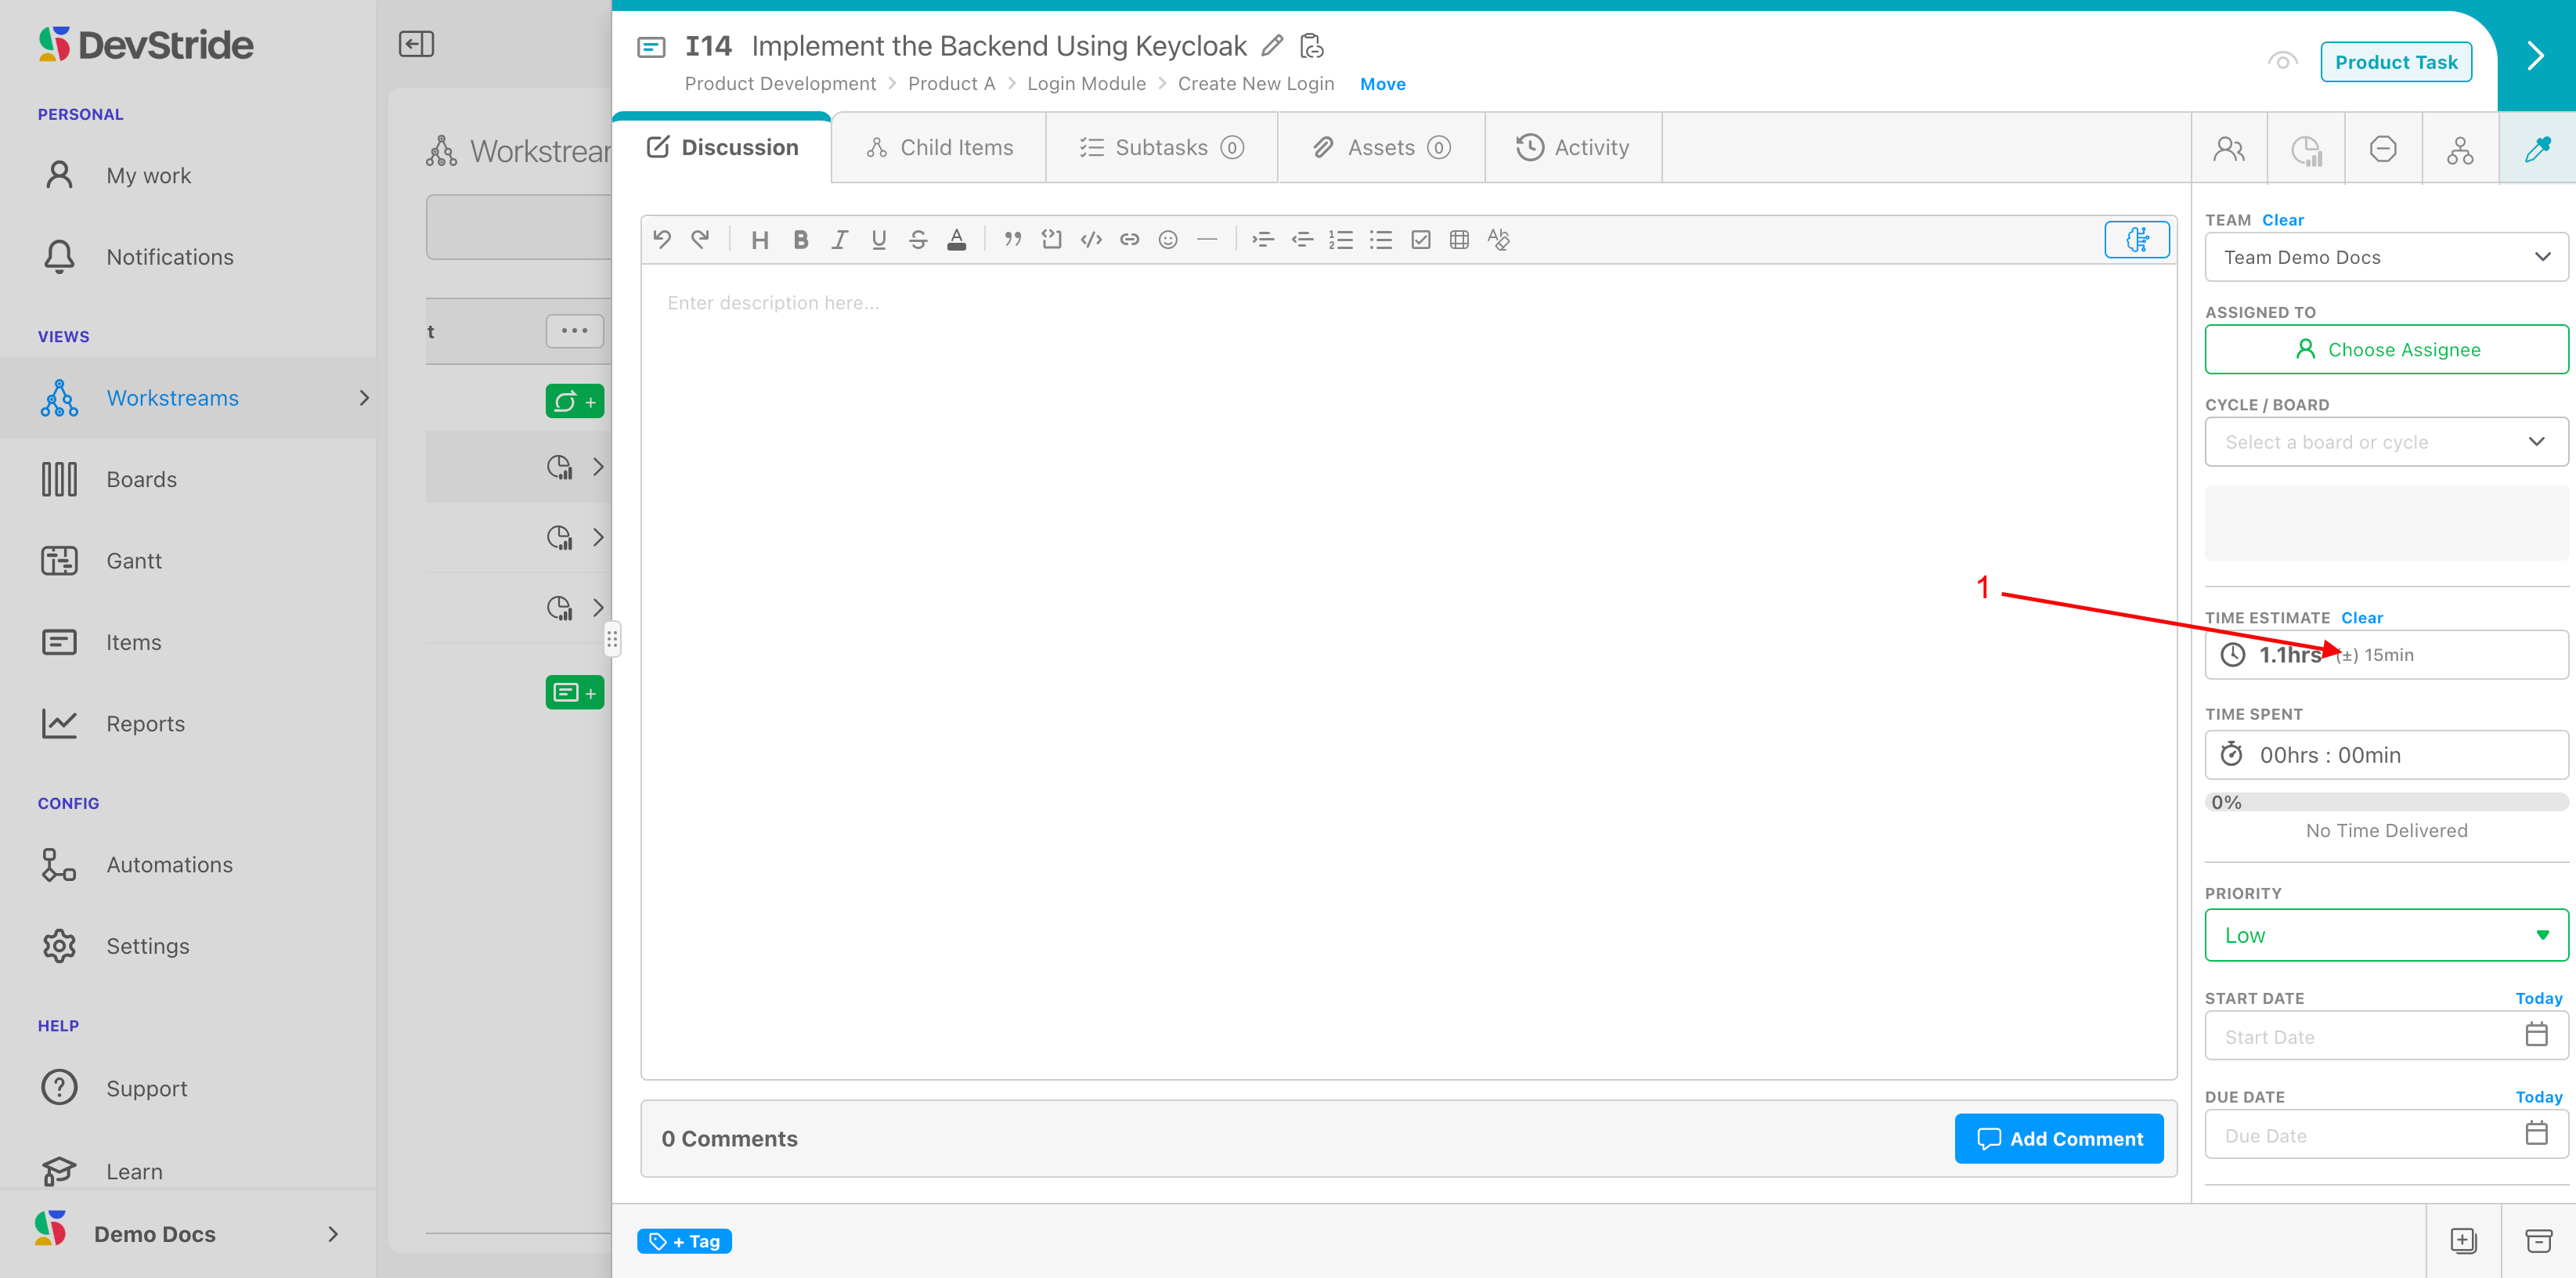
Once you have entered your time estimate on a task, DevStride also displays the standard deviation in the range field as well as the resulting time estimate calculation on the item (1).
Why it's important
Why does estimating tracking matter? And why is knowing the standard deviation useful?
A larger deviation in one item might not make might not make a big difference to the overall project.
However, tracking the standard deviation on each item can allow visibility into the group of items associated with a given project.
If you note that in a pool of items the standard deviation is fairly large, there is more risk that the time estimates could be off for that pool of work, potentially resulting in project delays.
A Time Tracking Best Practice: Visibility through rolled up Estimates
There's an easy way to get instant visibility on having too many tasks or tasks that might take too long for a given portion of your project.
Create estimation ranges for each of your item types to track whether—when combined—they will reach the outer level of your estimate for the entire set.
Here's how that works.
In Settings, Create a range for each of your task-level items (1).
In our example below, tasks are our smallest types, so we created suitable ranges of a certain number of hours from xxs tasks all the way to xl tasks.
We also created larger ranges for what we would consider small, medium and large Capabilities, which is the next level up in our item type hierarchy. (1) We could choose to do this with our Module item types as well. We will just show Tasks and Capabilities for this example.
Once we defined our ranges, we created collections named for each type of item and then grouped our ranges into their collections. Then we assigned the collection we wanted to use to our item type. We used related names to help us match our ranges to our collections.
Once in our system, we can apply estimates to each task. Since Tasks are children of Modules in our item hierarchy, we can easily see if the Tasks we have in a given module exceed the sizing we have defined for its (parent) Module.
In our example below, our Module item displays an orange warning icon. This warning lets us know that based on our estimated time, this module could take longer than our definition of a module of this size:
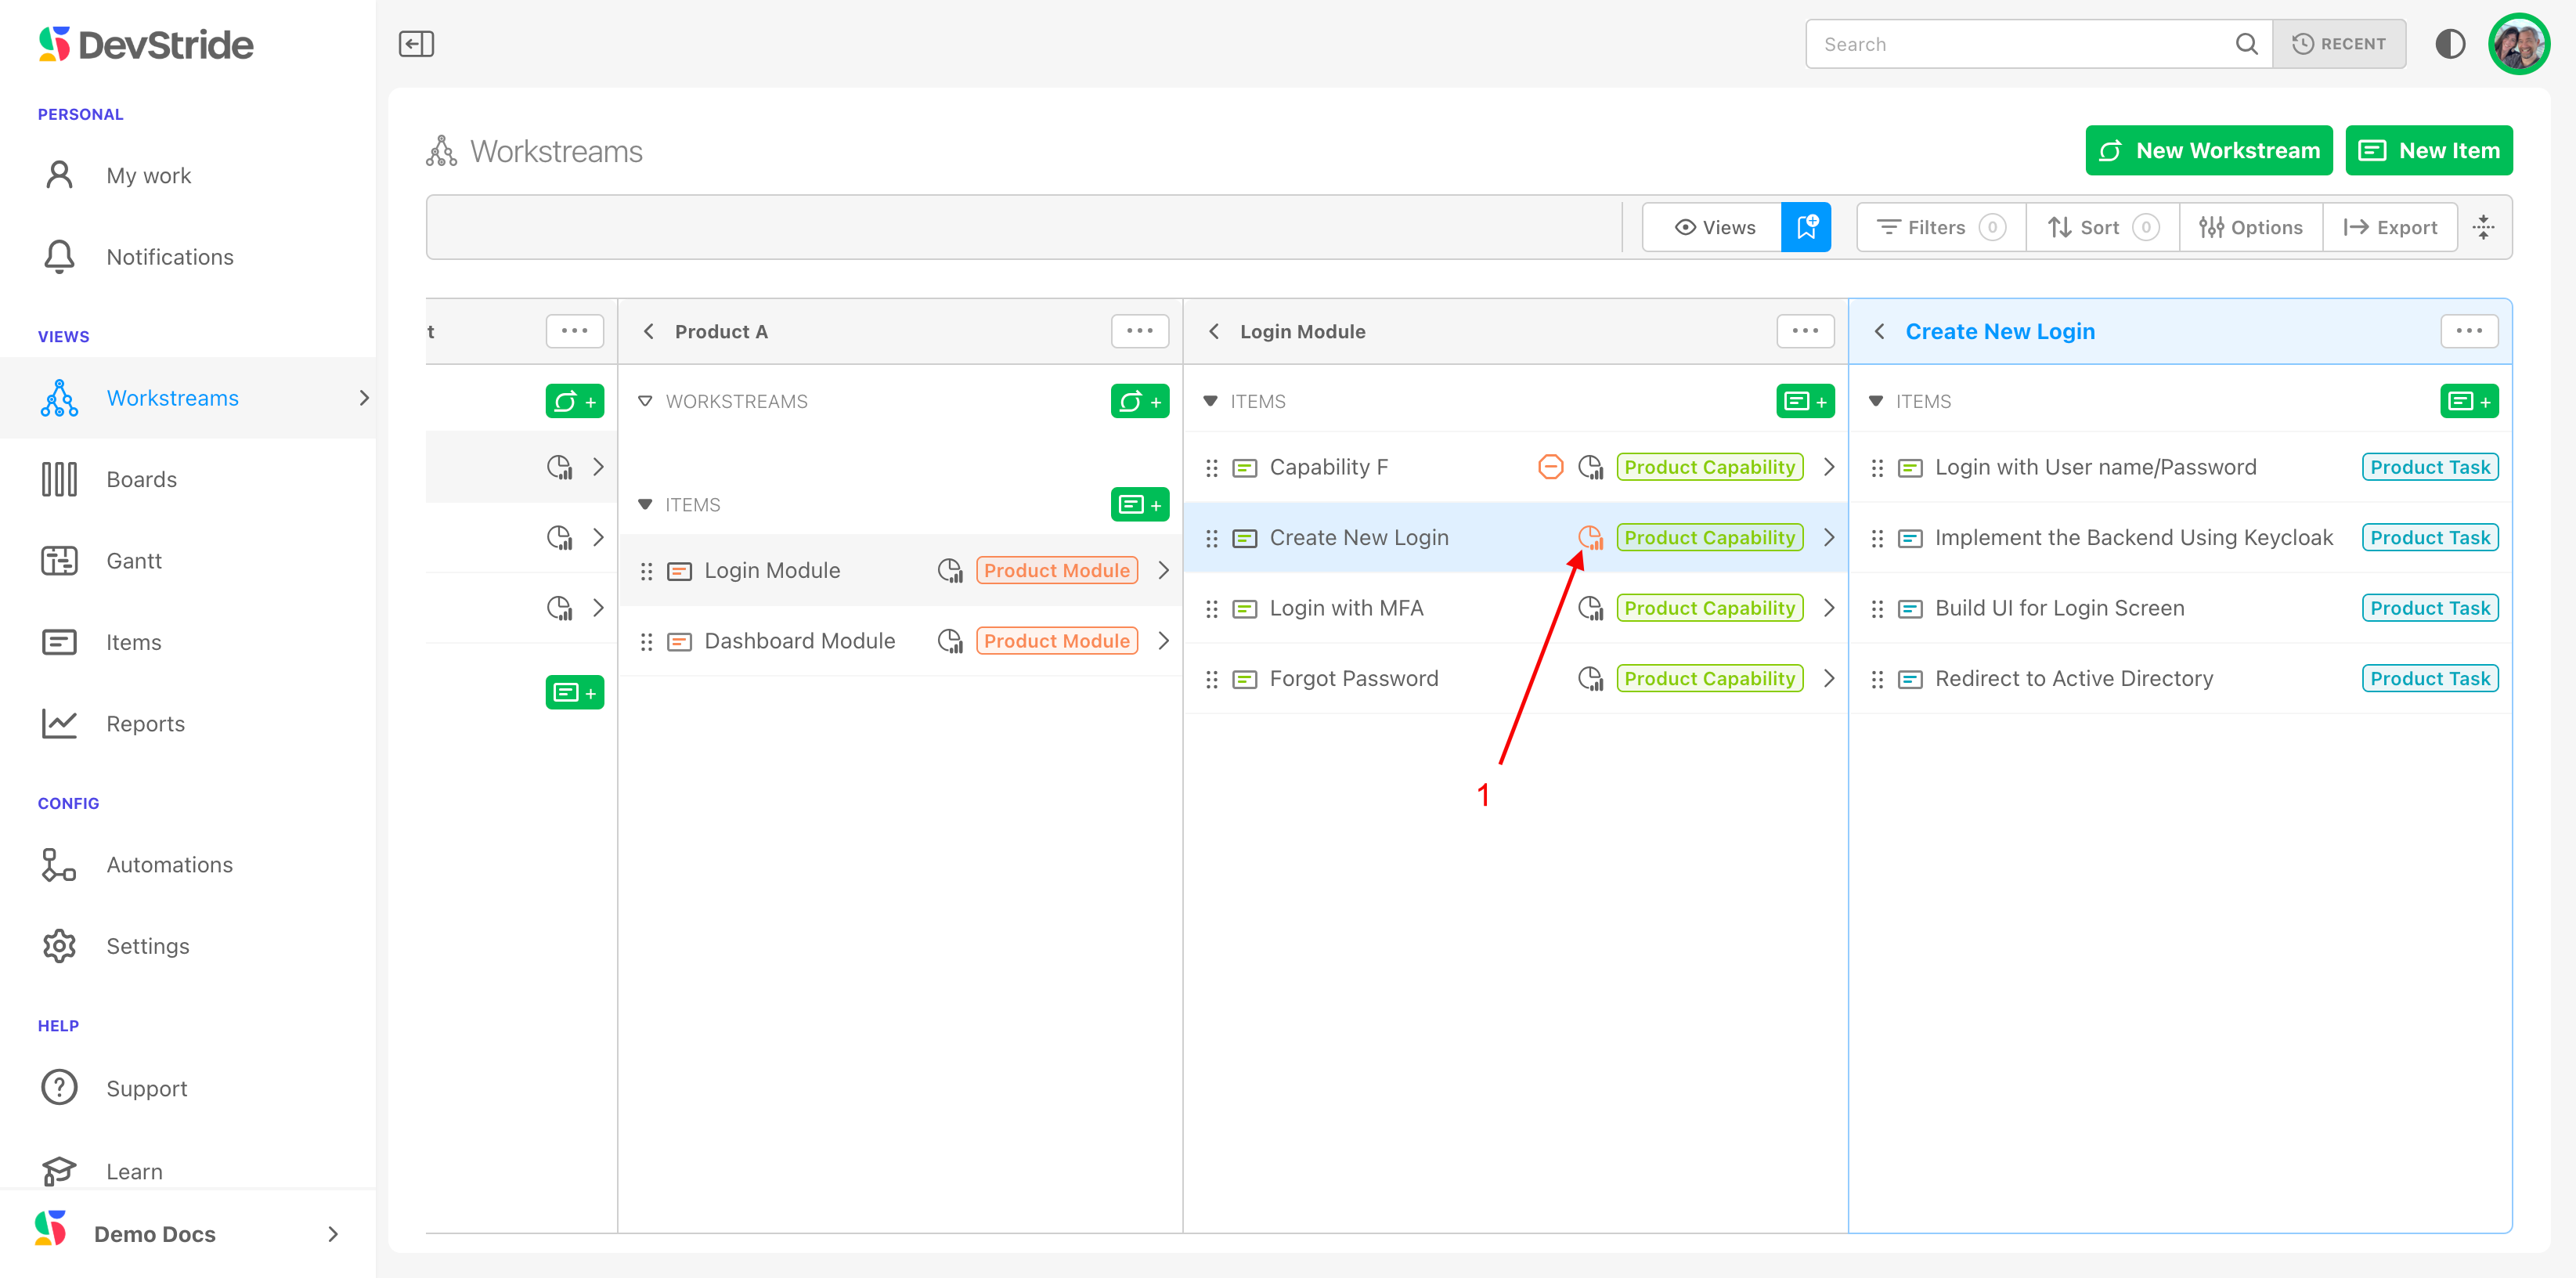
You can click on the warning icon to see the completion stats and the warning details.
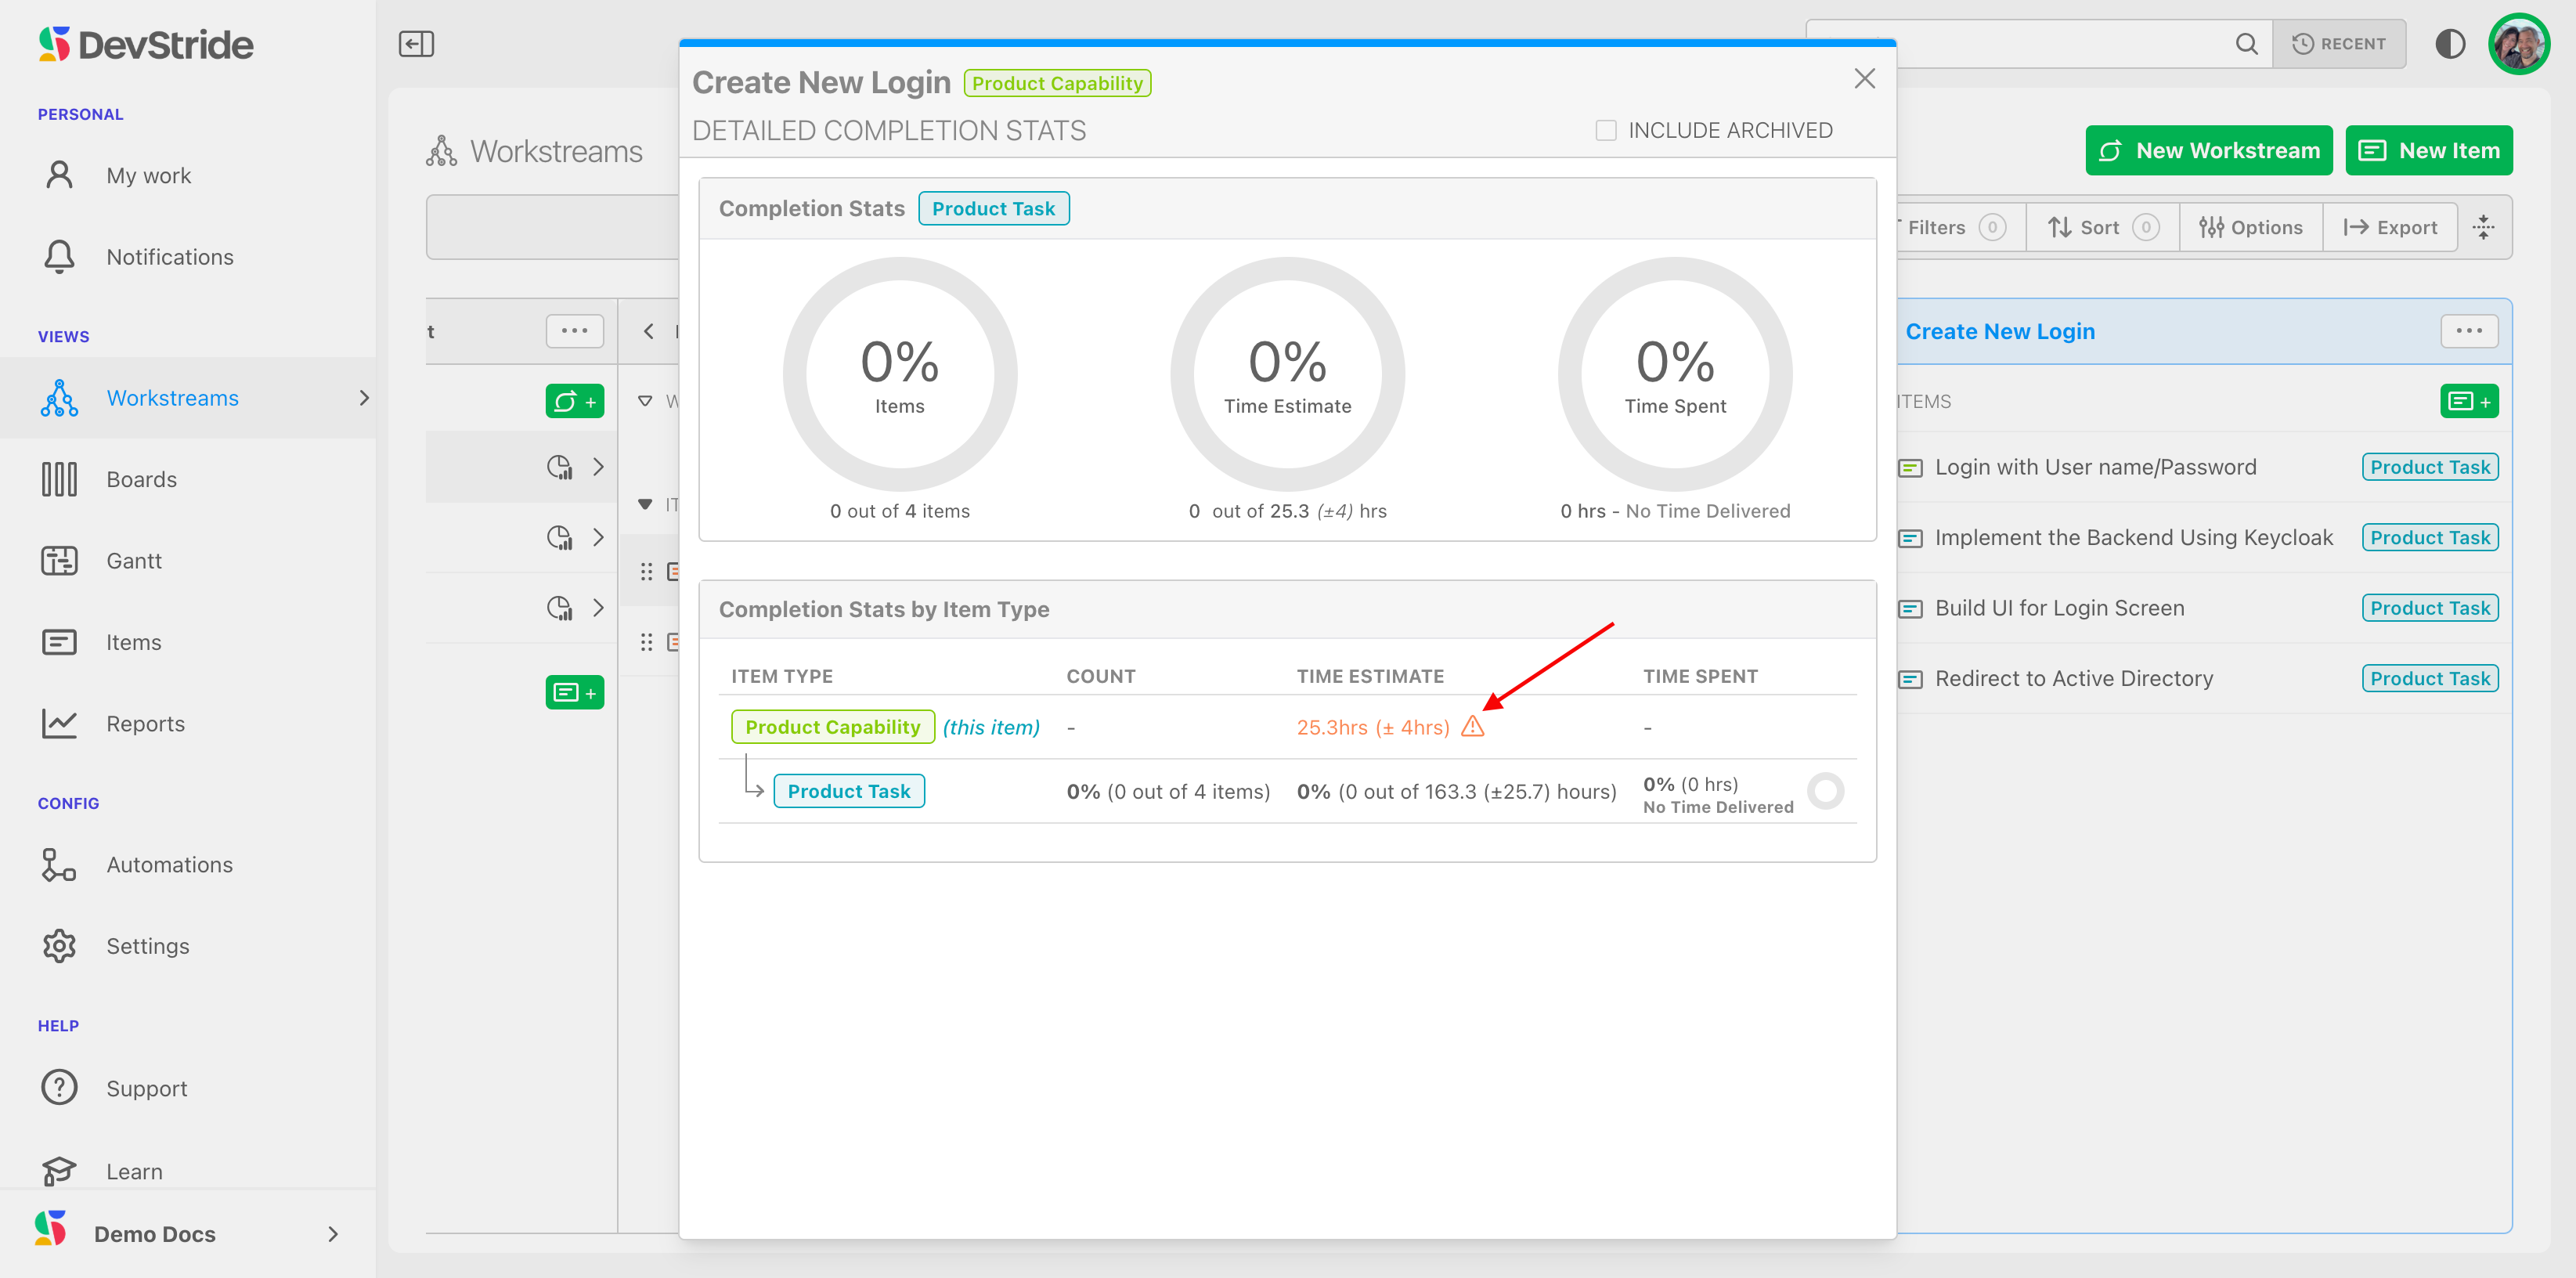
This warning icon shows throughout the system, elevating the potential issue.
The takeaway: The better you decompose your work into small estimated tasks that roll up into bigger estimated buckets, the better predictability you have.
What This Gives You
With powerful and flexibility estimation capabilities, DevStride gives you predictability right from the beginning—for successful project delivery in the end.
Time Spent
DevStride uses the concept of "time spent" primarily for the purpose of creating ongoing predictability.
It is not intended to be a payroll or billing time-tracking system. However, you can choose to derive time spent information from DevStride in service of those needs. For more information on time spent for payroll or billing tracking, please reach out to your DevStride implementation team.
We will be focusing here on using DevStride's time spent capabilities as they relate to project performance and predictability.
Time spent in DevStride represents the sum of time spent on an individual task. This can be rolled up to modules, etc.
The goal of identifying time spent on a task or a group of tasks in not micromanagement. The main purpose of tracking time spent is to help size the work appropriately in future estimations. This increases over-all predictability.
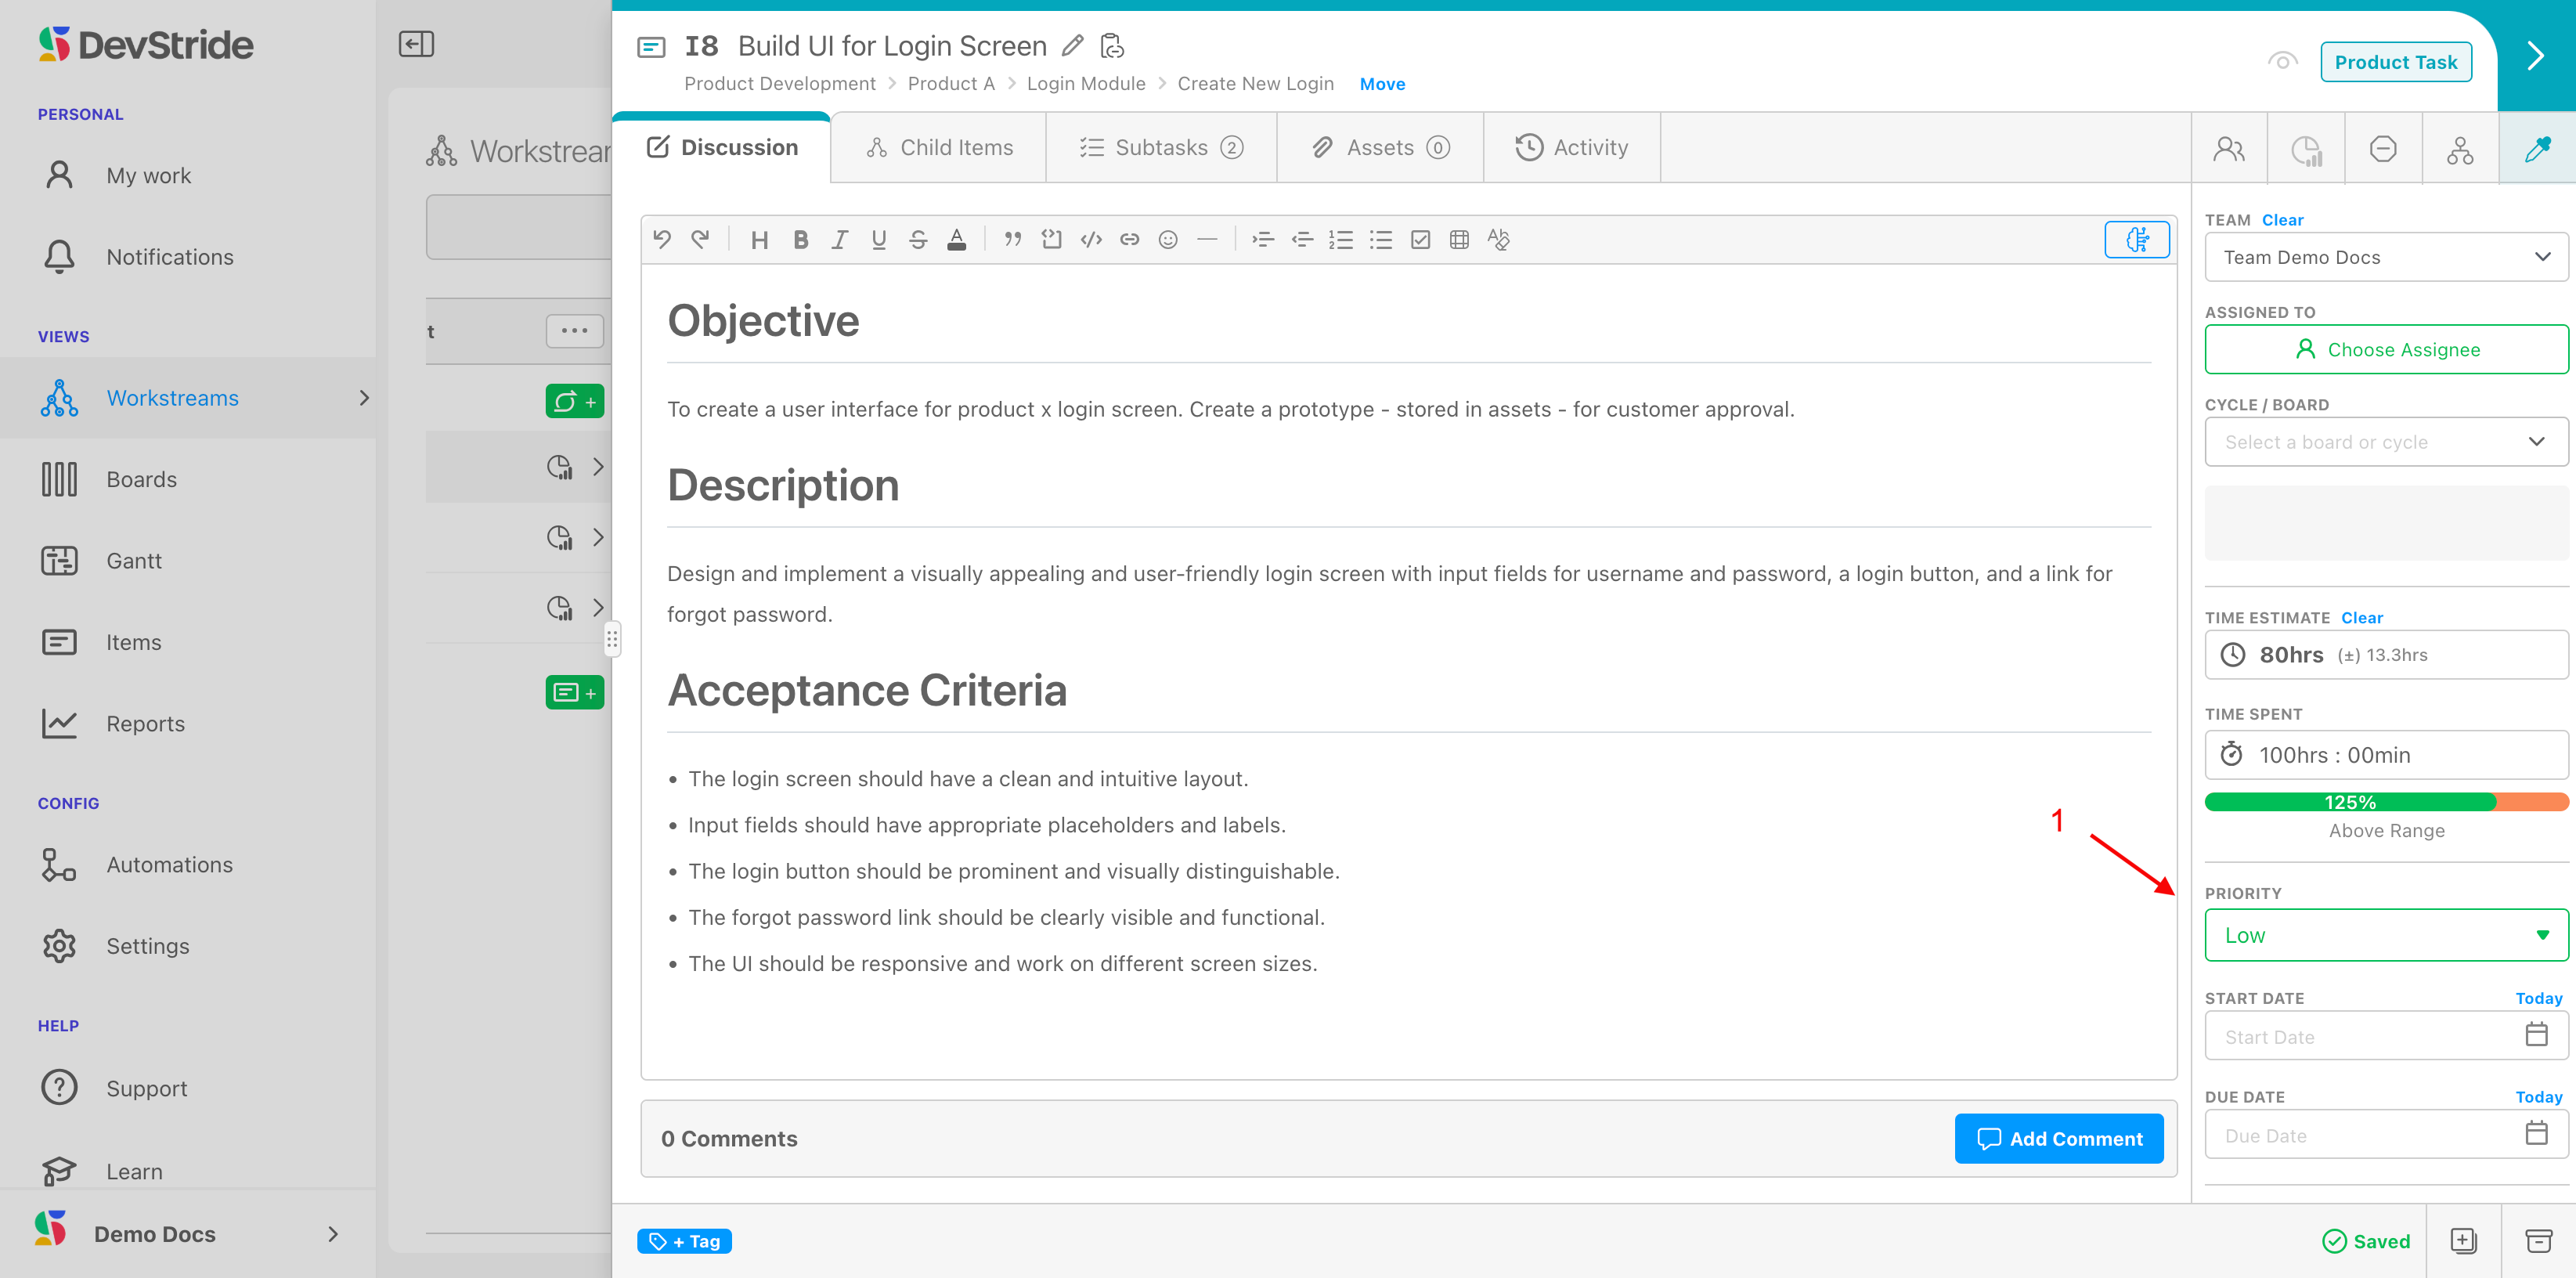
To that end, DevStride's ties your time spent information (1) on each item to your estimate, and indicates whether the time was over or under the original guess (2).

In DevStride, time is tracked at the lowest item type level in your hierarchy (for example, tasks). DevStride aggregates the time spent entries for the lowest level items and displays the total at their parent level. The parent time tracked fields are not editable as they reflect the total of the child-items time.
At the parent level, DevStride indicates any actual time overage (1) compared to the estimate (2) as a percentage.
In the case of time spent overage, warning icons display on the item and throughout the system on workstreams, boards, and gantt charts. These icons link to an interactive completion stats pop-up (3).

Time Spent: A Powerful Predicability Tool
The time spent range indicator can provide real signal for the purposes of strengthening your team's project management capabilities.
Because all time spent rolls up from the lowest item in the hierarchy to the highest, it's possible to see the overall effort that is required to complete tasks for a given parent item.
An indicator that shows a team's estimate of time is well-under or well-over actual time spent signals that the work required for an individual task—or for a group of tasks—is not well-understood.
For these occurrences, it's important for the team and/or its project leader to intervene on that type of item, in order to discover any potential underlying issue. This also helps future estimates be more accurate for project planning.
Note: While you can assign an owner at a parent-level item, only the time for the individual child tasks they are assigned to follow the parent-level owner.
The assignee here is primarily used for understanding accountability for the parent level, as is often done with organizations using RACI (responsibility) charts. If the owner of the parent has any work to do themselves on a parent item, that work should be tracked as child tasks.
In this example below, this parent item is assigned to someone responsible for the overall work. The owners of the tasks of the child items are listed below (2). The time for the child items belongs to assignees of those items.

Time and Subtasks
DevStrides can track estimates and time on sub-tasks as well.
How to do it:
On the subtasks tab (1), use the configure icon (2) to enable the time estimation and/or tracking (3).
Subtasks' time and estimation updates (4) for this item will now roll up to the item totals(5).

What this gives you
Tracking time for subtasks is useful when the individual steps are substantial enough to want to track time on them. An example might be that a user story item might take several steps to complete. Tracking those subtasks and the time each take helps for both estimating the task and tracking its overall time.
A Special Use Case: Time Tracking for Billing
As we mentioned above, you can choose to derive time spent information from DevStride for the purpose of certain basic billing needs.
Organizations that bill by time entries, such as attorney, can use DevStride subtasks to accomplish this goal.
You can build subtasks for each time entry and track billable time. In this way, some DevStride users take advantage of this method for rudimentary time tracking for engagements and client work.
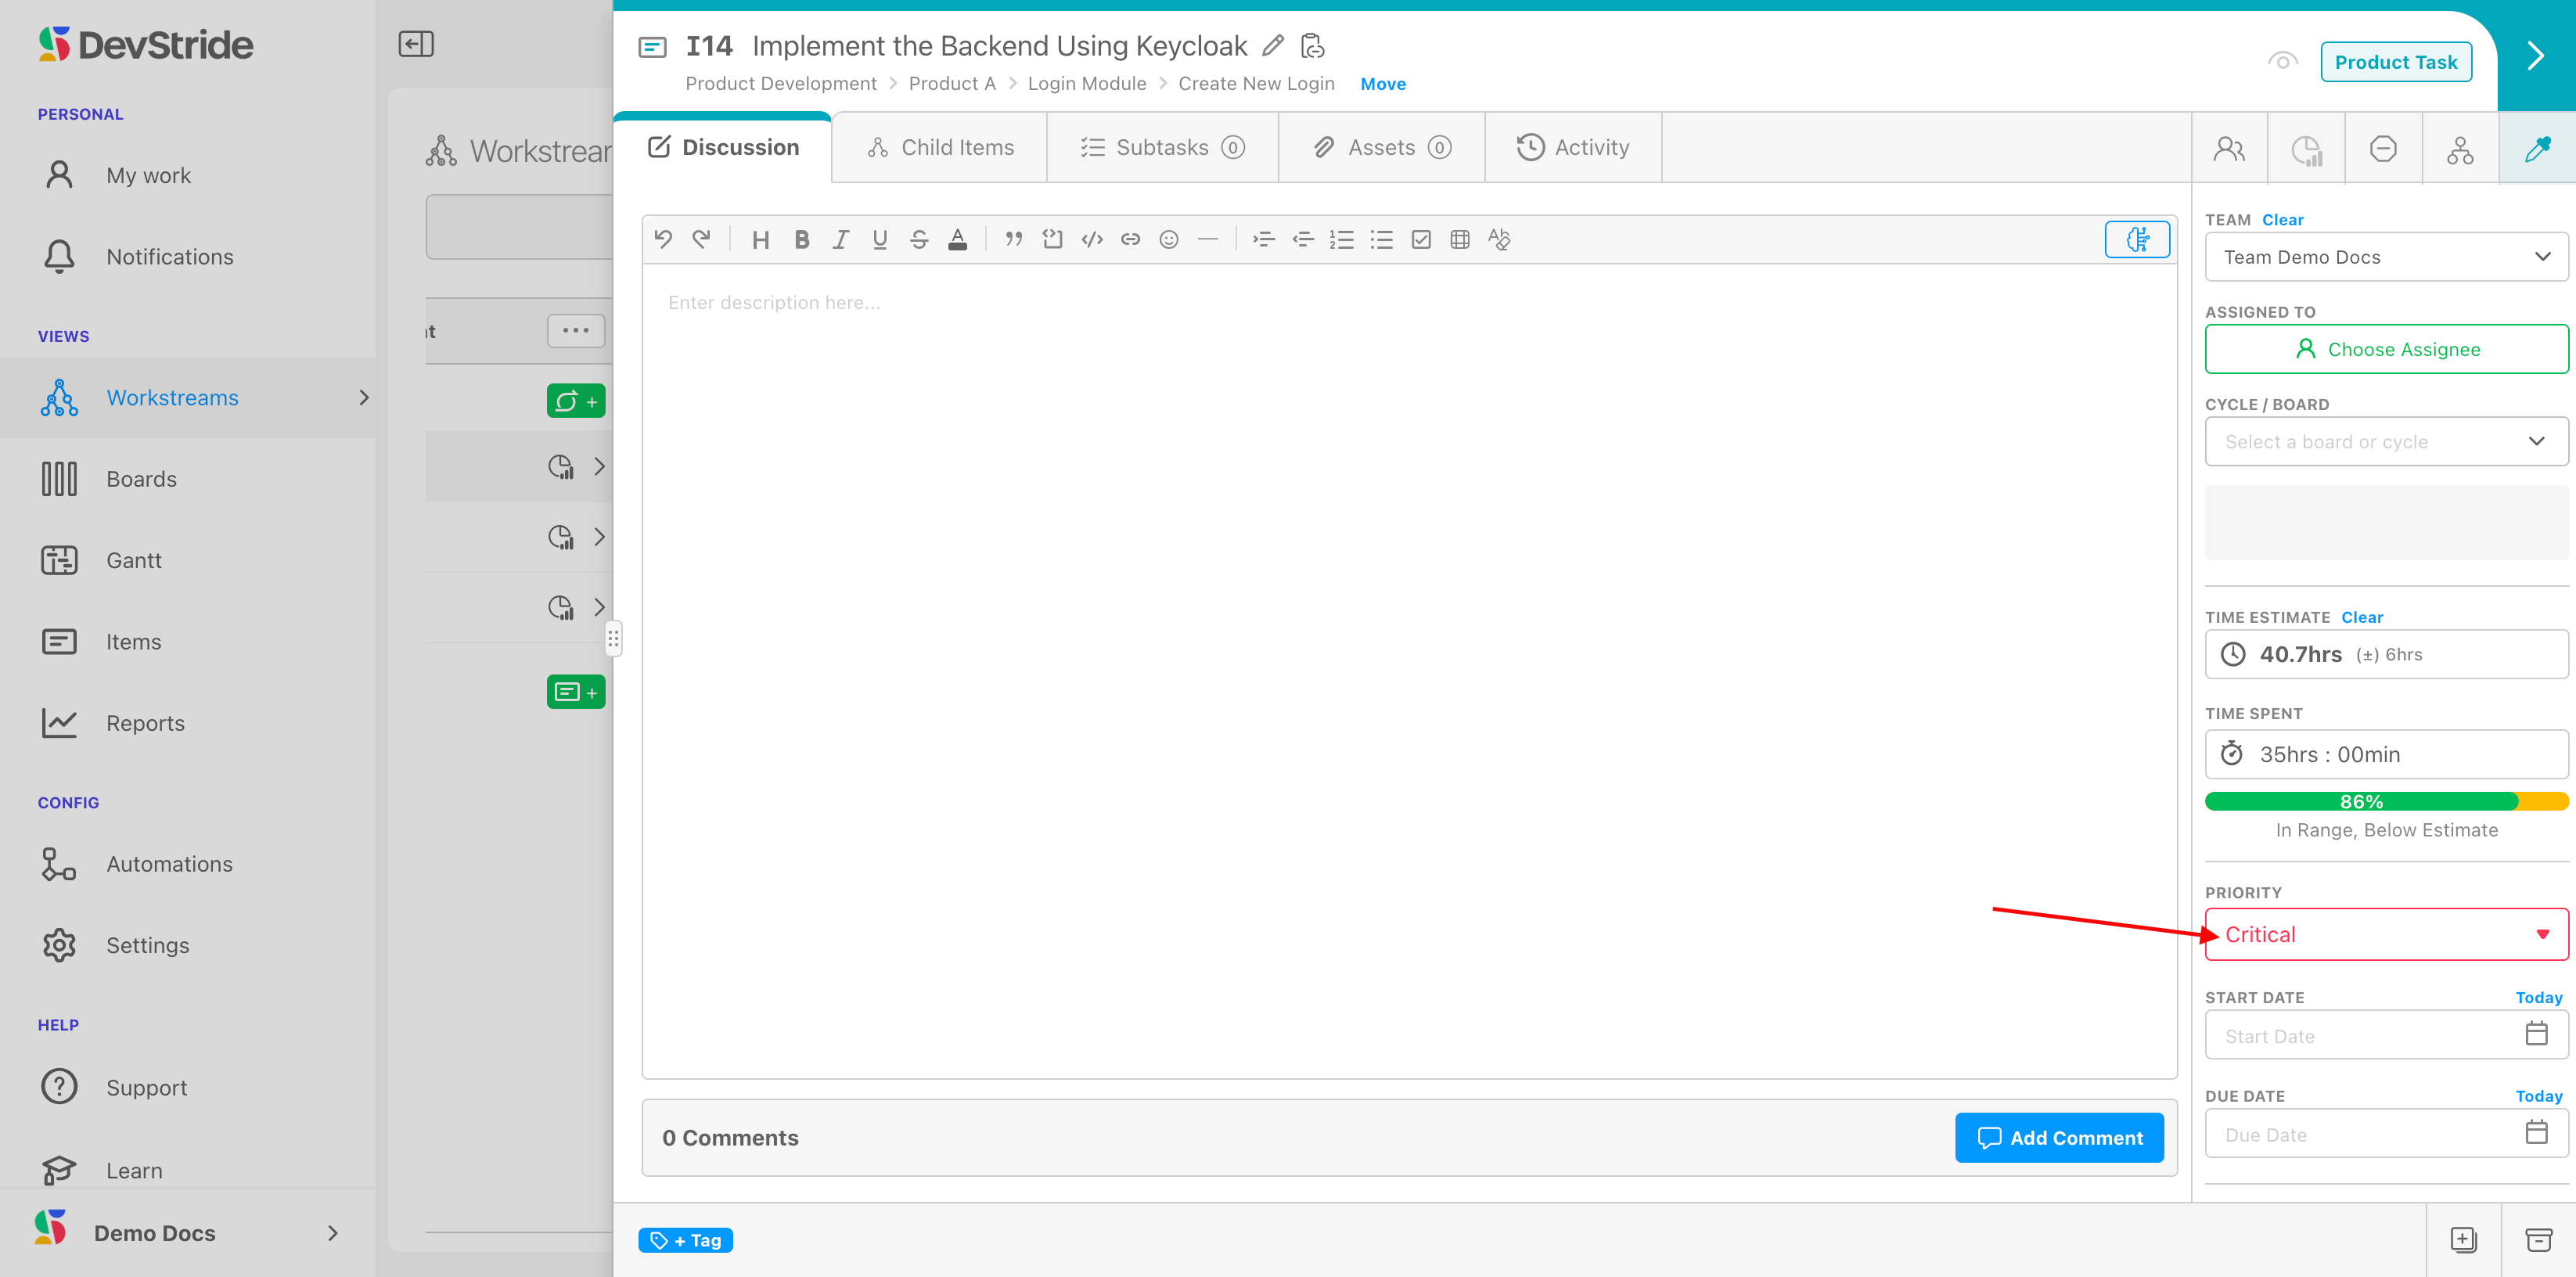
Priority
Next on the item workspace is the Priority setting (1).
Priority settings are customizable. You can set up the priority options for your organizations in Settings (1).
As with all Settings collections, you can use the default levels or click on the New icon to add to the list of available options(2). The levels in this list reflect the pool of all levels available to any collection in the entire organization.
You can then drag any options in this list to an existing collection, or create a new Collection (3).
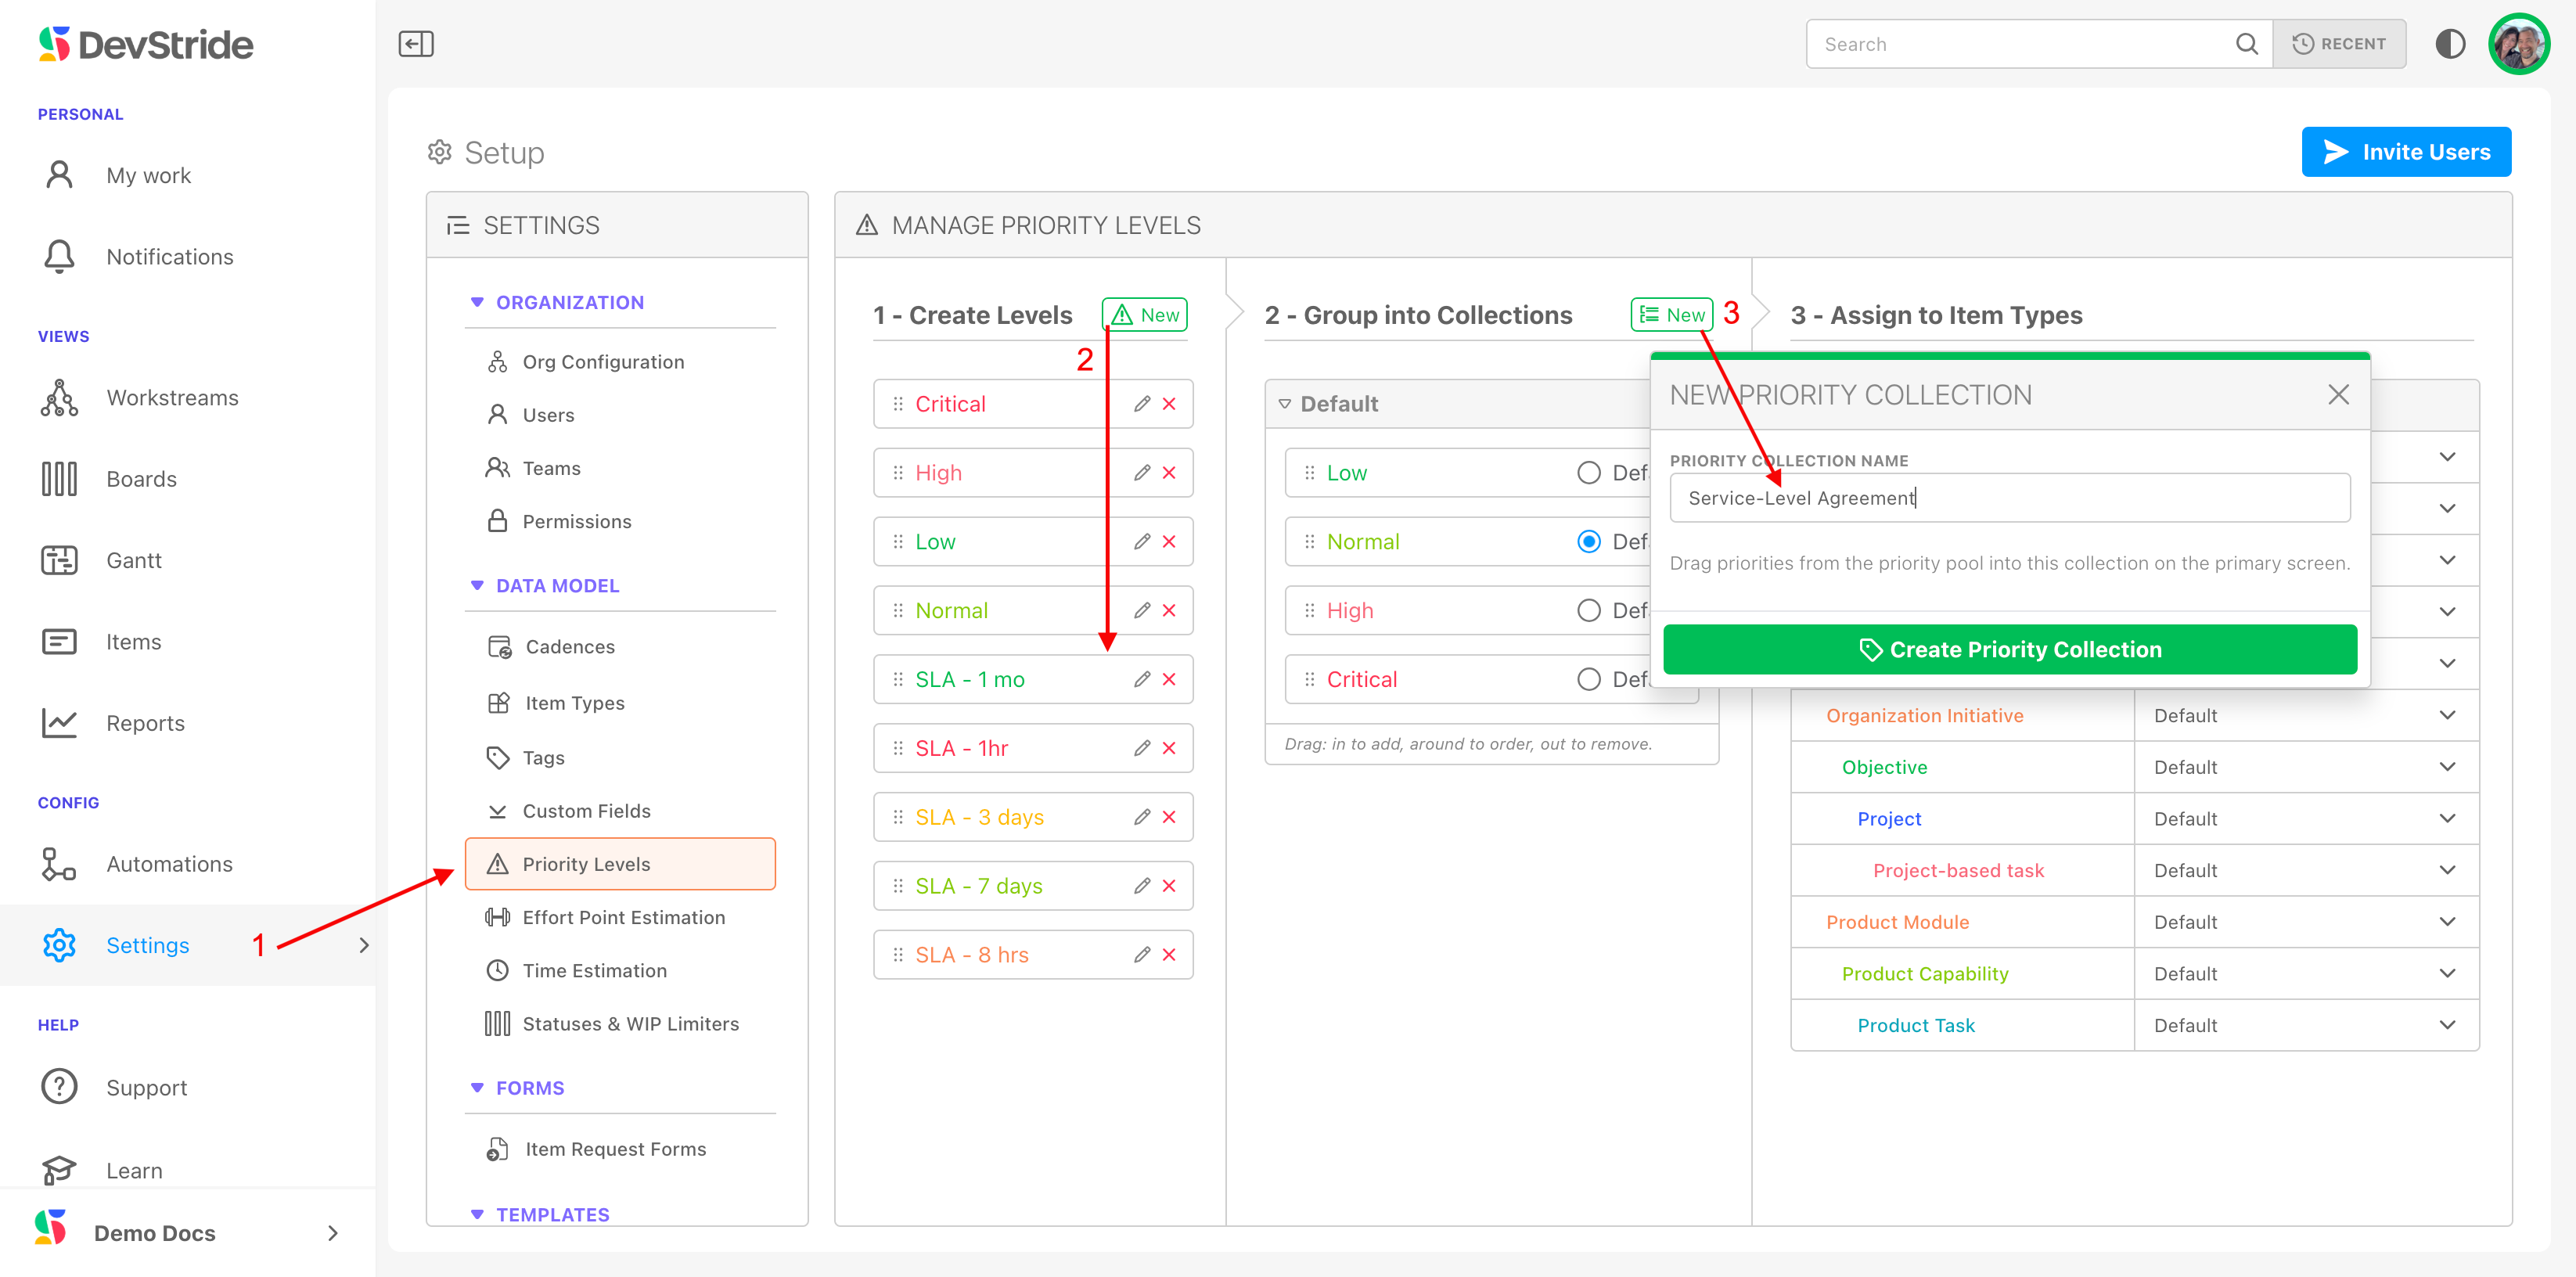
Then, simply drag the levels you would like included in the new collection from the Levels pane into the Collection (4).

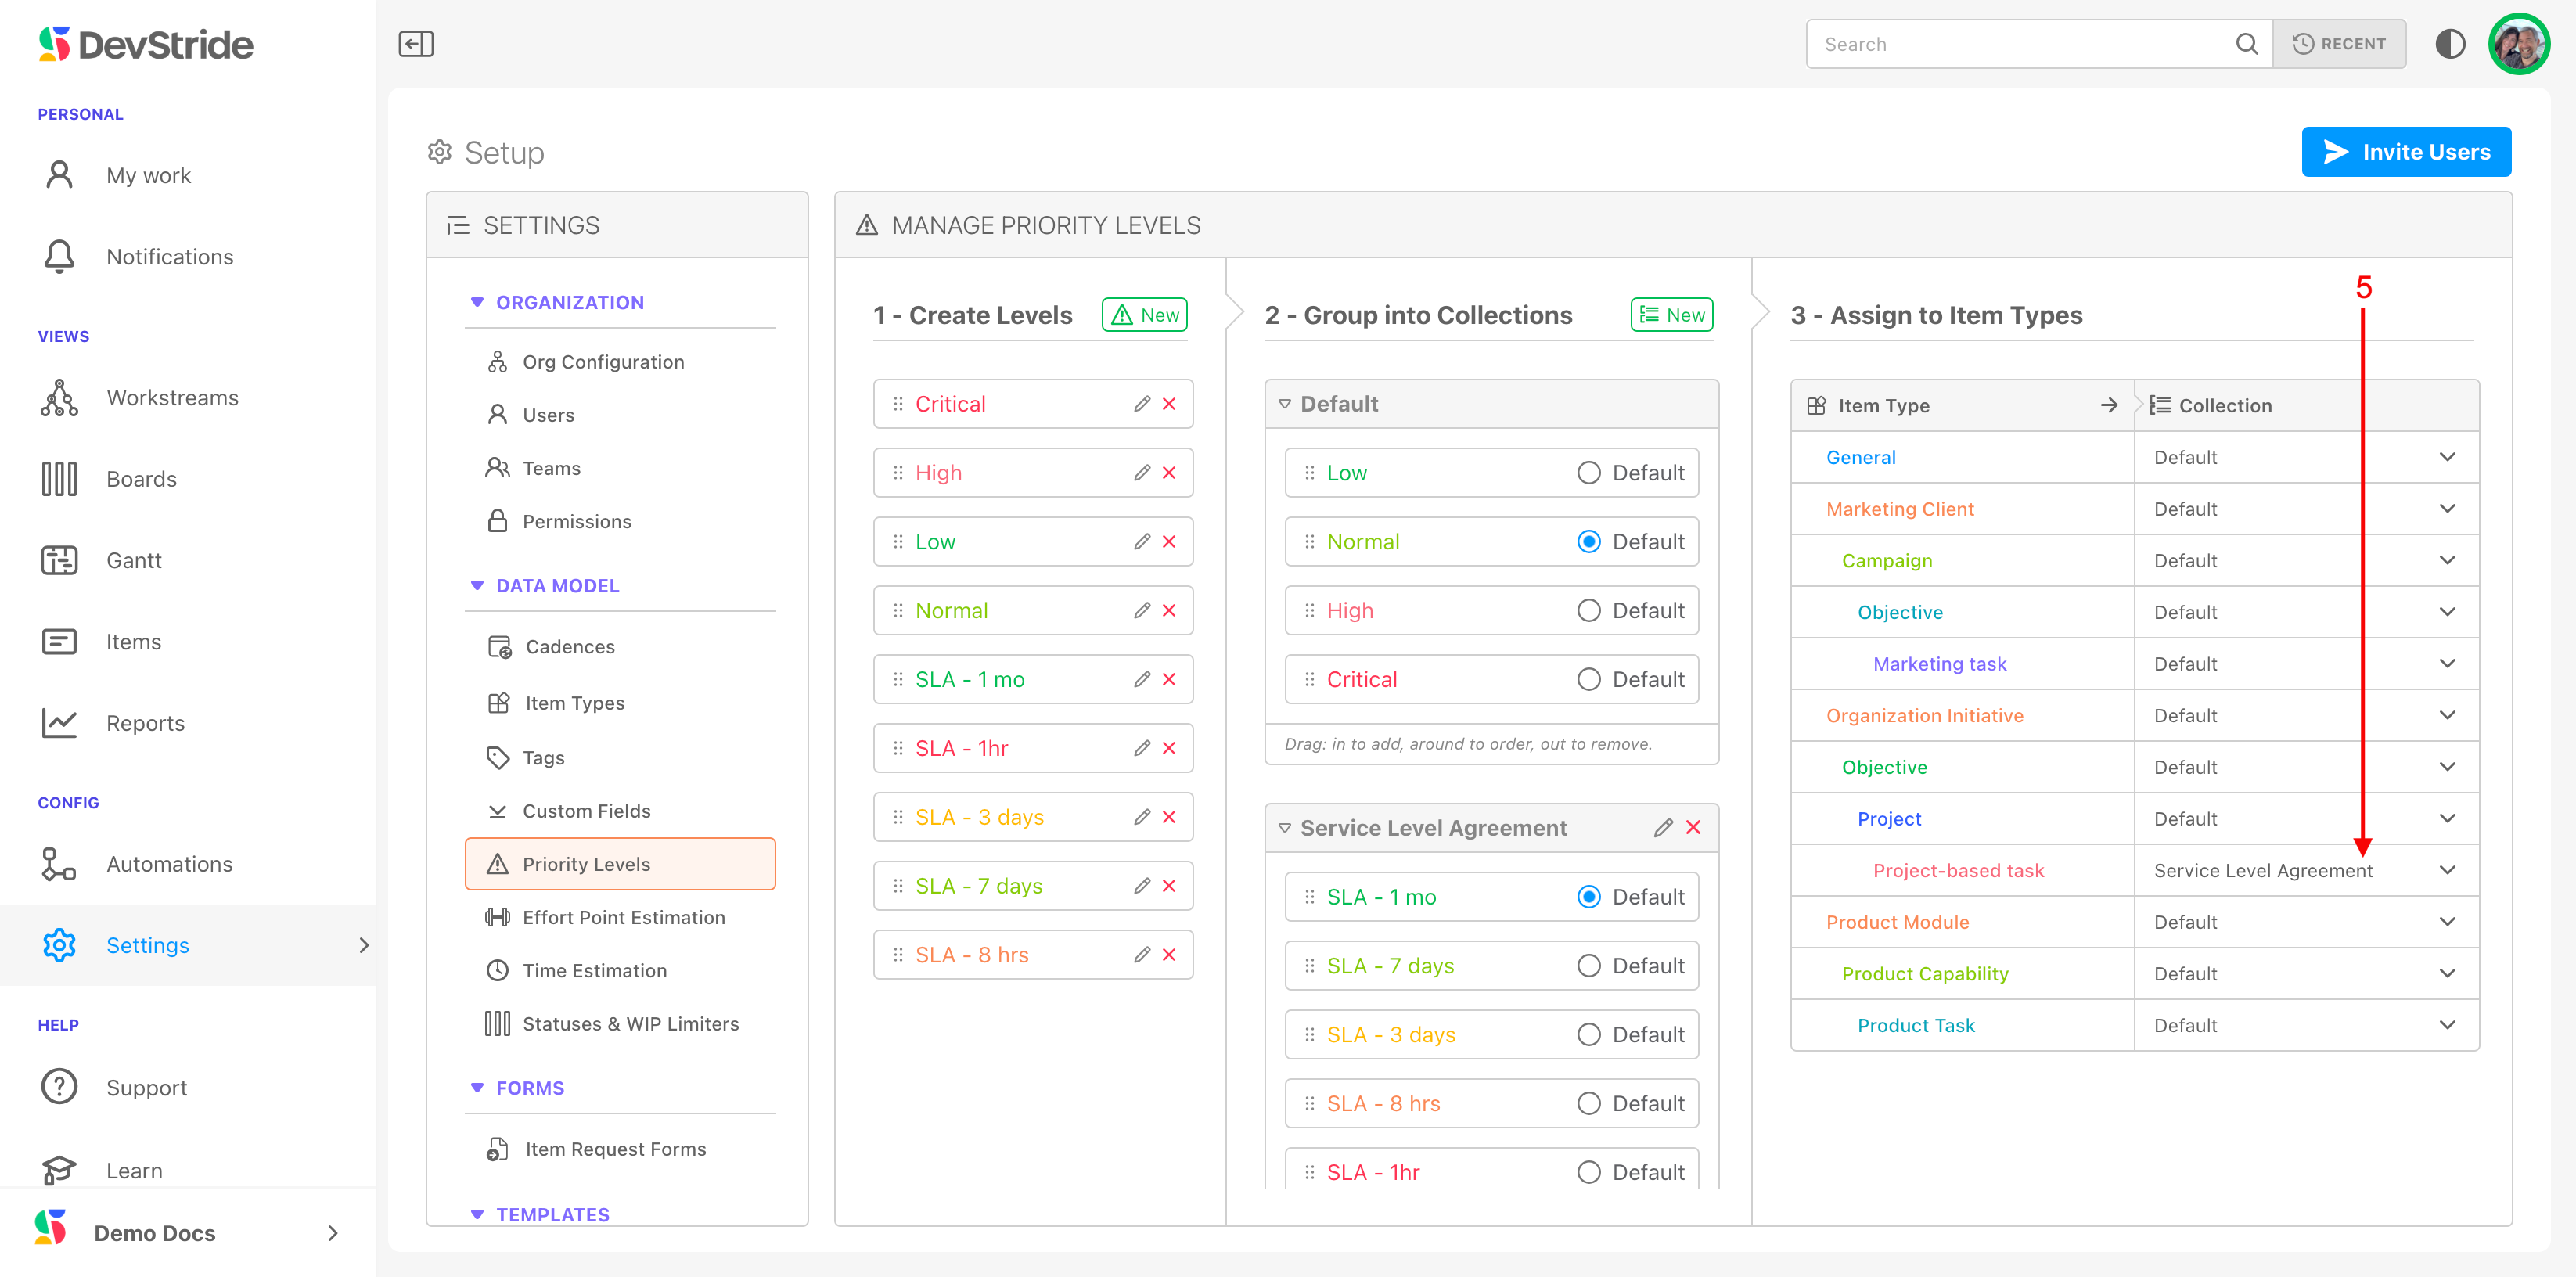
After you have included all the levels you want to include in your new collection, you can add that collection to the desired Item type (5). Now the levels from the collection will be displayed for that item type throughout your DevStride organization.
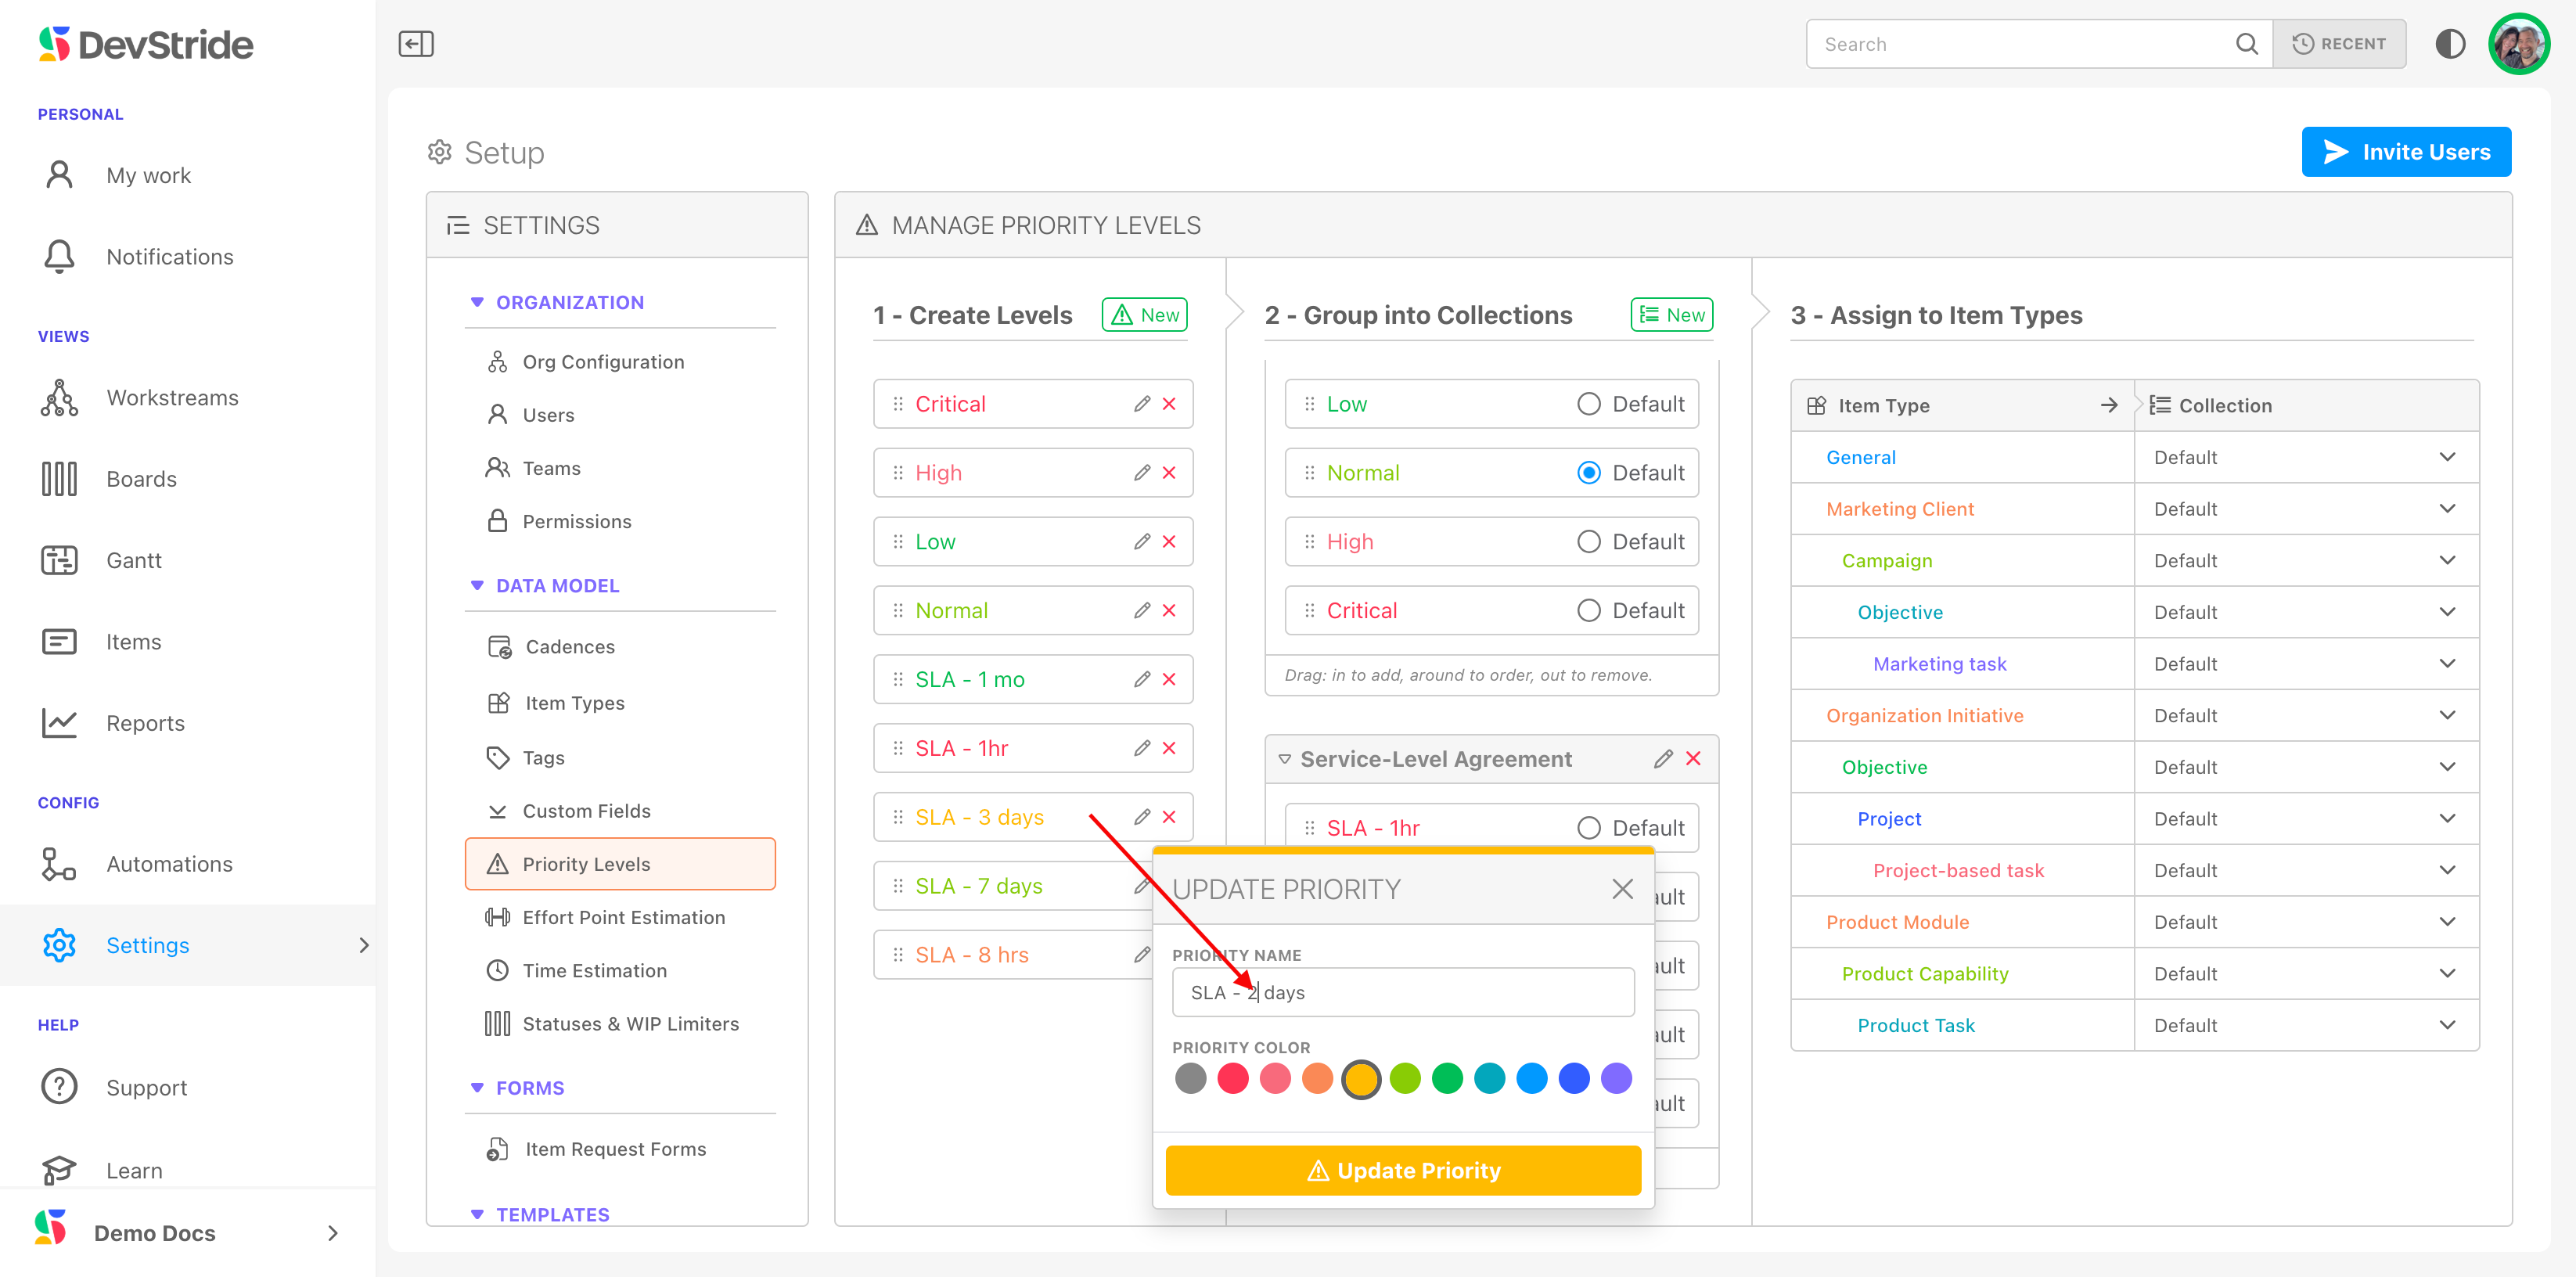
If you would like to make any edits to individual items on your priority lists, click on the pencil icon and make your changes. These updates will be applied to all items that use this level system-wide.
Priority levels are used throughout the system, on the item workspace of the item itself, and as a field in multiple views and analytics throughout DevStride.
What this gives you
Because different kinds of projects have different requirements for priority tracking, DevStride gives you the flexibility you need to use the kind of priorities that work for each item type in your item type hierarchy.
In our example, we have projects that are based on service-level agreements, so we created priority levels that help track priorities for established response times. We used a red "SLA - 1 hour" level to show that the priority for fixing this issue is 1 hour. The red color and the 1-hour priority shows a the critical nature of the issue.
Note: As with many other settings in DevStride, priority levels can be used as a trigger in Automations, which will be covered later. A change in a priority can trigger notifications and other actions in the system, which is another method to raise visibility and prevent potential setbacks.
Start Dates and Due Dates
Start dates and due dates can be used in either a manual or automated fashion within DevStride.
You can choose to set start dates and end dates manually by setting the dates up from any of the multiple item views that DevStride offers (including boards, gantt charts, and reports, which will be covered later).
In the item's workspace, you can simply type in or use the calendar icon to select or enter start and end dates (1). You can also click "today" (2) to quickly insert today's date. Click "clear" (2) to clear out the date if you decide you do not want a date to appear right now (3).

Start and end dates can also be used as triggers in Automations.
If you use cyclical planning, as with sprints, you can sync your start and end dates with your cycles. DevStride's default is to sync start and end dates automatically with the cycle cadences you set up (1).

If any of your teams work in board cycles (sprints or other specified cadences) this sync setting becomes important. When you set up your boards and assign them to a cycle, the tasks associated with that board adopt the start and end date board's cycle as their start and due date.
Note: You can set dates to end before the board's cycle end date, so that you can plan for that item to end earlier than the cycle itself. This can happen when you want something completed in the first half of a cycle, for example, and you want to make another item dependent on it finishing by a certain date.
If you reset the item to another board, however, that item will adopt the new board's date. If you want a different date from the new board's, you will have to re-set the date.
We will cover the default setting more as well as other options when we discuss Boards.
Progress Tracking
DevStride's progress tracking shows the "percentage complete" of the item across the system. If the item has children, it reflects the percentage complete based on its children.
DevStride provides the option of manually indicating the percentage of completeness as well. This might be important, for example, for an organization tracking an element of the project work that might be outside of their company, such as by a vendor, or outside their direct control. For these situations, you can manually track percentage complete by turning on the option and changing the percentage number (1).

Next: Setting Up Custom Fields
Was this article helpful?