Admin Onboarding - Item Workspace - Right Bar: Time Estimates
- 28 Feb 2025
- 5 Minutes to read
- Contributors

- Print
- DarkLight
Admin Onboarding - Item Workspace - Right Bar: Time Estimates
- Updated on 28 Feb 2025
- 5 Minutes to read
- Contributors
- Print
- DarkLight
Article summary
Did you find this summary helpful?
Thank you for your feedback!
Item Workspace Tour: Right Bar Features continued - Time Estimates
A more common method of managing project estimation is by time.
About Time Estimation
Time esimtation is probably the most useful method of estimating time, especially when you know who will be doing the work.
DevStride uses a system called the PERT method for estimating time.
PERT forces an optimistic estimate, a likely estimate, and a pessimistic estimate, and then provides a weighted average estimate.
DevStride provides a default list of pre-sets that you can customize to use for your most typical estimate of time in the form of T-shirt sizes (extra small, small, medium, large, etc.), where a size always equals the same amount of time.
For example, on your projects, your team might consider an extra small task one that typically takes 1 hour, a small task one that takes 4 hours, and a medium task one that takes 8 hours.
The degree of range within each estimate drives the resulting confidence level calculation.
How to Do It
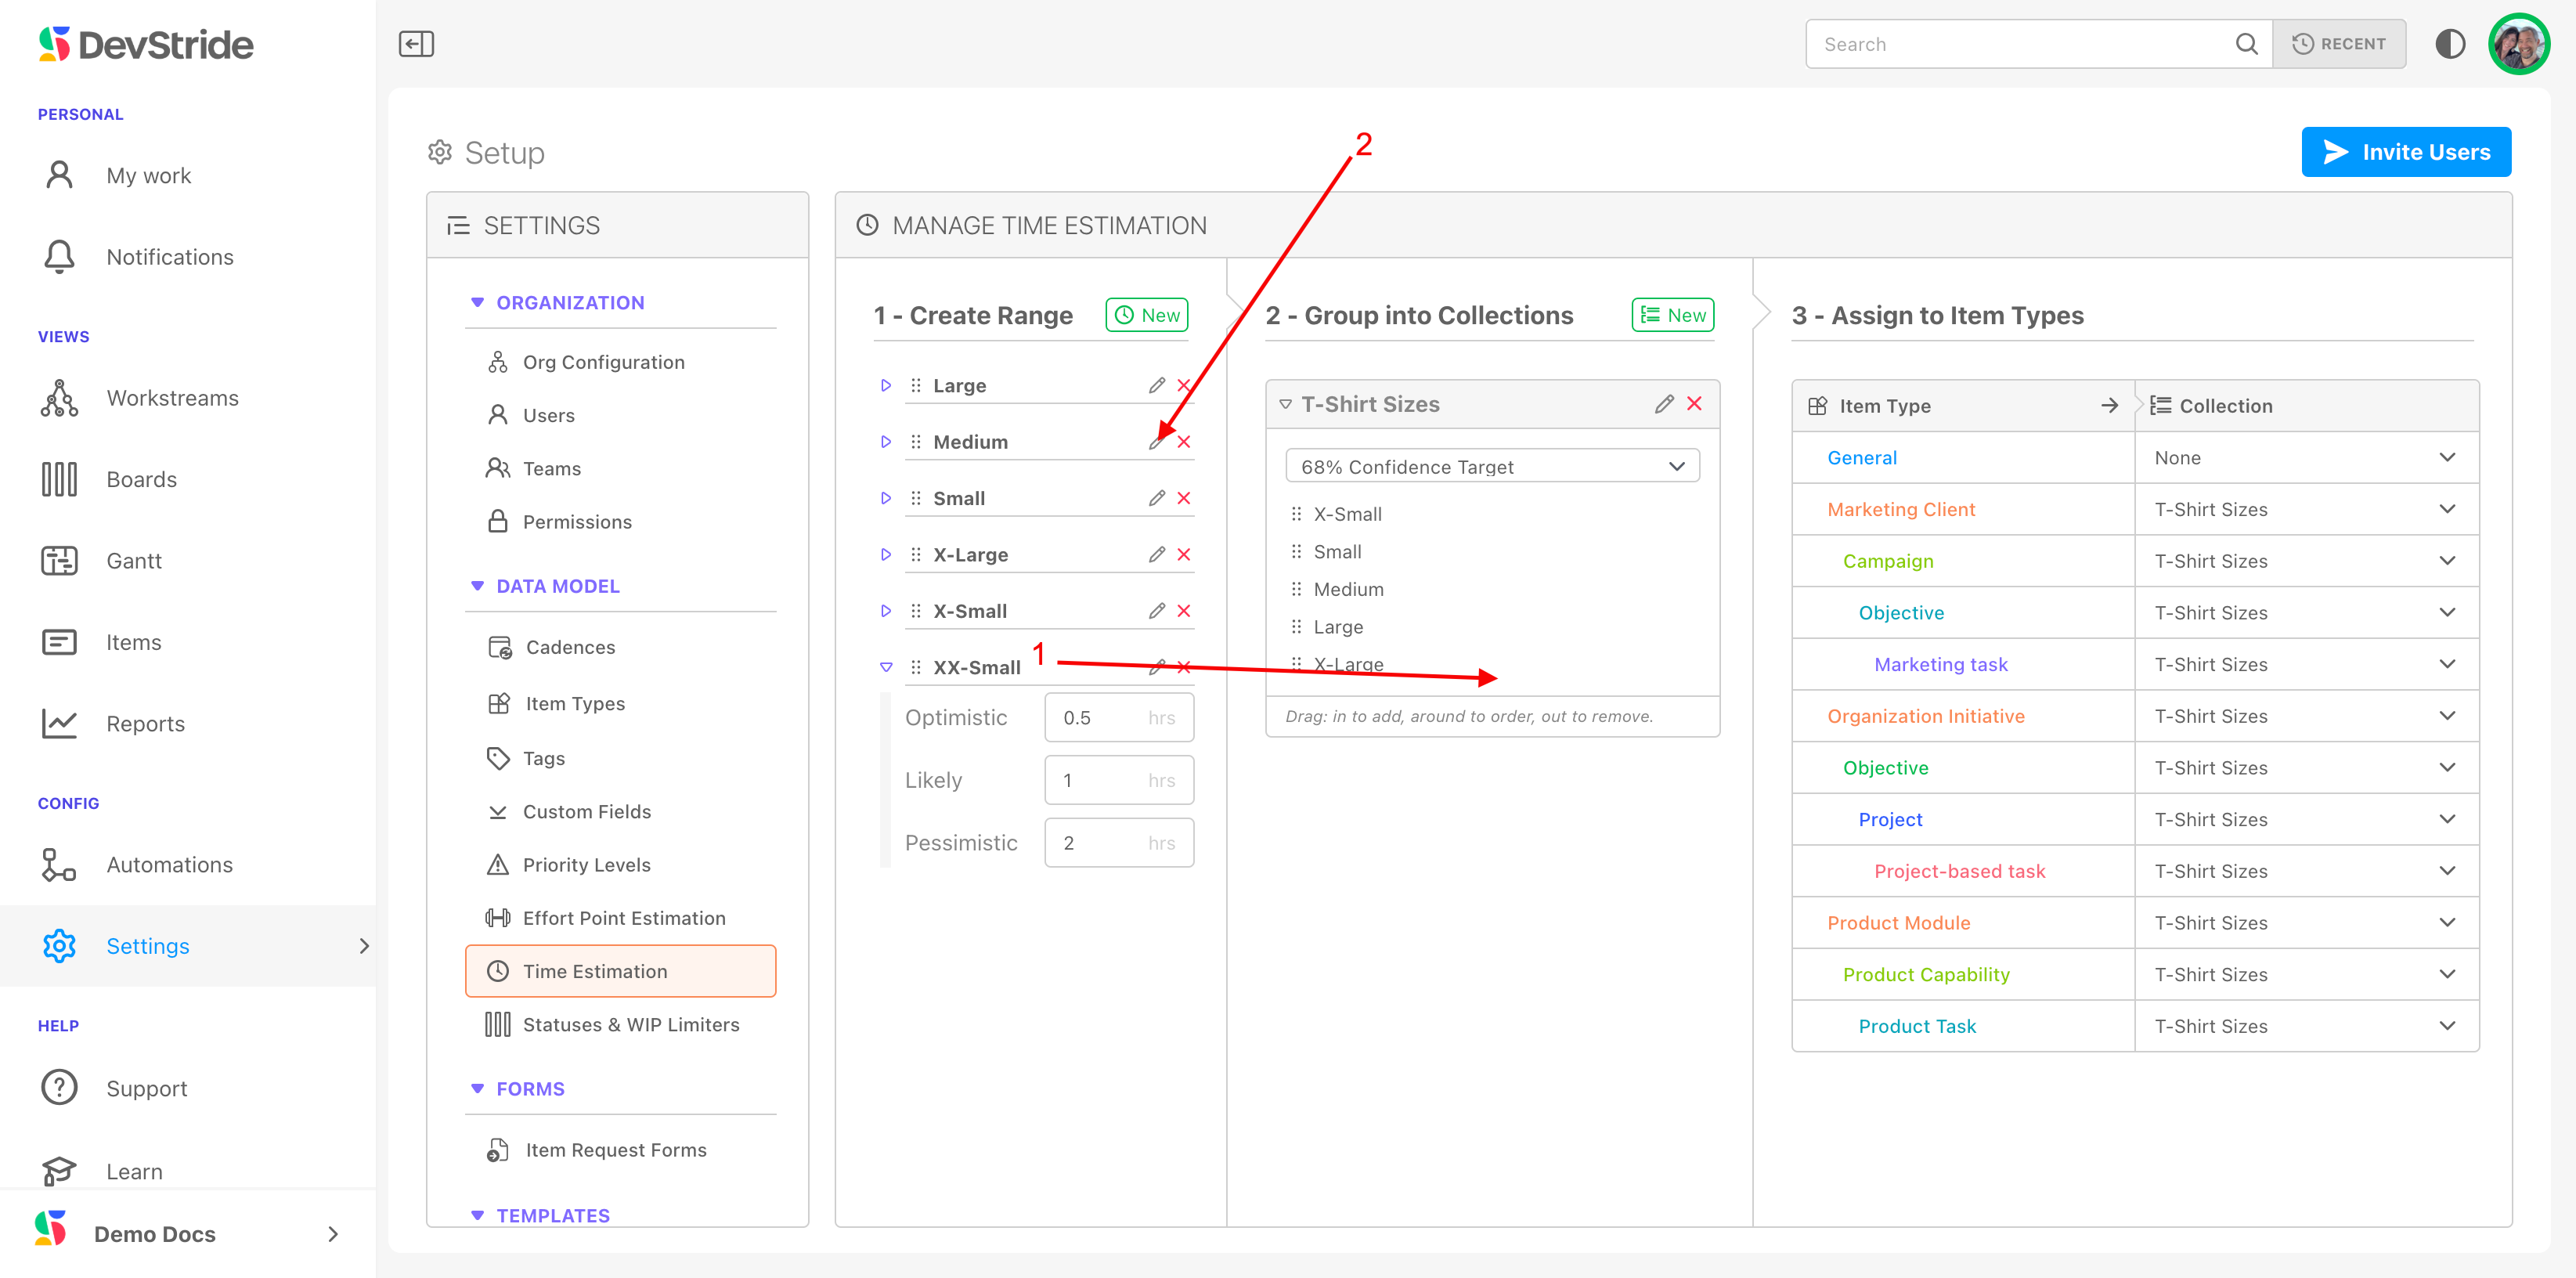
To add options to your Time Estimation settings, go to Settings > Time Estimation (1) and click on the New icon (2) next to Create Range.
Fill in the details of how you want your new option to appear (3). In this example, we are adding a new size, xxs, with time estimates that we consider appropriate for our team. Click Create Estimation Range.

We just added xxs as an option, but we need to identify the list (collection) we wish to use it in. We need to do this, because you can create multiple collections of time estimates.
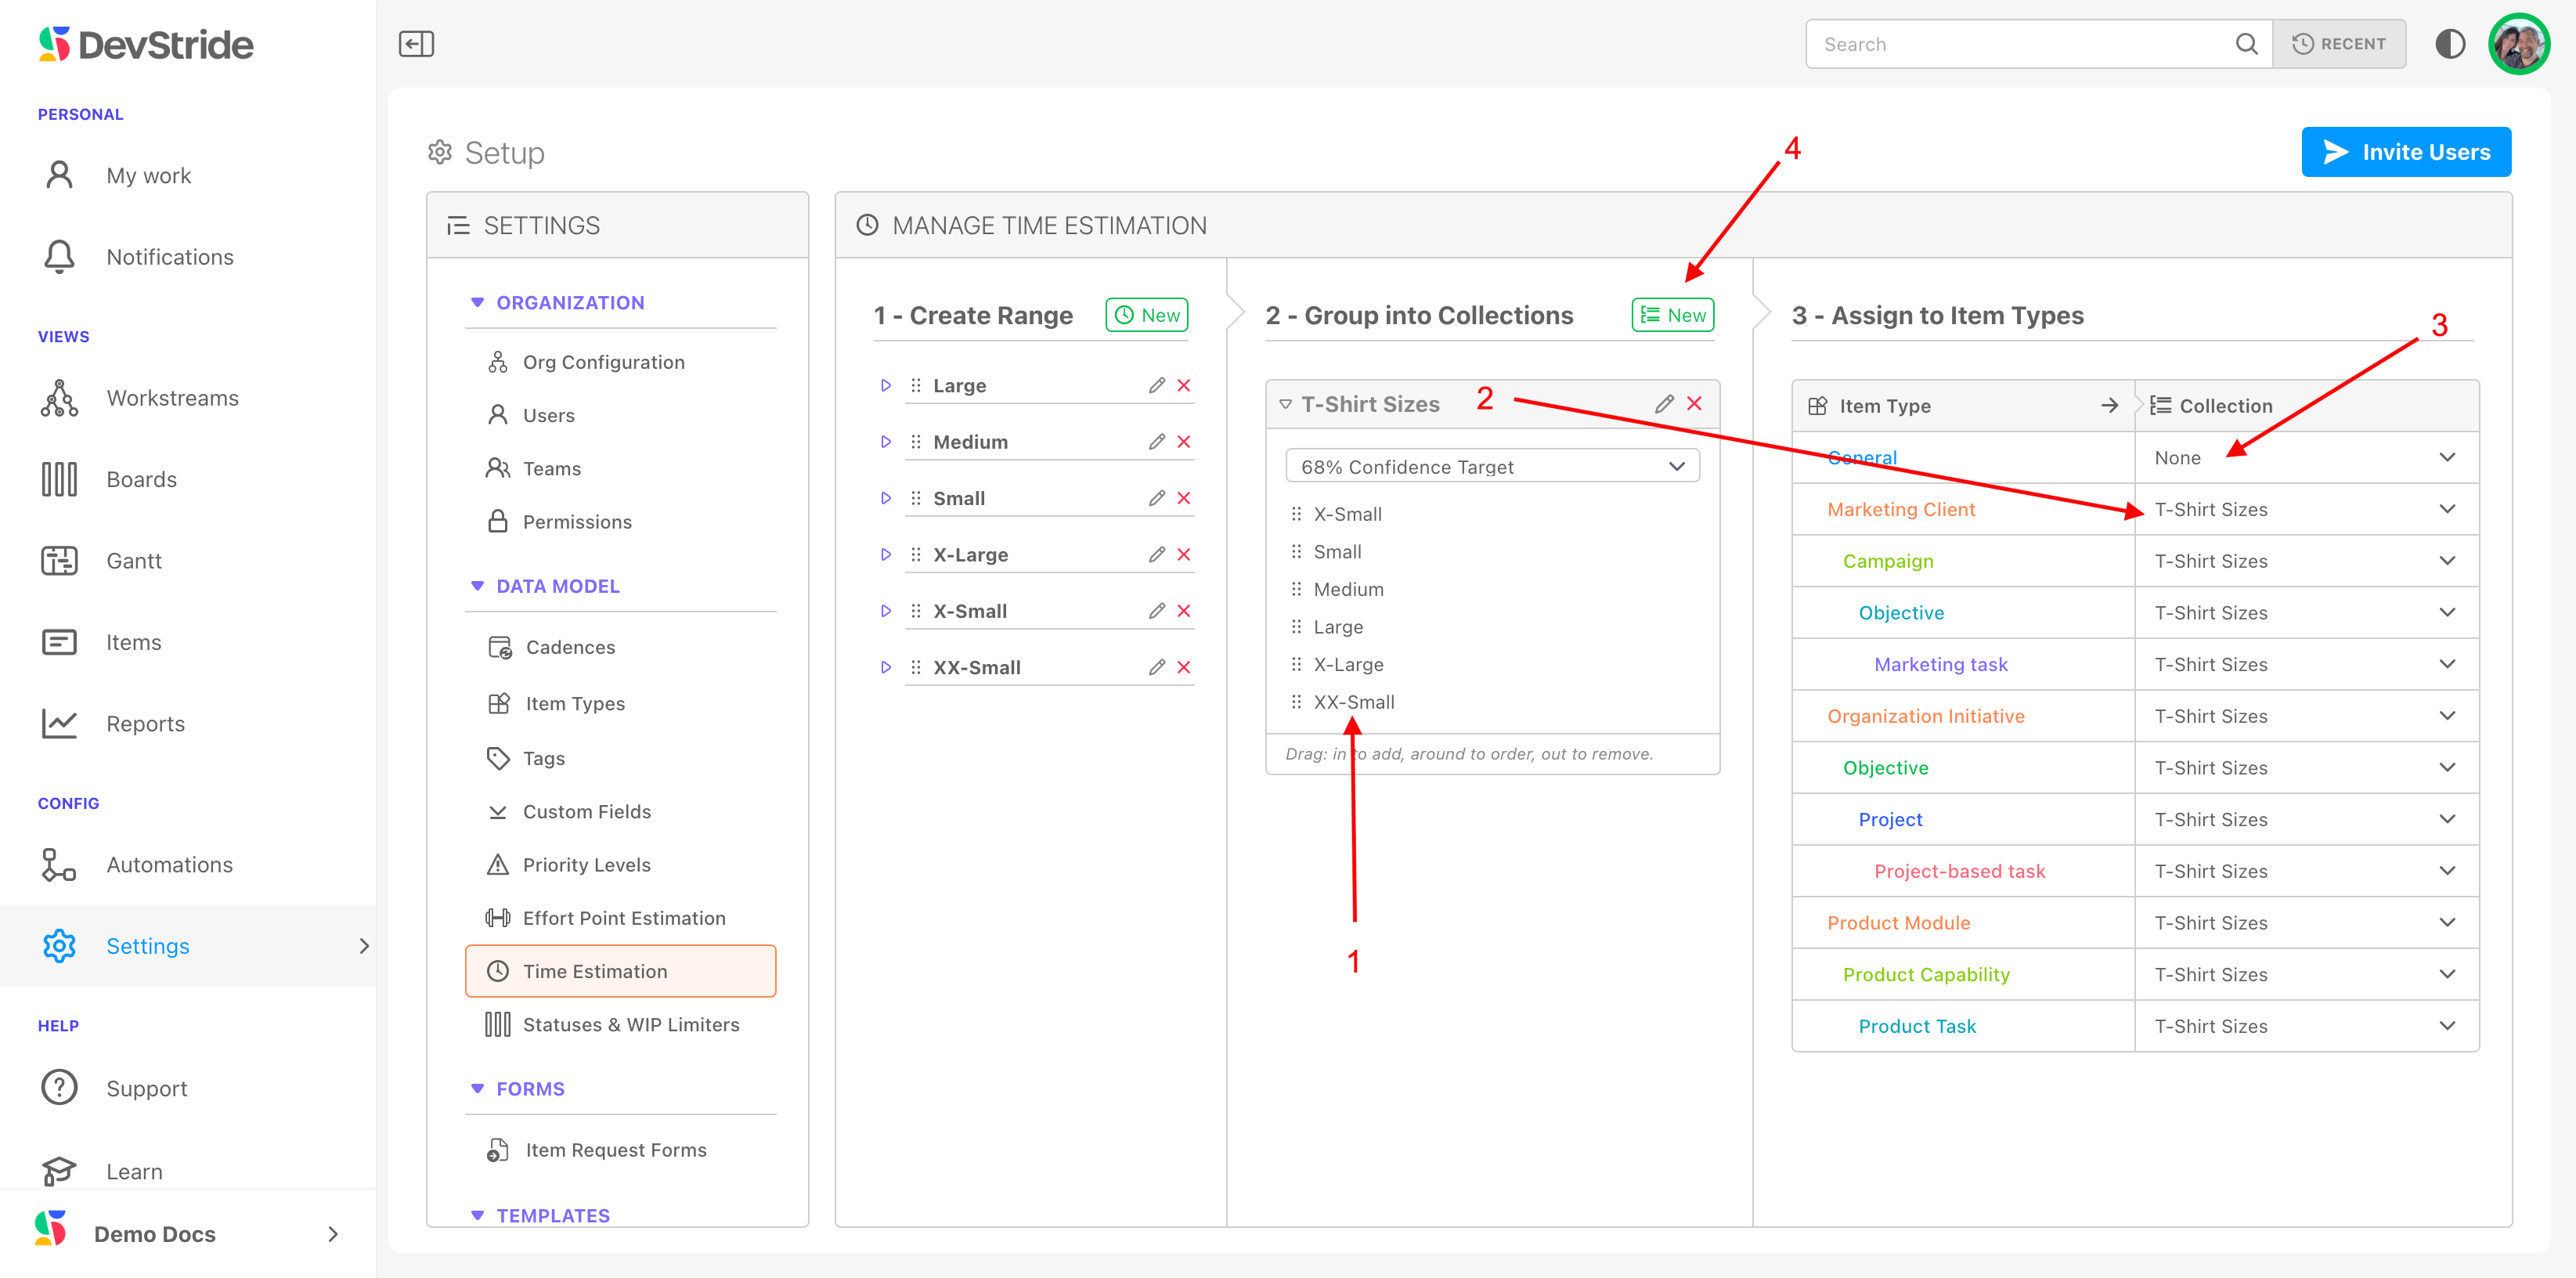
To add your new option to a collection, simply drag it from the list pane and drop it into a collection in the Group Into Collections pane (1). You can also rename any option by clicking on the pencil icon next to it (2). Any changes you changes you make here will flow through to the collections that use them.
Once you drag an option to the appropriate collection, it shows up in the associated drop-down lists in DevStride.
You can see the newly added xx-s range (1) that we created in our example. It is now one of the available options in the T-Shirt Size list (2). The T-Shirt size list can be associated with any of the item types (2). Item types can also be set to a different list or to none (3).
You can create new lists by clicking on the New icon (4) and defining your list. If you want different ranges, simply go back to the Create Range panel and click on New to create other ranges.
Note:
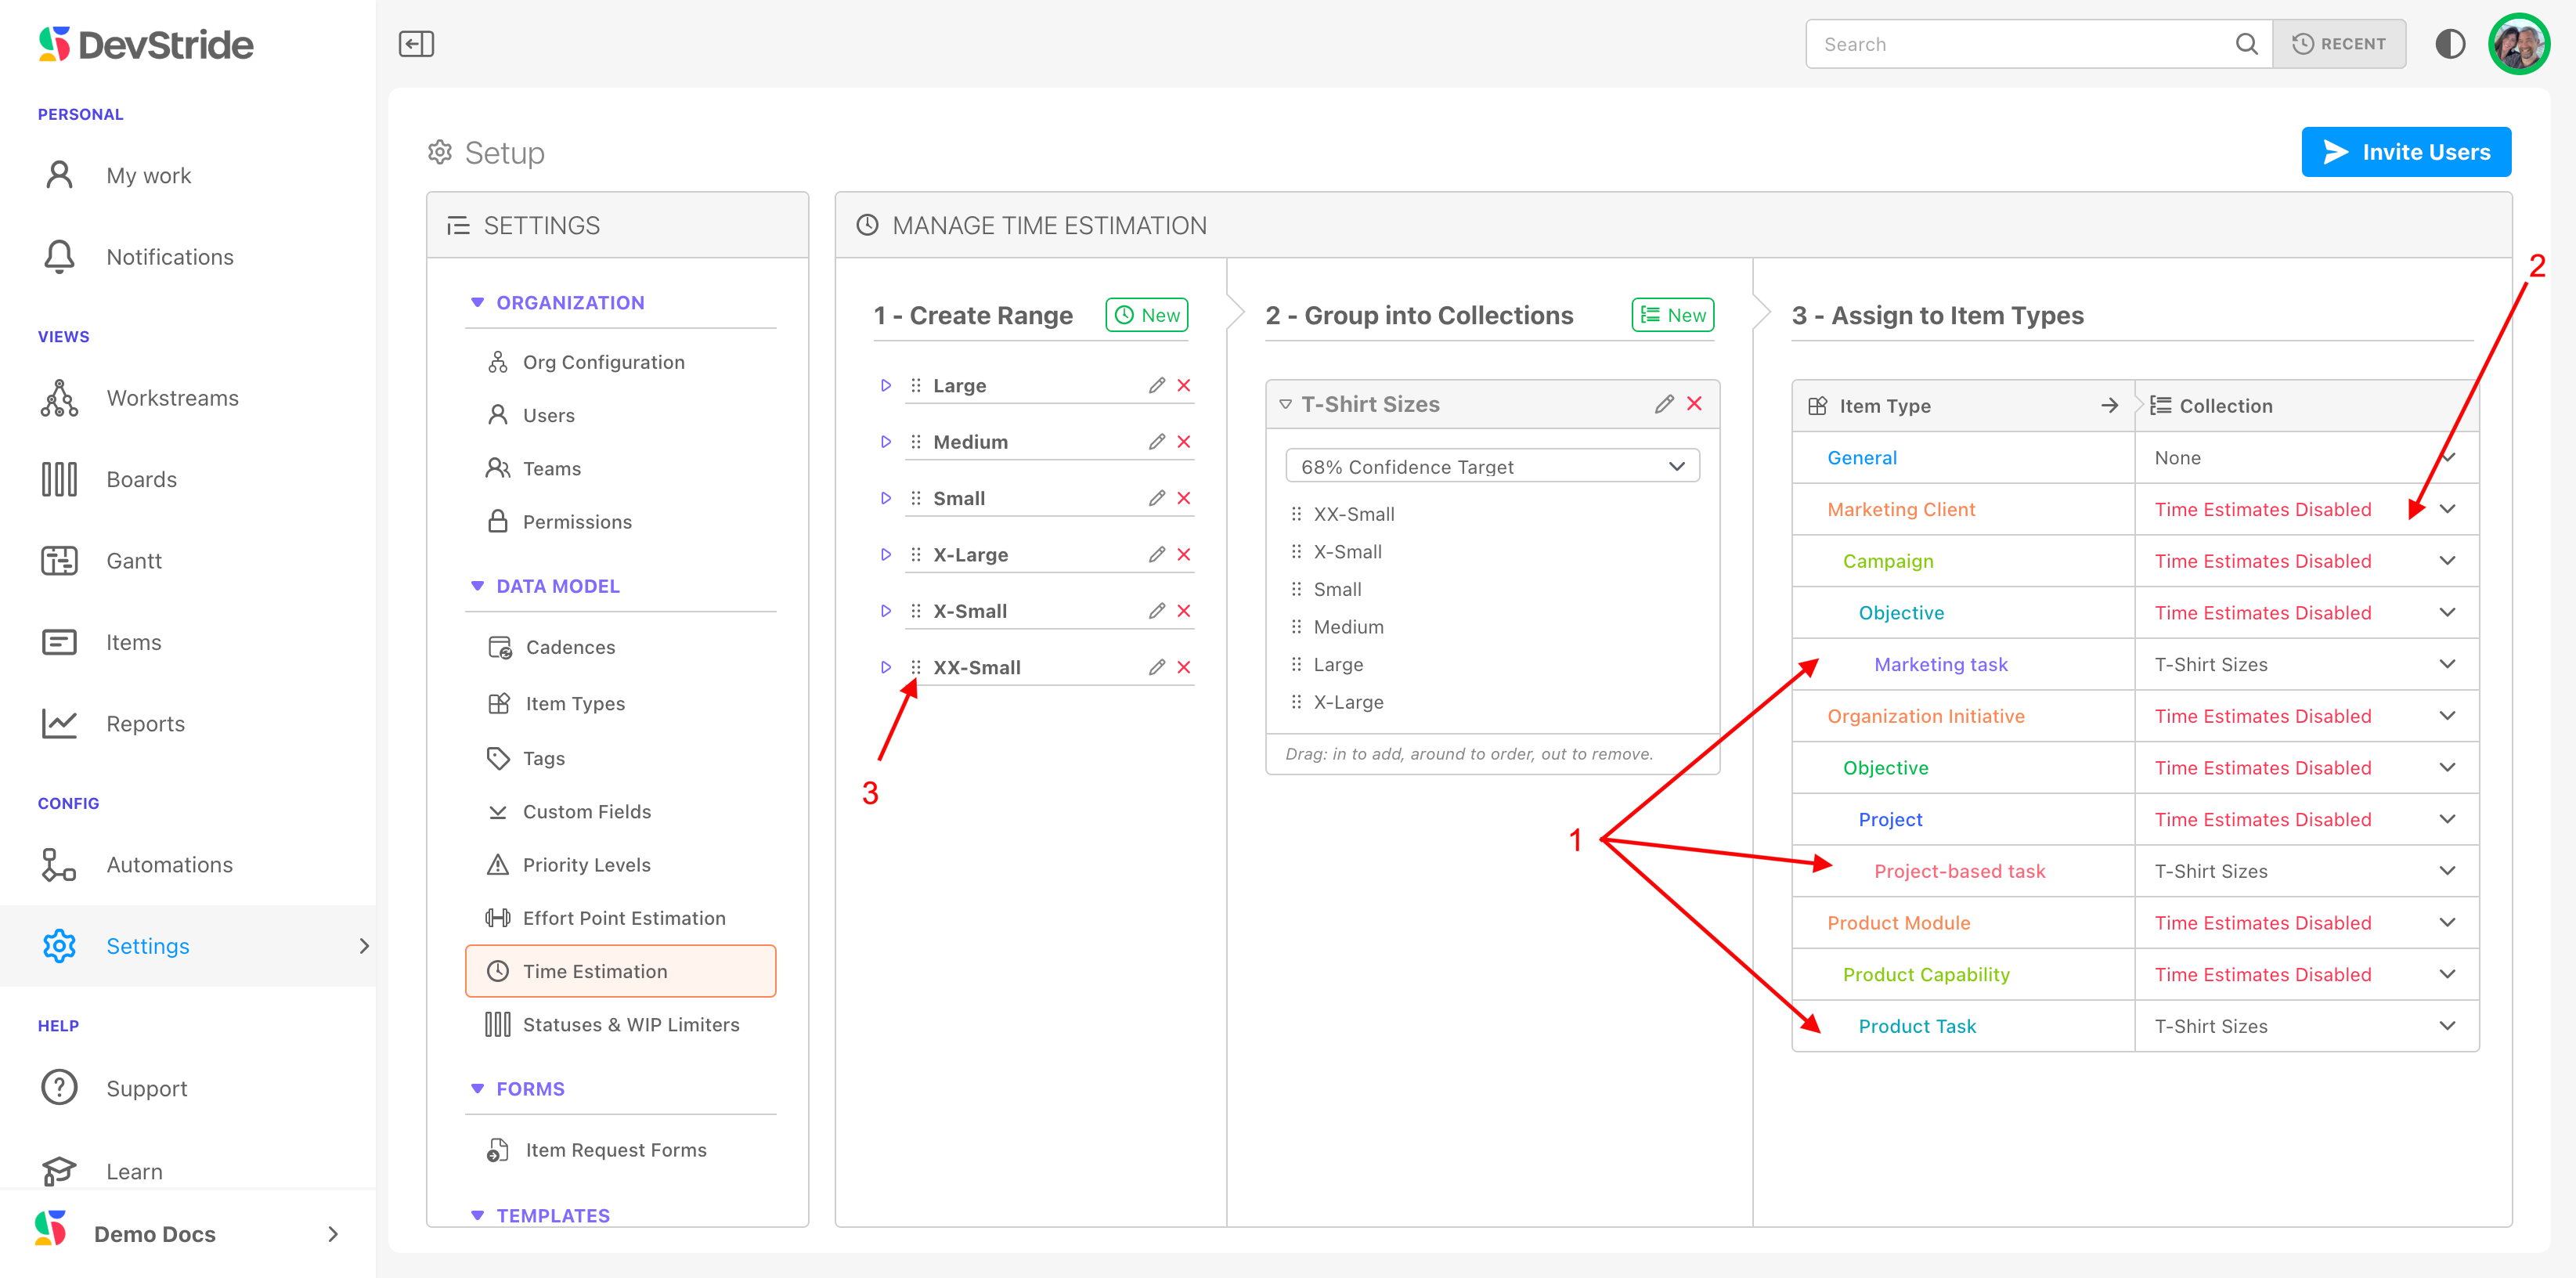
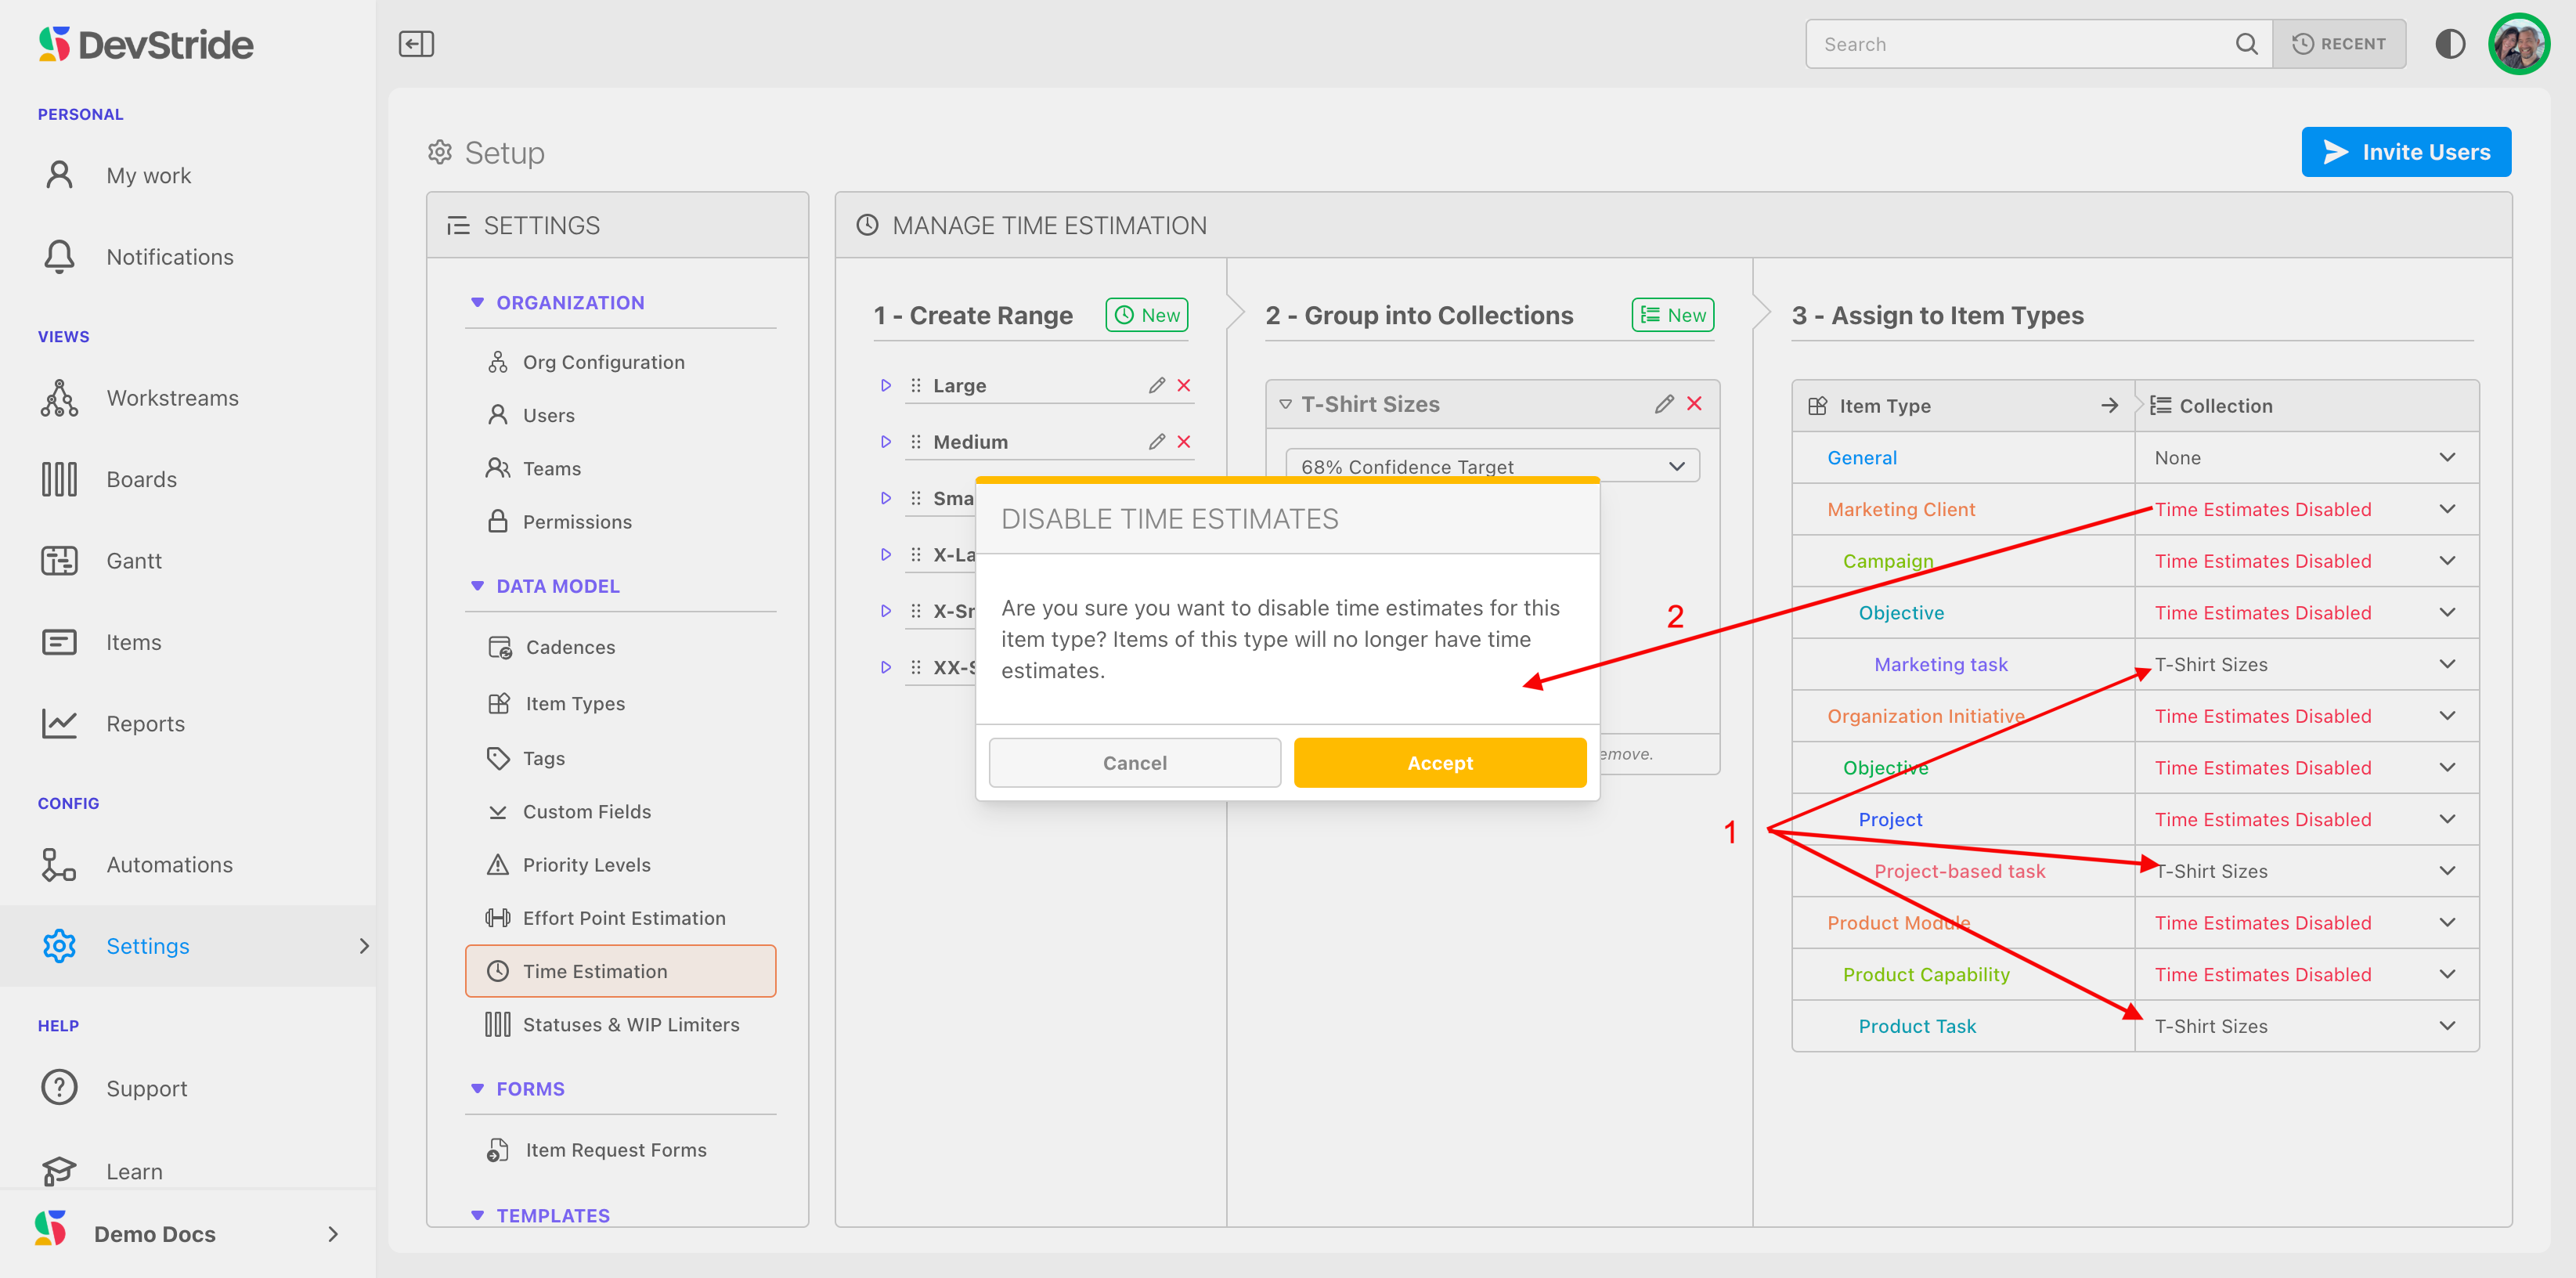
Teams often prefer that time estimates are only set up at the task level (1) as in our example below. You can disable any item types you do not wish to track time estimates on by clicking on "time estimates disabled" (2) in the drop down options for each relevant item type.
You can also re-arrange the order that your pre-set options show up in your drop-down list by using the grab bar and moving an item up or down on the list (3).
We can now take a look at the way our items are tracked in our example.
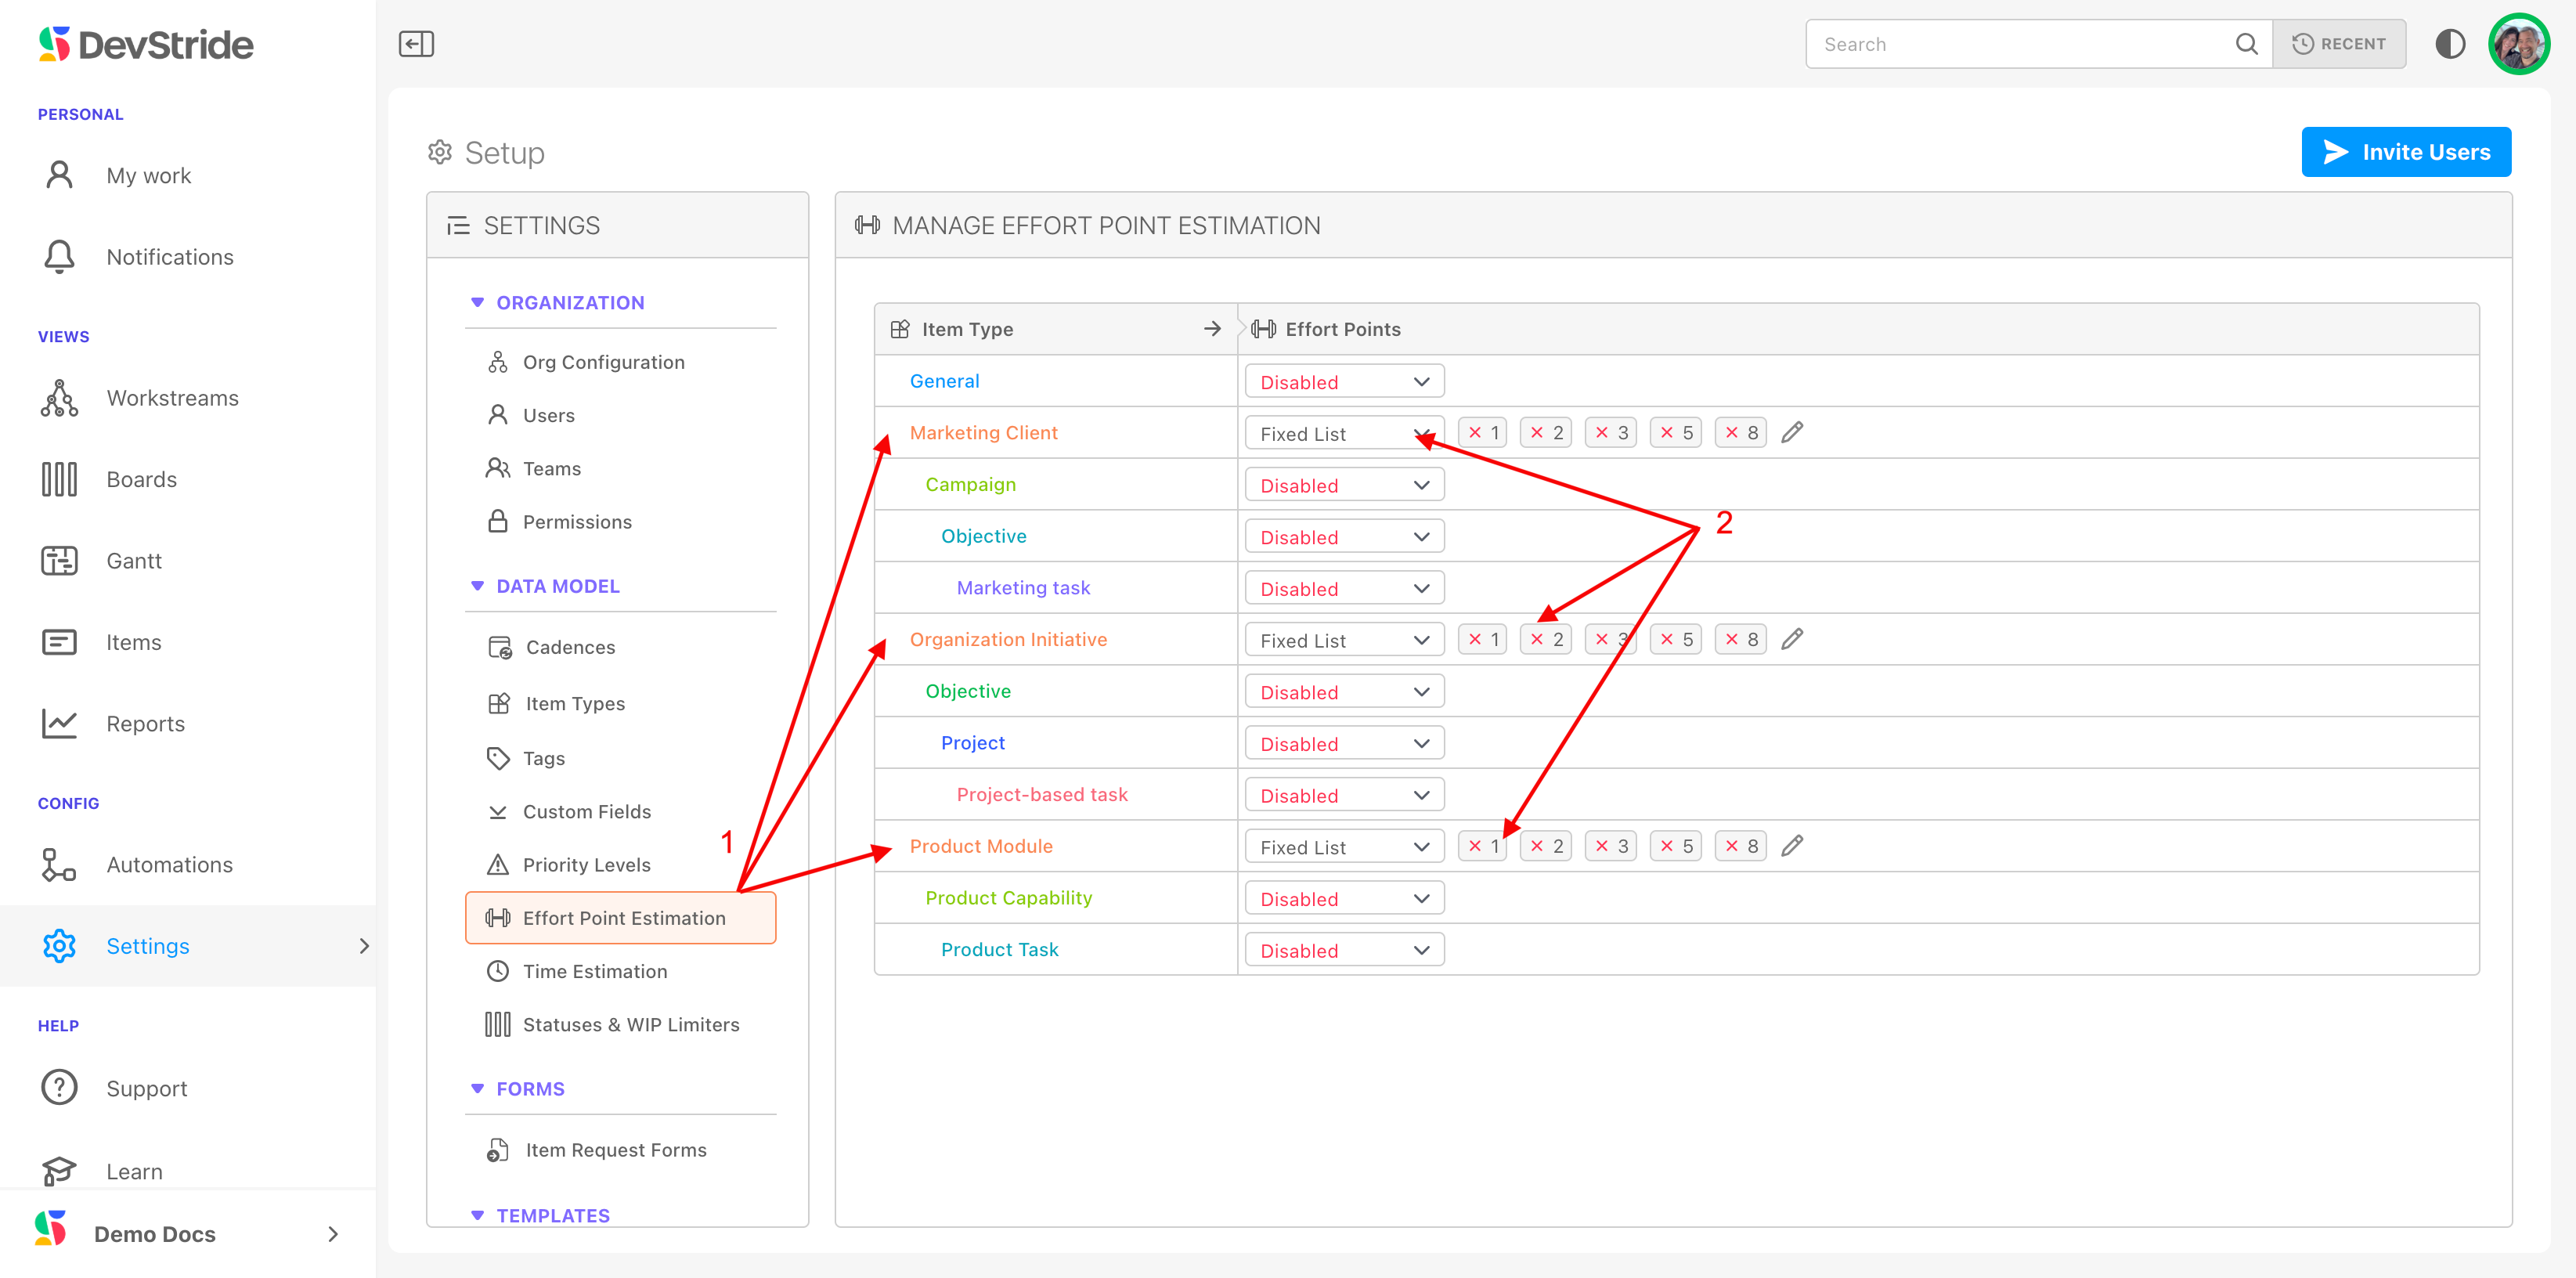
We are tracking estimated effort points in all Module item types in our hierarchy (1). You can see that we've used the fixed list of the Fibonacci-based scale that we created (2).
We are tracking all Task item types with time estimates using the t-shirt sizing list we set up (1). We disabled time estimation for all other item types (2).
When we open an item, the estimation method presets that are available to us (1) is now based on these settings.
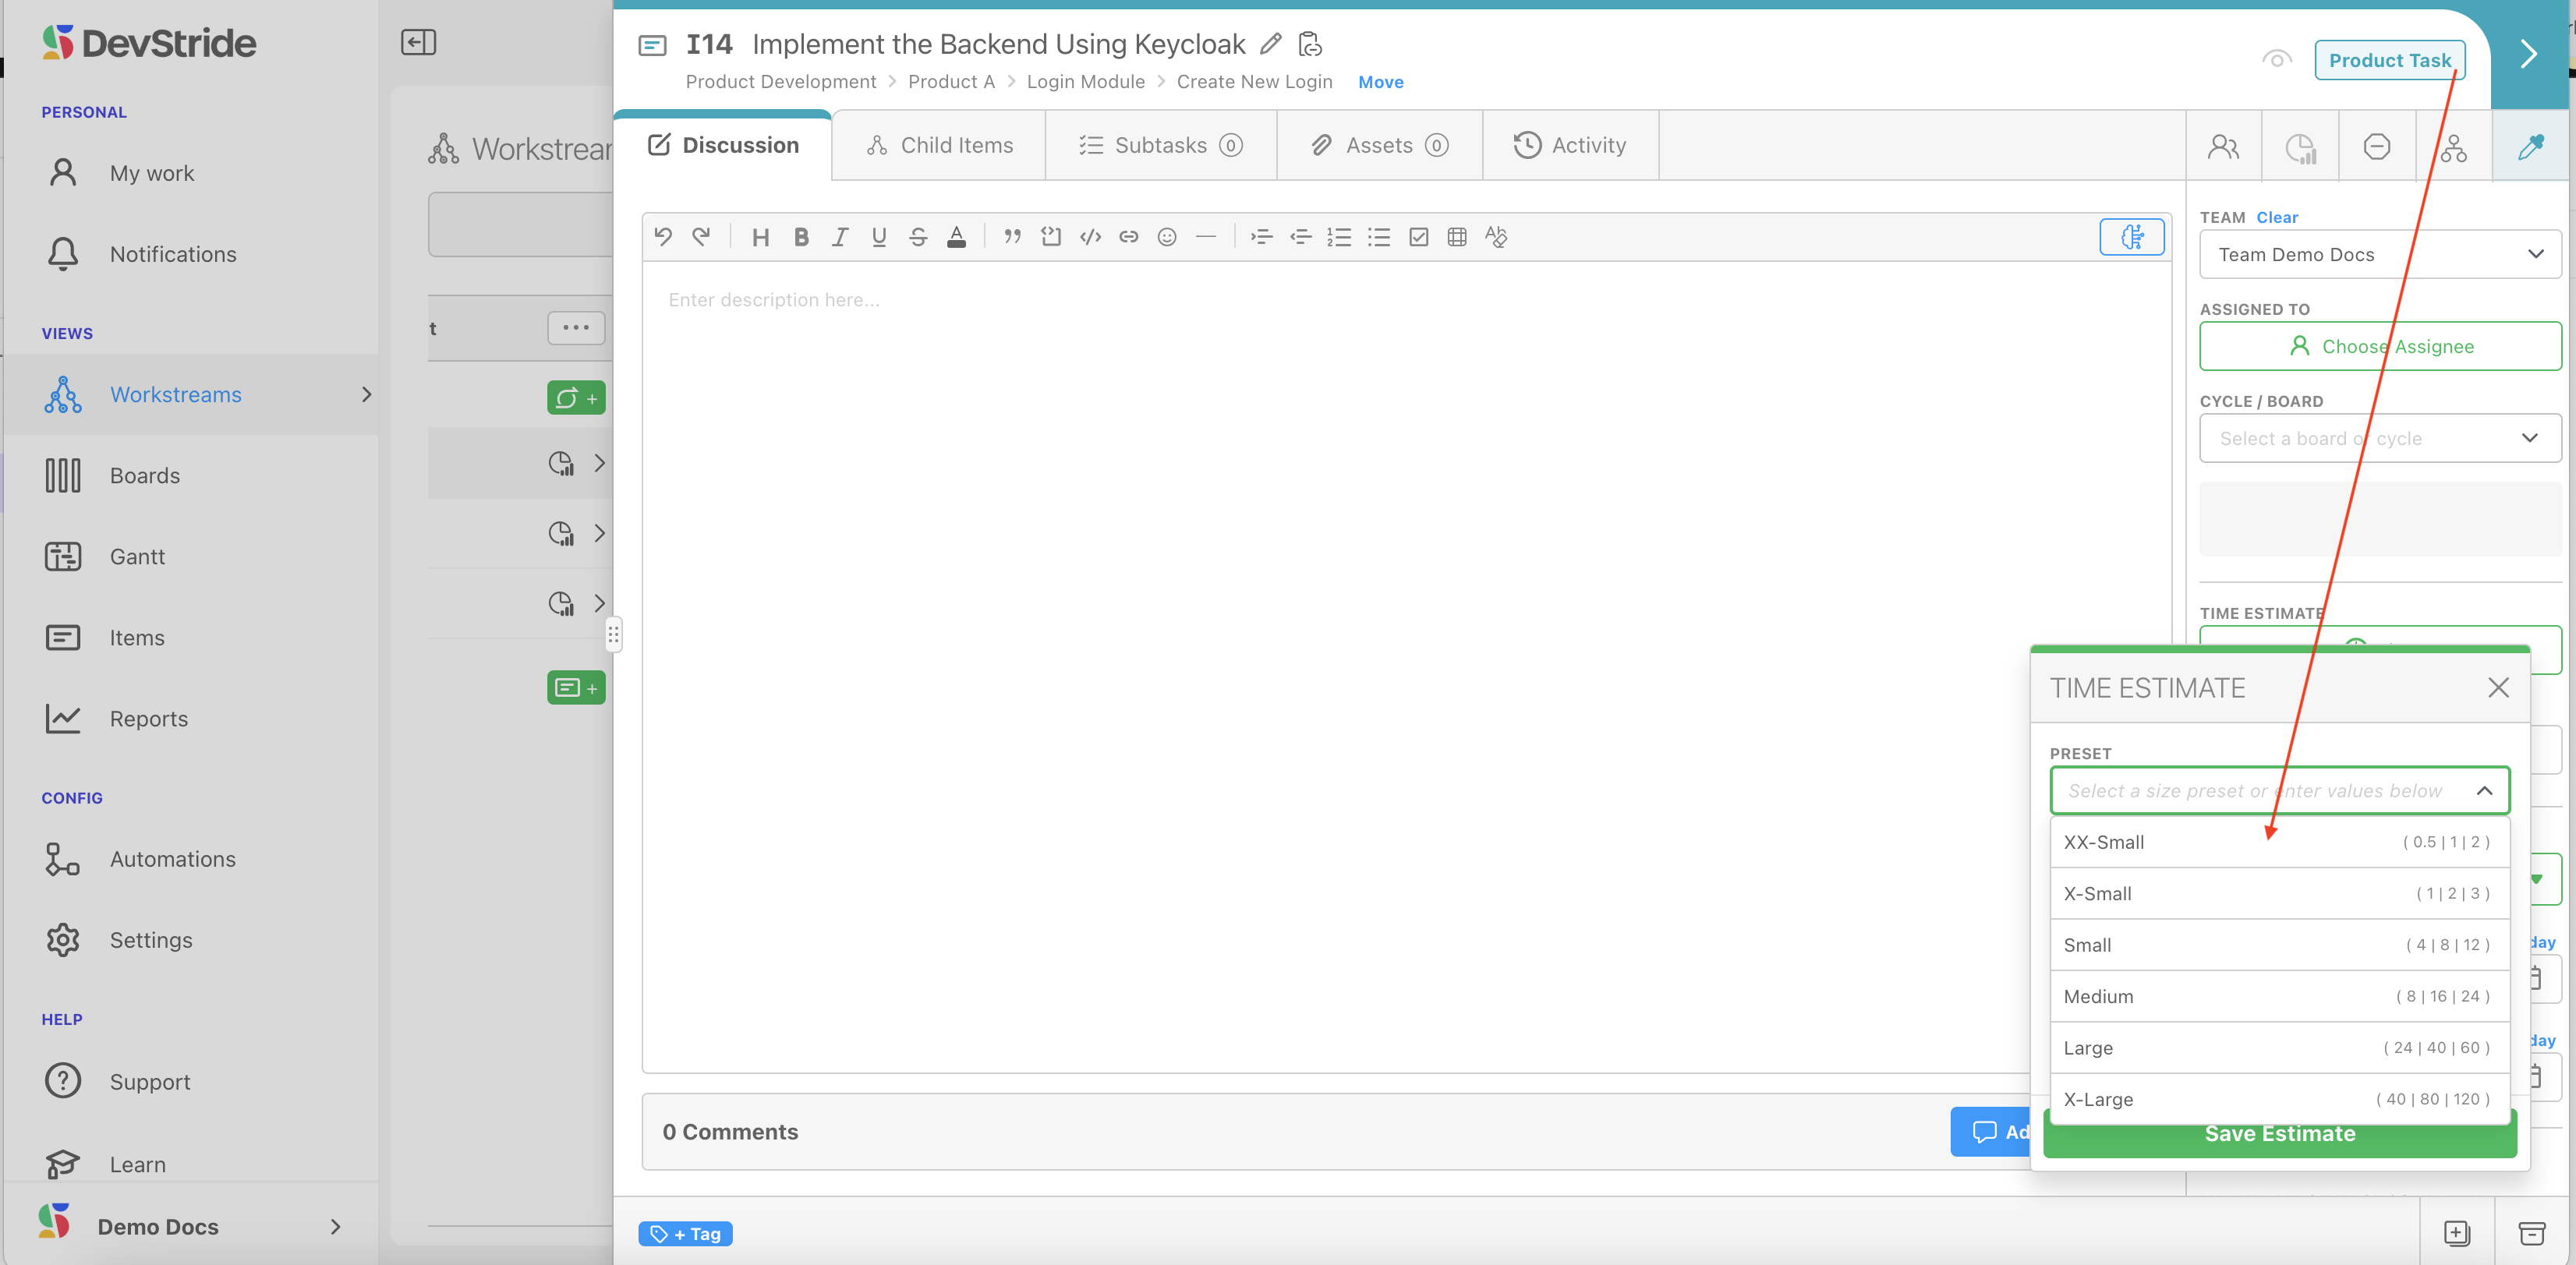
Note:
On any given item, your team can choose to either use pre-sets or can enter in their own estimates manually in the boxes below the pre-sets. DevStride automatically calculates the PERT and confidence level for manual entries as well.
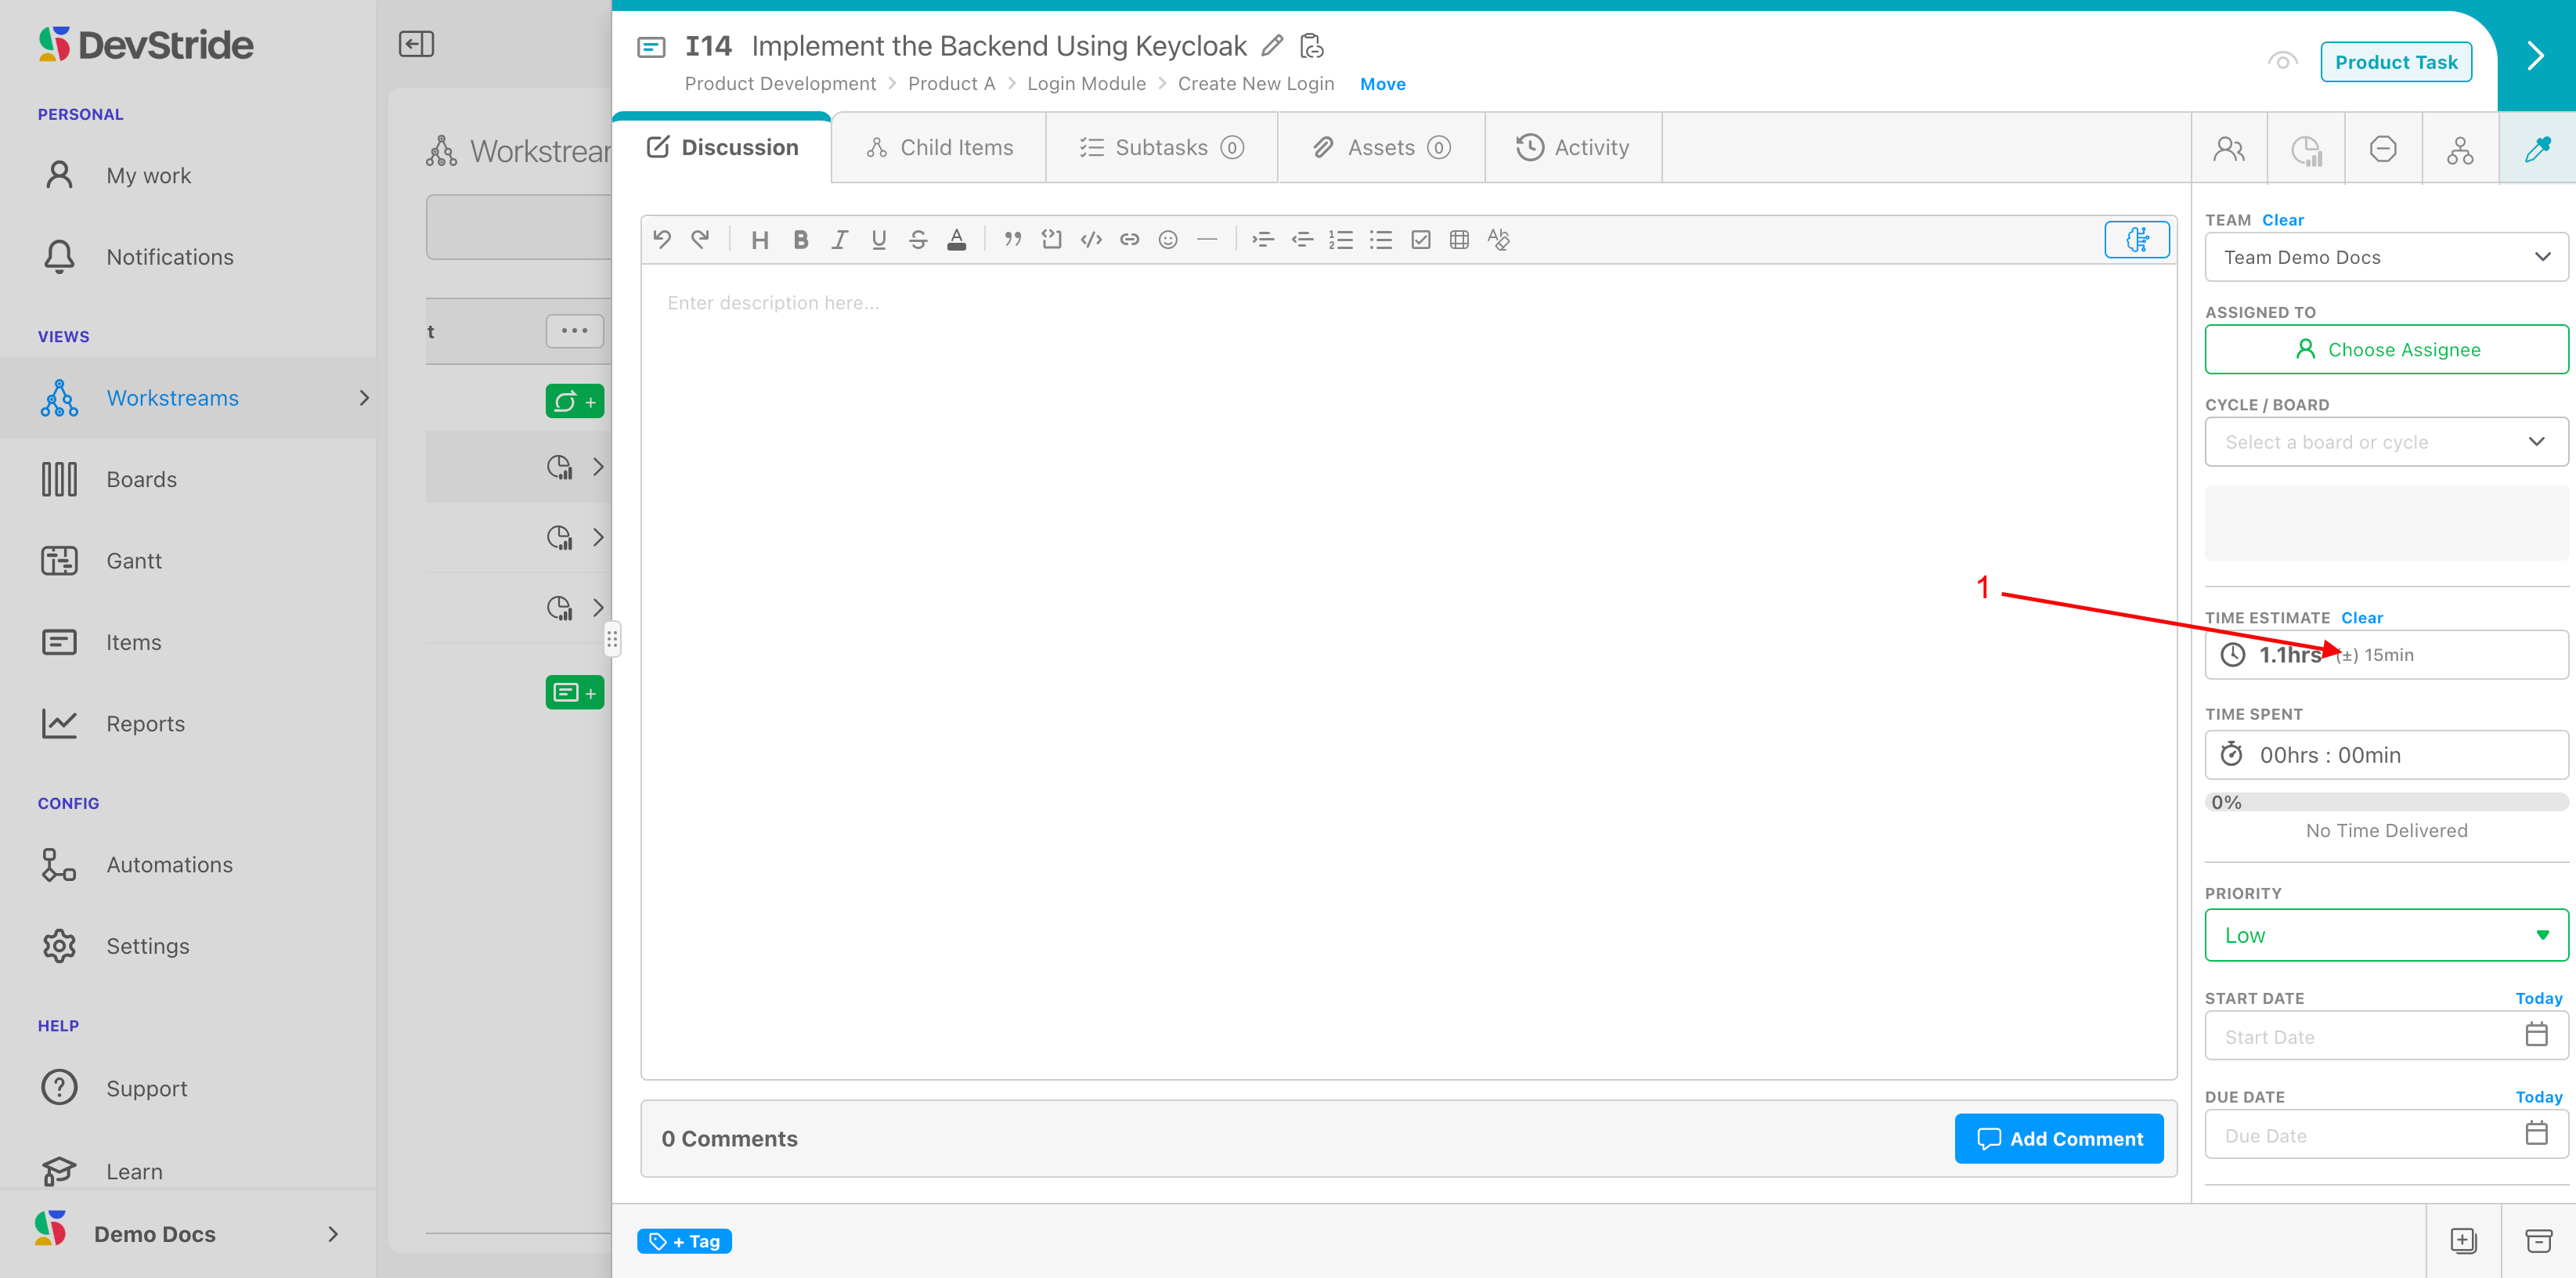
Once you have entered your time estimate on a task, DevStride also displays the standard deviation in the range field as well as the resulting time estimate calculation on the item (1).
Why it's important
Why does estimating tracking matter? And why is knowing the standard deviation useful?
A larger deviation in one item might not make might not make a big difference to the overall project.
However, tracking the standard deviation on each item can allow visibility into the group of items associated with a given project.
If you note that in a pool of items the standard deviation is fairly large, there is more risk that the time estimates could be off for that pool of work, potentially resulting in project delays.
A Time Tracking Best Practice: Visibility through rolled up Estimates
There's an easy way to get instant visibility on having too many tasks or tasks that might take too long for a given portion of your project.
Create estimation ranges for each of your item types to track whether—when combined—they will reach the outer level of your estimate for the entire set.
Here's how that works.
In Settings, Create a range for each of your task-level items (1).
In our example below, tasks are our smallest types, so we created suitable ranges of a certain number of hours from xxs tasks all the way to xl tasks.
We also created larger ranges for what we would consider small, medium and large Capabilities, which is the next level up in our item type hierarchy. (1) We could choose to do this with our Module item types as well. We will just show Tasks and Capabilities for this example.
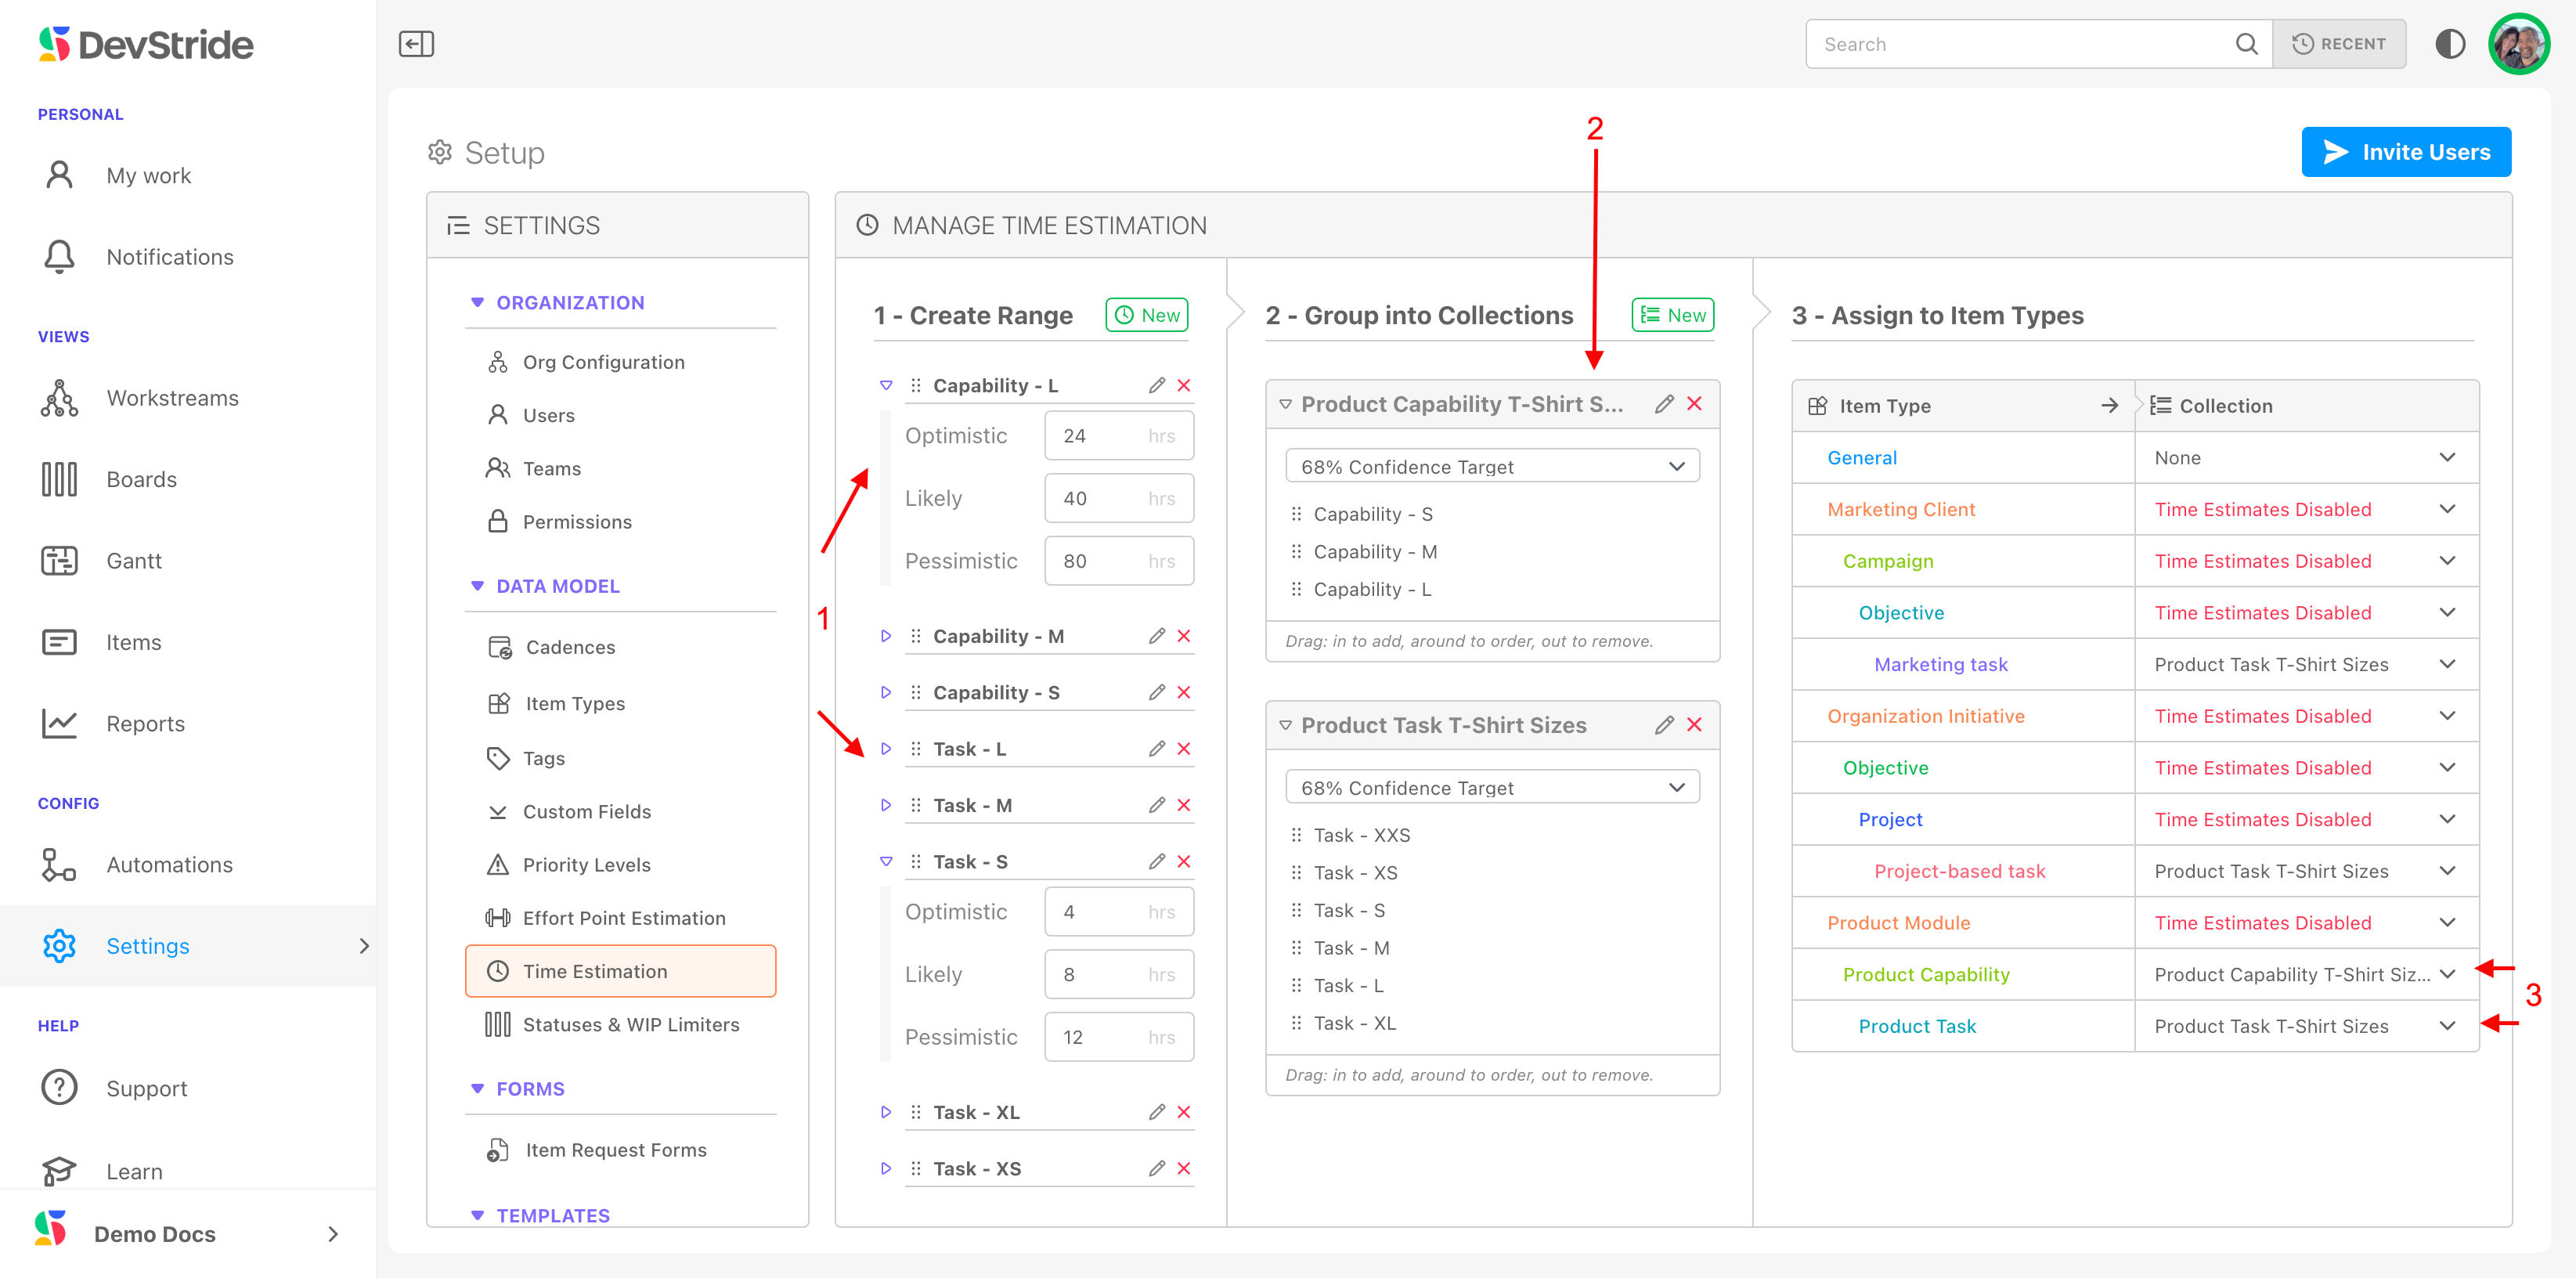
Once we defined our ranges, we created collections named for each type of item and then grouped our ranges into their collections. Then we assigned the collection we wanted to use to our item type. We used related names to help us match our ranges to our collections.
Once in our system, we can apply estimates to each task. Since Tasks are children of Modules in our item hierarchy, we can easily see if the Tasks we have in a given module exceed the sizing we have defined for its (parent) Module.
In our example below, our Module item displays an orange warning icon. This warning lets us know that based on our estimated time, this module could take longer than our definition of a module of this size:
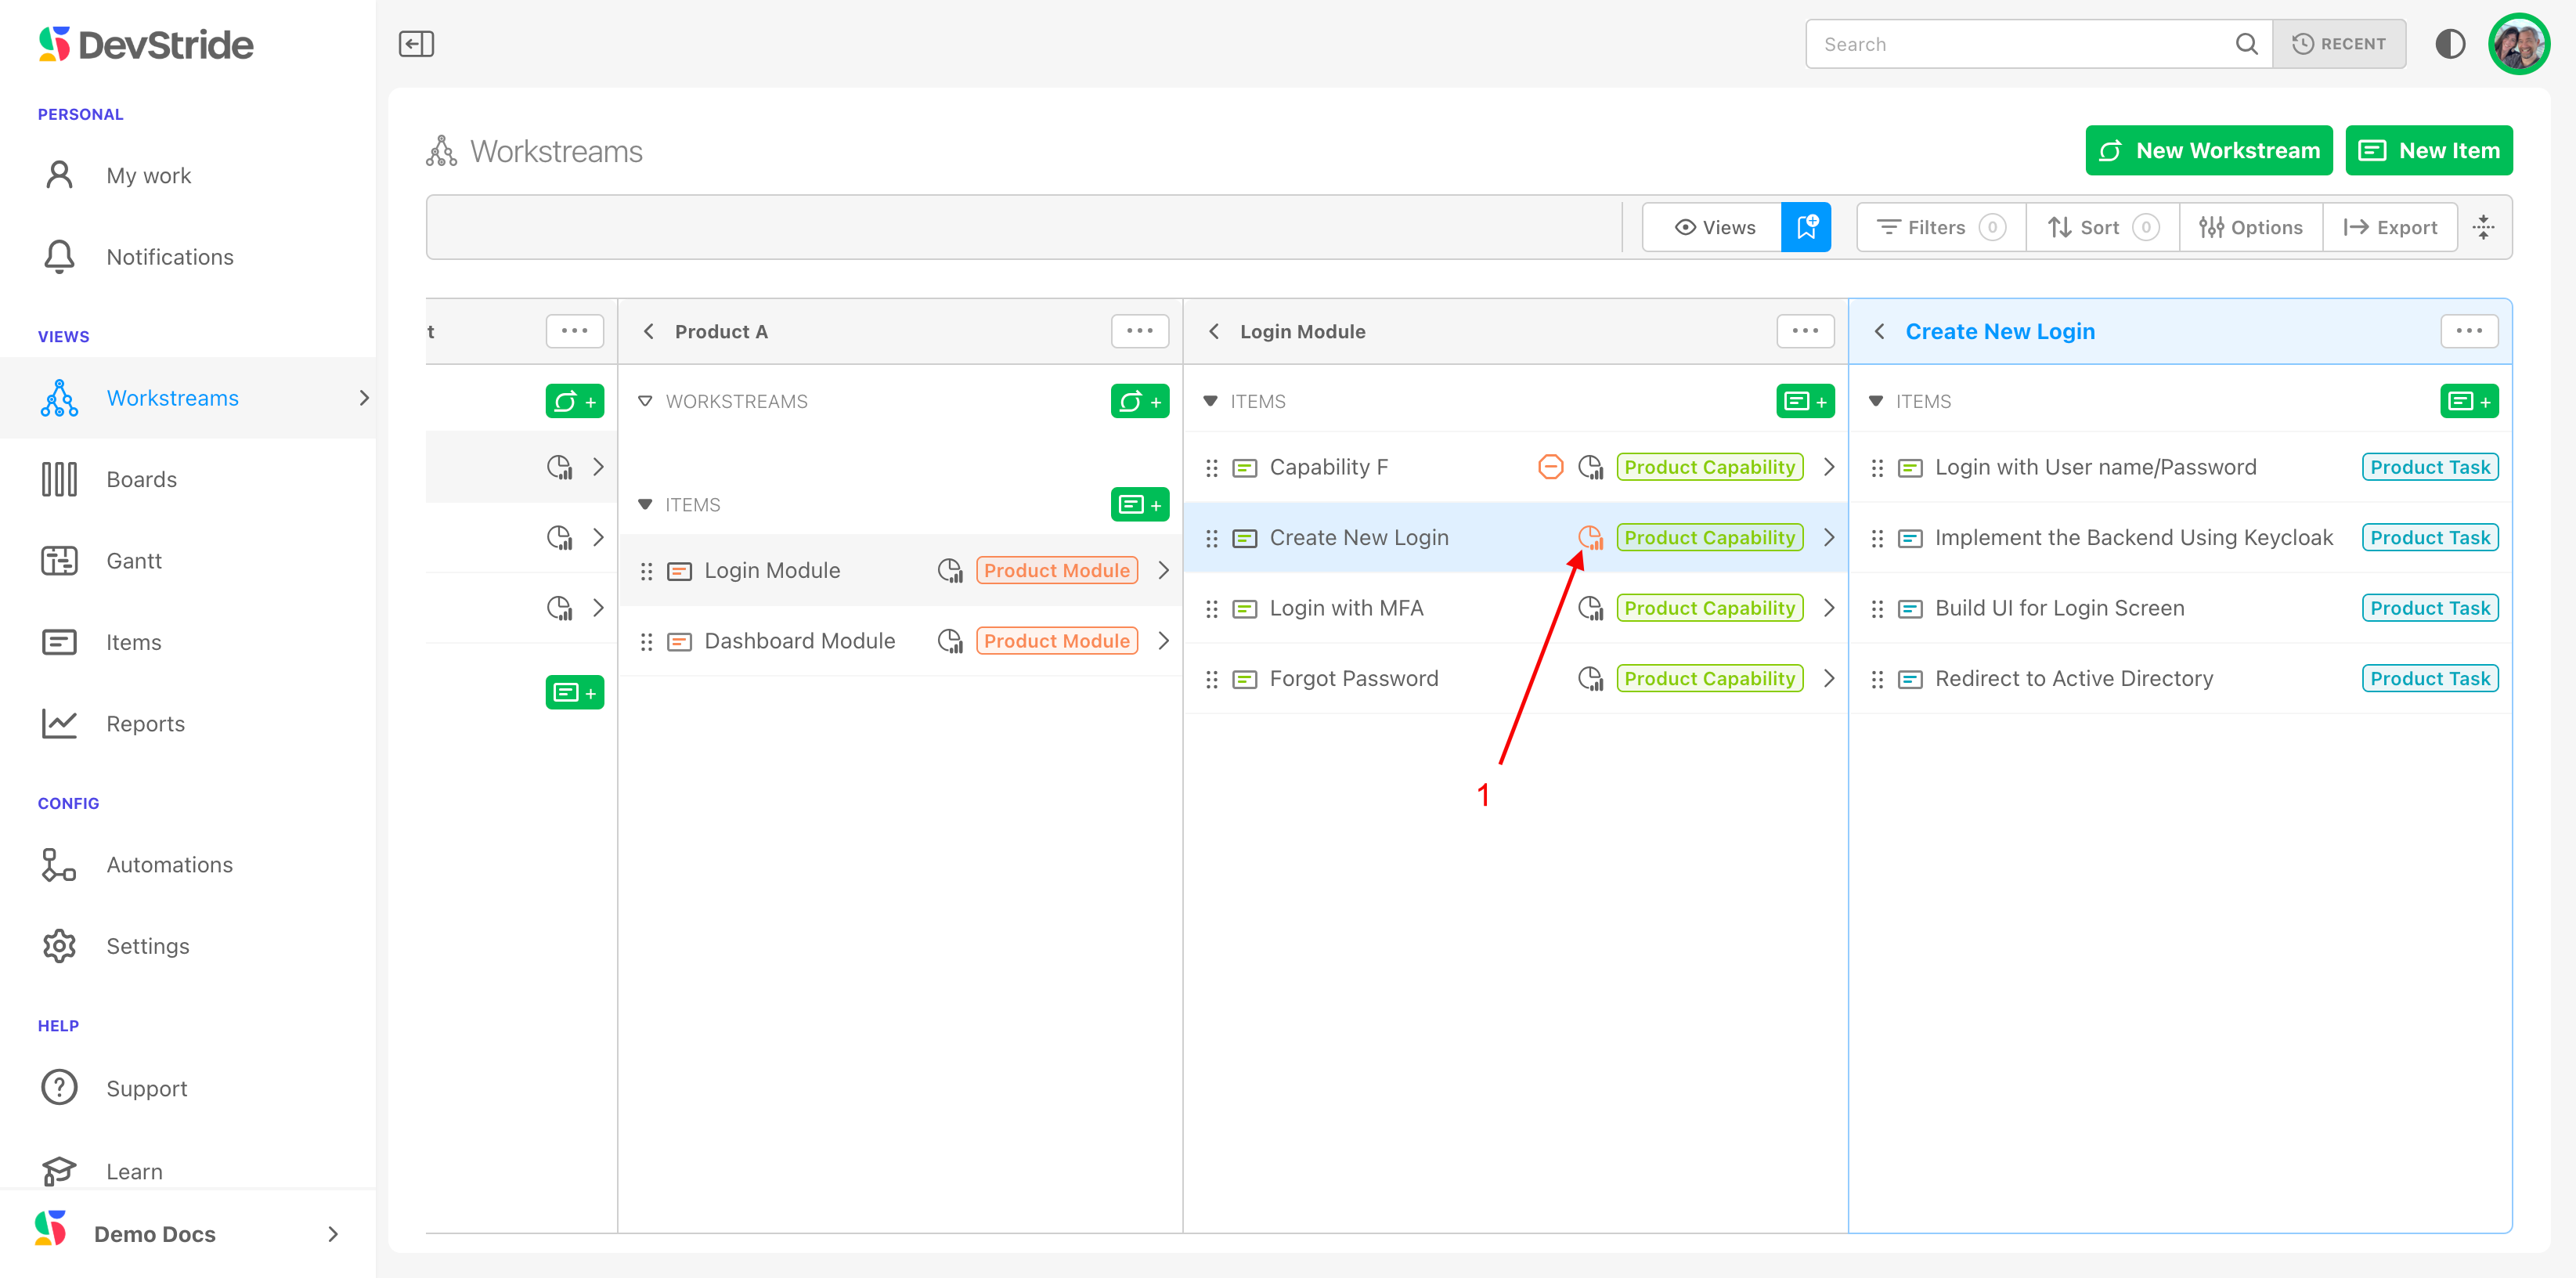
You can click on the warning icon to see the completion stats and the warning details.
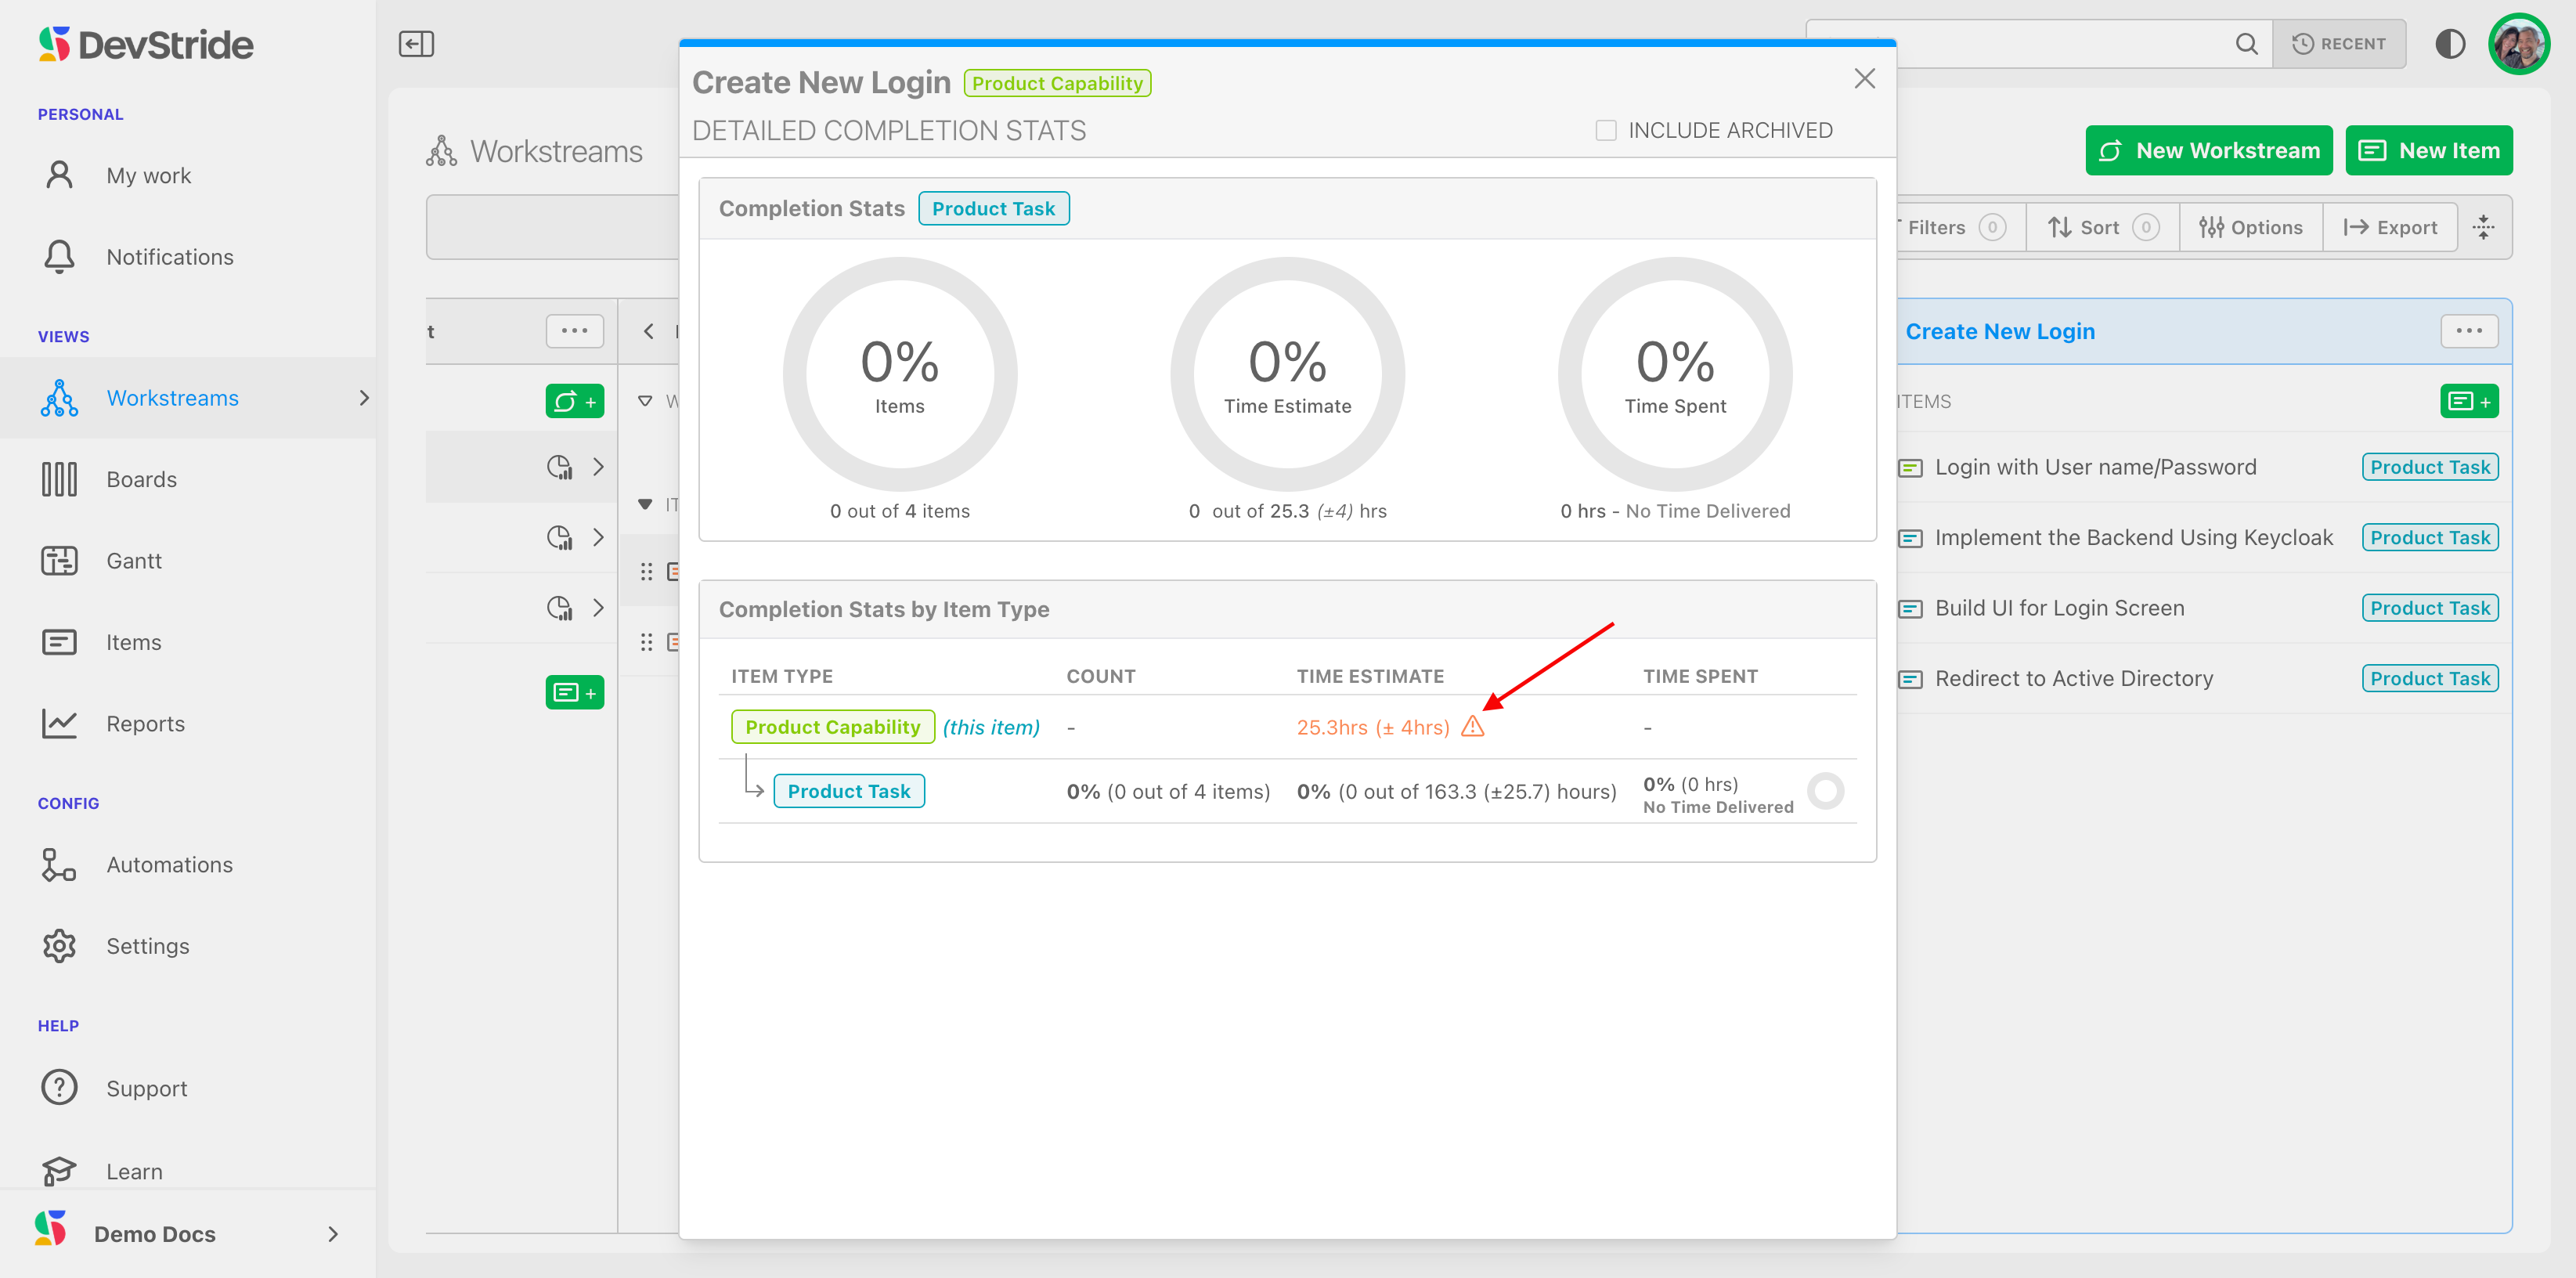
This warning icon shows throughout the system, elevating the potential issue.
The takeaway: The better you decompose your work into small estimated tasks that roll up into bigger estimated buckets, the better predictability you have.
What This Gives You
With powerful and flexibility estimation capabilities, DevStride gives you predictability right from the beginning—for successful project delivery in the end.
Now, continue to tour the right bar of the item workspace:
Teams through Status
Point Estimates
Best Practices for Time Estimates
Time Spent
Priority
Start Dates and Due Dates
Progress Tracking
Custom Fields
Was this article helpful?