Admin Onboarding - Setting Up Cadences and Timeboxes
- 12 May 2025
- 3 Minutes to read
- Contributors

- Print
- DarkLight
Admin Onboarding - Setting Up Cadences and Timeboxes
- Updated on 12 May 2025
- 3 Minutes to read
- Contributors
- Print
- DarkLight
Article summary
Did you find this summary helpful?
Thank you for your feedback!
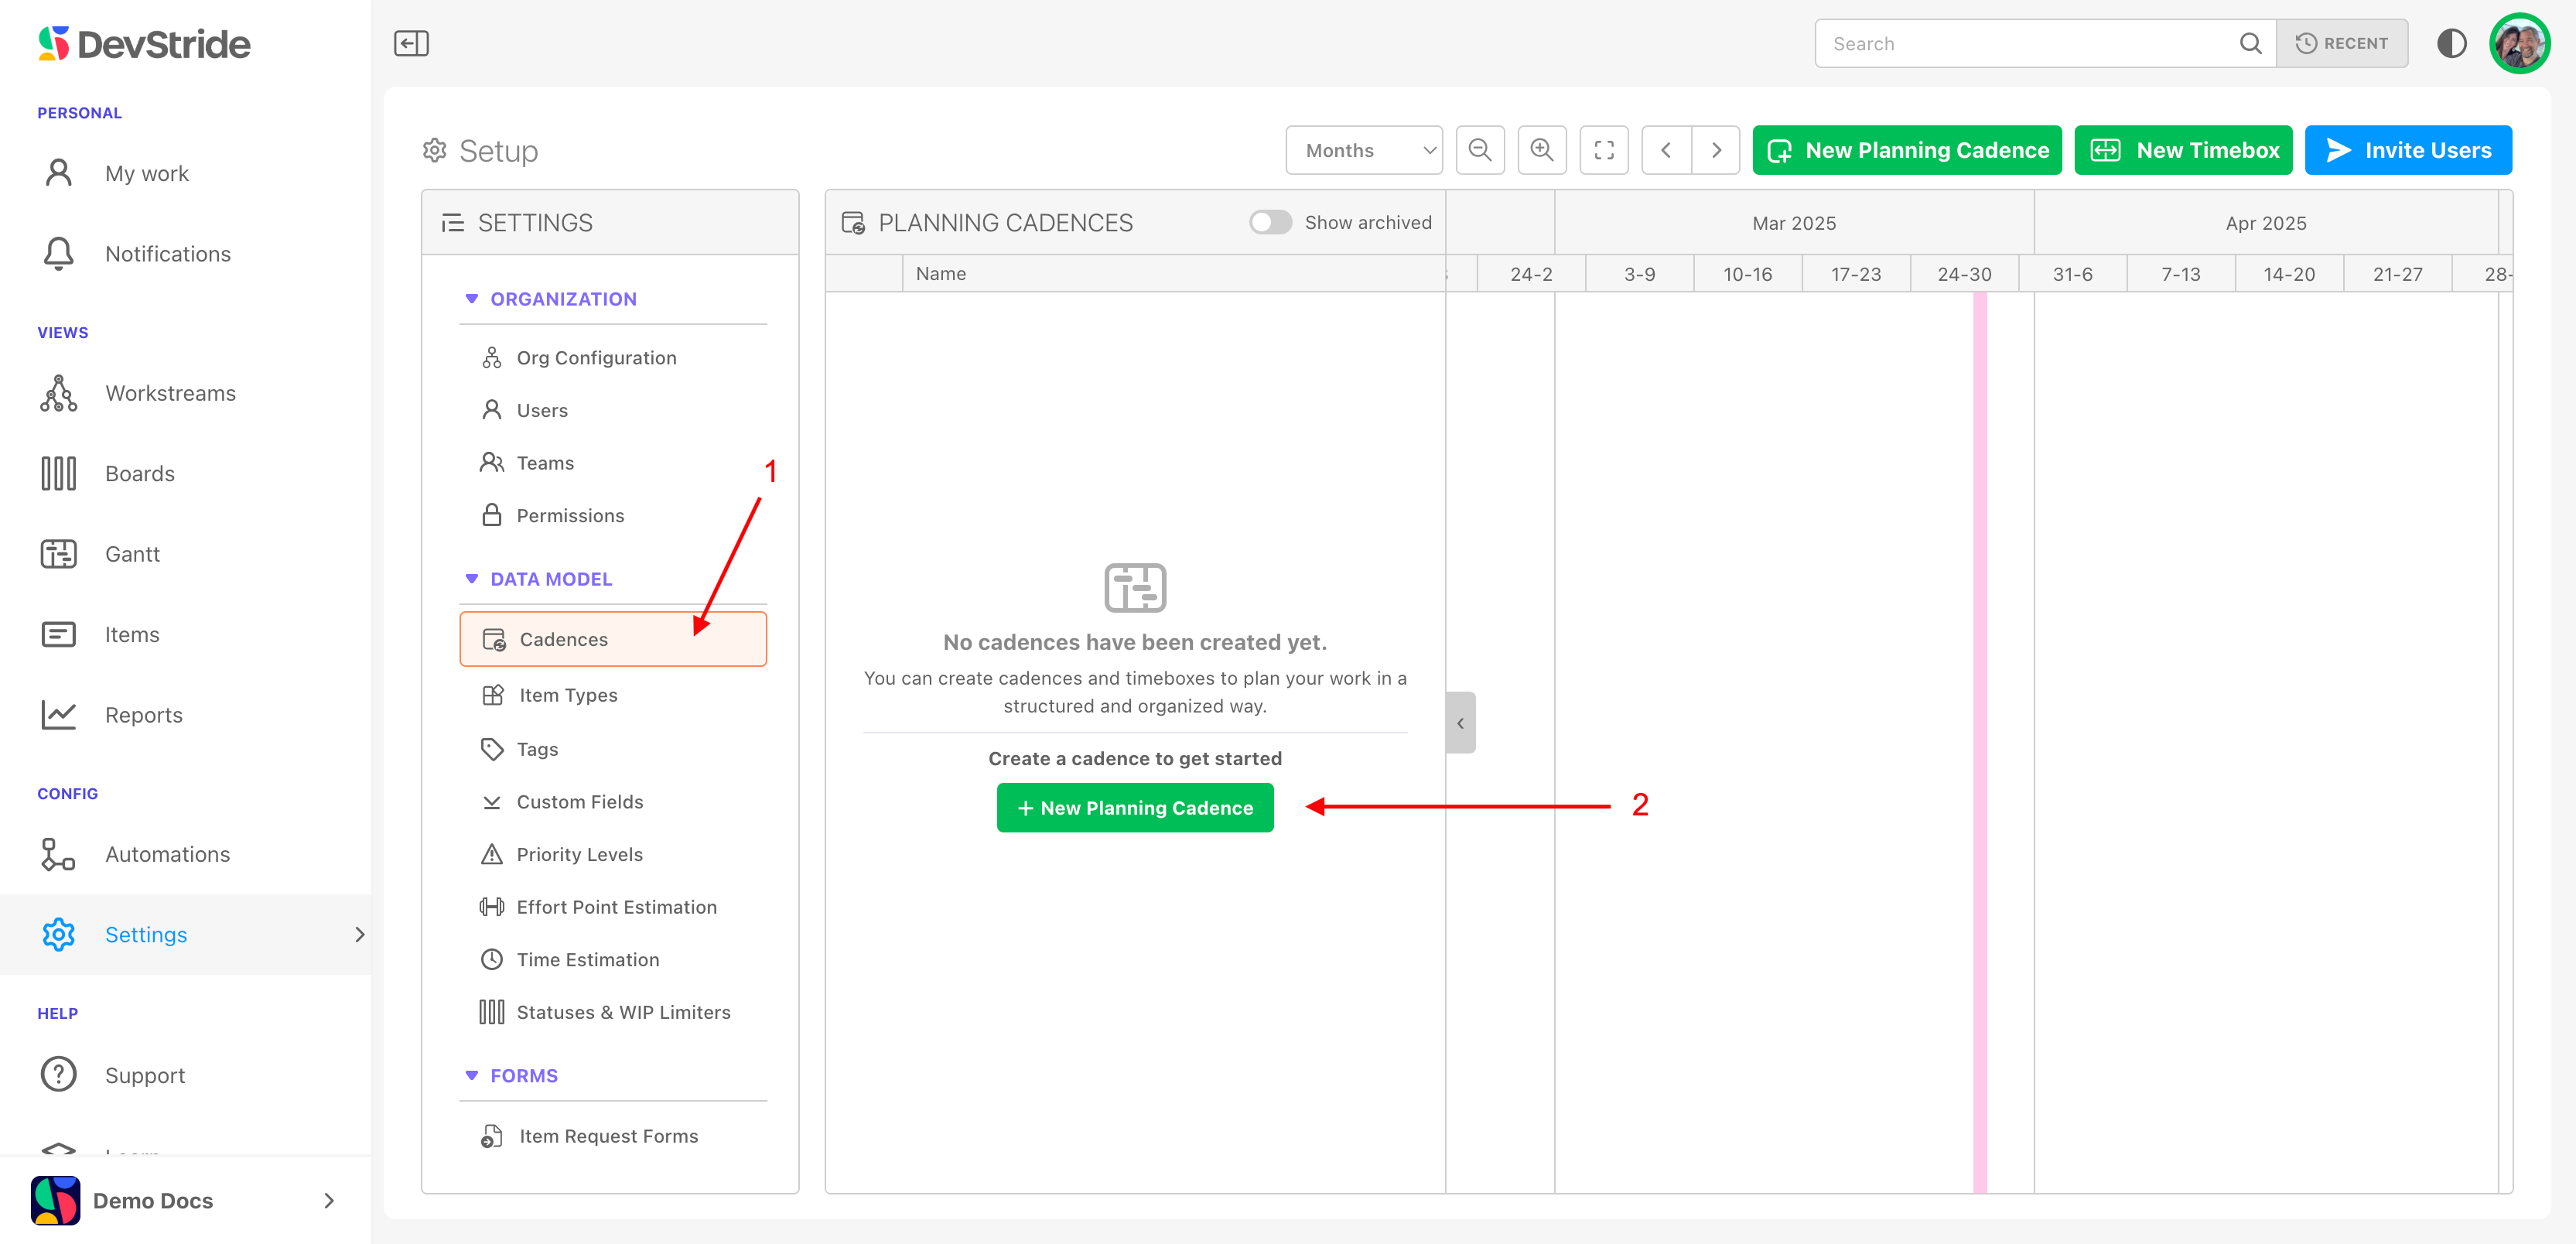
Step 1: Setting Up a Planning Cadence
Navigate to Cadences (1). Create a new cadence: Click New Planning Cadence (2).
Define the cadence parameters.
Here is an example of how you might fill out the pop-up box for a Program Increment (PI) planning cadence, typically 12 weeks.
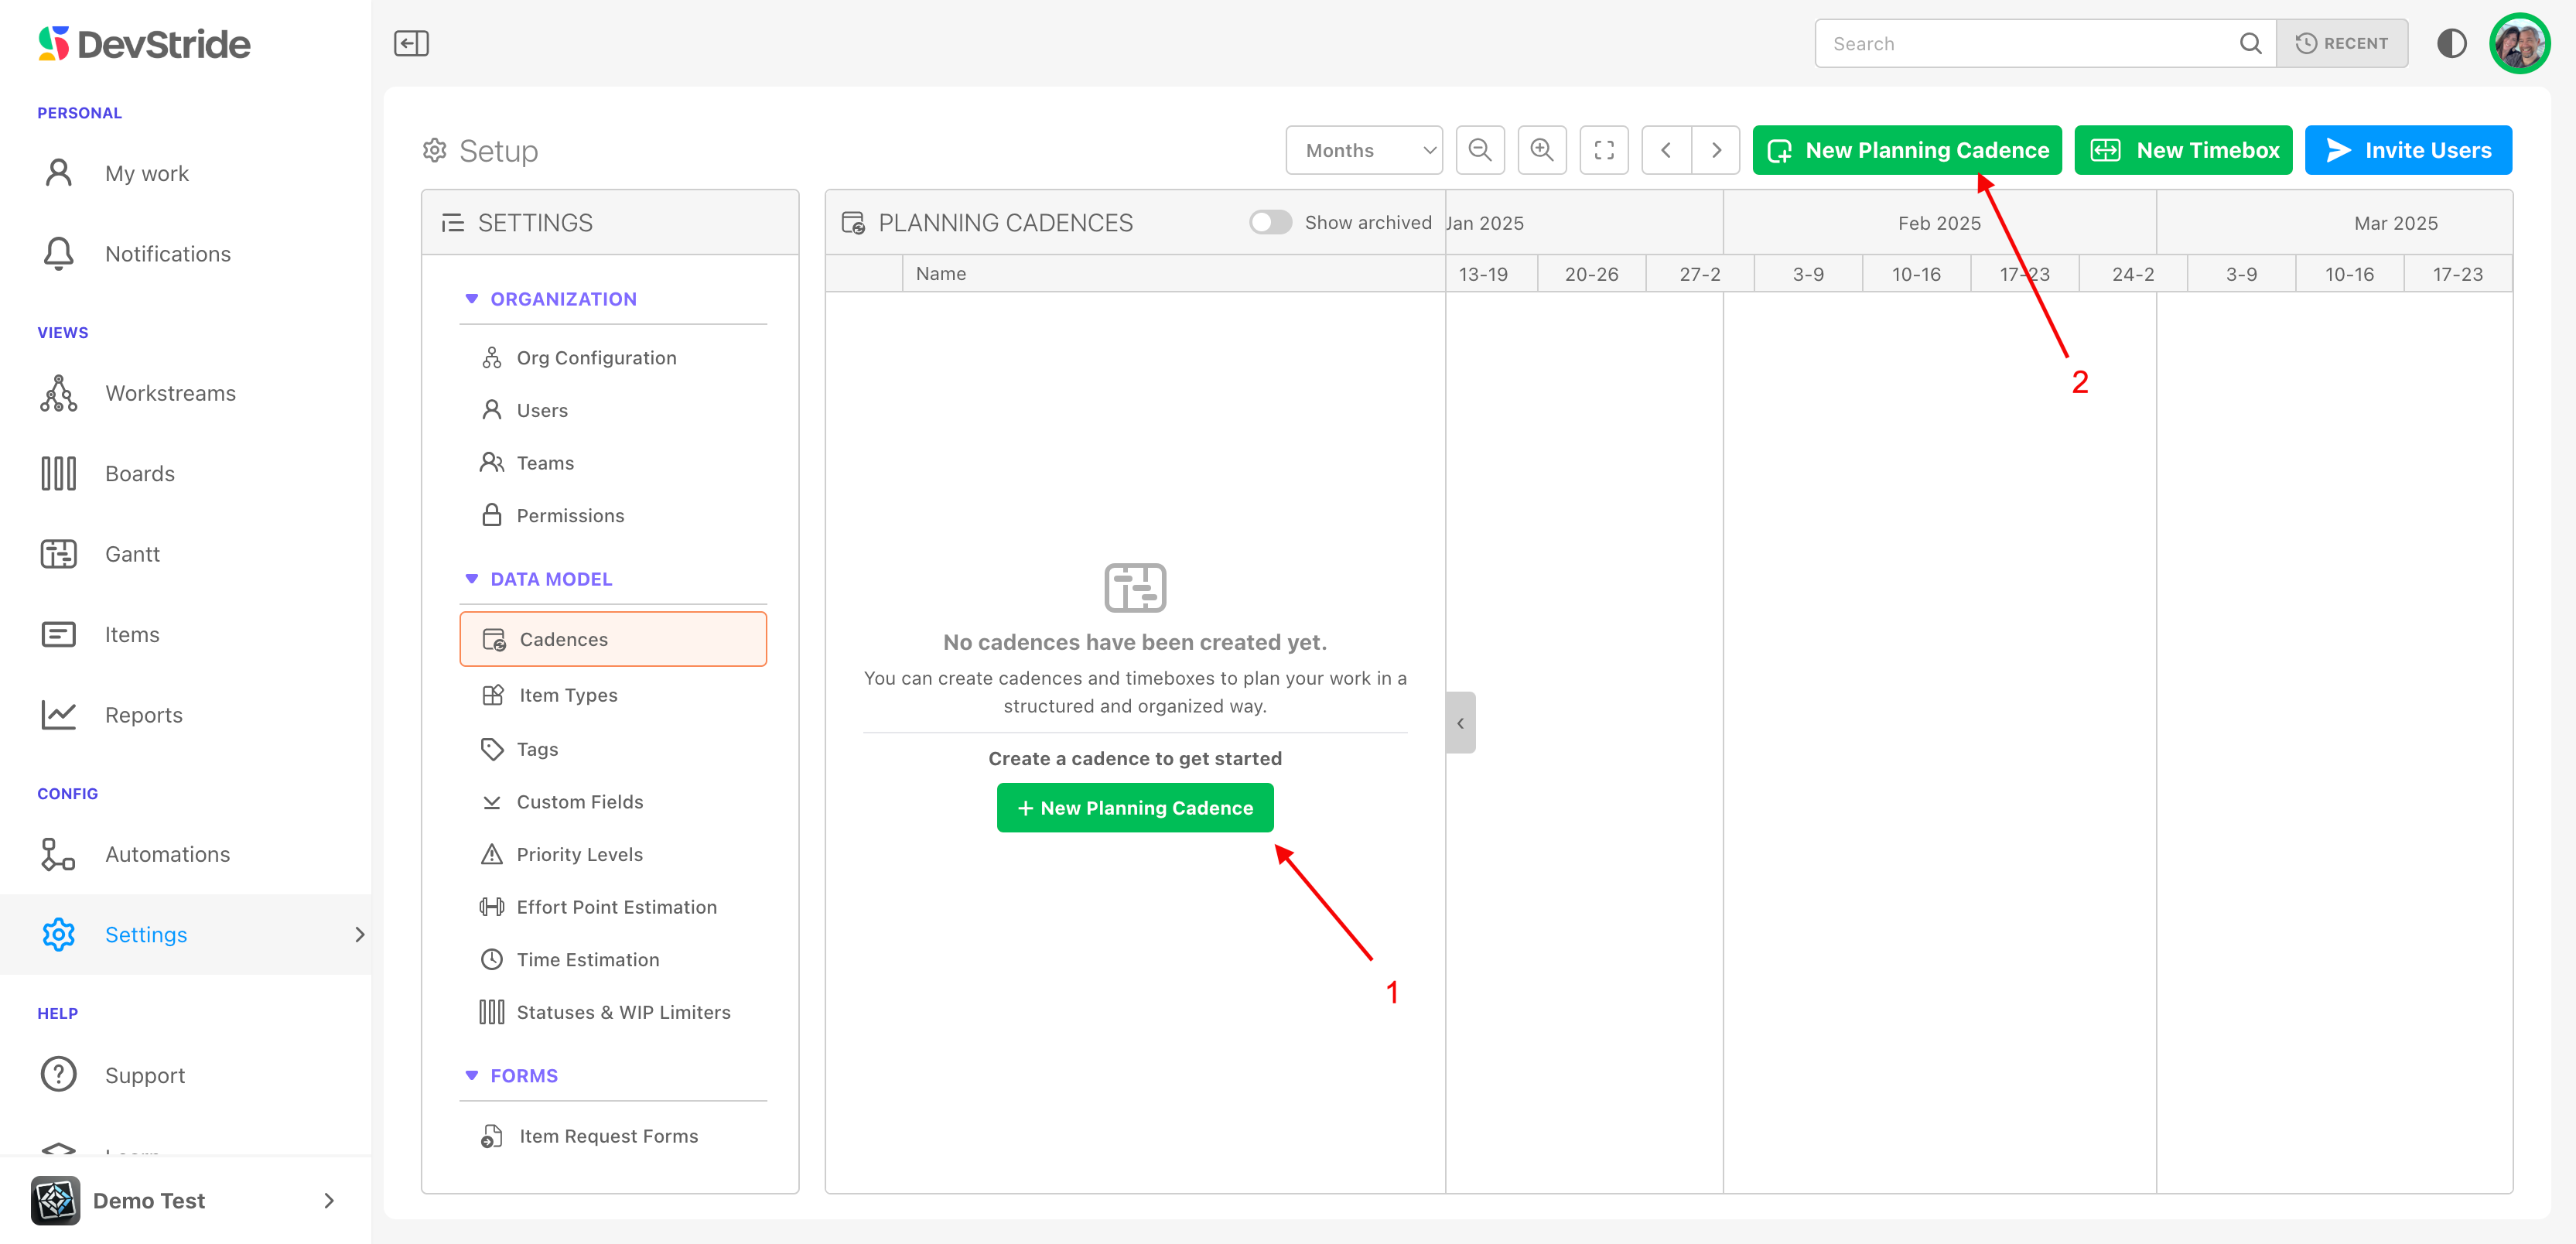
Click on New Planning Cadence (1) or (2).
Fill in the pop up box.
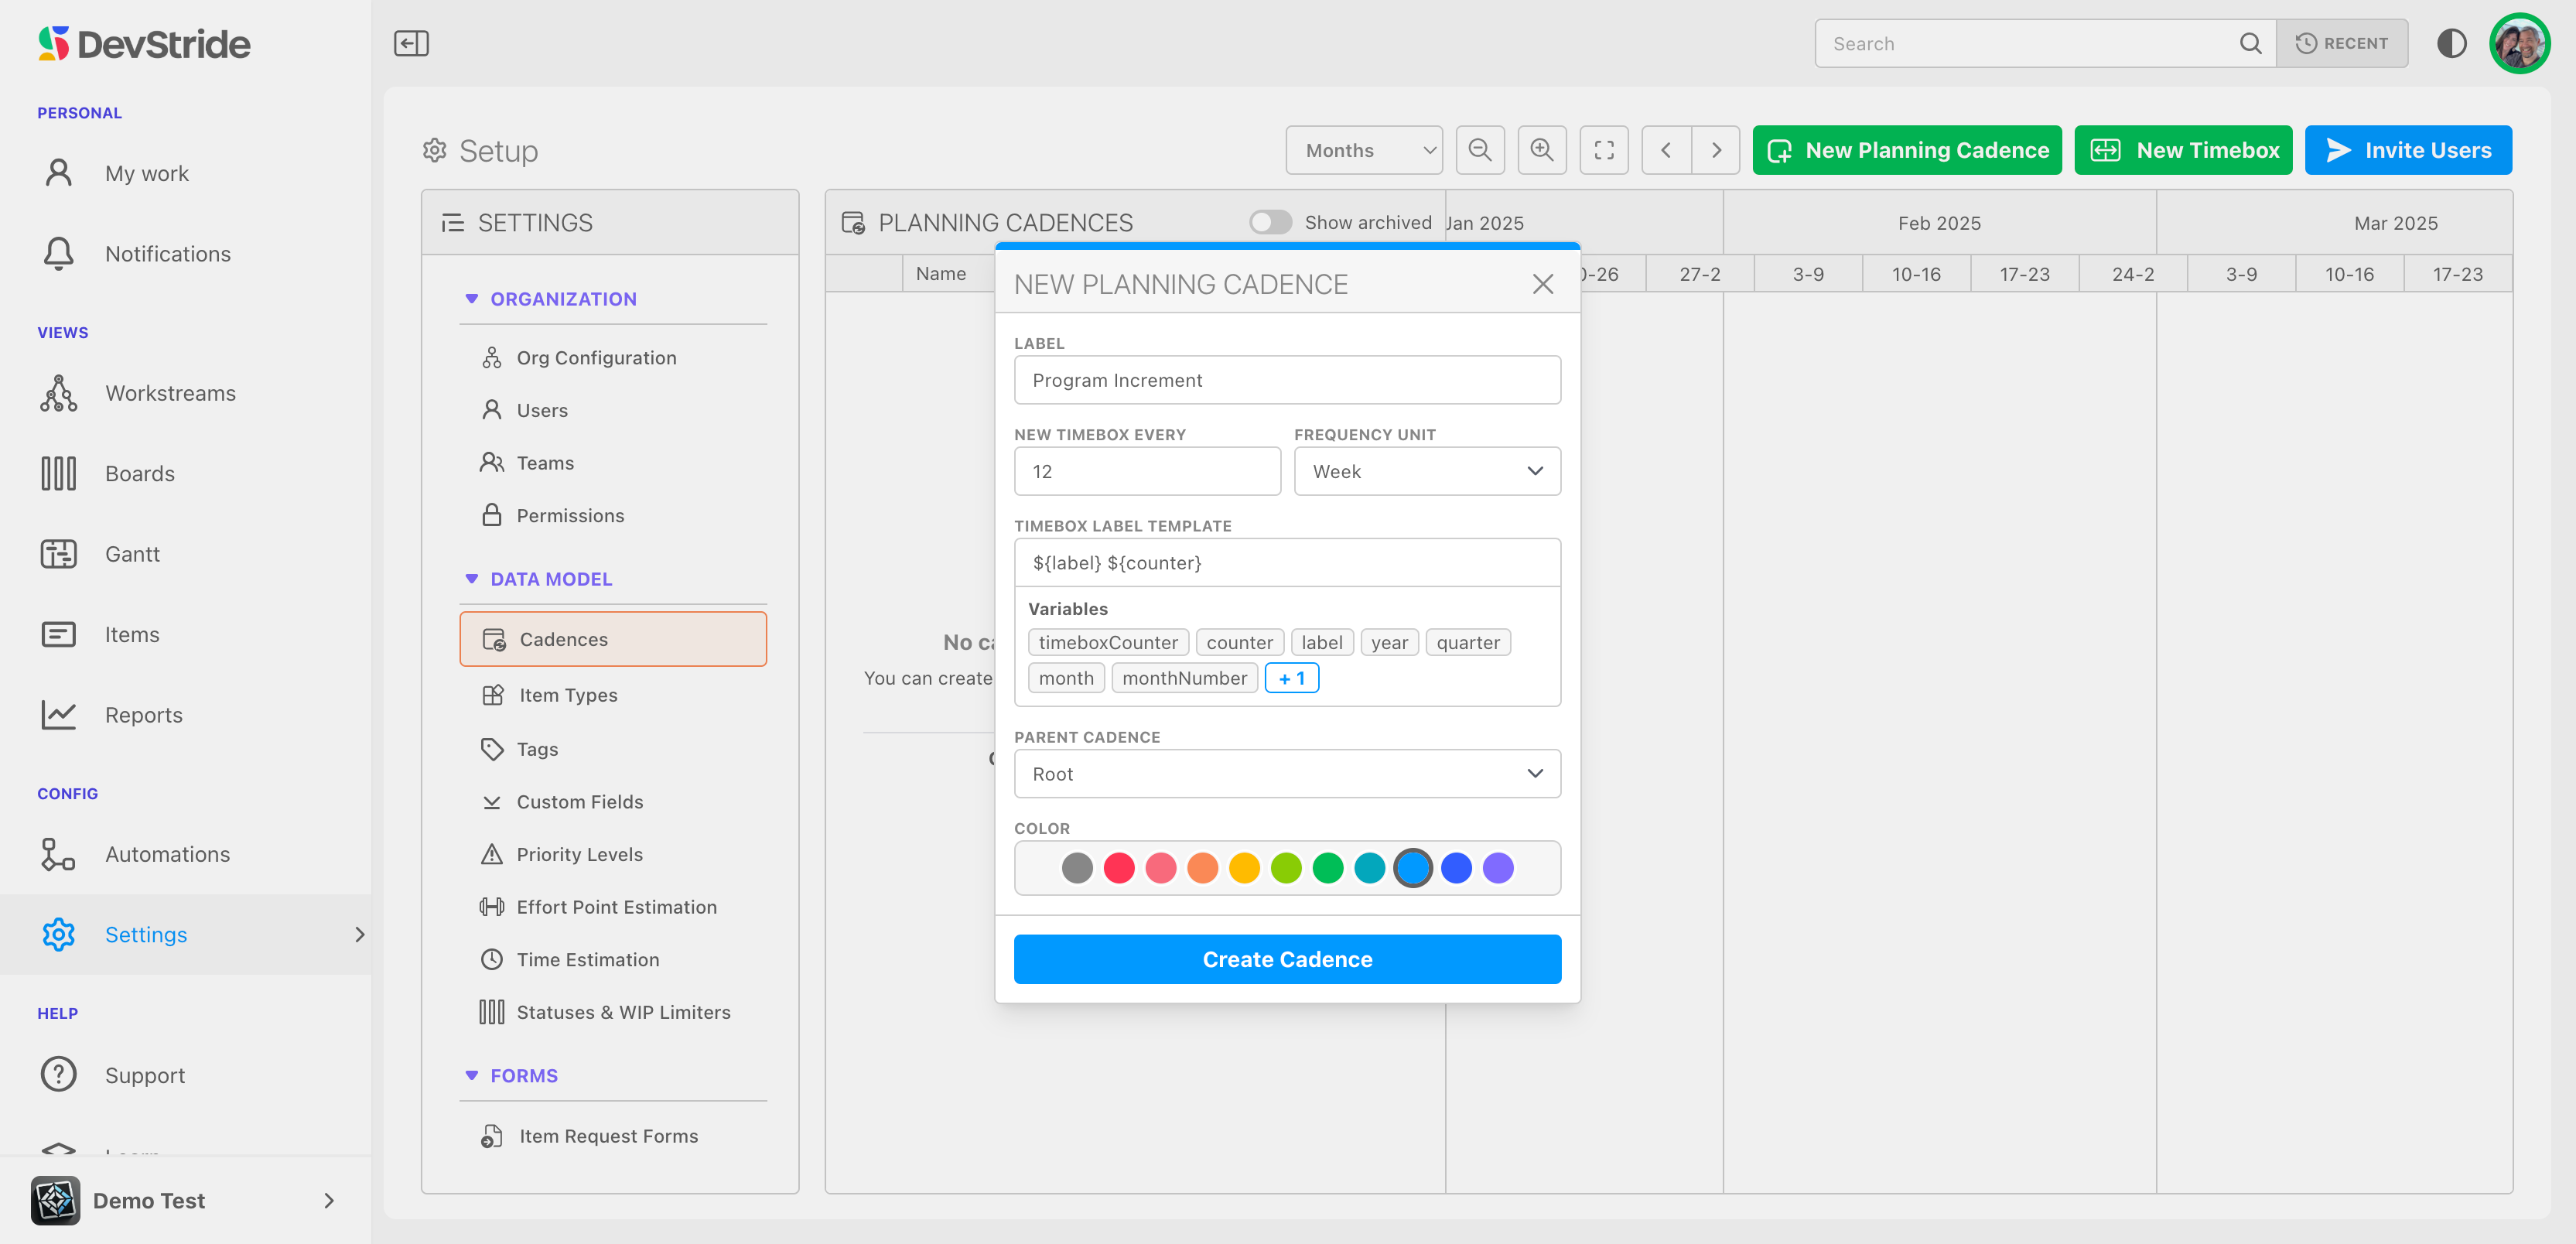
Cadence Label: Example - "Program Increment"
Frequency - New Timebox/Every: Example - Every "12" "weeks"
Parent Cadence: The first cadence is the root. For subsequent nested cadences click on the parent sprint here. For our program increment example, you could create 2 week sprints that sit inside the 12 week program increment parent.
Naming Convention: Use variables (e.g., PI {counter}) for automatic sequencing. Using the "counter" variable will automatically count up and insert the next set of dates in your cadence for you. (e.g., PI 1 , P1 2, etc).
Create Cadence: Once set, the cadence will be available for use in boards and planning.
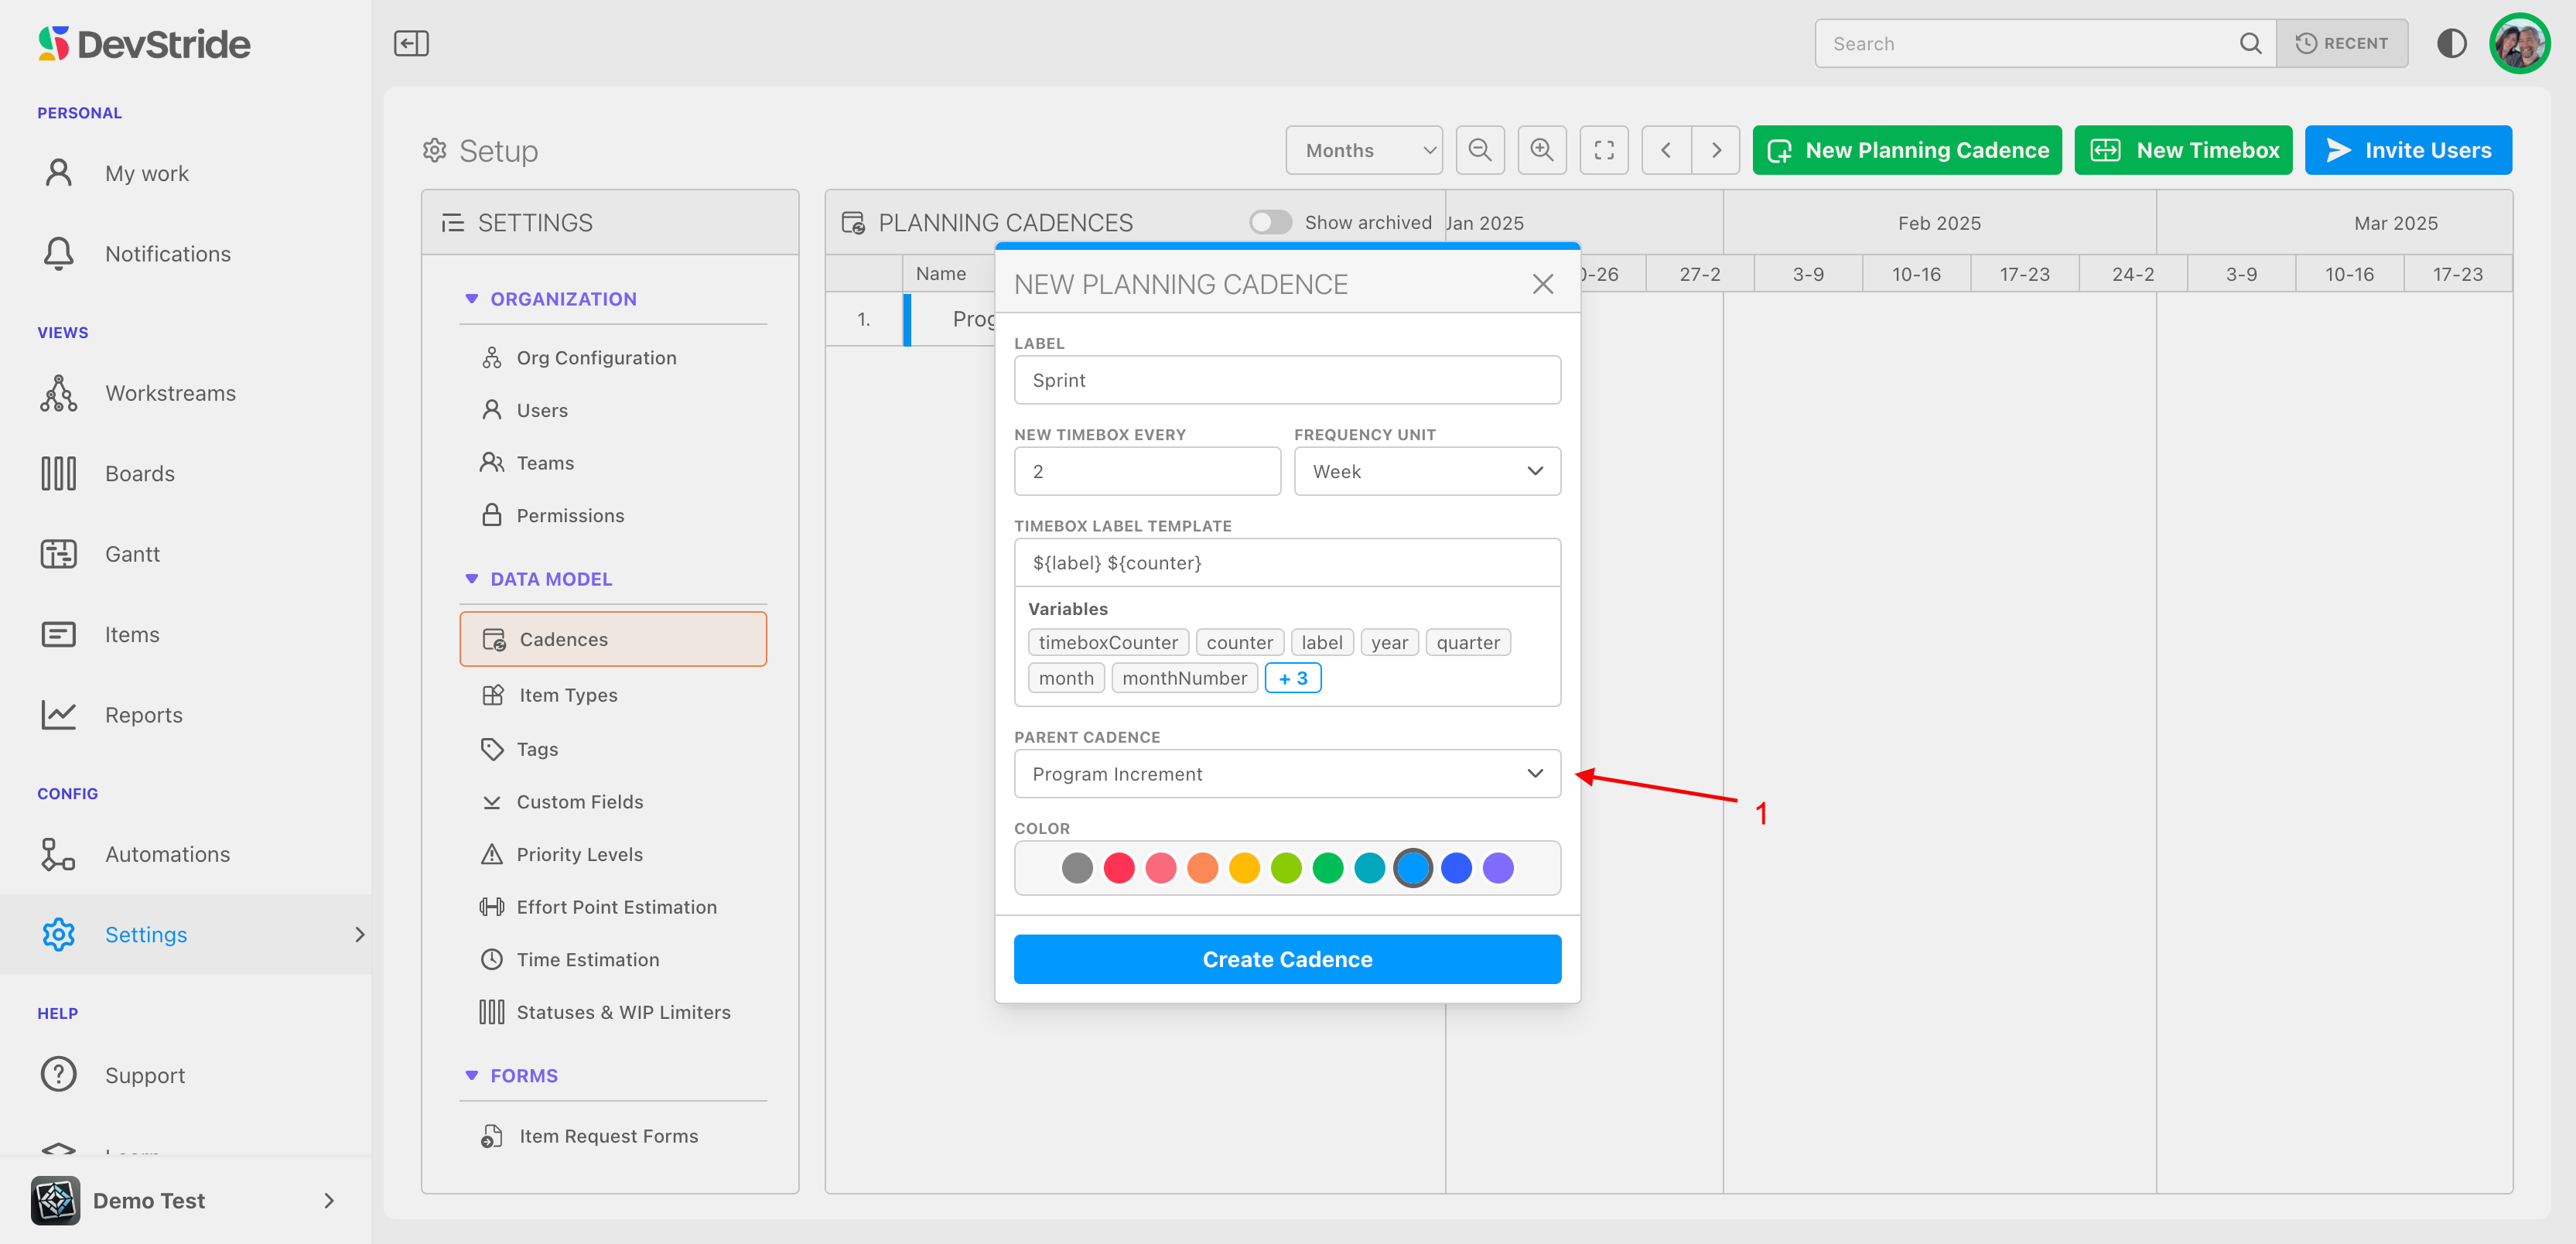
To add another cadence - such as a child cadence, click on new again. Here is how to add a 2 week sprint cadence as a cadence to the PI cadence we just created. This type of cadence could function as two week periods within the longer stretch of 12 weeks.
If the shorter sprint is intended to function as a child of the Planning Increment, select the PI as the parent.
Save time with "Ancestors" variables
Ancestor variables allow nested cadences to reference attributes from their parent cadence. This is especially useful for structured planning, such as:
Parent cadence: "Program Increment ${counter}" → becomes "Program Increment 2"
Child cadence: "Sprint $ {ancestor.counter}.${timeboxCounter}" → becomes "Sprint 2.1", "Sprint 2.2", etc.
This dynamic naming helps teams visually track and communicate where work fits within broader cycles.
The image below shows you how:
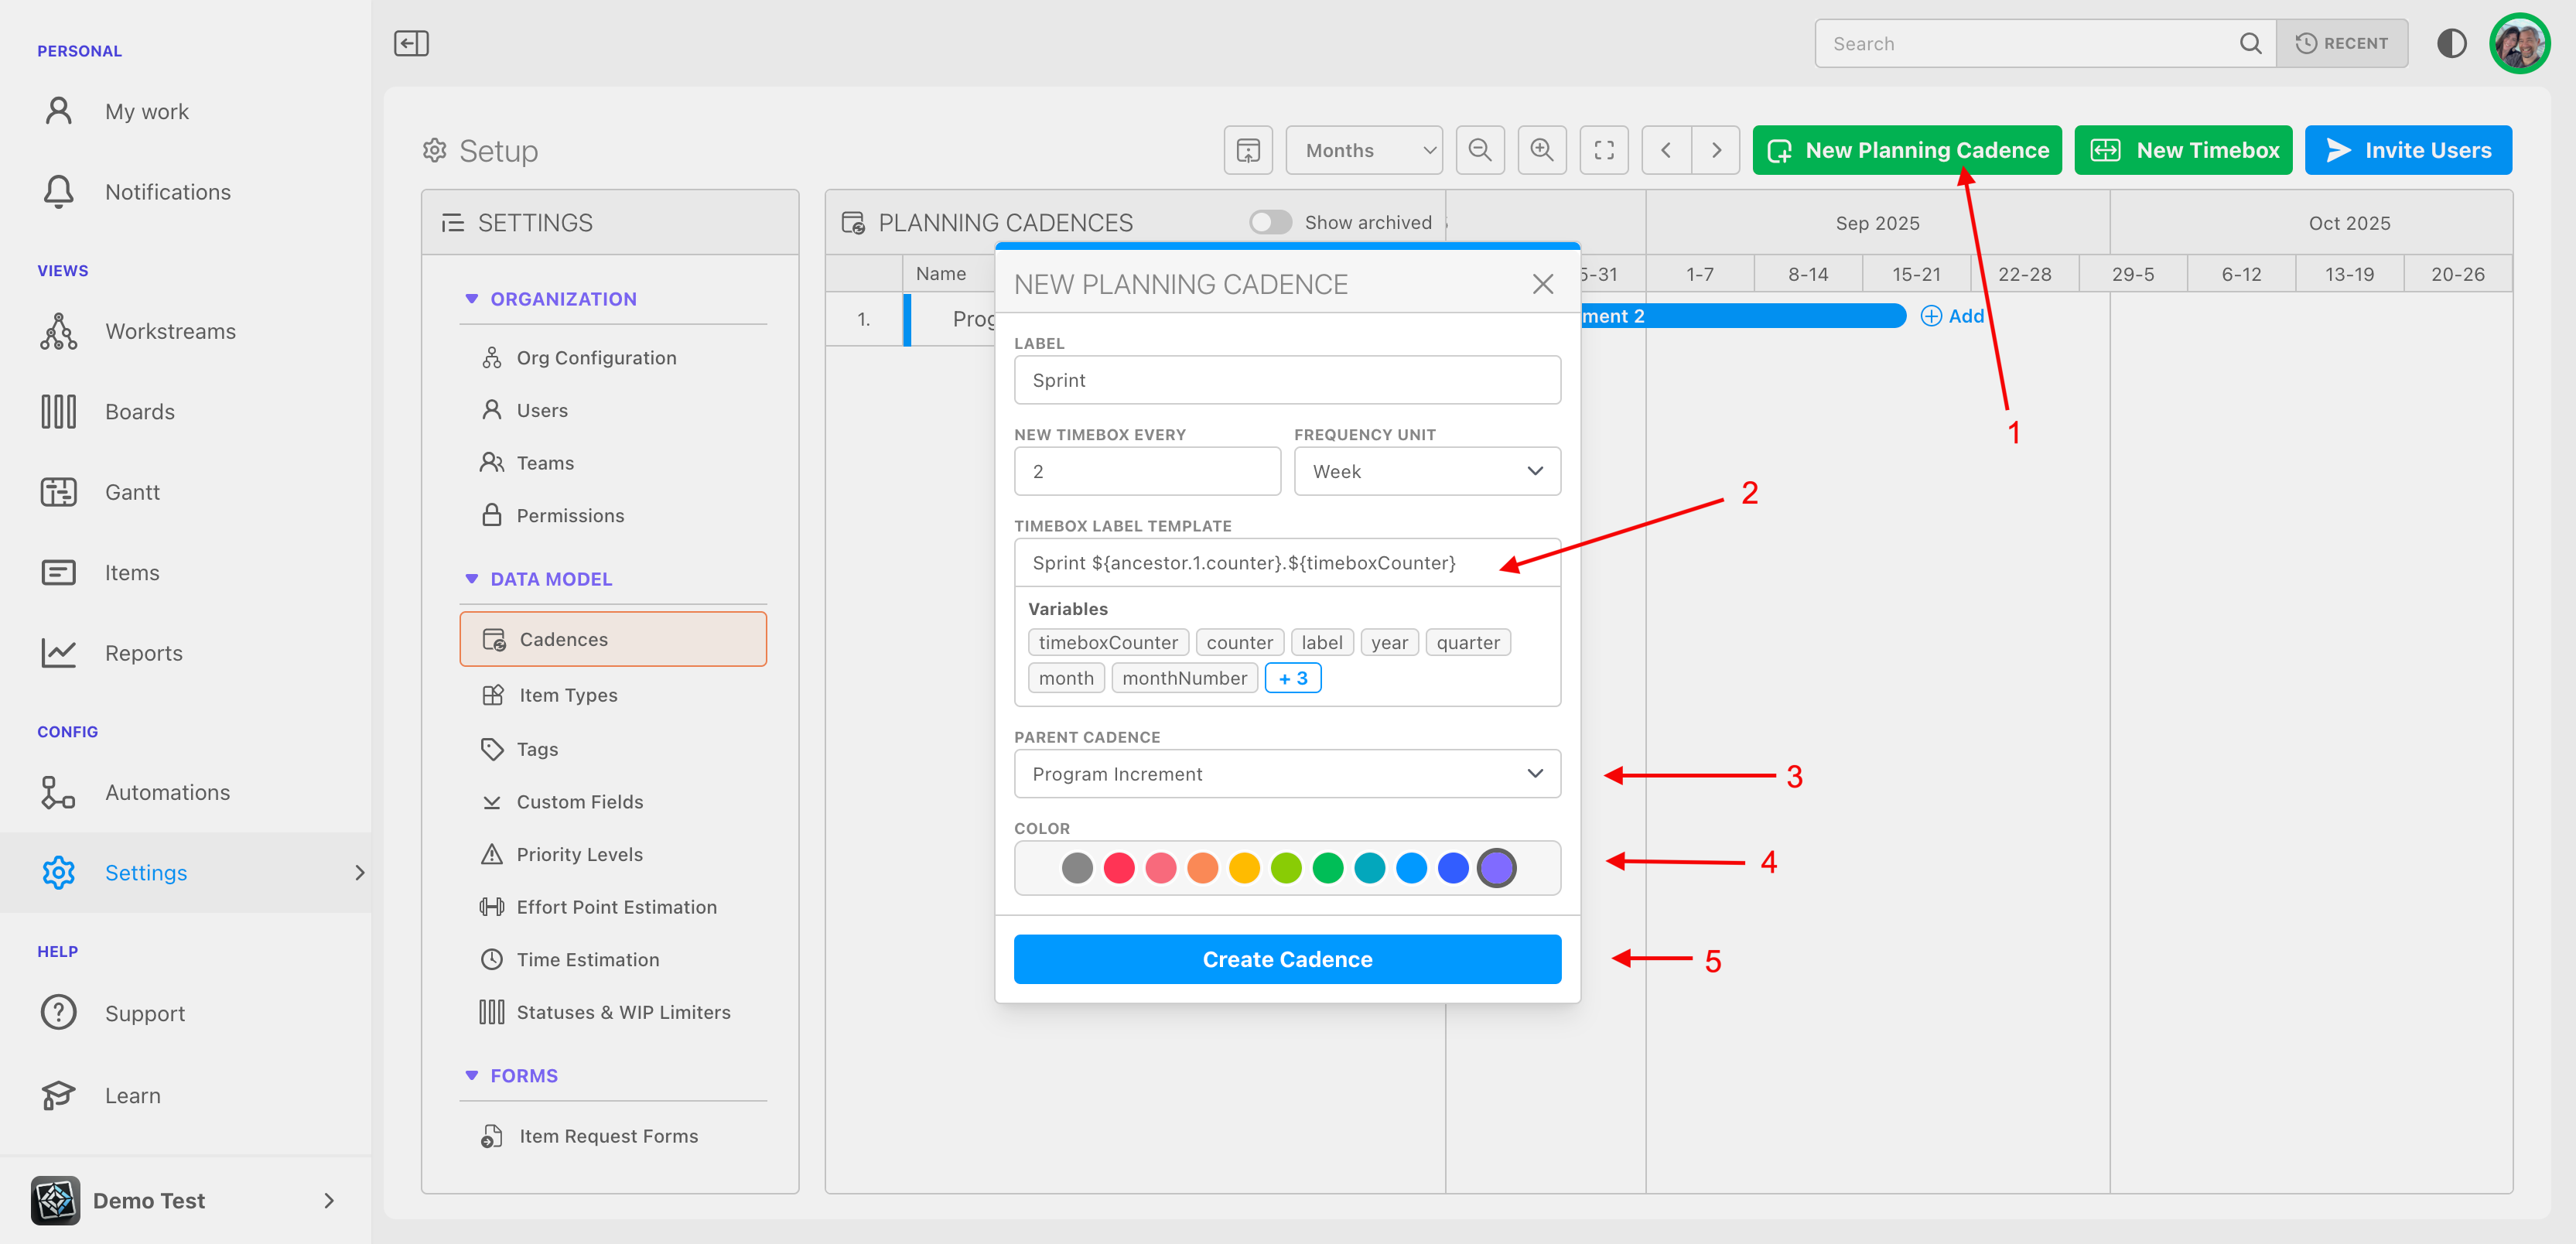
- Select New Planning Cadence (1).
- Fill in the dropdown box based on the type of planning cadence you wish to add.
- Under the Time-box Label Template field, type or select the variables as shown below (2), such as Sprint $ {ancestor.1.counter}.${timeboxCounter}.
- If applicable, select the parent for the cadence you are creating (3).
In this example, we are creating Sprints that count on under the program increment.
- Select the color you would like to use for this planning cadence (4).
- Click Create Cadence (5).
You can create multiple cadences for use by various teams and can apply them when you are ready.
You can add or edit cadences within Settings anytime.
Step 2: If desired, create time-boxes - flexibility included.
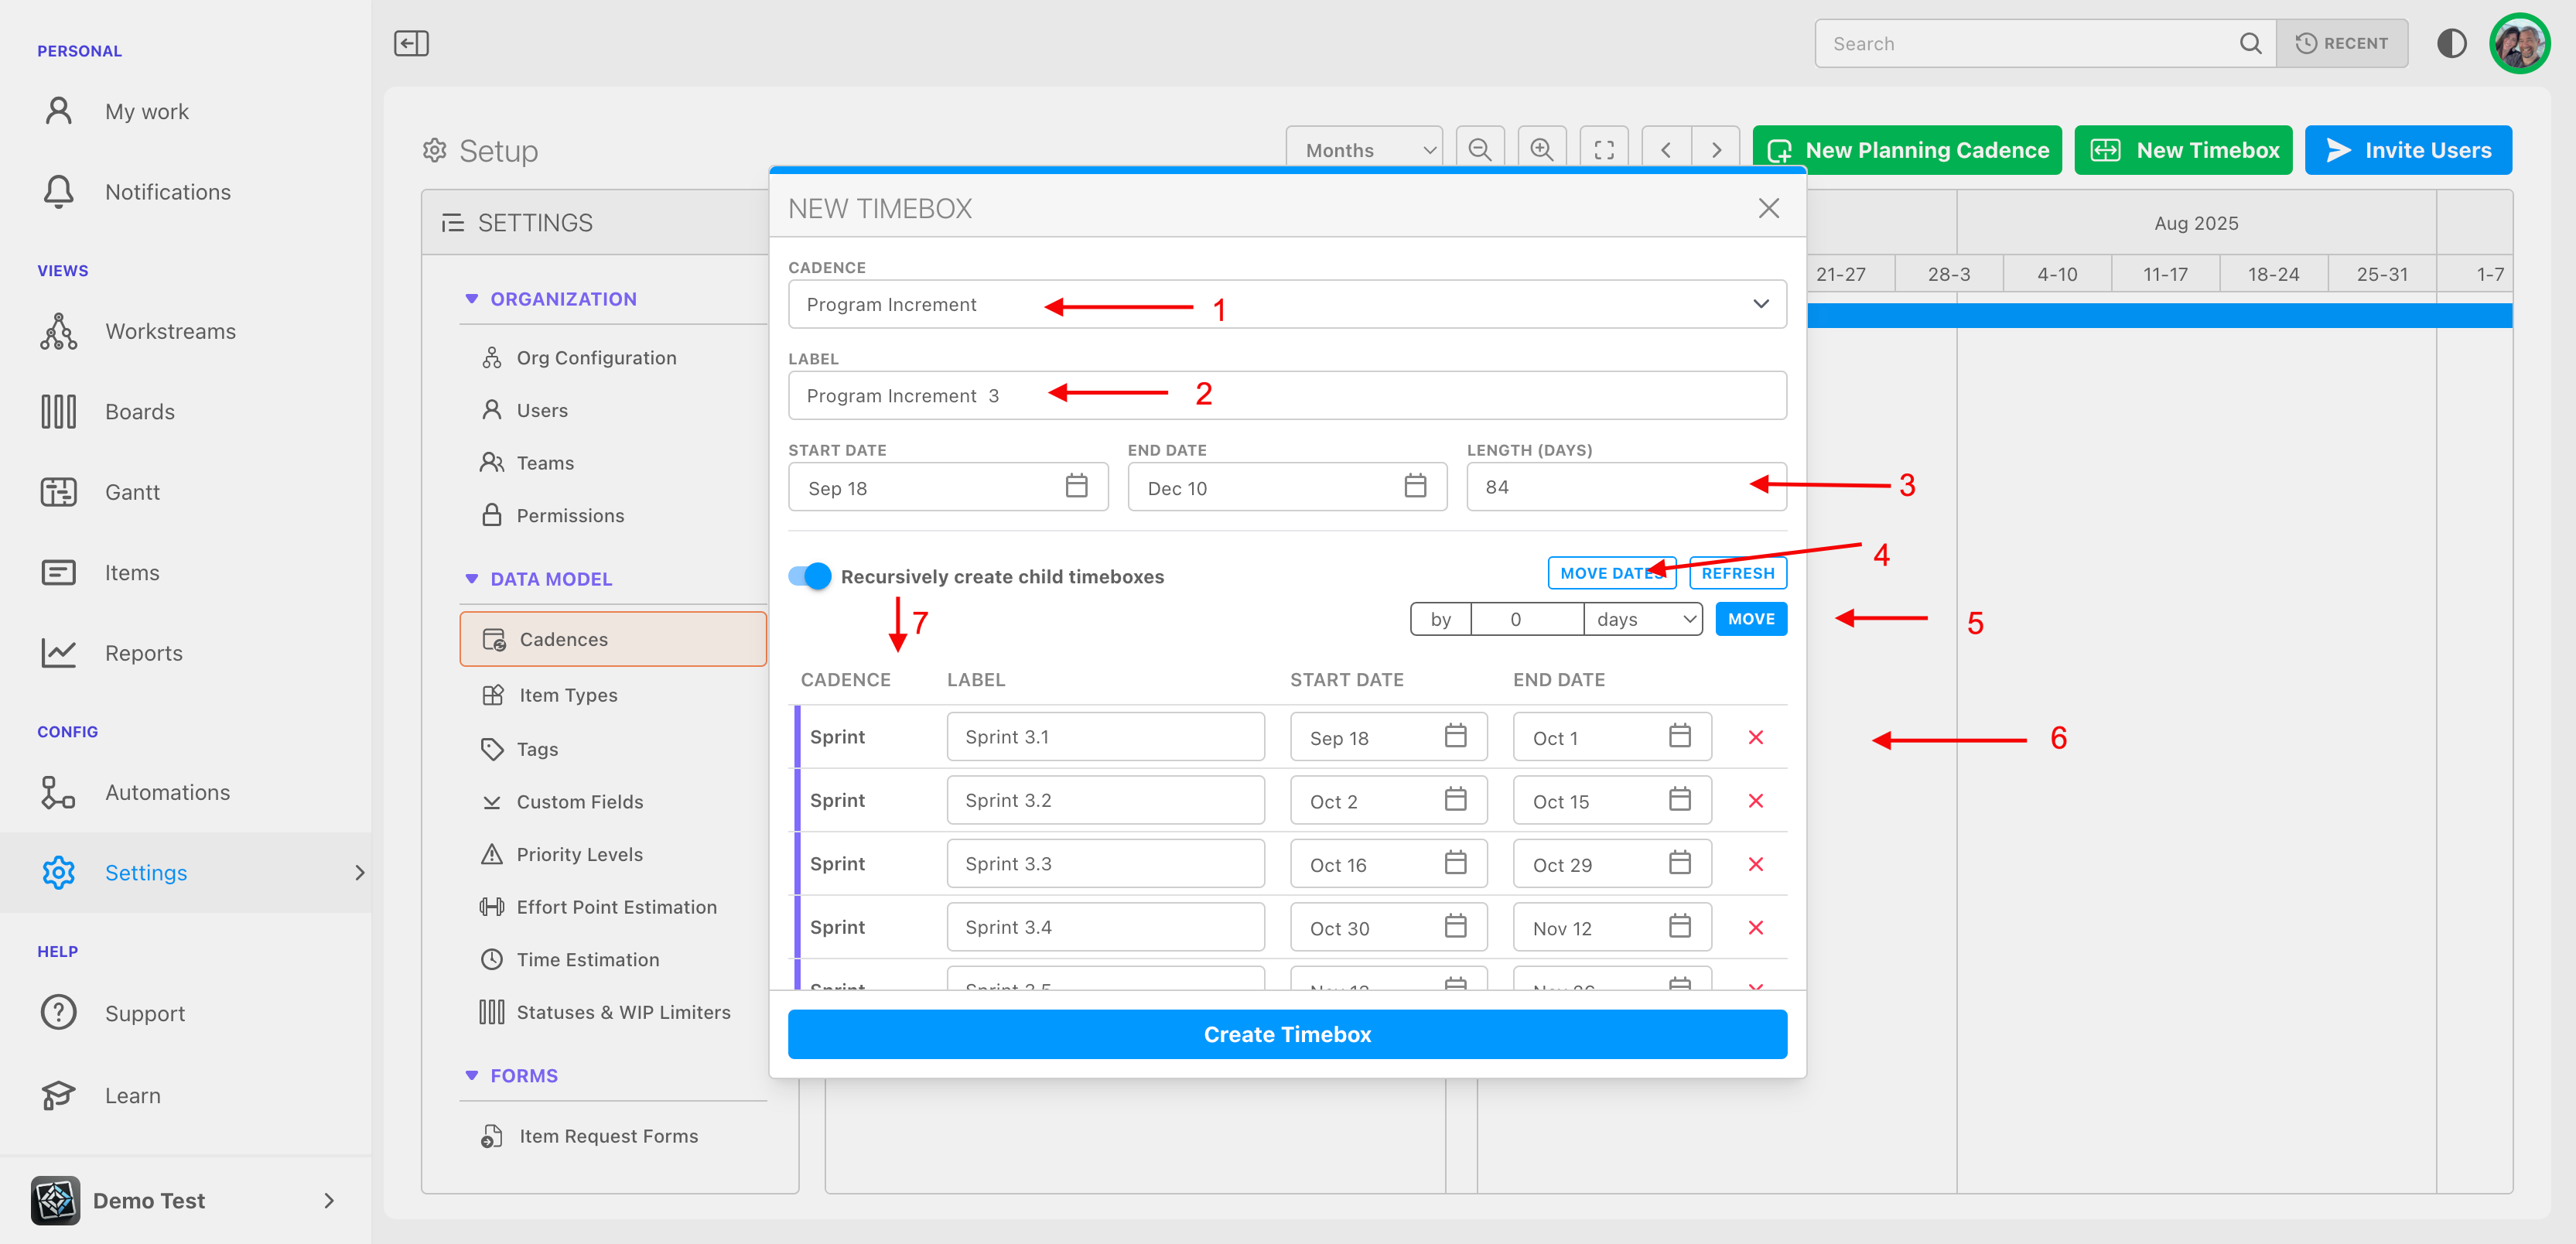
DevStride offers tremendous flexibility in time-box creation. Time-boxes can be set at any level of your planning cadences. In the example below, we are adding time box information to the Program Increment level of 12 weeks and can create its sprints underneath it, with the ability to adjust dates, if desired, at any level.
- You can select which Cadence type you wish to create (1).
- The label is fully editable at both the parent and child level (2). This can provide significant visibility to any important information you would like to convey via the label.
- Start and end dates for the time-box, as well as duration are adjustable (3). This is particularly helpful if you are setting up a your cadences and time-box series to start on a particular date of the year.
- Work or project break periods can easily be accommodated. Cadence dates can be adjusted by clicking Move Dates (4) and indicating the desired number of days (5).
- Child periods can also be adjusted or removed (6)
- You have a choice to recursively create child cadences or not (7).
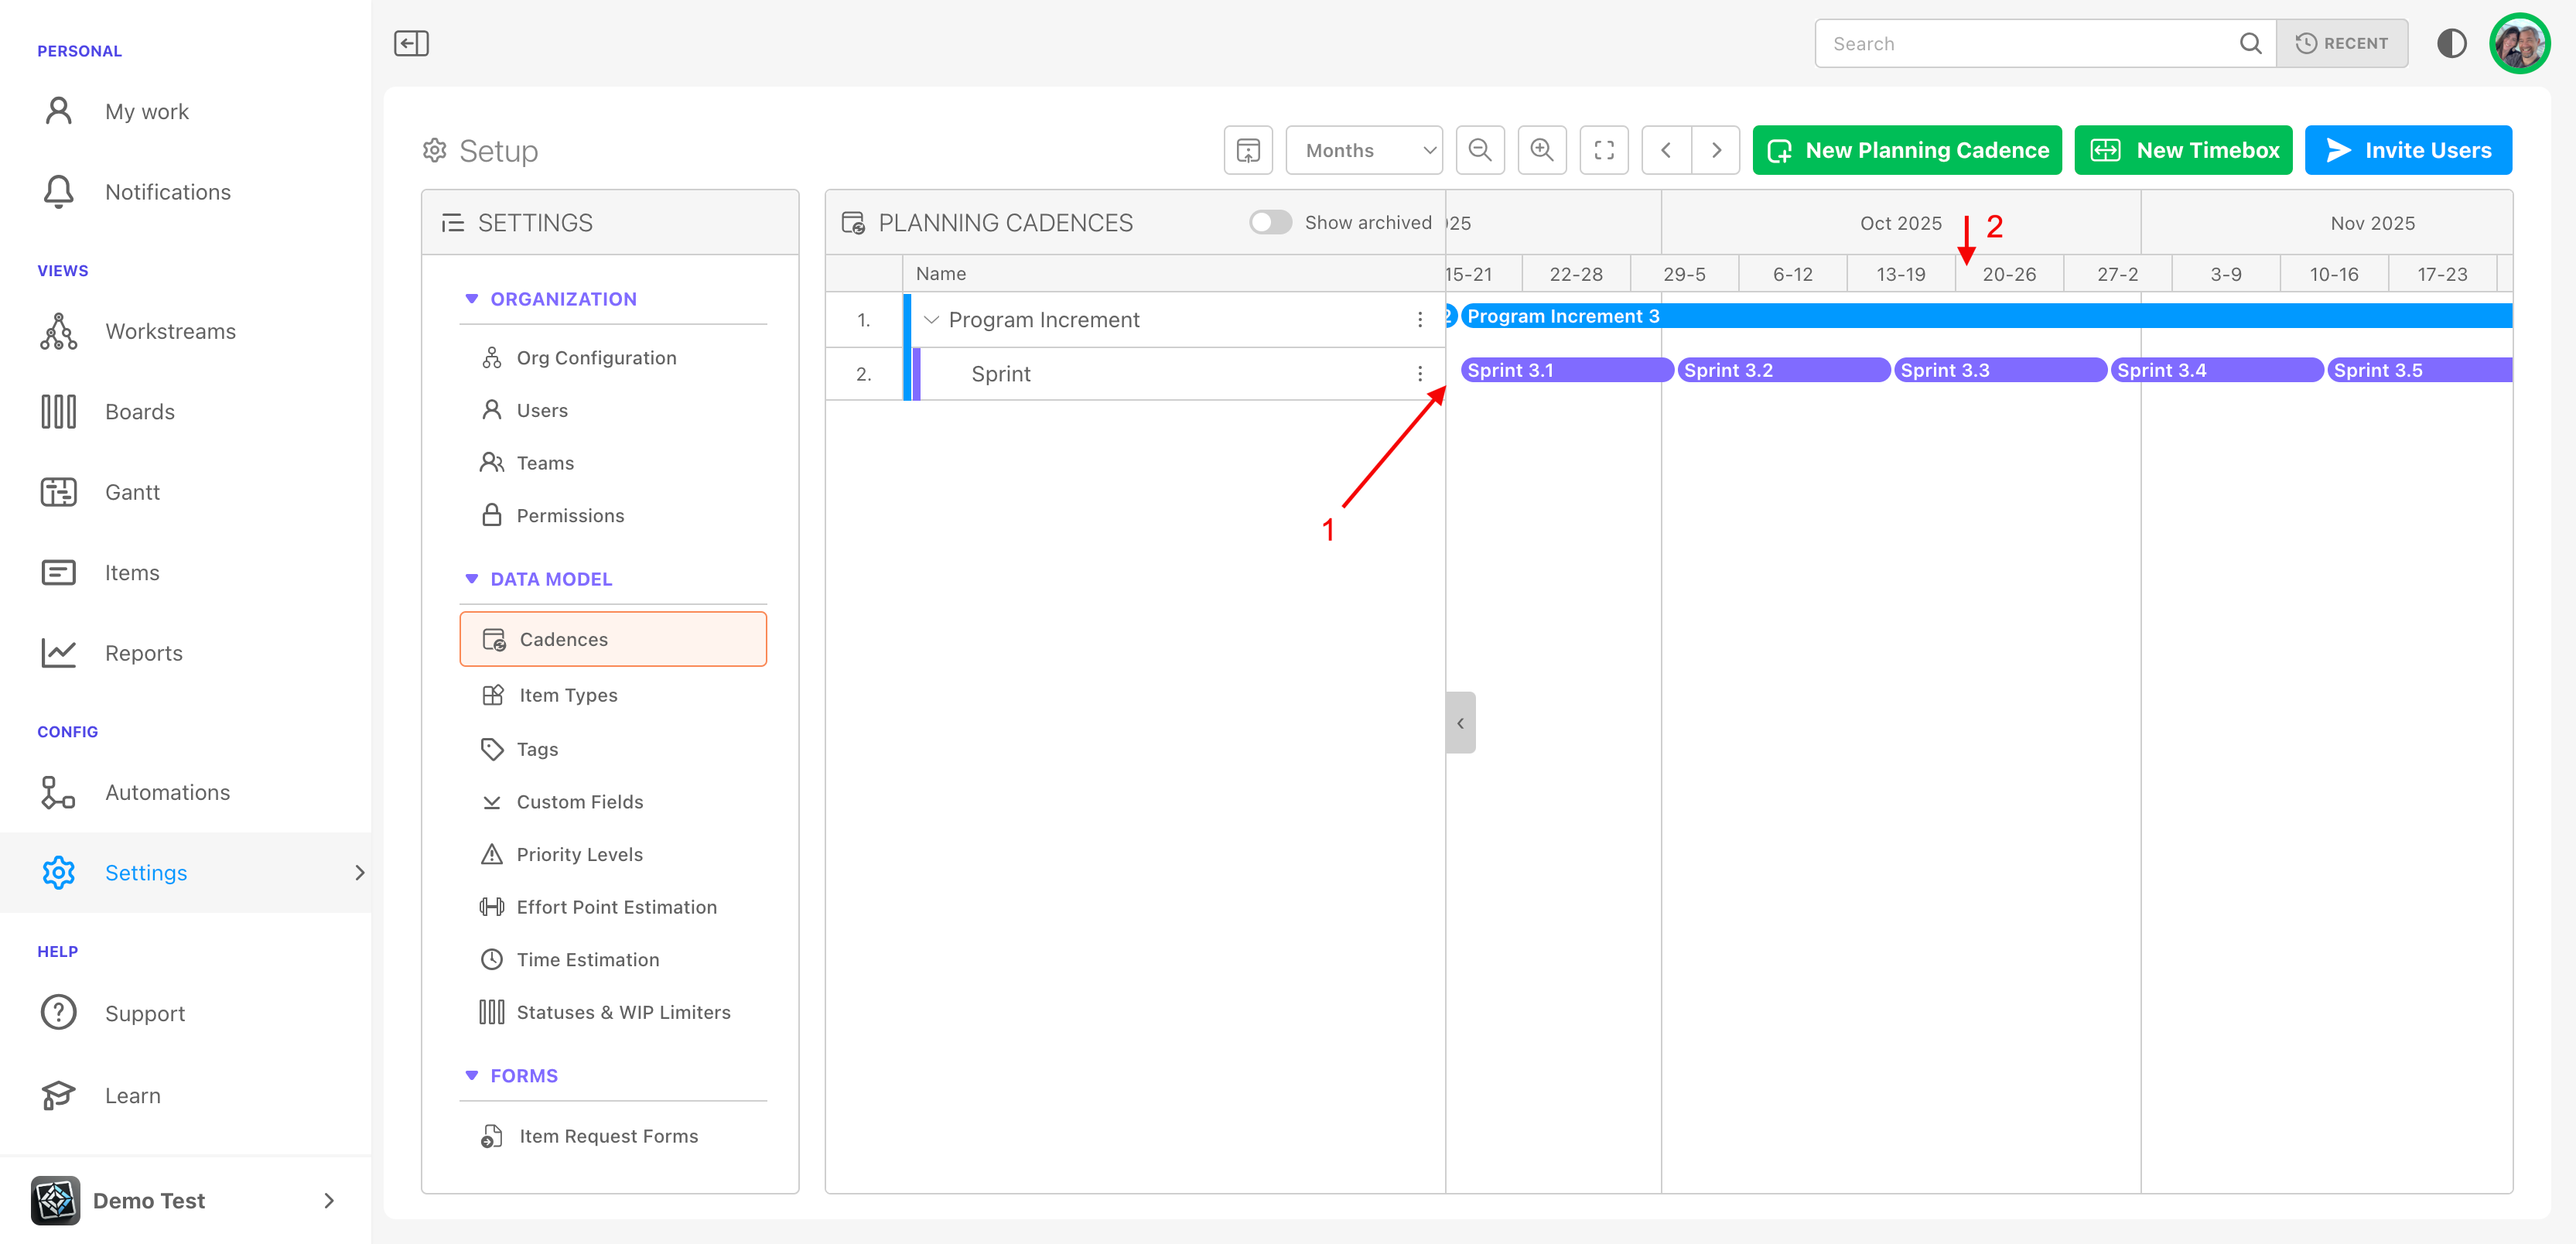
The Planning Cadence screen displays any parent-child relationship you set up (1) as well as the dates you applied (2). If selected, the cadences are recursively created.
Here are some additional features that cadences provide:
Advanced Cadence Features
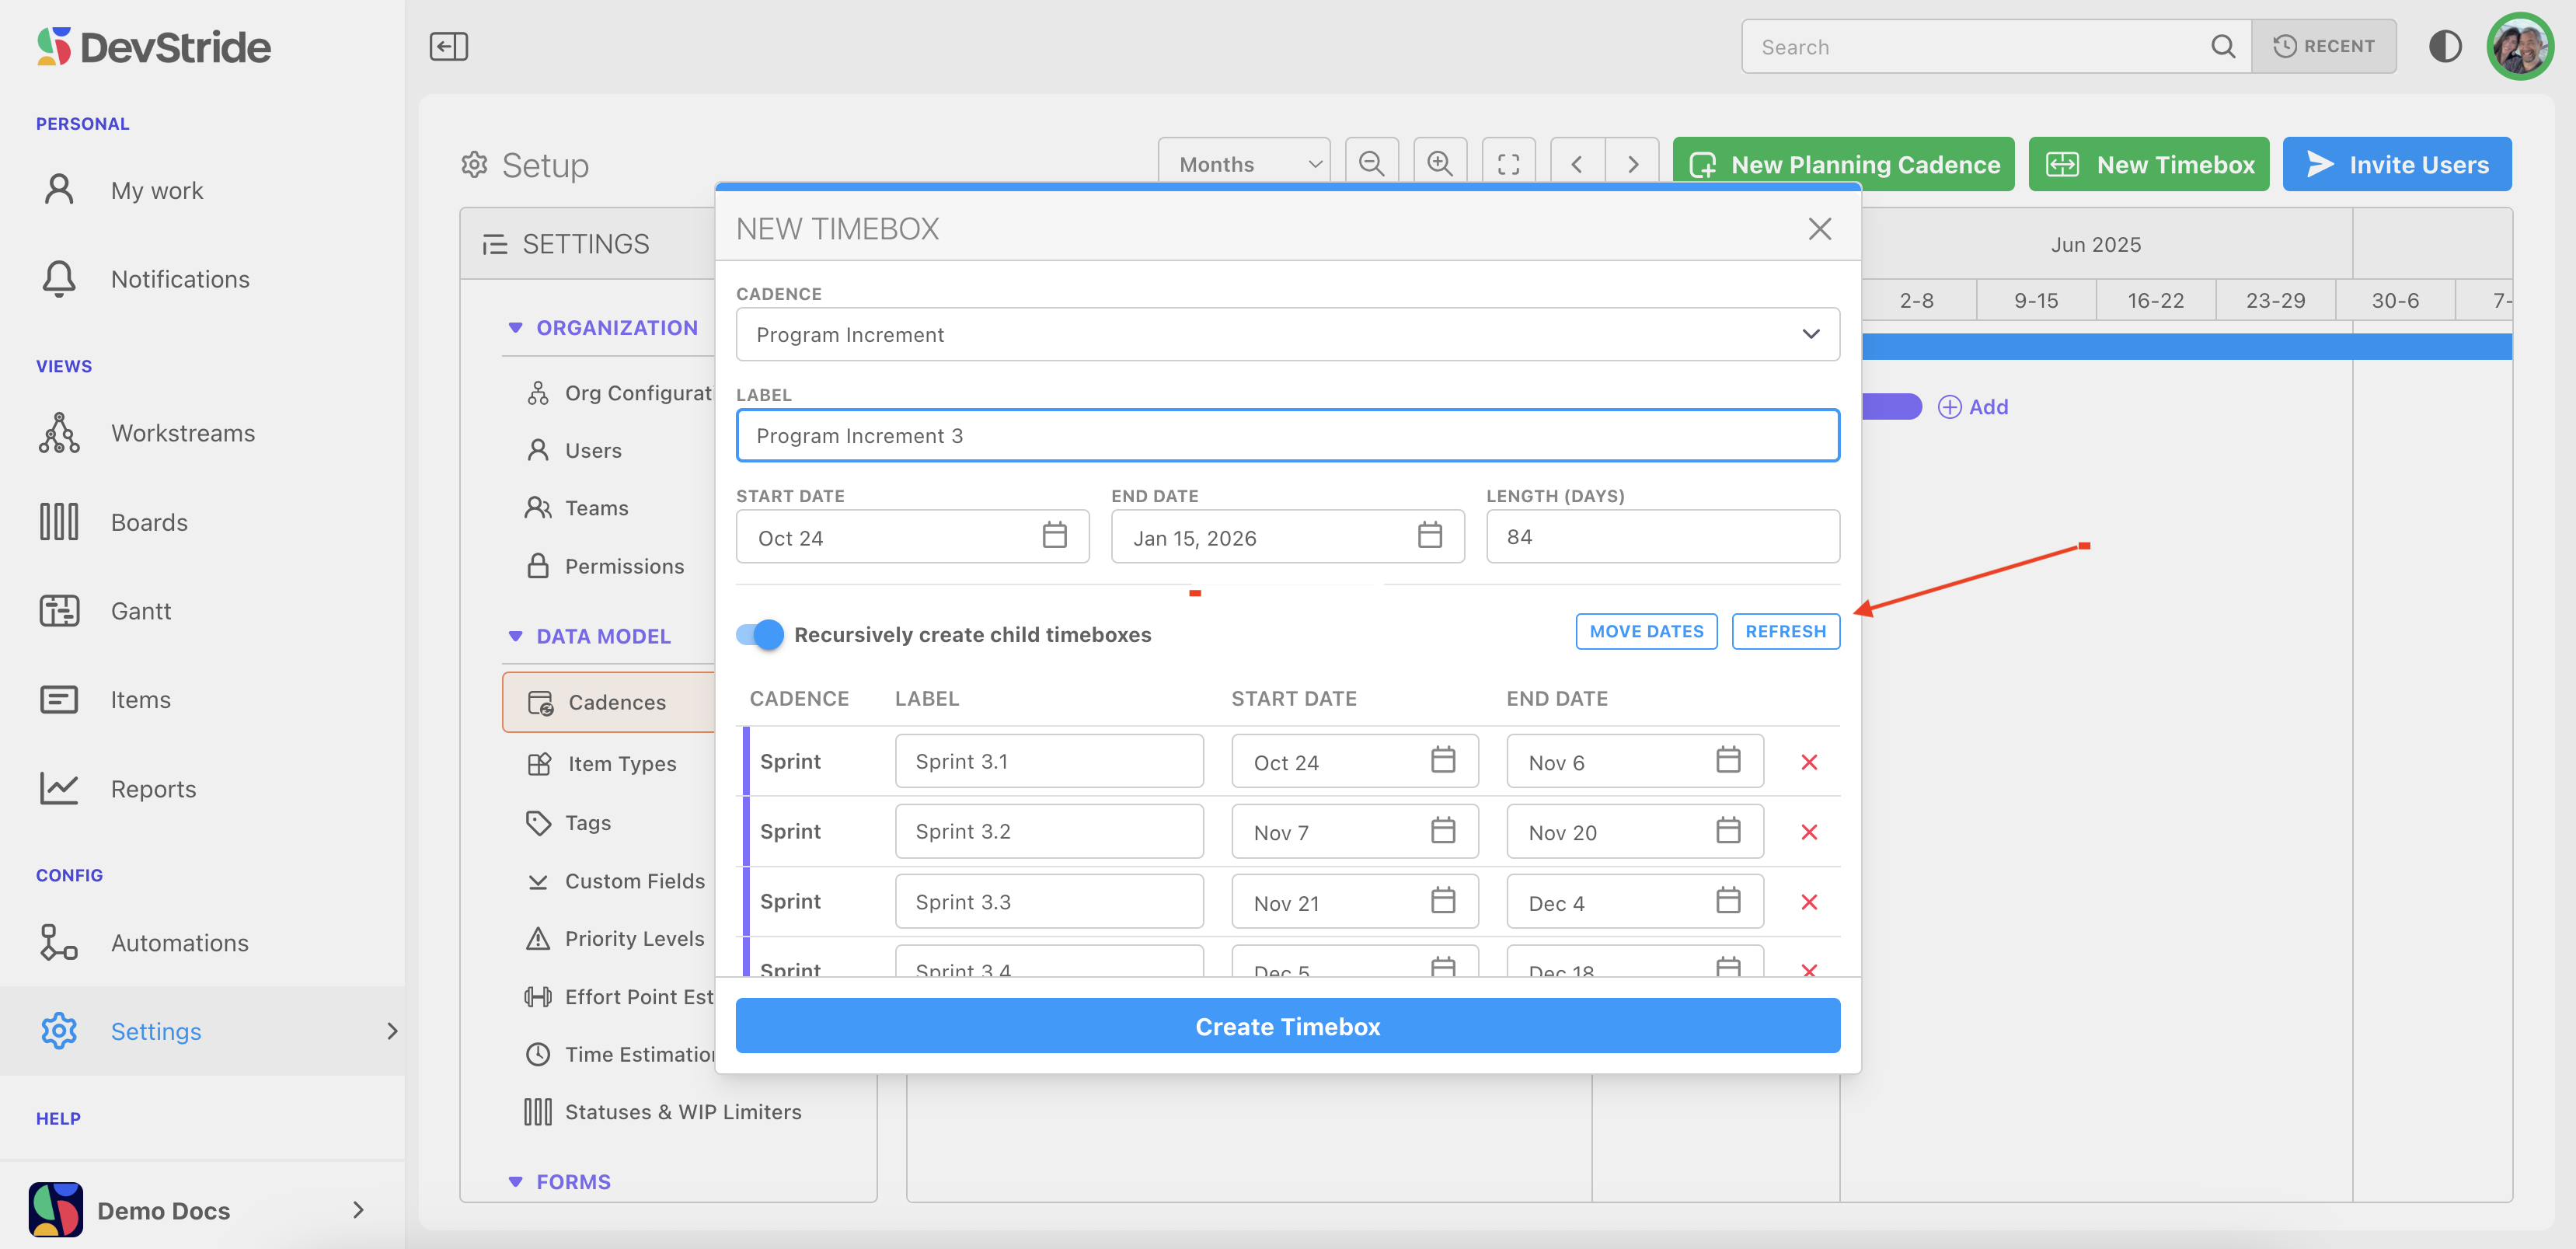
Date Synchronization: Ensures work items align with cadence start and end dates.
Adjustments & Refresh: Users can adjust cadence start dates and refresh to update dependent cycles.
Read on to find out how to assign and use cadences through the use of boards.
Was this article helpful?